CR-MM-1-0-00
PS-28 Cruiser
PS-28N Cruiser
CHAPTER 6 – CONTROL SYSTEM
Date of issue: 2018-09-27
Revision No.: 22
6 - 17
6.3.12.2 Removal of the middle two-arm lever
(a) Remove the front cover (between bulkheads No. 8 and 9) at the bottom of the fuselage
rear part.
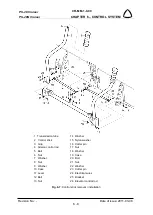
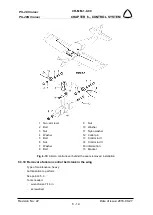
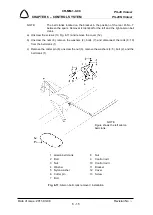
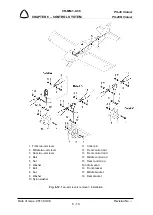
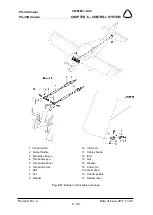
(b) Unscrew the nuts (5, Fig. 6-12), remove washers (6) and bolts (4) and disconnect rods
(13; 14) from the control lever (2).
(c) Remove the cotter pin (11), unscrew the nut (8), remove washer (9), and bolt (7).
(d) Remove the control lever (2) and washers (10) from the bracket (17).
6.3.12.3 Removal of the rear two-arm lever
(a) Remove the rear cover (between bulkheads No. 10 and 11) at the bottom of the fuselage
rear part.
(b) Unscrew the nuts (5, Fig. 6-12), remove washers (6) and bolts (4) and disconnect rods
(14; 15) from the control lever (3).
(c) Remove the cotter pin (11), unscrew the nut (8), remove washer (9), and bolt (7).
(d) Remove the control lever (3) and washers (10) from the bracket (18).
6.3.13 Installation of two-arm levers in the fuselage
Type of maintenance: heavy
Authorization to perform:
See point 2.5.3.
Tools needed:
-
wrench size 7/16 in
-
screwdriver
-
pliers
6.3.13.1 Installation of front two-arm lever
(a) Check condition of the control lever and lubrication of the friction surfaces. If the friction
surfaces are contaminated, then carefully remove contamination and grease them with
lubricant (see 2.6).
(b) Fit the control lever (1, Fig. 6-12) with the nylon washers (10) to the bracket (16), insert the
bolt (7) to the hole, install washer (9), screw and slightly tighten the nut (8).
(c) Secure the nut (8) with the new cotter pin (11).
NOTE:
The lever after installing must not show axial play and its travel must be
smooth without dragging.
(d) Fit the rods (12; 13) to the control lever (1), insert the bolts (4) with the first washers (6) to
the holes, install the second washers (6), screw and tighten the nuts (5).
(e) Check elevator deflections (see 6.4.3) and check plays in control (see 6.4.1).

