CR-MM-1-0-00
PS-28 Cruiser
PS-28N Cruiser
CHAPTER 12 – INSTRUMENTS AND AVIONICS
Date of issue: 2018-09-27
Revision No.: 22
12 - 51
12.3.39
Removal of SV-OAT-340 probe
Type of maintenance: line
Authorization to perform:
See point 2.5.3.
Tools needed:
-
wrench No. 9/16 in
(a) Set the
MASTER BAT
,
EFIS1 / EFIS 2
switches to OFF.
(b) Remove the covers on the bottom of the fuselage rear part.
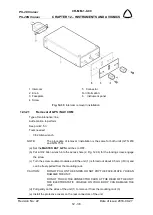
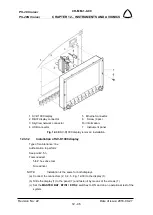
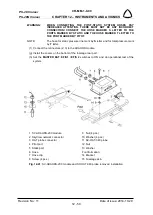
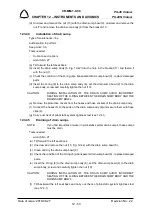
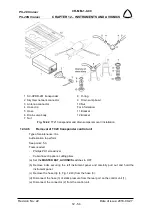
(c) Disconnect connector (3, Fig. 12-41) from the ADAHRS module (1).
(d) Remove fastening members of the probe wires.
(e) Remove the connector (3) and pins from the probe wires
(f) Unscrew the nut (12), remove the washer (13) and pull out the probe (11).
12.3.40
Installation of SV-OAT-340 probe
Type of maintenance: line
Authorization to perform:
See point 2.5.3.
Tools needed:
-
wrench No. 9/16 in
NOTE:
Do not insert the pins on the ends of the OAT probe wires into the connector
until you are done running probe wires through the aircraft.
(a) On the outside of the fuselage, insert the wires and the probe (1, Fig. 12-41) through the
hole on the fuselage bottom skin (15).
(b) On the inside of the fuselage, insert the washer (13) and the nut (12) over the wires.
(c) Hand-thread the nut (12) onto the probe (11). At this point, the washer (13) should be
sandwiched between the nut (12) and the fuselage bottom skin (15), then carefully tighten
the nut using the wrench.
(d) Route and secure the probe wires to the location of the ADAHRS module.
(e) Carefully insert the pins on the wires into the connector. Pins are not polarized and lock
into place when inserted correctly.
(f) Connect the connector (3) to the ADAHRS module (1).
(g) Install the covers on the bottom of the fuselage rear part.
(h) Set the
MASTER BAT
,
AVIONICS
switches to ON and
do an operational test.

