


Chapter 8 — Inspection and Maintenance
Part No. 750-184
8-19
The coupling must be checked for both parallel (offset) alignment and
angular (gap) alignment. Parallel misalignment exists when shaft axis are
parallel but not concentric. Angular misalignment is the reverse situation -
shaft axis concentric, but not parallel.
Checking parallel alignment, both horizontal and vertical can be
accomplished, by laying a straightedge across the coupling halves and
checking with a thickness gauge to obtain the amount of misalignment. The
check should be done on the top of the coupling and at 90 degrees. A useful
hint is to hold a flashlight behind the straightedge so that any gap can readily
be seen.
Shim stock of appropriate thickness and area is then used under either the
feet of the pump or the motor to establish parallel alignment. A tolerance of
.008" is a permissible limit.
After parallel alignment is established, check for angular alignment, which
is done by checking the gap between coupling halves. The coupling should
have a minimum gap of 1/16" and a maximum of 3/32".
Set the spacing between the halves at one point by using a thickness gauge
and then rotate the coupling slowly to be sure that clearance at that point
remains the same through 360 degrees of rotation. Adjust to obtain proper
gap by loosening the hold-down bolts and shifting either the pump or the
motor as required. Generally, a slight tapping on either the front or rear legs
is all that is needed to obtain lateral adjustment. Rear legs may require
shimming for vertical correction.
Tighten the hold-down bolts after adjustments are made and recheck
alignment.
Calipers can also be used to check angular alignment. Measure the overall
distance of the outer ends of the coupling halves at 90
°
intervals. Shift the
pump or motor, as required, so that the ends of the coupling are the same
distance apart at all points. The coupling will then have proper angular
alignment.
Remember that alignment in one direction may alter alignment in another.
Recheck both angular and parallel alignment procedures after making any
alteration.
A properly aligned coupling will last longer and will provide trouble-free
mechanical operation.
Air Compressor Replacement
Use the following procedures in replacing the pump on a CB-LE. Be sure to
tag the motor leads if disconnected to simplify reconnection.
Dismantling
1. Lift out the two front cylinder pins that hold the screen, and remove the
screen.
2. Disconnect the flared nut on tubing “A” (behind screen) and lift tubing “A”
high enough to prevent drainage of lubricating oil from the tank.
3. Disconnect the flared nut at the orifice fitting.
4. Remove the two sheet metal screws that hold the cylinder in place. One
screw is located at the top rear of cylinder, the other is at the bottom front.
Summary of Contents for CB Ohio Special 100 HP
Page 2: ...ii ...
Page 8: ...viii ...
Page 42: ...Chapter 2 Burner Operation and Control 2 22 Part No 750 184 ...
Page 116: ...Chapter 6 Adjustment Procedures 6 28 Part No 750 184 ...
Page 126: ...Chapter 8 Inspection and Maintenance 8 6 Part No 750 184 ...
Page 153: ...Chapter 9 Parts Part No 750 184 9 3 Insulated Front Head Model CB LE ...
Page 154: ...Chapter 9 Parts 9 4 Part No 750 184 Insulated Front Head Interior Model CB LE ...
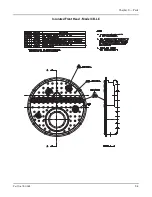
Page 155: ...Chapter 9 Parts Part No 750 184 9 5 Insulated Inner Door Model CB OS ...
Page 156: ...Chapter 9 Parts 9 6 Part No 750 184 Insulated Rear Head CB LE ...
Page 157: ...Chapter 9 Parts Part No 750 184 9 7 Insulated Rear Head CB LE ...
Page 158: ...Chapter 9 Parts 9 8 Part No 750 184 Insulated Rear Head CB OS ...
Page 159: ...Chapter 9 Parts Part No 750 184 9 9 Dry Oven Model CB LE ...
Page 161: ...Chapter 9 Parts Part No 750 184 9 11 Motor Impeller Model CB LE ...
Page 162: ...Chapter 9 Parts 9 12 Part No 750 184 Front Head Linkage ...
Page 170: ...Chapter 9 Parts 9 20 Part No 750 184 Control Cabinet Hawk ICS ...
Page 171: ...Chapter 9 Parts Part No 750 184 9 21 Control Panel Standard ...
Page 172: ...Chapter 9 Parts 9 22 Part No 750 184 Entrance Box ...
Page 173: ...Chapter 9 Parts Part No 750 184 9 23 Front Head Electrical CB LE ...
Page 174: ...Chapter 9 Parts 9 24 Part No 750 184 Front Head Electrical CB LE ...
Page 175: ...Chapter 9 Parts Part No 750 184 9 25 Front Head Electrical CB OS ...
Page 176: ...Chapter 9 Parts 9 26 Part No 750 184 Front Head Electrical CB OS ...
Page 179: ...Chapter 9 Parts Part No 750 184 9 29 Heavy Oil Piping 60 Steam CB LE ...
Page 180: ...Chapter 9 Parts 9 30 Part No 750 184 Heavy Oil Piping 60 Steam CB LE SEE TABLE NEXT PAGE ...
Page 181: ...Chapter 9 Parts Part No 750 184 9 31 Common Oil Parts Heavy Oil ...
Page 182: ...Chapter 9 Parts 9 32 Part No 750 184 Side Mounted Air Compressor Piping ...
Page 183: ...Chapter 9 Parts Part No 750 184 9 33 Air Compressor Piping CB OS ...
Page 185: ...Chapter 9 Parts Part No 750 184 9 35 Light Oil Piping ...
Page 186: ...Chapter 9 Parts 9 36 Part No 750 184 Light Oil Air Piping Front Head ...
Page 187: ...Chapter 9 Parts Part No 750 184 9 37 Light Oil Air Piping Front Head PAGE 9 31 ...
Page 191: ...Chapter 9 Parts Part No 750 184 9 41 Gas Train 125 150 HP ...
Page 193: ...Chapter 9 Parts Part No 750 184 9 43 Gas Train 200 HP ...
Page 195: ...Chapter 9 Parts Part No 750 184 9 45 Steam Pressure Controls ...
Page 196: ...Chapter 9 Parts 9 46 Part No 750 184 Hot Water Temperature Controls ...
Page 197: ...Chapter 9 Parts Part No 750 184 9 47 Water Column ...
Page 198: ...Chapter 9 Parts 9 48 Part No 750 184 Water Column ...
Page 199: ...Chapter 9 Parts Part No 750 184 9 49 Fireside Gaskets CB LE ...
Page 200: ...Chapter 9 Parts 9 50 Part No 750 184 Fireside Gaskets CB OS ...


