Chapter 11
11-13
11.1.10 Printing the System Information of a MEAP Application
0014-8074
/ / / / iR C3380i / iR C3380 / iR C2880i / iR C2880
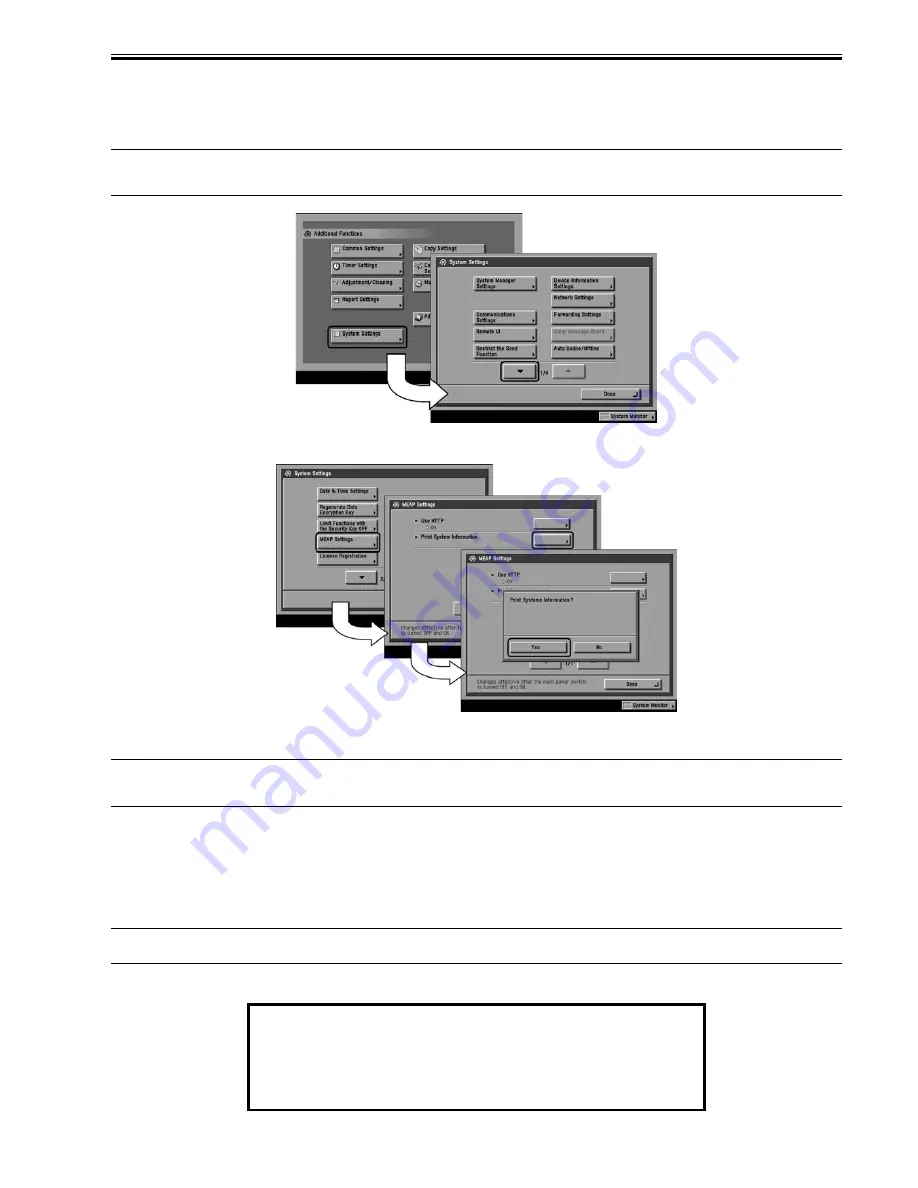
1) Make the following selections:
Additional Functions
button >
System Settings
button> the
down-arrow
button.
Memo:
If the System manager ID and system password have already been assigned, ID Entry dialog appears after System Settings button is pressed. Enter the system
manager ID and the password, and click ID key.
F-11-23
2) Make the following selections:
MEAP Settings
button >
Print System Information
button >
Yes
button.
F-11-24
3) Press
Done
button as many times as necessary until the Basic screen appears.
4) Turn off the MEAP device's main power; wait for 10 sec, and then turn the power back on.
Important:
The previous version of printing function for MEAP application status information (system information) was depended on PDL. However, current version of
function is not dependent on PDL. So even device for which PDL is not available can print it. (Since iRC3220)
11.1.11 Reference (Application System Information)
0014-8075
/ / / / iR C3380i / iR C3380 / iR C2880i / iR C2880
You can check all applications installed to the device at a glance with the MEAP application status information and, thus, it is important for you to provide it when
you are reporting a problem.
The following items of information will be indicated or printed for individual applications:
Memo:
The system information shown on the screen and the system information printed in the MEAP device's user mode are exactly the same.
T-11-11
Application System Information
Application Name: C-Cabinet Gateway for MEAP
Application ID/System Application Name: 03a46668-63e4-4636-9cbb-492b6cef05d5
Application Version: 1.0.0
Status: Resolved
Installed on: Tue Oct 21 14:00:11 GMT+09:00 2003
Vendor : Canon Inc.
License Status : Installed
Maximum Memory Usage : 1024
Registered Service :
Summary of Contents for iR C3380 series
Page 1: ...Aug 29 2006 Service Manual iR C3380 2880 Series...
Page 2: ......
Page 6: ......
Page 23: ...Chapter 1 Introduction...
Page 24: ......
Page 26: ......
Page 52: ......
Page 53: ...Chapter 2 Installation...
Page 54: ......
Page 127: ...Chapter 3 Basic Operation...
Page 128: ......
Page 130: ......
Page 136: ......
Page 137: ...Chapter 4 Main Controller...
Page 138: ......
Page 160: ......
Page 161: ...Chapter 5 Original Exposure System...
Page 162: ......
Page 188: ...Chapter 5 5 24 F 5 68 4 Remove the original sensor 2 hook 1 F 5 69...
Page 189: ...Chapter 6 Laser Exposure...
Page 190: ......
Page 192: ......
Page 206: ......
Page 207: ...Chapter 7 Image Formation...
Page 208: ......
Page 256: ......
Page 257: ...Chapter 8 Pickup Feeding System...
Page 258: ......
Page 262: ......
Page 303: ...Chapter 9 Fixing System...
Page 304: ......
Page 306: ......
Page 321: ...Chapter 10 Externals and Controls...
Page 322: ......
Page 326: ......
Page 336: ...Chapter 10 10 10 F 10 10 2 Remove the check mark from SNMP Status Enabled...
Page 337: ...Chapter 10 10 11 F 10 11...
Page 359: ...Chapter 11 MEAP...
Page 360: ......
Page 362: ......
Page 401: ...Chapter 12 RDS...
Page 402: ......
Page 404: ......
Page 411: ...Chapter 13 Maintenance and Inspection...
Page 412: ......
Page 414: ......
Page 416: ...Chapter 13 13 2 F 13 1 8 9 1 2 3 3 5 6 7 10 11 12 13 14 4...
Page 421: ...Chapter 14 Standards and Adjustments...
Page 422: ......
Page 424: ......
Page 431: ...Chapter 15 Correcting Faulty Images...
Page 432: ......
Page 434: ......
Page 459: ...Chapter 16 Self Diagnosis...
Page 460: ......
Page 462: ......
Page 481: ...Chapter 17 Service Mode...
Page 482: ......
Page 484: ......
Page 571: ...Chapter 18 Upgrading...
Page 572: ......
Page 574: ......
Page 603: ...Chapter 19 Service Tools...
Page 604: ......
Page 606: ......
Page 609: ...Aug 29 2006...
Page 610: ......


