Chapter 9
9-9
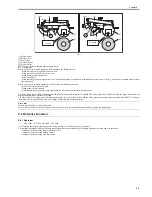
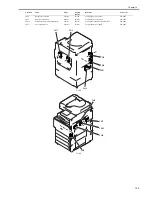
F-9-7
[1] Pressure plate
[2] Release lever
[3] Sensor flag
[4] Fixing film unit
[5] Pressure roller
PS13: Fixing pressure releasing home position sensor
M3: Fixing motor
Below are the cases in which pressure will be applied to the fixing film unit:
- When pressure is not applied at power-on state
- When pressure is applied at power-on state
- When returning from sleep mode
- After jam removal
- When the state of pressure application is not certain after opening / closing doors with interlocks such as front cover (E.g. when a door is opened while pressure
is being applied)
Below are the cases in which pressure will be released from the fixing film unit:
- In power ON jam at power-on state
- When paper jam has occurred
- When the equipment enters the sleep mode (both the soft switch and the timer are applicable)
The fixing motor (M3) will be rotated forward (the positive rotation) when pressure is applied. The fixing motor (M3) will be rotated in the opposite direction (the
negative rotation) when pressure is released.
The sensor flag [3] in conjunction with the pressure release cover [2] will be rotated, and the fixing automatic pressure release position sensor (PS13) will detect
the movement. This regulates the start / end timings of applying and releasing pressure.
Error code
Error in pressure/release of fixing film unit
In case that the output of fixing automatic pressure phase sensor is not changed although rotating/reversing the fixing motor
9.4 Protective Functions
9.4.1 Overview
0013-8529
/ / / / iR C3380i / iR C3380 / iR C2880i / iR C2880
It is a function that detects overheating of the fixing assembly to cut off the power to the heater.
The machine is equipped with the following mechanisms that detect overheating of the fixing assembly to cut the power to the heater:
- cutting off the power using the DC controller (CPU)
- cutting off the power using a safety circuit
- cutting off the power using a thermal switch
[5]
[4]
[1]
PS13
[2]
[3]
[4]
[5]
[5]
[1]
PS13
[3]
M3
M3
Pressed
Released
Summary of Contents for iR C3380 series
Page 1: ...Aug 29 2006 Service Manual iR C3380 2880 Series...
Page 2: ......
Page 6: ......
Page 23: ...Chapter 1 Introduction...
Page 24: ......
Page 26: ......
Page 52: ......
Page 53: ...Chapter 2 Installation...
Page 54: ......
Page 127: ...Chapter 3 Basic Operation...
Page 128: ......
Page 130: ......
Page 136: ......
Page 137: ...Chapter 4 Main Controller...
Page 138: ......
Page 160: ......
Page 161: ...Chapter 5 Original Exposure System...
Page 162: ......
Page 188: ...Chapter 5 5 24 F 5 68 4 Remove the original sensor 2 hook 1 F 5 69...
Page 189: ...Chapter 6 Laser Exposure...
Page 190: ......
Page 192: ......
Page 206: ......
Page 207: ...Chapter 7 Image Formation...
Page 208: ......
Page 256: ......
Page 257: ...Chapter 8 Pickup Feeding System...
Page 258: ......
Page 262: ......
Page 303: ...Chapter 9 Fixing System...
Page 304: ......
Page 306: ......
Page 321: ...Chapter 10 Externals and Controls...
Page 322: ......
Page 326: ......
Page 336: ...Chapter 10 10 10 F 10 10 2 Remove the check mark from SNMP Status Enabled...
Page 337: ...Chapter 10 10 11 F 10 11...
Page 359: ...Chapter 11 MEAP...
Page 360: ......
Page 362: ......
Page 401: ...Chapter 12 RDS...
Page 402: ......
Page 404: ......
Page 411: ...Chapter 13 Maintenance and Inspection...
Page 412: ......
Page 414: ......
Page 416: ...Chapter 13 13 2 F 13 1 8 9 1 2 3 3 5 6 7 10 11 12 13 14 4...
Page 421: ...Chapter 14 Standards and Adjustments...
Page 422: ......
Page 424: ......
Page 431: ...Chapter 15 Correcting Faulty Images...
Page 432: ......
Page 434: ......
Page 459: ...Chapter 16 Self Diagnosis...
Page 460: ......
Page 462: ......
Page 481: ...Chapter 17 Service Mode...
Page 482: ......
Page 484: ......
Page 571: ...Chapter 18 Upgrading...
Page 572: ......
Page 574: ......
Page 603: ...Chapter 19 Service Tools...
Page 604: ......
Page 606: ......
Page 609: ...Aug 29 2006...
Page 610: ......

