Chapter 9
9-11
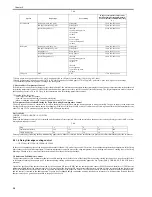
9.4.2 Fixing System Error Code
0013-8530
/ / / / iR C3380i / iR C3380 / iR C2880i / iR C2880
T-9-11
Code
Description
Corrective action
E001
Fixing high temperature error
0000 Condition
The reading of the main thermistor is 260 deg C or more.
Cause
The main thermistor is faulty. The DC PCB is faulty.
- Replace the fixing sleeve unit (main thermistor).
- Replace the DC controller PCB. *1
0001 Condition
The reading of the sub thermistor is 290 deg C or more.
Cause
The sub main thermistor is faulty. The DC PCB is faulty.
- Replace the fixing sleeve unit (sub thermistor).
- Replace the DC controller PCB. *1
0002 Condition
The safety circuit (of the DC controller) has detected a high temperature error
(about 260 deg C or more).
Cause
The thermal switch is faulty. The low-temperature power supply PCB is
faulty. The DC PCB is faulty.
Replace the DC controller PCB. *1
E003
Fixing low temperature error
0000 Condition
In 20 sec after the fixing heater has gone on, the reading of the main thermistor
is 120 deg C or less.
Cause
The main thermistor is faulty. The DC controller is faulty. The connector has
poor contact, or the harness is faulty.
- Replace the fixing sleeve unit (main thermistor).
- Replace the DC controller PCB. *1
0001 Condition
In the course of printing temperature control, the reading of the sub thermistor
is 80 deg C or less for 2 sec or more.
Cause
The sub thermistor is faulty. The DC controller PCB is faulty. The connector
has poor contact, or the harness is faulty.
- Replace the fixing sleeve unit (sub thermistor).
- Replace the DC controller PCB. *1
0002 Condition
During initial rotation, the reading of the main thermistor is 50 deg C or less
0.2 sec after the start of temperature control.
Cause
The DC controller PCB is faulty. The connector has poor contact, or the
harness is faulty.
- Replace the fixing sleeve unit (main thermistor).
- Replace the DC controller PCB. *1
E004
Thermistor is not connected
0000 During walm-up rotation, the thermistor connection signal (FUSER CNCTX)
is open.
- Confirm the cable connection
- Replace the cable exchange, and established
- Replace the fixing unit
- Replace the DC controller PCB.
E009
Error in pressure/release of fixing film unit
0001 In case that the output of fixing automatic pressure phase sensor is not changed
although rotating/reversing the fixing motor
- Check the pressure/release mechanism. Check the connection of the
connector.
- Replace the motor.
E808
Low-voltage power supply circuit fault (zero-cross error)
0000 The low-voltage power supply circuit fault (zero-cross error)
Cause
The low-voltage power supply PCB is faulty. The DC controller PCB is faulty.
- Replace the low-voltage power supply PCB.
- Replace the DC control PCB.
E840
Fan shutter error
0000 Fan shutter open/close operation Error
Cause
Abnormal rotation of the fan shutter motor
Defect of the fan shutter position sensor
Defect of the fan shutter home position error
Defect of the DC controller PCB
- Replace the fan shutter motor
- Replace the fan shutter position sensor
- Replace the fan shutter home position sensor
- Replace the DC controller PCB
Summary of Contents for iR C3380 series
Page 1: ...Aug 29 2006 Service Manual iR C3380 2880 Series...
Page 2: ......
Page 6: ......
Page 23: ...Chapter 1 Introduction...
Page 24: ......
Page 26: ......
Page 52: ......
Page 53: ...Chapter 2 Installation...
Page 54: ......
Page 127: ...Chapter 3 Basic Operation...
Page 128: ......
Page 130: ......
Page 136: ......
Page 137: ...Chapter 4 Main Controller...
Page 138: ......
Page 160: ......
Page 161: ...Chapter 5 Original Exposure System...
Page 162: ......
Page 188: ...Chapter 5 5 24 F 5 68 4 Remove the original sensor 2 hook 1 F 5 69...
Page 189: ...Chapter 6 Laser Exposure...
Page 190: ......
Page 192: ......
Page 206: ......
Page 207: ...Chapter 7 Image Formation...
Page 208: ......
Page 256: ......
Page 257: ...Chapter 8 Pickup Feeding System...
Page 258: ......
Page 262: ......
Page 303: ...Chapter 9 Fixing System...
Page 304: ......
Page 306: ......
Page 321: ...Chapter 10 Externals and Controls...
Page 322: ......
Page 326: ......
Page 336: ...Chapter 10 10 10 F 10 10 2 Remove the check mark from SNMP Status Enabled...
Page 337: ...Chapter 10 10 11 F 10 11...
Page 359: ...Chapter 11 MEAP...
Page 360: ......
Page 362: ......
Page 401: ...Chapter 12 RDS...
Page 402: ......
Page 404: ......
Page 411: ...Chapter 13 Maintenance and Inspection...
Page 412: ......
Page 414: ......
Page 416: ...Chapter 13 13 2 F 13 1 8 9 1 2 3 3 5 6 7 10 11 12 13 14 4...
Page 421: ...Chapter 14 Standards and Adjustments...
Page 422: ......
Page 424: ......
Page 431: ...Chapter 15 Correcting Faulty Images...
Page 432: ......
Page 434: ......
Page 459: ...Chapter 16 Self Diagnosis...
Page 460: ......
Page 462: ......
Page 481: ...Chapter 17 Service Mode...
Page 482: ......
Page 484: ......
Page 571: ...Chapter 18 Upgrading...
Page 572: ......
Page 574: ......
Page 603: ...Chapter 19 Service Tools...
Page 604: ......
Page 606: ......
Page 609: ...Aug 29 2006...
Page 610: ......

