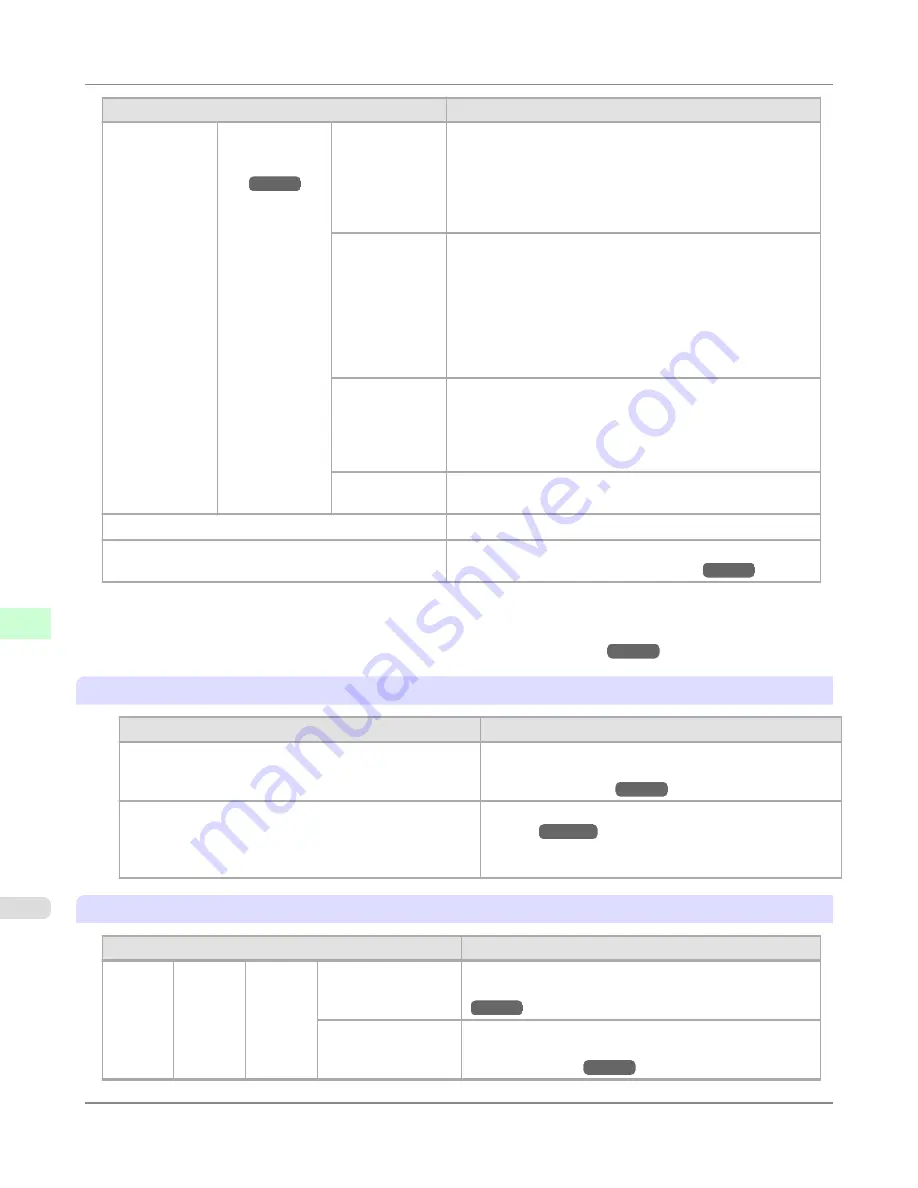
Setting Item
Description, Instructions
Paper Details
(The type of pa-
per is displayed
here.)
(
*1
→P.940
)
NearEnd Sht
Mrgn
Specify a margin at the leading edge of sheets to ensure better
printing quality at the leading edge.
Note that if you choose
5mm
, it may lower the printing quali-
ty at the leading edge and affect feeding accuracy. The prin-
ted surface may be scratched, and ink may adhere to the lead-
ing edge.
Bordless Mar-
gin
Adjust the margin during borderless printing.
Choose
Automatic
to have the printer automatically detect
the paper width and configure the margin settings for border-
less printing. If margins are mistakenly created when
Auto-
matic
is selected, choose
Fixed
. In this case, the paper width
is not detected automatically, and the document is printed
without borders, using the margin settings required by the
printer.
Width Detec-
tion
Specify this option to print inside boundaries or in other cases
when specifying a particular starting position for printing.
Paper width and skew are not detected if you select
Off
. If
paper is loaded askew, paper jams or Platen soiling may oc-
cur.
Return De-
faults
Choose
OK
to restore
Paper Details
to the default values.
Paper Details
Print the paper settings as specified in
Paper Details
.
Keep Paper Type
Select
On
when printing on a particular type of paper regular-
ly.
(See "
Changing the Type of Paper
.")
→P.791
*1: For information on the types of paper the printer supports, refer to the Paper Reference Guide. (See
Paper Ref-
erence Guide
.) Types of paper in the printer driver and related software (as well as on the Control Panel ) are
updated when you install the printer driver from the User Software CD-ROM or if you update paper informa-
tion with the Media Configuration Tool.
(See "
Updating paper information
.")
→P.779
Ink Menu
Setting Item
Description, Instructions
Rep. Ink Tank
Replace the Ink Tank at this point. Follow the instructions
displayed to complete the required procedure.
(See "
Re-
placing Ink Tanks
.")
→P.997
Head Cleaning A
Printhead cleaning options.
(See "
Cleaning the Print-
head
.")
→P.1012
Execute
Head Cleaning A
if printing is faint, oddly col-
ored, or contains foreign substances.
Job Menu
Setting Item
Description, Instructions
Print
Job
Job List
(Choose
a print
job)
Delete
Delete the current job or queued jobs.
(See "
Managing the
Job Queue (Deleting or Preempting Other Jobs)
.")
→P.725
Preempt Jobs
Print the job first after the current print job is finished.
(See "
Managing the Job Queue (Deleting or Preempt-
ing Other Jobs)
.")
→P.725
Control Panel
>
Printer Menu
>
Menu Settings
iPF8300S
9
940
Summary of Contents for imagePROGRAF iPF8300S
Page 20: ......
Page 933: ...Control Panel Operations and Display Screen 914 Printer Menu 924 Control Panel iPF8300S 9 913 ...
Page 1142: ...Specifications Printer Specifications 1123 Specifications iPF8300S 14 1122 ...
Page 1148: ...Appendix How to use this manual 1129 Disposal of the product 1139 Appendix iPF8300S 15 1128 ...
Page 1159: ...Disposal of the product WEEE Directive 1140 Appendix Disposal of the product iPF8300S 15 1139 ...
Page 1160: ...WEEE Directive Appendix Disposal of the product WEEE Directive iPF8300S 15 1140 ...
Page 1161: ...Appendix Disposal of the product iPF8300S WEEE Directive 15 1141 ...
Page 1162: ...Appendix Disposal of the product WEEE Directive iPF8300S 15 1142 ...
Page 1163: ...Appendix Disposal of the product iPF8300S WEEE Directive 15 1143 ...
Page 1164: ...Appendix Disposal of the product WEEE Directive iPF8300S 15 1144 ...
Page 1165: ...Appendix Disposal of the product iPF8300S WEEE Directive 15 1145 ...
Page 1166: ...Appendix Disposal of the product WEEE Directive iPF8300S 15 1146 ...
Page 1167: ...Appendix Disposal of the product iPF8300S WEEE Directive 15 1147 ...
Page 1168: ...Appendix Disposal of the product WEEE Directive iPF8300S 15 1148 ...
Page 1170: ...V Vacuum Strength 863 W When to replace 1013 ...
Page 1171: ......
Page 1172: ... CANON INC 2011 ...


