Brother DCP-J562DW Online User'S Manual Download Page 433

Advanced Mode

ControlCenter4 Advanced Mode gives you more control over the details of your machine's features and
allows you to customise one-button scan actions.

To change operation mode:

1. Click the 

 (

ControlCenter4

) icon in the task tray, and then select 

Open

.

2. Click the 

Configuration

 button, and then select 

Mode Select

.

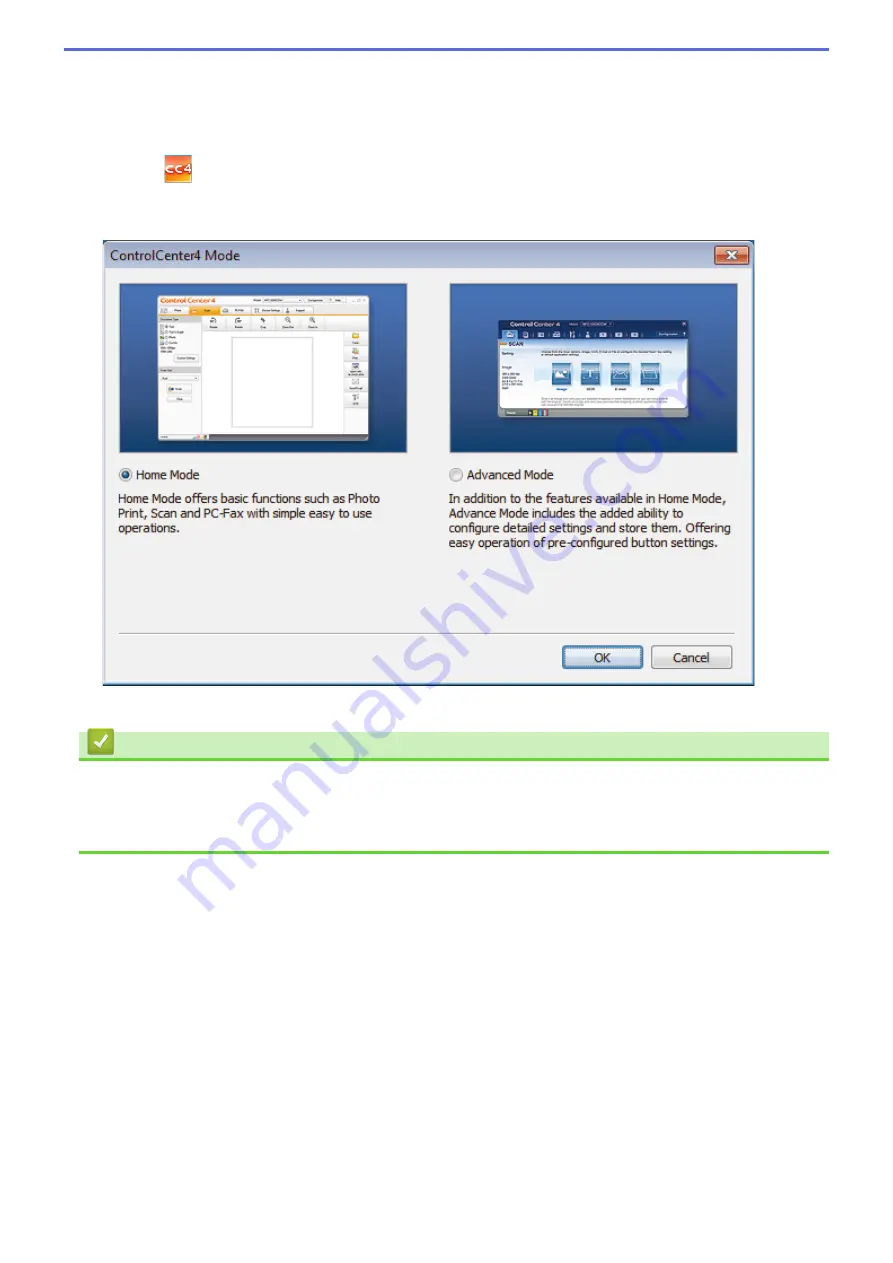
3. The mode selection dialog box appears. Select either the 

Home Mode

 or 

Advanced Mode

 option.

4. Click 

OK

.

  Related Information

ControlCenter4 (Windows

®

)

Scan Using ControlCenter4 Home Mode (Windows

®

)

Scan Using ControlCenter4 Advanced Mode (Windows

®

)


427

Summary of Contents for DCP-J562DW

Page 1: ...Online User s Guide DCP J562DW MFC J480DW MFC J680DW MFC J880DW 2015 Brother Industries Ltd All rights reserved ...

Page 2: ...t Media 52 Load Documents 61 Load Documents in the Automatic Document Feeder ADF 62 Load Documents on the Scanner Glass 64 Unscannable Area 66 Print 67 Print from Your Computer Windows 68 Print a Photo Windows 69 Print a Document Windows 70 Cancel a Print Job Windows 71 Print More Than One Page on a Single Sheet of Paper N in 1 Windows 72 Print as a Poster Windows 73 Print on Both Sides of the Pap...

Page 3: ...m ControlCenter2 Macintosh 129 Scan from Your Computer Windows 132 Scan Using ControlCenter4 Home Mode Windows 133 Scan Using ControlCenter4 Advanced Mode Windows 148 Scan Using Nuance PaperPort 14SE or Other Windows Applications 163 Scan Using Windows Photo Gallery or Windows Fax and Scan 167 Install BookScan Enhancer and Whiteboard Enhancer Windows 171 Scan from Your Computer Macintosh 172 Scan ...

Page 4: ...ng Device 300 External and Extension Telephones 304 Fax Reports 310 Set the Transmission Verification Report s Style 311 Set the Fax Journal s Interval Period 312 PC FAX 314 PC FAX for Windows 315 PC FAX for Macintosh 339 PhotoCapture Center 342 Print Photos Directly from Media 343 Compatible Memory Cards and USB Flash Drives 344 Important Information about PhotoCapture Center 345 Print Photos fro...

Page 5: ...r Machine 416 Use Brother Web Services 417 Print with Google Cloud Print 419 Print with AirPrint 420 Print with Mopria 421 Print and Scan from a Mobile Device 422 Print and Scan Using Near Field Communication NFC 423 ControlCenter 424 ControlCenter4 Windows 425 Change the Operation Mode in ControlCenter4 Windows 426 Scan Using ControlCenter4 Home Mode Windows 428 Scan Using ControlCenter4 Advanced...

Page 6: ...achine s Printer Platen 516 Clean the Paper Feed Rollers 517 Clean the Paper Pick up Rollers 519 Check Your Brother Machine 520 Check the Print Quality 521 Check the Print Alignment from Your Brother Machine 525 Check the Ink Volume 527 Monitor Machine Status from Your Computer Windows 529 Monitor Machine Status from Your Computer Macintosh 534 Correct the Paper Feed to Clear Vertical Lines 536 Pa...

Page 7: ...Home Before You Use Your Brother Machine Before You Use Your Brother Machine Applicable Models Definitions of Notes Trademarks Important Note 1 ...

Page 8: ...e Applicable Models Applicable Models This User s Guide applies to the following models 1 8 inch LCD models MFC J480DW 2 7 inch Touchscreen LCD models DCP J562DW MFC J680DW MFC J880DW Related Information Before You Use Your Brother Machine 2 ...

Page 9: ...ly hazardous situation which if not avoided may result in damage to property or loss of product functionality NOTE NOTE specifies the operating environment conditions for installation or special conditions of use Tips icons provide helpful hints and supplementary information Electrical Hazard icons alert you to possible electrical shock Bold Bold style identifies buttons on the machine s control p...

Page 10: ...Market Google Cloud Print Google Drive Picasa Web Albums Google Play and Google Chrome are trademarks of Google Inc Use of these trademarks are subject to Google Permissions Mozilla and Firefox are registered trademarks of the Mozilla Foundation UNIX is a registered trademark of The Open Group in the United States and other countries Linux is the registered trademark of Linus Torvalds in the U S a...

Page 11: ...Edition Windows Server 2003 R2 and Windows Server 2003 R2 x64 Edition Windows Server 2008 in this document represents Windows Server 2008 and Windows Server 2008 R2 In this User s Guide the LCD messages of the MFC J880DW are used unless otherwise specified In this User s Guide the illustrations of the MFC J880DW are used unless otherwise specified Unless otherwise specified the screens in this man...

Page 12: ...e Before Using Your Machine Control Panel Overview LCD Overview Settings Screen Overview Navigate the Touchscreen Access Brother Utilities Windows Brother Utilities is an application launcher that offers convenient access to all Brother applications installed on your computer 6 ...

Page 13: ...g or receiving a fax into memory or while scanning a document into the computer Fax sending will not be stopped during printing from your computer However when the machine is copying or receiving a fax on paper it pauses the printing operation and then continues printing when copying or fax receiving has finished DCP models do not support the fax feature Firewall Windows If your computer is protec...

Page 14: ...ages to help you set up and use the machine Adjust the angle of the control panel by lifting it 2 Mode buttons FAX Press to switch the machine to FAX Mode SCAN Press to switch the machine to SCAN Mode COPY Press to switch the machine to COPY Mode WEB Press to switch the machine to WEB Mode 3 Settings buttons Clear Press to delete characters or to go back to the previous menu level 8 ...

Page 15: ...hile the machine is idle a or b Press to scroll through the menus and options d or c Press to move the cursor left or right on the LCD 5 4 8 7 6 4 Telephone buttons Hook Press before dialing to ensure a fax machine answers and then press Mono Start or Colour Start If the machine is in Fax Tel F T Mode and you pick up the handset of an external telephone during the F T ring pseudo double ring press...

Page 16: ...to maintain print quality To prolong print head life provide better ink efficiency and maintain print quality keep your machine connected to a power source at all times 8 Start buttons Mono Start Press to start sending faxes in monochrome Press to start making copies in monochrome Press to start scanning documents in colour or monochrome depending on the scan setting Colour Start Press to start se...

Page 17: ... Home Press to return to the Home screen While the machine is in Sleep Mode the Home icon blinks Cancel Press to cancel an operation available when illuminated in red 4 Power On Off Press to turn the machine on Press and hold down to turn the machine off The Touchscreen will display Shutting Down and will stay on for a few seconds before turning itself off If you have connected an external telepho...

Page 18: ...ing table shows the wireless network status The wireless setting is disabled Wireless network is connected A three level indicator in the LCD displays the current wireless signal strength The wireless access point cannot be detected You can configure wireless settings by pressing on the control panel For more information see the Quick Setup Guide 3 Ink Displays the available ink volume When an ink...

Page 19: ...provides access to Fax Copy and Scan operations Home Screen 2 1 7 6 3 4 5 2 Home Screen 2 provides access to additional features such as Photo Web and Apps operations 1 Date Time Displays the date and time set on the machine 2 Quiet Mode This icon appears when the Quiet Mode setting is set to On The Quiet Mode setting can reduce printing noise When Quiet Mode is turned on the print speed becomes s...

Page 20: ...ens press d or c 5 Ink Displays the available ink volume Press to access the Ink menu When an ink cartridge is near the end of its life or having a problem an error icon is displayed on the ink colour 6 Settings Press to access the Settings menu 7 Modes Fax Press to access Fax mode Copy Press to access Copy mode Scan Press to access Scan mode Photo Press to access Photo mode Web Press to connect t...

Page 21: ...ys how many new faxes you have received and stored in the memory Press View to view the faxes on the Touchscreen 10 Warning icon 10 The warning icon appears when there is an error or maintenance message press Detail to view it and then press to return to Ready mode This product adopts the font of ARPHIC TECHNOLOGY CO LTD DCP J562DW There are two Home screens that you can access by pressing d or c ...

Page 22: ...ng noise When Quiet Mode is turned on the print speed becomes slower 2 Wireless Status Each icon in the following table shows the wireless network status Your machine has not been connected to the wireless access point Press this button to configure wireless settings For more information see the Quick Setup Guide Wireless network is connected A three level indicator in each of the Home screens dis...

Page 23: ... is displayed on the ink colour 5 Settings Press to access the Settings menu 6 Modes Copy Press to access Copy mode Scan Press to access Scan mode Photo Press to access Photo mode Web Press to connect the Brother machine to an Internet service For more information see the Web Connect Guide solutions brother com manuals Apps Press to connect the Brother machine to the Brother Apps service For more ...

Page 24: ... to return to Ready mode This product adopts the font of ARPHIC TECHNOLOGY CO LTD Related Information Introduction to Your Brother Machine Cloud Service Notifications Reduce Printing Noise Reset Functions Reset Your Brother Machine Check the Ink Volume Settings Screen Overview Error and Maintenance Messages 18 ...

Page 25: ...d Service Notifications Related Models DCP J562DW MFC J680DW MFC J880DW If you use Brother Web Connect and New Function Notice is set to On notifications about cloud services will appear on the Home screen Check for new notifications by pressing Detail Related Information LCD Overview 19 ...

Page 26: ...n the print head and check the ink volume 2 Paper Type Press to access the Paper Type menu 3 Quiet Mode Displays the Quiet Mode setting Press to access the Quiet Mode menu When this menu is set to On is displayed on the Home screen 4 Receive Mode Displays the current Receive Mode Fax Fax Only Fax Tel External TAD Manual For some countries When the Distinctive Ring feature is turned on the Touchscr...

Page 27: ...t head and check the ink volume 2 Paper Type Press to access the Paper Type menu 3 Quiet Mode Displays the Quiet Mode setting Press to access the Quiet Mode menu When this menu is set to On is displayed on the Home screen 4 Date Time Displays the date and time Press to access the Date Time menu 5 Wi Fi Press to set up a wireless network connection If you are using a wireless connection a three lev...

Page 28: ...x Only Fax Tel External TAD Manual For some countries When the Distinctive Ring feature is turned on the Touchscreen displays D R For New Zealand When the FaxAbility feature is turned on the Touchscreen displays D R 5 Date Time Displays the date and time Press to access the Date Time menu 6 Wi Fi Press to set up a wireless network connection If you are using a wireless connection a three level ind...

Page 29: ...Related Information Introduction to Your Brother Machine LCD Overview Check the Ink Volume Distinctive Ring 23 ...

Page 30: ...s all the settings and features and their available options Press d c or a b to scroll through them IMPORTANT DO NOT press the Touchscreen with a sharp object such as a pen or stylus It may damage the machine DO NOT touch the Touchscreen immediately after plugging in the power cord or turning on the machine Doing this may cause an error Related Information Introduction to Your Brother Machine 24 ...

Page 31: ...other Brother Utilities Windows 8 Tap or click Brother Utilities either on the Start screen or the desktop Windows 8 1 Move your mouse to the lower left corner of the Start screen and click if you are using a touch based device swipe up from the bottom of the Start screen to bring up the Apps screen When the Apps screen appears tap or click Brother Utilities 2 Select your machine 3 Choose the oper...

Page 32: ...creen or the desktop Windows 8 1 Move your mouse to the lower left corner of the Start screen and click if you are using a touch based device swipe up from the bottom of the Start screen to bring up the Apps screen When the Apps screen appears tap or click Brother Utilities 2 Click the drop down list and then select your model name if not already selected Click Tools in the left navigation bar and...

Page 33: ...Home Paper Handling Paper Handling Load Paper Load Documents 27 ...

Page 34: ...per tray cover to print on Photo 10 x 15 cm or Photo L 89 x 127 mm size paper Load Paper in the Manual Feed Slot Load special print media in this slot one sheet at a time Unprintable Area Paper Settings Acceptable Paper and Other Print Media The print quality can be affected by the type of paper you use in the machine Error and Maintenance Messages Paper Handling and Printing Problems 28 ...

Page 35: ...per Handling Load Paper Load Paper in the Paper Tray Load Paper in the Paper Tray Load Cut Sheet Paper or Photo 2L Paper in the Paper Tray Load Photo Paper in the Paper Tray Load Envelopes in the Paper Tray 29 ...

Page 36: ...ze and Paper Type settings if needed following the on screen instructions Load only one size and type of paper in the paper tray at a time When you load a different paper size in the tray you must change the Paper Size setting in the machine or the paper size setting on your computer 1 If the paper support flap 1 is open close it and then close the paper support 2 2 1 2 Pull the paper tray complet...

Page 37: ... jams and misfeeds Always make sure the paper is not curled or wrinkled 6 Gently load paper in the paper tray with the printing surface face down Make sure the paper is flat in the tray and the paper length guide 1 touches the edges of the paper 1 31 ...

Page 38: ...e it with the paper you are adding Always fan the stack of paper well to prevent the machine from feeding multiple pages 7 Gently adjust the paper width guides 1 to fit the paper Make sure the paper guides touch the edges of the paper 1 8 Close the output paper tray cover 9 Slowly push the paper tray completely into the machine 10 While holding the paper tray in the machine pull out the paper supp...

Page 39: ...Related Information Load Paper in the Paper Tray Change the Check Paper Size Setting Choose the Right Print Media Change the Paper Size and Paper Type 33 ...

Page 40: ...tings if needed following the on screen instructions Load only one size and type of paper in the paper tray at a time When you load a different paper size in the tray you must change the Paper Size setting in the machine or the paper size setting on your computer 1 If the paper support flap 1 is open close it and then close the paper support 2 2 1 2 Pull the paper tray completely out of the machin...

Page 41: ...ng surface face down Loading more than 20 sheets of photo paper may cause paper jams 7 Gently adjust the paper guides 1 to fit the paper Make sure the paper width guides touch the edges of the paper and the paper is flat in the tray 1 8 Slowly push the paper tray completely into the machine 35 ...

Page 42: ...l out the paper support 1 until it locks into place and then unfold the paper support flap 2 2 1 Related Information Load Paper in the Paper Tray Change the Check Paper Size Setting Choose the Right Print Media Change the Paper Size and Paper Type 36 ...

Page 43: ... or the paper size setting on your computer Before loading envelopes in the tray press the corners and sides of the envelopes to make them as flat as possible See Related Information 1 If the paper support flap 1 is open close it and then close the paper support 2 2 1 2 Pull the paper tray completely out of the machine 3 Open the output paper tray cover 1 1 4 Load up to 10 envelopes in the paper t...

Page 44: ...e the output paper tray cover 6 Slowly push the paper tray completely into the machine 7 While holding the paper tray in the machine pull out the paper support 1 until it locks into place and then unfold the paper support flap 2 2 1 Related Information Load Paper in the Paper Tray About Envelopes 38 ...

Page 45: ... Change the Check Paper Size Setting Choose the Right Print Media Change the Paper Size and Paper Type 39 ...

Page 46: ...aper size Change the Paper Size and Paper Type settings if needed following the on screen instructions Load only one size and type of paper in the paper tray at a time When you load a different paper size in the tray you must change the Paper Size setting in the machine or the paper size setting on your computer 1 If the paper support flap 1 is open close it and then close the paper support 2 2 1 ...

Page 47: ... paper support flap when using the photo paper tray Otherwise it is difficult to take out the printouts IMPORTANT When you have finished printing photos return the photo paper tray to the Normal printing position If you do not you will get a No Paper Fed error when you use cut sheet paper Photo Paper Tray in the Normal printing position Photo Paper Tray in the Photo printing position Related Infor...

Page 48: ... Paper Handling and Printing Problems 42 ...

Page 49: ...dia in this slot one sheet at a time The machine automatically turns on Manual Feed mode when you put paper in the manual feed slot 1 Open the manual feed slot cover 2 Lift up the paper support 3 Slide the manual feed slot paper guides to fit the width of the paper you are using 4 Load only one sheet of paper in the manual feed slot with the printing surface face up 43 ...

Page 50: ... in the illustration See Related Information IMPORTANT DO NOT load more than one sheet of paper in the manual feed slot at any one time Doing this may cause a paper jam When printing multiple pages do not feed the next sheet of paper until the Touchscreen displays a message instructing you to feed the next sheet 44 ...

Page 51: ...ull it out and insert it again in the centre position 6 Using both hands push one sheet of paper into the manual feed slot until the front edge touches the paper feed rollers Let go of the paper when you hear the machine pull it The LCD displays Manual Feed Slot ready Read the instruction displayed on the LCD and then press OK When loading an envelope or a sheet of thick paper push the envelope in...

Page 52: ...aced in the manual feed slot the machine always prints from the manual feed slot The machine will eject paper loaded in the manual feed slot while a test page fax or report is being printed The machine will eject paper loaded in the manual feed slot during the machine s cleaning process Wait until the machine finishes its cleaning and then load paper in the manual feed slot Related Information Loa...

Page 53: ...nd envelopes The machine can print in the shaded areas of cut sheet paper only when the Borderless print feature is available and turned on Cut Sheet Paper Envelopes Top 1 Left 2 Bottom 3 Right 4 Cut Sheet 3 mm 3 mm 3 mm 3 mm Envelopes 12 mm 3 mm 12 mm 3 mm The Borderless print feature is not available for envelopes and 2 sided printing Related Information Load Paper Paper Handling and Printing Pr...

Page 54: ...Size and Paper Type settings for the paper tray Change the Check Paper Size Setting If the Check Paper setting is set to On and you pull the paper tray out of the machine the LCD displays a message asking if you want to change the Paper Size and Paper Type settings Shrink Page Size of an Oversized Incoming Fax 48 ...

Page 55: ...rinted surface face up onto the paper tray at the front of the machine When you use glossy paper remove each sheet at once to prevent smudging or paper jams DCP J562DW MFC J680DW MFC J880DW 1 Do one of the following DCP J562DW MFC J680DW Press Settings Paper Type MFC J880DW Press Settings Tray Setting Paper Type 2 Press a or b to display the Plain Paper Inkjet Paper Brother BP71 or Other Glossy op...

Page 56: ... Paper Handling and Printing Problems 50 ...

Page 57: ...MFC J480DW DCP J562DW MFC J680DW MFC J880DW MFC J480DW 1 Press Settings 2 Press a or b to select the following a Select General Setup Press OK b Select Check Paper Press OK c Select On or Off Press OK 3 Press Stop Exit DCP J562DW MFC J680DW MFC J880DW 1 Press Settings All Settings General Setup Check Paper 2 Press On or Off 3 Press Related Information Paper Settings Load Cut Sheet Paper or Photo 2...

Page 58: ...When you print on inkjet paper coated paper and glossy paper be sure to choose the proper print media in the Basic tab of the printer driver or in the Paper Type setting on the machine When you print on Brother Photo paper load one extra sheet of the same photo paper in the paper tray When using photo paper remove each sheet at once to prevent smudging or paper jams Avoid touching the printed surf...

Page 59: ...d using the Brother paper listed in the table If Brother paper is not available in your country we recommend testing various paper types before purchasing large quantities Brother paper Paper Type Item A4 Plain BP60PA A4 Glossy Photo BP71GA4 A4 Inkjet Matte BP60MA 10 x 15 cm Glossy Photo BP71GP Related Information Acceptable Paper and Other Print Media 53 ...

Page 60: ...PORTANT DO NOT use the following kinds of paper Damaged curled wrinkled or irregularly shaped 1 1 1 2 mm or greater curl may cause jams to occur Extremely shiny or highly textured Paper that cannot be arranged uniformly when stacked Paper made with a short grain Paper capacity of the output paper tray cover Up to 50 sheets of A4 80 gsm paper Photo paper must be picked up from the output paper tray...

Page 61: ... embossed have raised writing on them Have clasps or staples Are pre printed on the inside Are self adhesive Have double flaps Self adhesive Double flaps You may experience paper feed problems caused by the thickness size and flap shape of the envelopes you are using Before loading envelopes in the tray press the flaps edges and corners to make them as flat as possible as shown in the illustration...

Page 62: ...Related Information Acceptable Paper and Other Print Media Load Envelopes in the Paper Tray Load Paper in the Manual Feed Slot 56 ...

Page 63: ...a Paper Type and Paper Size for Each Operation Paper Capacity of the Paper Trays Paper Weight and Thickness Load Cut Sheet Paper or Photo 2L Paper in the Paper Tray Load Photo Paper in the Paper Tray Load Envelopes in the Paper Tray Load Paper in the Manual Feed Slot Load special print media in this slot one sheet at a time 57 ...

Page 64: ...4 1 x 266 7 mm 7 1 4 x 10 1 2 in Yes JIS B5 3 182 x 257 mm 7 2 x 10 1 in Yes A5 148 x 210 mm 5 8 x 8 3 in Yes Yes A6 105 x 148 mm 4 1 x 5 8 in Yes Cards Photo 10 x 15 cm 4 x 6 in Yes Yes Yes Photo L 9 x 13 cm 3 5 x 5 in Yes Photo 2L 13 x 18 cm 5 x 7 in Yes Yes Index Card 13 x 20 cm 5 x 8 in Yes Envelopes C5 Envelope 162 x 229 mm 6 4 x 9 in Yes DL Envelope 110 x 220 mm 4 3 x 8 7 in Yes Com 10 104 7...

Page 65: ...0 Index Card 30 Envelopes 10 Photo Paper Tray DCP J562DW MFC J680DW MFC J880DW Photo 10 x 15 cm and Photo L 89 x 127 mm Plain Paper Inkjet Paper Glossy Paper Recycled Paper and Photo 20 Manual Feed Slot DCP J562DW MFC J680DW MFC J880DW A4 Executive Letter Legal JIS B5 A5 A6 Envelopes Com 10 DL C5 Monarch Photo 10 x 15 cm Photo L 89 x 127 mm Photo 2L 13 x 18 cm and Index Card 127 x 203 mm Plain Pap...

Page 66: ...cled Paper 64 to 120 gsm 0 08 to 0 15 mm Inkjet Paper 64 to 200 gsm 0 08 to 0 25 mm Glossy Paper 1 Up to 220 gsm Up to 0 25 mm Cards Photo Card 1 Up to 220 gsm Up to 0 25 mm Index Card Up to 120 gsm Up to 0 15 mm Envelopes 80 to 95 gsm Up to 0 52 mm 1 BP71 260 gsm paper is specially designed for Brother inkjet machines Related Information Choose the Right Print Media Paper Handling and Printing Pr...

Page 67: ...ocument Feeder ADF The ADF can hold up 20 pages and feeds each sheet individually Load Documents on the Scanner Glass Unscannable Area The unscannable area of a page depends on the settings in the application you are using The figures below show the typical unscannable measurements 61 ...

Page 68: ... 215 9 mm Paper Weight 64 to 90 gsm IMPORTANT DO NOT pull on the document while it is feeding DO NOT use paper that is curled wrinkled folded ripped stapled paper clipped pasted or taped DO NOT use cardboard newspaper or fabric Make sure documents with correction fluid or written in ink are completely dry 1 Lift up and unfold the ADF document support 1 1 2 Fan the pages well 3 Adjust the paper gui...

Page 69: ...Related Information Load Documents Copy a Document Error and Maintenance Messages Telephone and Fax problems Other Problems 63 ...

Page 70: ...p to 2 kg ADF models To use the scanner glass the ADF must be empty and the ADF document support must be closed 1 Lift the document cover 2 Place the document face down in the upper left corner of the scanner glass aligned with the arrow 3 Close the document cover IMPORTANT If you are scanning a book or thick document DO NOT slam or press on the document cover Related Information Load Documents Co...

Page 71: ... Other Problems 65 ...

Page 72: ...settings in the application you are using The figures below show the typical unscannable measurements Usage Document Size Top 1 Bottom 3 Left 2 Right 4 Fax A4 3 mm 3 mm 1 Letter 4 mm Legal Copy All paper sizes 3 mm Scan 1 mm 1 mm 1 The unscannable area is 1 mm when using the ADF Related Information Load Documents 66 ...

Page 73: ...Home Print Print Print from Your Computer Windows Print from Your Computer Macintosh 67 ...

Page 74: ...to change the order of the printed pages Print a Colour Document in Greyscale Windows Greyscale mode makes the print processing speed faster than colour mode If your document contains colour selecting Greyscale mode prints your document in 256 levels of greyscale Prevent Smudged Printouts and Paper Jams When Printing on Both Sides of the Paper Windows Some types of print media may need more drying...

Page 75: ...hoto paper in the paper tray 4 Click the Media Type drop down list and then select the type of paper you are using IMPORTANT To get the best print quality for the settings you have selected always set the Media Type option to match the type of paper you load 5 Click the Paper Size drop down list and then select your paper size 6 Select the Borderless check box if needed 7 For Colour Mode select Na...

Page 76: ...of paper you load 5 Click the Paper Size drop down list and then select your paper size 6 For Colour Mode select the Natural or Vivid option 7 In the Orientation field select either the Portrait or Landscape option to set the orientation of your printout If your application software contains a similar layout feature we recommend using the one in the application 8 Type the number of copies 1 999 yo...

Page 77: ...rint or was sent to the print queue in error you may have to delete it to allow subsequent jobs to print 1 Double click the printer icon in the task tray 2 Select the print job you want to cancel 3 Click the Document menu 4 Select Cancel 5 Click Yes Related Information Print from Your Computer Windows Monitor Machine Status from Your Computer Windows 71 ...

Page 78: ...ld select either the Portrait or Landscape option to set the orientation of your printout If your application software contains a similar layout feature we recommend using the one in the application 4 Click the Multiple Page drop down list and then select the 2 in 1 4 in 1 9 in 1 or 16 in 1 option 5 Click the Page Order drop down list and then select your page order 6 Click the Border Line drop do...

Page 79: ...ther MFC XXXX Printer where XXXX is the name of your model and then click the printing properties or preferences button The printer driver window appears 3 Click the Multiple Page drop down list and then select the 1 in 2x2 Pages or 1 in 3x3 Pages option 4 Change other printer settings if needed 5 Click OK 6 Complete your print operation Related Information Print from Your Computer Windows Print S...

Page 80: ...rinter where XXXX is the name of your model and then click the printing properties or preferences button The printer driver window appears 3 In the Orientation field select either the Portrait or Landscape option to set the orientation of your printout If your application software contains a similar layout feature we recommend using the one in the application 4 Click the 2 sided Booklet drop down ...

Page 81: ...ght Short Edge Left 7 Select the Binding Offset check box if you want to specify the offset for binding in inches or millimetres 8 Click OK to return to the printer driver window 9 Change other printer settings if needed The Borderless feature is not available when using this option 10 Click OK again and then complete your print operation 75 ...

Page 82: ...Related Information Print from Your Computer Windows Print Settings Windows Print as a Booklet Automatically Windows 76 ...

Page 83: ...hin it may wrinkle 1 Select the print command in your application 2 Select Brother MFC XXXX Printer where XXXX is the name of your model and then click the printing properties or preferences button The printer driver window appears 3 In the Orientation field select either the Portrait or Landscape option to set the orientation of your printout If your application software contains a similar layout...

Page 84: ...ut having to change the order of the printed pages You can specify the number of sheets in each smaller booklet set from 1 15 This option can be helpful when folding a printed booklet that has a large number of pages 8 Select the Binding Offset check box if you want to specify the offset for binding in inches or millimetres 9 Click OK to return to the printer driver window 10 Change other printer ...

Page 85: ...prints your document in 256 levels of greyscale 1 Select the print command in your application 2 Select Brother MFC XXXX Printer where XXXX is the name of your model and then click the printing properties or preferences button The printer driver window appears 3 Click the Advanced tab 4 For Colour Greyscale select Greyscale 5 Change other printer settings if needed 6 Click OK 7 Complete your print...

Page 86: ...The printer driver window appears 3 Click the 2 sided Booklet drop down list and then select 2 sided 4 Click the Advanced tab 5 Click the Other Print Options button 6 Select the Advanced 2 sided Settings option on the left side of the screen 7 Select one of the following options Option Description Normal Select this mode to print at normal speed using a normal amount of ink 2 sided 1 Slower print ...

Page 87: ... printing properties or preferences button The printer driver window appears 3 Click the Print Profiles tab 4 Select your profile from the print profile list The profile settings are shown on the left side of the printer driver window 5 Do one of the following If the settings are correct for your print job click OK To change the settings go back to the Basic or Advanced tab change settings and the...

Page 88: ...Related Information Print from Your Computer Windows Create or Delete Your Print Profile Windows Print Settings Windows 82 ...

Page 89: ...anced tab and configure the print settings you want for the new Print Profile 4 Click the Print Profiles tab 5 Do one of the following To create a new print profile a Click Add Profile The Add Profile dialog box appears b Type the new profile name in the Name field c Click the icon you want to use to represent this profile from the icon list d Click OK The new Print Profile name is added to the li...

Page 90: ...ars click Settings and then click Control Panel In the Hardware and Sound group click View devices and printers For Windows Server 2012 Move your mouse to the lower right corner of your desktop When the menu bar appears click Settings and then click Control Panel In the Hardware group click View devices and printers For Windows Server 2012 R2 Click Control Panel on the Start screen In the Hardware...

Page 91: ...ted media type Slow Drying Paper Select this option if you use a type of plain paper on which ink dries slowly This option may cause slight blurring of the text 2 Print Quality Select the print resolution you want Because print quality and speed are related the higher the quality the longer it will take to print the document 3 Paper Size Select the size of the paper you want to use You can either ...

Page 92: ...e copy of your document will print and then reprint according to the number of copies you choose If this option is not selected then each page will print according to the number of copies chosen before the next page of the document is printed Reverse Order Select this option to print your document in reverse order The last page of your document will be printed first 7 Multiple Page Select this opt...

Page 93: ...ve its sharpness white balance and colour density This process may take several minutes depending on the image size and your computer s specifications 2 Ink Save Mode Select this option to print using lighter colours and emphasise image outlines The amount of ink that is saved varies depending on the type of documents printed Ink Save Mode may make your printouts look different than they appear on...

Page 94: ...eed Advanced Colour Settings Select the method that the machine uses to arrange dots to express halftones The printout colour can be adjusted to achieve the closest match to what appears on your computer screen Advanced 2 sided Settings Select the print speed for 2 sided printing Some types of print media may need more drying time when using the 2 sided feature Change this option if you have probl...

Page 95: ... Change the Default Print Settings Windows 89 ...

Page 96: ...n Greyscale Macintosh Greyscale mode makes the print processing speed faster than colour mode If your document contains colour selecting Greyscale mode prints your document in 256 levels of greyscale Prevent Smudged Printouts and Paper Jams When Printing on Both Sides of the Paper Macintosh Some types of print media may need more drying time when using the 2 sided feature Change the Advanced 2 sid...

Page 97: ...X is your model name For more page setup options click the Show Details button 4 Click the Paper Size pop up menu and then select your paper size To print photographs without margins select a borderless paper size option 5 Click the Orientation button that matches the way you want the photo to print 6 Click the application pop up menu and then select Print Settings The Print Settings options appea...

Page 98: ...nu and then select your paper size 5 Select the Orientation option that matches the way you want the document to print 6 Click the application pop up menu and then select Print Settings The Print Settings options appear 7 Click the Media Type pop up menu and then select the media type you want to use IMPORTANT To get the best print quality for the settings you have selected always set the Media Ty...

Page 99: ...is your model name For more page setup options click the Show Details button 3 Select the Orientation option that matches the way you want the document to print 4 Click the application pop up menu and then select Layout The Layout setting options appear 5 In the Two Sided section select the Short Edge binding or Long Edge binding option 6 Change other printer settings if needed The Borderless feat...

Page 100: ...s your model name For more page setup options click the Show Details button 3 Click the application pop up menu and then select Layout The Layout setting options appear 4 Click the Pages per Sheet pop up menu and then select the number of pages to print on each sheet 5 Select the Layout Direction option 6 Click the Border pop up menu and then select your border line type 7 Change other printer set...

Page 101: ... of greyscale 1 From an application such as Apple TextEdit click the File menu and then select Print 2 Select Brother MFC XXXX where XXXX is your model name For more page setup options click the Show Details button 3 Click the application pop up menu and then select Print Settings The Print Settings options appear 4 Click the Color Grayscale pop up menu and then select the Grayscale option 5 Chang...

Page 102: ...ayout The Layout setting options appear 4 In the Two Sided section select the Short Edge binding or Long Edge binding option 5 Click the application pop up menu and then select Print Settings The Print Settings options appear 6 Click the Advanced print settings list 7 Click the Advanced 2 sided Settings menu 8 Select one of the following options from the Advanced 2 sided Settings pop up menu Optio...

Page 103: ...ither choose from standard paper sizes or create a custom paper size 2 Orientation Select the orientation portrait or landscape of your printout If your application contains a similar setting we recommend that you set the orientation using the application 3 Scale Type a value into the field to enlarge or reduce the pages in your document to fit the selected paper size 97 ...

Page 104: ...rder Select the type of border to use when printing multiple pages on a single sheet of paper 4 Two Sided available only for certain models Select whether to print on both sides of the paper 5 Reverse page orientation Select this option to rotate the printed image 180 degrees 6 Flip horizontally Select this option to reverse the printed image on the page horizontally from left to right 98 ...

Page 105: ...t page of the document is printed 2 Page Order Select the page order 3 Scale to fit paper size Select this option to enlarge or reduce the pages in your document to fit the selected paper size 4 Destination Paper Size Select the paper size to print on 5 Scale down only Select this option if you want to reduce the pages in your document when they are too large for the selected paper size If this op...

Page 106: ...s according to the selected media type 2 Slow Drying Paper Select this option if you use a type of plain paper on which ink dries slowly This option may cause slight blurring of the text 3 Print Quality Select the print resolution you want Because print quality and speed are related the higher the quality the longer it will take to print the document 100 ...

Page 107: ...sided feature Change this option if you have problems with smudged 2 sided printouts or paper jams Other Print Options Paper Thickness Select the appropriate paper thickness Bi Directional Printing Select this option to increase the print speed When this option is selected the print head prints in both directions When this option is cleared the print head prints in only one direction resulting in ...

Page 108: ...ty This process may take several minutes depending on the size of the image and the specifications of your computer Related Information Print from Your Computer Macintosh Error and Maintenance Messages Paper Handling and Printing Problems Print a Photo Macintosh Print a Document Macintosh Print on Both Sides of the Paper Automatically Automatic 2 sided Printing Macintosh Print More Than One Page o...

Page 109: ...s and documents on your Brother machine Use the software applications provided by Brother or use your favourite scanning application Scan from Your Computer Macintosh There are several ways you can use your Macintosh to scan photos and documents on your Brother machine Use the software applications provided by Brother or your favourite scanning application 103 ...

Page 110: ...ach document and use the Auto Crop feature to create separate files or a single multi page file Scan to an Editable Text File Using OCR Your machine can convert characters in a scanned document to text data using optical character recognition OCR technology You can edit this text using your preferred text editing application Scan to E mail Attachment Send a scanned document as an email attachment ...

Page 111: ...PIN use the control panel to enter the four digit PIN for the computer and then press OK 5 Do one of the following To change the settings go to the next step To use the default settings press Mono Start or Colour Start Scan Type depends on the default settings Pressing Mono Start or Colour Start does not allow you to change the settings 6 Press a or b to select the Scan Settings option and then pr...

Page 112: ...start scanning without changing additional settings The machine starts scanning If you are using the machine s scanner glass follow the LCD instructions to complete the scanning job 5 Press the Scan Settings option and then press Set at Device To use the Scan Settings option a computer with the ControlCenter software installed must be connected to the machine 6 Select the scan settings you want to...

Page 113: ...nd then press OK If the LCD prompts you to enter a PIN use the control panel to enter the four digit PIN for the computer and then press OK 5 Do one of the following To change the settings go to the next step To use the default settings press Mono Start or Colour Start Scan Type depends on the default settings Pressing Mono Start or Colour Start does not allow you to change the settings 6 Press a ...

Page 114: ...next step Press Start to start scanning without changing additional settings The machine starts scanning If you are using the machine s scanner glass follow the LCD instructions to complete the scanning job 5 Press the Scan Settings option and then press Set at Device To use the Scan Settings option a computer with the ControlCenter software installed must be connected to the machine 6 Select the ...

Page 115: ...canner glass follow the LCD instructions to complete the scanning job 6 Select the scan settings you want to change and then press OK Option Description Scan Type Select the scan type for your document Resolution Select the scan resolution for your document File Type Select the file format for your document Scan Size Select the scan size for your document Scan Long Paper available only for certain...

Page 116: ...move the memory card or USB flash drive from the machine while it is reading the data You could lose your data or damage the memory card or USB flash drive Related Information Scan Using the Scan Button on Your Brother Machine Memory Card or USB Flash Drive Information Scan to Media Settings 110 ...

Page 117: ...ble cameras or digital cameras that use the USB mass storage standard Other USB devices are not supported MFC J680DW MFC J880DW Compatible Memory Cards Slot USB flash drive DCP J562DW MFC J680DW MFC J880DW Compatible Memory Cards Slot Memory Stick Duo Memory Stick PRO Duo Upper slot Memory Stick Micro M2 Adapter required SD Memory Card SDHC Memory Card SDXC Memory Card MultiMediaCard MultiMediaCar...

Page 118: ...DF PDF Best for scanning Colour documents at better quality than 100 dpi 200 dpi Best for scanning Colour documents or photos in high quality at a smaller file size than 600 dpi 300 dpi Best for scanning photos at the highest quality and largest file size 600 dpi Auto Scan Size Choose the scan size for your document Scan Long Paper Scan documents printed on long paper using the ADF available only ...

Page 119: ... Factory Reset Restore all settings back to the factory settings Related Information Save Scanned Data to a Memory Card or USB Flash Drive 113 ...

Page 120: ...llustration You must place the documents at least 10 mm away from each other Auto Crop adjusts the skew of the document on the scanner glass however if your document is skewed more than 10 degrees this feature will not work The ADF must be empty to use Auto Crop ADF models only The Auto Crop feature is available for a maximum of 16 documents depending on the size of the documents 1 Load documents ...

Page 121: ...Related Information Scan Using the Scan Button on Your Brother Machine 115 ...

Page 122: ...make permanent changes use Brother s ControlCenter software MFC J480DW MFC J680DW MFC J880DW MFC J480DW 1 Load your document 2 Press SCAN 3 Press a or b to select the Scan to OCR option and then press OK 4 If the machine is connected over the network press a or b to select the computer where you want to send data and then press OK If the LCD prompts you to enter a PIN use the control panel to ente...

Page 123: ...or the computer and then press OK 4 Do one of the following To change the settings press Options and then go to the next step Press Start to start scanning without changing additional settings The machine starts scanning If you are using the machine s scanner glass follow the LCD instructions to complete the scanning job 5 Press the Scan Settings option and then press Set at Device To use the Scan...

Page 124: ...nd then press OK 4 If the machine is connected over the network press a or b to select the computer where you want to send data and then press OK If the LCD prompts you to enter a PIN use the control panel to enter the four digit PIN for the computer and then press OK 5 Do one of the following To change the settings go to the next step To use the default settings press Mono Start or Colour Start S...

Page 125: ...n go to the next step Press Start to start scanning without changing additional settings The machine scans the document and saves it as a file attachment It then launches your email application and opens a new blank email message with the scanned file attached 5 Press the Scan Settings option and then press Set at Device To use the Scan Settings option a computer with the ControlCenter software in...

Page 126: ...ows 8 users to scan using a Brother machine on the network You must install the driver via Web Services Use Web Services to Install Drivers Used for Scanning Windows Vista Windows 7 and Windows 8 Use Web Services to monitor printers on the network Scan Using Web Services from the Brother Machine Windows Vista SP2 or greater Windows 7 and Windows 8 If you have installed the driver for scanning via ...

Page 127: ...on Right click the machine you want to install Windows 7 Click Start Control Panel Network and Internet View network computers and devices The machine s Web Services Name appears with the printer icon Right click the machine you want to install Windows 8 Move your mouse to the lower right corner of your desktop When the menu bar appears click Settings Change PC settings Devices Add a device The ma...

Page 128: ...Related Information Web Services for Scanning on Your Network Windows Vista SP2 or greater Windows 7 and Windows 8 122 ...

Page 129: ...splays an insufficient memory error message choose a smaller size in the Paper size setting or a lower resolution in the Resolution DPI setting MFC J480DW DCP J562DW MFC J680DW MFC J880DW MFC J480DW 1 Load your document 2 Press SCAN 3 Press a or b to select the following a Select Web Service Press OK b Select the type of scan you want Press OK c Select the computer where you want to send data Pres...

Page 130: ...ofiles button The Scan Profiles dialog box appears Windows 7 and Windows 8 Right click the machine icon and then select Scan profiles The Scan Profiles dialog box appears 3 Select the scan profile you want to use 4 Make sure the scanner selected in the Scanner list is a Brother machine that supports Web Services for scanning and then click the Set as Default button 5 Click Edit The Edit Default Pr...

Page 131: ...s from ControlCenter4 Windows 1 Click the ControlCenter4 icon in the task tray and then click Open 2 Click the Device Settings tab 3 Click the Device Scan Settings button The Device Scan Settings dialog box appears 4 Click the tab for the Scan to action you want to change Image OCR E mail or File 5 Change the settings as needed 6 Click OK 125 ...

Page 132: ...s Yes Scan Type Yes Yes Yes Yes Document Size Yes Yes Yes Yes Brightness Yes Yes Yes Yes Contrast Yes Yes Yes Yes Auto Crop Yes Yes Yes ID Card Scan Yes Yes Yes Yes Advanced Settings Yes Yes Yes Yes Default Yes Yes Yes Yes File Type Select the file type you want to use for the scanned data Target Application Select the destination application from the drop down list OCR Language Set the optical ch...

Page 133: ...rate colour reproduction This mode uses up to 16 8 million colours to scan the image but it requires the most memory and has the longest transfer time Document Size The document size is set to A4 by default For faster scan speeds select the exact size of your document from the Document Size drop down list If you select the 1 to 2 A4 option the scanned image will be divided into two A5 size documen...

Page 134: ...ke the scanned data more recognisable When you use this feature choose from three settings High Medium and Low Default Select this option to restore all settings to their factory setting values Related Information Scan Using the Scan Button on Your Brother Machine 128 ...

Page 135: ...r icon The ControlCenter2 screen appears 2 Hold the control key on your keyboard and click the scan destination Image OCR E mail or File whose settings you want to change 3 Click the Device Button tab The settings for the scan destination that you selected appear The following example shows the Scan to Image settings Settings Applicable Features Image OCR E mail File Target Application E mail Appl...

Page 136: ... application from the Application Name pop up menu and then click Delete File Type Select the file type you want to use for the scanned data File size Change the file size by moving the File size slider to the right or left OCR Language Set the optical character recognition OCR language to match the language of the scanned document s text available only for certain models Destination File Path Cli...

Page 137: ...xact size of your document from the Document Size drop down list If you select the 1 to 2 A4 option the scanned image will be divided into two A5 size documents ID Card Scan Select this check box to scan both sides of the identification card onto one page Advanced Settings Click the Advanced Settings button in the scan settings dialog box to configure advanced settings Brightness Set the Brightnes...

Page 138: ...e s main features Scan Using ControlCenter4 Advanced Mode Windows ControlCenter4 Advanced Mode gives you more control over the details of your machine s features and allows you to customise one button scan actions Scan Using Nuance PaperPort 14SE or Other Windows Applications You can use the Nuance PaperPort 14SE application for scanning Scan Using Windows Photo Gallery or Windows Fax and Scan Win...

Page 139: ...e Mode Windows Use ControlCenter4 Home Mode to access your machine s main features Scan Using ControlCenter4 Home Mode Windows Save Scanned Data to a Folder as a PDF File Using ControlCenter4 Home Mode Windows Scan Settings for ControlCenter4 Home Mode Windows Change the Operation Mode in ControlCenter4 Windows 133 ...

Page 140: ...n Size if needed 6 Click Scan The machine starts scanning and the scanned image appears in the image viewer 7 If you scanned multiple pages using the ADF click the left or right arrow buttons to preview each scanned page ADF models only 8 Crop the scanned image if needed 9 Do one of the following Click Save to save scanned data Click Print to print scanned data Click Open with an Application to op...

Page 141: ...pe Using ControlCenter4 Home Mode Windows Change Scan Size Using ControlCenter4 Home Mode Windows Crop a Scanned Image Using ControlCenter4 Home Mode Windows Print Scanned Data Using ControlCenter4 Home Mode Windows Open with an Application Using ControlCenter4 Home Mode Windows 135 ...

Page 142: ...Mode Windows Select the Document Type option that matches the type of original you want to scan Option Description Photo 600 x 600 dpi 24bit Colour Text and Graph 300 x 300 dpi 24bit Colour Monochrome Text 200 x 200 dpi Black White Custom 300 x 300 dpi 24bit Colour as default Select the scan settings you want from the Custom Settings button Related Information Scan Using ControlCenter4 Home Mode W...

Page 143: ...e but produce a finer scanned image Scan Type Select from a range of scan colour depths Auto Use for any type of document This mode automatically picks an appropriate colour depth for the document Black White Use for text or line art images Grey Error Diffusion Use for photographic images or graphics Error Diffusion is a method for creating simulated grey images without using true grey dots Black ...

Page 144: ...can multiple documents placed on the scanner glass The machine will scan each document and create separate files or a single multi page file Continuous Scanning Select this option to scan multiple pages from the scanner glass or ADF available only for certain models After a page is scanned either continue scanning or finish Use this method to scan more pages than the maximum ADF capacity ID Card S...

Page 145: ...can Size Using ControlCenter4 Home Mode Windows Change Scan Size Using ControlCenter4 Home Mode Windows For faster scan speeds select the exact size of your document from the Scan Size drop down menu Auto means that the machine will automatically detect the document size Related Information Scan Using ControlCenter4 Home Mode Windows 139 ...

Page 146: ...splays the scanned image so that the entire image fits in the window 3 Zoom In Zooms in on the scanned image 4 Zoom Out Zooms out of the scanned image 5 Crop and Edit Removes the outer parts of the image Click the Crop and Edit button and then change the frame to contain the area you want to keep after cropping 6 Page Select Indicates the page number of the scanned page currently shown in the imag...

Page 147: ...ooms out of the image d Rotates the image counter clockwise 90 degrees e Rotates the image clockwise 90 degrees f Click and drag the frame to adjust the area to be cropped 3 Click OK The edited image is displayed in the image viewer Related Information Scan Using ControlCenter4 Home Mode Windows 141 ...

Page 148: ...ies using the printer driver features that are available in ControlCenter4 1 Scan a document 2 Click Print a Shows which images are currently selected and how many copies of each image will print b Click the Properties button to change specific printer settings c Select the Paper Size Media Type and Layout options The current settings are enclosed in a blue square 3 Configure the print settings an...

Page 149: ...an Application Using ControlCenter4 Home Mode Windows The Open with an Application button lets you scan an image directly into your graphics application for editing 1 Click the Open with an Application button 2 Select the application from the drop down list and then click OK The image will be opened in the application you have selected Related Information Scan Using ControlCenter4 Home Mode Window...

Page 150: ...ode setting for ControlCenter4 1 Load your document 2 Click the ControlCenter4 icon in the task tray and then click Open 3 Click the Scan tab 4 Select the Document Type 5 Change the size of your document if needed 6 Click Scan The machine starts scanning and the scanned image appears in the image viewer 7 Click the left or right arrow buttons to preview each scanned page 8 Click Save The Save dial...

Page 151: ...he password 10 In the File Name field type a prefix for your file name if needed 11 Click the folder icon to browse and select the folder where you want to save your scanned documents 12 Click OK The scanned document is saved to the destination folder as a PDF Related Information Scan Using ControlCenter4 Home Mode Windows 145 ...

Page 152: ...ommended for most users when scanning pictures TIFF tif TIFF Multi Page tif Portable Network Graphics png PDF pdf recommended for scanning and sharing documents High Compression PDF pdf Secure PDF pdf Searchable PDF pdf available only for certain models XML Paper Specification xps the XML Paper Specification is available for Windows Vista Windows 7 and Windows 8 or when using applications that sup...

Page 153: ... to specify the destination where you would like to save your scanned documents Show Folder Select this option to automatically display the destination folder after scanning File size Adjust the data compression ratio of the scanned image Change the file size by moving the File size slider to the right or left Custom Settings Select the Custom option click the Custom Settings button and then chang...

Page 154: ...computer as PDF files Scan Both Sides of an ID Card Using ControlCenter4 Advanced Mode Windows Scan to E mail Attachment Using ControlCenter4 Advanced Mode Windows Send a scanned document as an email attachment Scan to an Editable Text File OCR Using ControlCenter4 Advanced Mode Windows Your machine can convert characters in a scanned document to text data using optical character recognition OCR t...

Page 155: ...can Photos and Graphics Using ControlCenter4 Advanced Mode Windows Send scanned photos or graphics directly to your computer Select Advanced Mode as the mode setting for ControlCenter4 1 Load your document 2 Click the ControlCenter4 icon in the task tray and then click Open 3 Click the Scan tab 4 Click the Image button The scan settings dialog box appears 149 ...

Page 156: ...eeded To change the file name or Destination File Path click Change To preview and configure the scanned image select the PreScan check box 6 Click Scan The machine starts scanning The image opens in the application you have selected Related Information Scan Using ControlCenter4 Advanced Mode Windows 150 ...

Page 157: ... Advanced Mode Windows Save Scanned Data to a Folder as a PDF File Using ControlCenter4 Advanced Mode Windows Scan documents and save them to a folder on your computer as PDF files Select Advanced Mode as the mode setting for ControlCenter4 1 Load your document 2 Click the ControlCenter4 icon in the task tray and then click Open 3 Click the Scan tab 151 ...

Page 158: ...en type the password 6 Click the folder icon to browse and select the folder where you want to save your scanned documents 7 Change the scan settings such as file format file name resolution or colour if needed To preview and configure the scanned image select the PreScan check box 8 Click Scan The machine starts scanning The file is saved in the folder you selected Related Information Scan Using ...

Page 159: ... Card Using ControlCenter4 Advanced Mode Windows Scan Both Sides of an ID Card Using ControlCenter4 Advanced Mode Windows Select Advanced Mode as the mode setting for ControlCenter4 1 Place an ID card on the scanner glass 2 Click the ControlCenter4 icon in the task tray and then click Open 3 Click the Scan tab 153 ...

Page 160: ... 7 Change the scan settings such as file format file name scan location resolution or colour if needed 8 Click Scan The machine starts scanning one side of the identification card 9 After the machine has scanned one side turn over the identification card and then click Continue to scan the other side 10 Click Finish Related Information Scan Using ControlCenter4 Advanced Mode Windows 154 ...

Page 161: ...Select Advanced Mode as the mode setting for ControlCenter4 The Scan to E mail feature does not support Webmail services Use the Scan to Image or Scan to File feature to scan a document or a picture and then attach the scanned file to an email message The machine scans to your default email client 1 Load your document 2 Click the ControlCenter4 icon in the task tray and then click Open 3 Click the...

Page 162: ...e name or Destination File Path click Change To preview and configure the scanned image select the PreScan check box 6 Click Scan The machine starts scanning Your default email application opens and the scanned image is attached to a new blank email message Related Information Scan Using ControlCenter4 Advanced Mode Windows 156 ...

Page 163: ... MFC J480DW MFC J680DW MFC J880DW Your machine can convert characters in a scanned document to text data using optical character recognition OCR technology You can edit this text using your preferred text editing application Select Advanced Mode as the mode setting for ControlCenter4 1 Load your document 2 Click the ControlCenter4 icon in the task tray and then click Open 3 Click the Scan tab 4 Cl...

Page 164: ...file name or Destination File Path click Change To preview and configure the scanned image select the PreScan check box 6 Click Scan The machine scans the document converts it to editable text and then sends it to your default word processing application Related Information Scan Using ControlCenter4 Advanced Mode Windows 158 ...

Page 165: ...nected to a network that has access to the Internet through either a wired or wireless connection 1 Load your document 2 Click the ControlCenter4 icon in the task tray and then click Open 3 Click the Scan tab 4 Click the E mail or File button The scan settings dialog box appears 5 Click the File Type drop down list and then select the Microsoft Office Word docx or Microsoft Office PowerPoint pptx ...

Page 166: ...pe Yes Yes Yes Yes Document Size Yes Yes Yes Yes Brightness Yes Yes Yes Yes Contrast Yes Yes Yes Yes Continuous Scanning Yes Yes Yes Yes Auto Crop Yes Yes Yes ID Card Scan Yes Yes Yes Yes Advanced Settings Yes Yes Yes Yes Default Yes Yes Yes Yes File Type Select the file type you want to use for the scanned data For Image E mail and File Windows Bitmap bmp JPEG jpg recommended for most users when ...

Page 167: ...scanned image s destination every time you scan Destination Folder To change the folder for the Image OCR and E mail features click Change Click the folder icon and then browse to the folder where you want to save your scanned document Scan Location Select the Folder or SharePoint radio button to specify the destination where you would like to save your scanned documents Show Folder Select this op...

Page 168: ...ment again You can also type a value into the field to set the Brightness level Contrast Increase or decrease the Contrast level by moving the slider to the right or left An increase emphasises dark and light areas of the image while a decrease reveals more details in grey areas You can also type a value into the field to set the Contrast level Continuous Scanning Select this option to scan multip...

Page 169: ...s the steps will be similar PaperPort 14SE supports both TWAIN and WIA drivers the TWAIN driver recommended is used in these steps Depending on the model of your machine Nuance PaperPort 14SE may not be included If it is not included you can use other software applications that support scanning 1 Load your document 2 Start PaperPort 14SE Do one of the following Windows XP Windows Vista and Windows...

Page 170: ...cument size adjust the scanning area by holding down the left mouse button and dragging your mouse pointer over the portion you want to scan 10 Click PreScan if you want to preview your image and crop unwanted portions before scanning 11 Click Start The machine starts scanning Related Information Scan from Your Computer Windows TWAIN Driver Settings Windows 164 ...

Page 171: ...n Scan Image Type Resolution Scan Type Photo Use for scanning photo images 300 x 300 dpi 24bit Colour Web Use for attaching the scanned image to web pages 100 x 100 dpi 24bit Colour Text Use for scanning text documents 200 x 200 dpi Black White 2 Resolution Select a scanning resolution from the Resolution drop down list Higher resolutions take more memory and transfer time but produce a finer scan...

Page 172: ...the image while a decrease reveals more details in grey areas You can also type a value in the field to set the contrast level 6 Brightness Set the Brightness level by dragging the slider to the right or left to lighten or darken the image If the scanned image is too light set a lower brightness level and scan the document again If the image is too dark set a higher brightness level and scan the d...

Page 173: ...ing the scanner glass also called the flatbed 1 Load your document 2 Launch your scanning application Do one of the following Windows Photo Gallery Click File Import from Camera or Scanner Windows Fax and Scan Click File New Scan 3 Select the scanner you want to use 4 Click Import or OK The New Scan dialog box appears 5 Adjust the settings in the Scanner Setup dialog box if needed The scanner reso...

Page 174: ...Related Information Scan from Your Computer Windows WIA Driver Settings Windows 168 ...

Page 175: ... or Flatbed option from the drop down list Picture Type Image Type Select Color picture Grayscale picture Black and white picture or text or Custom Settings for the type of document you want to scan To change advanced settings click the Adjust the quality of the scanned picture link Page size The Page size option is available when you selected the Document Feeder as the Paper source option 169 ...

Page 176: ...ncrease or decrease the Contrast level by moving the slider to the right or left An increase emphasises dark and light areas of the image while a decrease reveals more details in grey areas You can also type a value in the field to set the contrast level Resolution DPI Select a scanning resolution from the Resolution DPI list Higher resolutions take more memory and transfer time but produce a fine...

Page 177: ...e text and images in photos taken of a whiteboard These applications are not available for Windows Server 2003 2008 2012 series The machine must be turned on and connected to the computer The computer must be connected to the Internet You must be logged on with Administrator access privileges 1 Click Brother Utilities 2 Select your machine from the drop down list 3 Select Do More in the left navig...

Page 178: ...nd documents on your Brother machine Use the software applications provided by Brother or your favourite scanning application Scan Using ControlCenter2 Macintosh Use Brother s ControlCenter software to scan photos and save them as JPEGs PDFs or other file formats Scan Using Presto PageManager or other TWAIN Compliant Applications Macintosh 172 ...

Page 179: ...es of an ID Card Using ControlCenter2 Macintosh Scan to E mail Attachment Using ControlCenter2 Macintosh Send a scanned document as an email attachment Scan to an Editable Text File OCR Using ControlCenter2 Macintosh Your machine can convert characters in a scanned document to text data using optical character recognition OCR technology You can edit this text using your preferred text editing appl...

Page 180: ...g ControlCenter2 Macintosh Send scanned photos or graphics directly to your computer 1 Load your document 2 In the Finder menu bar click Go Applications Brother and then double click the ControlCenter icon The ControlCenter2 screen appears 3 Click the SCAN tab 4 Click the Image button The scan settings dialog box appears 174 ...

Page 181: ... resolution or colour if needed To change the file name or destination file path click Change 6 Click the Start Scanning button The machine starts scanning The scanned image will open in the application you have selected Related Information Scan Using ControlCenter2 Macintosh 175 ...

Page 182: ...rolCenter2 Macintosh Save Scanned Data to a Folder as a PDF File Using ControlCenter2 Macintosh 1 Load your document 2 In the Finder menu bar click Go Applications Brother and then double click the ControlCenter icon The ControlCenter2 screen appears 3 Click the SCAN tab 4 Click the File button The scan settings dialog box appears 176 ...

Page 183: ... type your password in the Password and Re type Password fields and then click OK 6 Change the scan settings such as file format file name destination folder resolution or colour if needed 7 Click the Start Scanning button The machine starts scanning The file will be saved in the folder you selected Related Information Scan Using ControlCenter2 Macintosh 177 ...

Page 184: ... Macintosh Scan Both Sides of an ID Card Using ControlCenter2 Macintosh 1 Place an ID card on the scanner glass 2 In the Finder menu bar click Go Applications Brother and then double click the ControlCenter icon The ControlCenter2 screen appears 3 Click the SCAN tab 4 Click the File button The scan settings dialog box appears 178 ...

Page 185: ...Configure other settings if needed 8 Click the Start Scanning button The machine starts scanning one side of the identification card 9 After the machine has scanned one side turn over the identification card and then click Continue to scan the other side 10 Click Finish Related Information Scan Using ControlCenter2 Macintosh 179 ...

Page 186: ...feature does not support Webmail services Use the Scan to Image or Scan to File feature to scan a document or a picture and then attach the scanned file to an email message The machine scans to your default email client 1 Load your document 2 In the Finder menu bar click Go Applications Brother and then double click the ControlCenter icon The ControlCenter2 screen appears 3 Click the SCAN tab 4 Cl...

Page 187: ...olour if needed To change the file name or destination file path click Change 6 Click the Start Scanning button The machine starts scanning Your default email application will open and the scanned image is attached to a new blank email Related Information Scan Using ControlCenter2 Macintosh 181 ...

Page 188: ...nition OCR technology You can edit this text using your preferred text editing application Macintosh Presto PageManager must be installed on your computer Download Presto PageManager from http nj newsoft com tw download brother PM9SEInstaller_BR_multilang2 dmg The Scan to OCR feature is available for certain languages 1 Load your document 2 In the Finder menu bar click Go Applications Brother and ...

Page 189: ...colour if needed To change the file name or destination file path click Change 6 Click the Start Scanning button The machine scans the document converts it to editable text and then sends it to your default word processing application Related Information Scan Using ControlCenter2 Macintosh 183 ...

Page 190: ... wireless connection 1 Load your document 2 In the Finder menu bar click Go Applications Brother and then double click the ControlCenter icon The ControlCenter2 screen appears 3 Click the SCAN tab 4 Click the E mail or File button The scan settings dialog box appears 5 Click the File Type pop up menu and then select the Microsoft Office Word docx or Microsoft Office PowerPoint pptx option If a mes...

Page 191: ...ner Interface Yes Yes Yes Yes Advanced Settings Yes Yes Yes Yes Restore Defaults Yes Yes Yes Yes Target Application E mail Application Select which application is used to open scanned data Only applications installed on your computer can be selected Add Add an application to the pop up menu Type the application name in the Application Name field up to 30 characters and select your preferred applic...

Page 192: ...grey images without using true grey dots Black dots are put in a specific pattern to give a grey appearance True Gray Use for photographic images or graphics This mode is more accurate because it uses up to 256 shades of grey 24bit Color Use to create an image with the most accurate colour reproduction This mode uses up to 16 8 million colours to scan the image but it requires the most memory and ...

Page 193: ...he Contrast level by moving the slider to the right or left An increase emphasises dark and light areas of the image while a decrease reveals more details in grey areas Remove Background Color Select this option to remove the base colour of documents to make the scanned data more recognisable When you use this feature select from three settings high medium and low Restore Defaults Select this opti...

Page 194: ...ess this from the Presto PageManager Help menu Follow these steps if you are using Presto PageManager Instructions for using other applications that support TWAIN specifications are very similar to the steps that follow 1 Start Presto PageManager The first time you use the Brother TWAIN driver you must set it as the default driver To set the Brother TWAIN driver as the default driver do the follow...

Page 195: ...select a document size adjust the scanning area by holding down the mouse button and dragging your mouse pointer over the portion you want to scan 6 Click Start The machine starts scanning Related Information Scan from Your Computer Macintosh TWAIN Driver Settings Macintosh NewSoft Technical Support 189 ...

Page 196: ...scanned image 2 Scan Type Select from a range of scan colour depths Black White Use for text or line art images Gray Error Diffusion Use for photographic images or graphics Error Diffusion is a method for creating simulated grey images without using true grey dots Black dots are put in a specific pattern to give a grey appearance True Gray Use for photographic images or graphics This mode is more ...

Page 197: ...evel and scan the document again If the image is too dark set a higher brightness level and scan the document again You can also type a value in the box to set the brightness Contrast Increase or decrease the Contrast level by moving the slider to the right or left An increase emphasises dark and light areas of the image while a decrease reveals more details in grey areas You can also type a value...

Page 198: ...Related Information Scan Using Presto PageManager or other TWAIN Compliant Applications Macintosh 192 ...

Page 199: ...s Court Suite 202 Fremont CA 94539 Telephone 1 510 770 8900 Fax 1 510 770 8980 URL http www newsoftinc com Germany Telephone 4940306988851 URL http de newsoft eu com UK Telephone 44 0 203 318 0692 URL http uk newsoft eu com France Telephone 33176607489 URL http fr newsoft eu com Italy Telephone 390699268256 URL http it newsoft eu com Spain Telephone 34901666314 Related Information Scan Using Prest...

Page 200: ...pying two or four pages of your document onto one page of the copy The poster feature divides your document into sections then enlarges the sections so you can assemble them into a poster To print a poster use the scanner glass 2 sided Copy Copy an ID Card Use the 2in1 ID feature to copy both sides of an identification card onto one page keeping the original card size Copy in Ink Save Mode When yo...

Page 201: ...f you are copying multiple pages we recommend using the ADF 3 Press COPY The LCD displays Press Start Normal Quality Paper Type Paper Size 01 4 Enter the number of copies using the dial pad 5 Change the copy settings if needed Press a or b to scroll through the copy settings When the setting you want is highlighted press OK When you load paper other than A4 size Plain Paper you must change the Pap...

Page 202: ...document face down on the scanner glass Place the document face down in the ADF ADF models only If you are copying multiple pages we recommend using the ADF 3 Press Copy The Touchscreen displays 4 Change the copy settings if needed When you load paper other than A4 size Plain Paper you must change the Paper Size and Paper Type settings by pressing the Options button 196 ...

Page 203: ... keyboard Press OK Options Press to change the copy settings for the next copy only When you have finished changing settings press OK After you have finished choosing new options you can save them by pressing the Save as Shortcut button 5 Press Mono Start or Colour Start To stop copying press Related Information Copy Load Documents in the Automatic Document Feeder ADF Load Documents on the Scanner...

Page 204: ...Fit to Page option go to the next step 7 When finished press Mono Start or Colour Start If you selected the Fit to Page option your machine adjusts the copy size to fit the paper size set in the machine The Fit to Page option does not work correctly when the document on the scanner glass is skewed more than three degrees Using the document guidelines on the left and top place your document in the ...

Page 205: ...ep 7 Read and confirm the displayed list of options you have selected and then press OK 8 When you have finished changing settings press Mono Start or Colour Start If you selected the Fit to Page option your machine adjusts the copy size to fit the paper size set in the machine The Fit to Page option does not work correctly when the document on the scanner glass is skewed more than three degrees U...

Page 206: ...s 2 to start printing DCP J562DW MFC J680DW MFC J880DW 1 Load your document 2 Press Copy 3 Enter the number of copies in one of the following ways Press or on the Touchscreen Press to display the keyboard on the Touchscreen and then enter the number of copies using the Touchscreen keyboard Press OK 4 Press Options Stack Sort Sort 5 Read and confirm the displayed list of settings you have selected ...

Page 207: ...C J680DW MFC J880DW MFC J480DW 1 Load your document 2 Press COPY 3 Enter the number of copies using the dial pad 4 Press a or b to select Page Layout Press OK 5 Press a or b to display the options and then press OK to select the option you want 6 Press Mono Start or Colour Start If you placed the document in the ADF or are making a poster the machine scans the pages and starts printing If you are ...

Page 208: ...ettings you have selected and then press OK 7 When you have finished changing settings press Mono Start or Colour Start If you placed the document in the ADF ADF models only or are making a poster the machine scans the pages and starts printing If you are using the scanner glass go to the next step 8 After the machine scans the page place the next page on the scanner glass Press Continue Repeat th...

Page 209: ...f you are copying from the scanner glass place the document face down in the direction shown in the table Option Description Off 1in1 2in1 P When using the ADF When using the scanner glass 2in1 L When using the ADF When using the scanner glass 2in1 ID Using the scanner glass 4in1 P When using the ADF When using the scanner glass 4in1 L When using the ADF When using the scanner glass Poster 2x1 Usi...

Page 210: ...els only If you are copying from the scanner glass place the document face down in the direction shown in the table Option Description Off 1in1 2in1 Portrait When using the ADF When using the scanner glass 2in1 Landscape When using the ADF When using the scanner glass 2in1 ID Using the scanner glass 4in1 Portrait When using the ADF When using the scanner glass 4in1 Landscape When using the ADF Whe...

Page 211: ...Option Description Poster 2x1 Using the scanner glass Poster 2x2 Using the scanner glass Poster 3x3 Using the scanner glass Related Information Make Page Layout Copies N in 1 or Poster 205 ...

Page 212: ...Home Copy 2 sided Copy 2 sided Copy Copy on Both Sides of the Paper 1 sided to 2 sided 2 sided to 2 sided Reduce the amount of paper you use by copying onto both sides of the paper 206 ...

Page 213: ...ss a or b to select the following a Select 2 sided Copy Press OK b Select 2 sided Copy once again Press OK c Select the option you want to select Press OK Option Description Off 1sided 2sided LongEdgeFlip 1sided 2sided ShortEdgeFlip 2sided 2sided 1 1 2 1 1 2 6 Press Mono Start or Colour Start If you placed the document in the ADF the machine scans the pages and starts printing If you are using the...

Page 214: ...ss a or b to display the 2 sided Copy option and then press it 6 Press the option you want Option Description Off 1 sided 2 sided Long Edge Flip 1 sided 2 sided Short Edge Flip 2 sided 2 sided 1 1 2 1 1 2 7 Review your settings on the Touchscreen and then press OK 8 Press Mono Start or Colour Start If you placed the document in the ADF ADF models only the machine scans the pages and starts printin...

Page 215: ...the jam prevention settings 2 sided 1 or 2 sided 2 The 2 sided 1 option uses a longer print time for the ink to dry The 2 sided 2 option uses a longer print time and will also print in lighter colours Related Information 2 sided Copy Paper Handling and Printing Problems 209 ...

Page 216: ...cation card to the extent permitted under applicable laws For more information see the Product Safety Guide MFC J480DW DCP J562DW MFC J680DW MFC J880DW MFC J480DW 1 Place your identification card face down near the upper left corner of the scanner glass a b c d a a 3 mm or greater top left b 207 mm c 145 mm d scannable area 2 Press COPY 3 Enter the number of copies using the dial pad 4 Press a or ...

Page 217: ...ble area 2 Press Copy 3 Enter the number of copies in one of the following ways Press or on the Touchscreen Press to display the keyboard on the Touchscreen and then enter the number of copies using the Touchscreen keyboard Press OK 4 Press Options Page Layout 2in1 ID 5 Read and confirm the displayed list of settings you have selected When you have finished changing settings press OK 6 Press Mono ...

Page 218: ...The Ink Save Mode feature is supported by technology from Reallusion Inc 1 Load your document 2 Press Copy 3 Enter the number of copies in one of the following ways Press or on the Touchscreen Press to display the keyboard on the Touchscreen and then enter the number of copies using the Touchscreen keyboard Press OK 4 Press Options Advanced Settings Ink Save Mode 5 Read and confirm the displayed l...

Page 219: ...st change the Paper Size setting Enlarge Reduce 100 Enlarge Select an enlargement ratio for the next copy Reduce Select a reduction ratio for the next copy Fit to Page Adjusts the copy size to fit on the paper size you have set Custom 25 400 Enter an enlargement or reduction ratio Density Increase the density to make the text darker Decrease the density to make the text lighter Stack Sort Select t...

Page 220: ... Normal or Fast 1 option Plain Paper is the only Paper Type option Paper Type Select a paper type If you are copying on special paper set the machine for the type of paper you are using to get the best print quality Paper Size Select a paper size If you are copying on paper other than A4 size you must change the Paper Size setting Enlarge Reduce 100 Enlarge Select an enlargement ratio for the next...

Page 221: ... of the paper 1 sided 2 sided 2 sided 2 sided 1 1 2 1 1 2 Advanced Settings Ink Save Mode MFC J880DW Prints colours lighter and emphasises the outlines of images Thin Paper Copy MFC J880DW Avoid bleeding through thin paper when copying Book Copy MFC J880DW Correct dark borders and skew when copying from the scanner glass 215 ...

Page 222: ...s easier to read Set New Default Saves the copy settings that you use most often by setting them as the default settings Factory Reset Restores any changed copy settings to the factory settings Save as Shortcut Add the current settings as a shortcut 1 DCP J562DW is not available MFC J880DW The Ink Save Mode Thin Paper Copy Book Copy and Watermark Copy features are supported by technology from Real...

Page 223: ...Home Fax Fax Send a Fax Receive a Fax Voice Operations and Fax Numbers Telephone Services and External Devices Fax Reports PC FAX 217 ...

Page 224: ...important document immediately without waiting for the machine to retrieve the scan from its memory transmit the fax quickly by turning on Real Time TX Send a Fax at a Specified Time Delayed Fax You can store up to 50 faxes in the machine s memory to be sent within the next twenty four hour period Cancel a Fax in Progress Check and Cancel a Pending Fax Follow these steps to view or to cancel faxes...

Page 225: ...ou want and then press OK c Select Send a fax Press OK Caller ID hist Select a number from the Caller ID history Not available for Taiwan and some countries Press a or b to select the following a Select Caller ID hist Press OK b Select the number you want and then press OK c Select Send a fax Press OK Address Book Select a number from the Address Book Press a or b to select the following a Select ...

Page 226: ...es The machine starts sending the document Repeat this step for each additional page MFC J680DW MFC J880DW 1 Load your document in the ADF or on the scanner glass 2 Press Fax MFC J880DW If Fax Preview is set to On press Fax Sending Faxes The Touchscreen displays 3 Enter the fax number in one of the following ways Dial Pad Enter the fax number manually Press all digits of the number using the Touch...

Page 227: ...sending the document If you are using the scanner glass and selecting Mono in the Colour Setting the machine starts scanning the first page Go to the next step If you are using the scanner glass and selecting Colour in the Colour Setting the Touchscreen asks if you want to send a colour fax Press Yes Colour fax to confirm The machine starts dialling and sending the document 10 When the Touchscreen...

Page 228: ...FAX 3 Press Hook and listen for a dial tone 4 Enter the fax number 5 When you hear fax tones press Mono Start or Colour Start If you are using the scanner glass press 1 to send a fax MFC J680DW MFC J880DW 1 Load your document 2 Press Fax MFC J880DW If Fax Preview is set to On press Fax Sending Faxes 3 Press Hook and listen for a dial tone 4 Enter the fax number 5 When you hear fax tones press Fax ...

Page 229: ... Start or Send key before hanging up 2 Load your document 3 Press Mono Start or Colour Start If you are using the scanner glass press 1 to send a fax 4 Replace the handset of an external telephone MFC J680DW MFC J880DW 1 Ask the other party to wait for fax tones beeps and then press the Start or Send key before hanging up 2 Load your document 3 Press Fax Start If you are using the scanner glass pr...

Page 230: ...bers to the broadcast in the following ways Enter a number using the dial pad in the following way a Press a or b to select Add Number and then press OK b Enter a number using the dial pad and then press OK Select a number from the list in the following way a Press a or b to select Address Book and then press OK b Press a or b to select Alphabetical Order or Numerical Order and then press OK c Pre...

Page 231: ...Press the first letter of the name and press OK Press the name and then press the number you want to add Repeat this step to enter additional fax numbers 5 When finished press OK 6 Press Fax Start 7 Do one of the following If you are using the ADF the machine starts scanning and sending the document If you are using the scanner glass the machine starts scanning the first page When the Touchscreen ...

Page 232: ...To cancel the entire broadcast select the Broadcasting job number and then press OK Press 1 to confirm or press 2 to exit without cancelling To cancel the current number being dialled select the name or number on the LCD and then press OK Press 1 to confirm or press 2 to exit without cancelling To exit without cancelling press Stop Exit 4 Press Stop Exit MFC J680DW MFC J880DW 1 Press 2 Do one of t...

Page 233: ...rom the ADF the machine sends the document in real time even if Real Time TX is set to Off In Real Time Transmission the automatic redial feature does not work when using the scanner glass MFC J480DW MFC J680DW MFC J880DW MFC J480DW 1 Load your document 2 Press FAX 3 Press a or b to select the following a Select Advanced Settings Press OK b Select Real Time TX Press OK c Select On or Off Press OK ...

Page 234: ...d Fax 4 Press Delayed Fax 5 Press On 6 Press Set Time 7 Enter the time you want the fax to be sent using the Touchscreen Press OK The number of pages you can scan into the memory depends on the amount and type of data 8 Press OK 9 Enter the fax number 10 Press Fax Start 11 When the Touchscreen displays Next Page do one of the following Press No when finished scanning pages The machine starts sendi...

Page 235: ...el a fax that is already in process 2 When you press Stop Exit while the machine is dialling or sending the LCD displays Job Cancel Press 1 to confirm MFC J680DW MFC J880DW 1 Press to cancel a fax that is already in process 2 When you press while the machine is dialling or sending the Touchscreen displays Cancel Job Press Yes Related Information Send a Fax Telephone and Fax problems 229 ...

Page 236: ... Press OK 3 Do the following for each fax job you want to check or cancel a Press a or b to scroll through the waiting jobs If needed select the job you want to cancel and then press OK b Press 1 to confirm or press 2 to exit without cancelling 4 When finished press Stop Exit MFC J680DW MFC J880DW 1 Press Settings All Settings Fax Remaining Jobs 2 Do the following for each fax job you want to chec...

Page 237: ... when receiving a fax from you It also lets you pay for the call when you call someone s fax machine to retrieve a fax The polling feature must be set up on both machines to work Not all fax machines support polling Polled Transmit Polling Receive Polling Receive lets you call another fax machine to receive a fax 231 ...

Page 238: ...r fax machine can call and retrieve it The document will be stored and can be retrieved by any other fax machine until you delete it from the memory This feature is available only for monochrome faxes Setup for Polled Transmit Set Up Secure Polling Use the Secure Polling feature to restrict access to the documents you set up to be polled 232 ...

Page 239: ...the ADF the machine starts scanning the document 6 If you are using the scanner glass the Touchscreen prompts you to select one of the following options Press No when finished scanning pages Press Yes to scan another page Place the next page on the scanner glass and then press OK Repeat this step for each additional page 7 Your machine automatically sends the fax when it is polled and then prints ...

Page 240: ... 1 Load your document 2 Press Fax MFC J880DW If Fax Preview is set to On press Fax Sending Faxes 3 Press Options Polled TX 4 Press Secure 5 Enter the four digit secure code using the Touchscreen Press OK 6 Press Fax Start 7 If you are using the scanner glass the Touchscreen prompts you to select one of the following options Press No when finished scanning pages Press Yes to scan another page Place...

Page 241: ...mmediately without waiting for the machine to retrieve the scan from its memory Overseas Mode Set to On if you have difficulty sending faxes overseas Glass ScanSize Adjust the scan area of the scanner glass to the size of the document Set New Default Save your settings as the default Factory Reset Restore all settings back to the factory settings MFC J680DW MFC J880DW To change fax sending setting...

Page 242: ...iately without waiting for the machine to retrieve the scan from its memory Polled TX monochrome only Set the machine with a document to be retrieved by another fax machine Polling RX monochrome only Set the machine to poll another fax machine Overseas Mode Set to On if you have difficulty sending faxes overseas Glass Scan Size Adjust the scan area of the scanner glass to the size of the document ...

Page 243: ... fax machine at the end of the conversation the other party can send you a fax before you both hang up Memory Receive Options Use Memory Receive options to direct incoming faxes while you are away from the machine You can use only one Memory Receive option at a time Remote Fax Retrieval Use Remote Retrieval to call your machine from any touch tone telephone or fax machine and use a remote access c...

Page 244: ...mebody calls your machine you will hear the normal telephone ring sound The number of rings is set in the Ring Delay option Set the F T Ring Time Pseudo Double ring When you set the Receive Mode to Fax Tel if the call is a fax your machine will receive it automatically However if it is a voice call the machine will sound the F T ring pseudo double ring for the time you set in the F T Ring Time opt...

Page 245: ...seudo double ring made by your machine Manual To receive a fax in Manual mode lift the handset of the external telephone or press the Hook button When you hear fax tones short repeating beeps press the Start button and then select Receive to receive a fax You can also use the Fax Detect feature to receive faxes by lifting a handset on the same line as the machine External TAD External TAD mode let...

Page 246: ...vice Do you want the machine to answer fax and telephone calls automatically Yes MFC J480DW MFC J680DW MFC J880DW MFC J480DW 1 Press Settings 2 Press a or b to select the following a Select Fax Press OK b Select Setup Receive Press OK c Select Receive Mode Press OK For some countries If you cannot change the Receive Mode option make sure the Distinctive Ring feature is set to Off For New Zealand I...

Page 247: ... Fax Only Fax Tel External TAD or Manual option and then press the option you want 3 Press Related Information Receive Mode Settings Distinctive Ring Remote Retrieval Commands Connect an External TAD Telephone and Fax problems 241 ...

Page 248: ...480DW 1 Press Settings 2 Press a or b to select the following a Select Fax Press OK b Select Setup Receive Press OK c Select Ring Delay Press OK d Select the number of times you want the line to ring before the machine answers Press OK If you select 0 the machine will answer immediately and the line will not ring at all available only for some countries 3 Press Stop Exit MFC J680DW MFC J880DW 1 Pr...

Page 249: ... the machine s call on any telephone MFC J480DW MFC J680DW MFC J880DW MFC J480DW 1 Press Settings 2 Press a or b to select the following a Select Fax Press OK b Select Setup Receive Press OK c Select F T Ring Time Press OK d Select how long the machine will double ring to alert you to a voice call Press OK 3 Press Stop Exit Even if the caller hangs up during the pseudo double ringing the machine w...

Page 250: ...ax Detect is set to On but your machine does not connect a fax call when you lift an extension or external telephone handset press the remote activation code 51 91 for New Zealand If you send faxes from a computer on the same telephone line and the machine intercepts them set Fax Detect to Off MFC J480DW MFC J680DW MFC J880DW MFC J480DW 1 Press Settings 2 Press a or b to select the following a Sel...

Page 251: ...ome Fax Receive a Fax Fax Preview Fax Preview Use the Fax Preview feature to view received faxes on the LCD Set Fax Preview to On Preview New Faxes When a fax is received a message appears on the LCD 245 ...

Page 252: ...Stamp is turned on the Fax Preview screen will not display the received date and time 1 Press Settings 2 Press Fax Preview 3 Press On or Off 4 Press Yes The Touchscreen displays a message saying future received faxes will not be printed 5 Press Yes 6 Press If faxes are stored in the memory when you change Fax Preview to Off do one of the following If you do not want to print the stored faxes press...

Page 253: ...w faxes A blue mark appears next to new faxes Press the fax you want If you want to print or delete all the faxes in the list press Print Delete Do one of the following Press Print All New Faxes to print all faxes you have not yet viewed Press Print All Old Faxes to print all faxes you have viewed Press Delete All New Faxes to delete all faxes you have not yet viewed Press Delete All Old Faxes to ...

Page 254: ...e fax has multiple pages do one of the following Press Print All Pages to print the whole message A Touchscreen message asks if you want to delete the fax from the machine s memory To delete the fax press Yes To keep the fax in the machine s memory press No Press Print Displayed Only to print only the displayed page Press Print From Displayed to print from the displayed page to the last page If yo...

Page 255: ...e reduction ratio using the page size of the fax and your Paper Size setting MFC J480DW MFC J680DW MFC J880DW MFC J480DW 1 Press Settings 2 Press a or b to select the following a Select Fax Press OK b Select Setup Receive Press OK c Select Auto Reduction Press OK d Select On or Off Press OK 3 Press Stop Exit MFC J680DW MFC J880DW 1 Press Settings All Settings Fax Setup Receive Auto Reduction 2 Pre...

Page 256: ... and time on the machine This feature is available only for monochrome faxes MFC J480DW MFC J680DW MFC J880DW MFC J480DW 1 Press Settings 2 Press a or b to select the following a Select Fax Press OK b Select Setup Receive Press OK c Select Fax Rx Stamp Press OK d Select On or Off Press OK 3 Press Stop Exit MFC J680DW MFC J880DW 1 Press Settings All Settings Fax Setup Receive Fax Rx Stamp 2 Press O...

Page 257: ...y MFC J480DW MFC J680DW MFC J880DW MFC J480DW 1 Ask the other party to load the fax and to press the Start or Send key 2 When you hear CNG tones slow repeated beeps press Mono Start or Colour Start 3 Press 2 to receive the fax 4 Replace the external handset MFC J680DW MFC J880DW 1 Ask the other party to load the fax and to press the Start or Send key 2 When you hear CNG tones slow repeated beeps p...

Page 258: ...hine s Memory Use the Fax Storage feature to store incoming faxes in the machine s memory Retrieve your stored fax messages from a fax machine at another location using the Remote Retrieval commands Your machine prints a backup copy of each stored fax Use PC Fax Receive to Transfer Received Faxes to Your Computer Windows only Turn on the PC Fax Receive feature automatically store incoming faxes to...

Page 259: ...display the Fax Forward option and then press it 3 Enter the forwarding fax number up to 20 digits using the Touchscreen Press OK 4 Press Backup Print On or Backup Print Off If you select Backup Print On the machine prints received faxes at your machine so you will have a copy MFC J880DW When Fax Preview is turned on a backup copy of received faxes will not be printed even if you select Backup Pri...

Page 260: ... fax messages from a fax machine at another location using the Remote Retrieval commands Your machine prints a backup copy of each stored fax This feature is available only for monochrome faxes 1 Press Settings All Settings Fax Setup Receive Memory Receive 2 Press a or b to display the Fax Storage option and then press it 3 Press Related Information Memory Receive Options Forward Faxes Remotely Pr...

Page 261: ...ter and the PC FAX Receiving software runs your machine transfers faxes to your computer automatically MFC J480DW MFC J680DW MFC J880DW MFC J480DW 1 Press Settings 2 Press a or b to select the following a Select Fax Press OK b Select Setup Receive Press OK c Select Memory Receive Press OK d Select PC Fax Receive Press OK The LCD displays the message Run PC Fax on your computer e Press OK f Select ...

Page 262: ...hange the destination computer repeat these steps Related Information Memory Receive Options Transfer Your Faxes or Fax Journal Report Transfer Faxes to Your Computer Receive Faxes Using PC FAX Receive Windows 256 ...

Page 263: ...e Touchscreen displays Print all faxes If you press Yes faxes in the memory will be printed before the setting changes If you press No faxes in the memory will not be printed and the setting will be unchanged If received faxes are left in the machine s memory when you change to PC Fax Receive from another option Fax Forward Forward to Cloud or Fax Storage press USB or the name of the computer if y...

Page 264: ...OK b Select Setup Receive Press OK c Select Memory Receive Press OK d Select Off Press OK The LCD displays Print All Fax or Erase All Doc if received faxes are in your machine s memory 3 Press Stop Exit MFC J680DW MFC J880DW 1 Press Settings All Settings Fax Setup Receive Memory Receive 2 Press Off The Touchscreen displays Print all faxes or Erase all documents if received faxes are in your machin...

Page 265: ...eive and store your faxes in its memory when your PC is turned off 1 Press Settings 2 Press a or b to select the following a Select Fax Press OK b Select Print Document Press OK 3 Press Mono Start 4 Press Stop Exit MFC J680DW MFC J880DW If you select Fax Storage you can print all faxes from the memory 1 Press Settings All Settings Fax Print Document When Fax Preview 1 is set to Off you can also pr...

Page 266: ...te commands to retrieve fax messages Set a Remote Access Code Set a Remote Access Code to access and control your Brother machine even when you are away from it Use Your Remote Access Code Remote Retrieval Commands Forward Faxes Remotely Call your Brother machine from any touch tone telephone or fax machine to forward incoming faxes to another machine Change the Fax Forwarding Number 260 ...

Page 267: ...er a three digit code using the numbers 0 through 9 or using the Touchscreen The preset cannot be changed Press OK DO NOT use the same code used for your Remote Activation Code 51 91 for New Zealand or Remote Deactivation Code 51 91 for New Zealand To delete your code press and hold to restore the inactive setting and then press OK 3 Press Related Information Remote Fax Retrieval Use Your Remote A...

Page 268: ...ne has not received a fax 4 When the machine gives two short beeps enter a command The machine will hang up if you wait longer than 30 seconds to enter a command The machine will beep three times if you enter an invalid command 5 When finished press 9 and then press 0 to deactivate your machine 6 Hang up If your machine is set to Manual mode and you are using Remote Retrieval wait for about 100 se...

Page 269: ...ing has not been set up for example a Fax Forwarding number has not been registered You can register your Fax Forwarding number by entering 4 After you register the number Fax Forwarding will work 4 Fax Forwarding number 6 Fax Storage 96 Retrieve a fax 2 Retrieve all faxes Enter the fax number of a remote fax machine to receive stored fax messages 3 Erase faxes from memory If you hear one long bee...

Page 270: ... you hear one long beep you have messages 3 When you hear two short beeps press 9 6 2 4 Wait for the long beep and then use the dial pad to enter the fax number up to 20 digits of the remote fax machine where you want your fax messages sent followed by You cannot use and as dial numbers but you can press to insert a pause in the fax number 5 Hang up after you hear one long beep Your Brother machin...

Page 271: ...g beep you have messages 3 When you hear two short beeps press 9 5 4 4 Wait for the long beep enter the new number up to 20 digits of the remote fax machine you want your fax messages forwarded to using the dial pad then enter You cannot use and as dial numbers but you can press to insert a pause in the fax number 5 Press 9 0 to stop Remote Access when finished 6 Hang up after you hear one long be...

Page 272: ...ll when receiving a fax from you It also lets you pay for the call when you call someone s fax machine to retrieve a fax The polling feature must be set up on both machines to work Not all fax machines support polling Polled Transmit Polling Receive Polling Receive lets you call another fax machine to receive a fax 266 ...

Page 273: ... fax the other party has set up with a security code Setup for Delayed Polling Receive Delayed Polling Receive lets you set your machine to begin polling receive at a later time You can set up only one delayed polling operation Setup for Sequential Polling Receive Sequential Polling Receive lets you request documents from several fax machines in one operation Afterwards a Sequential Polling Report...

Page 274: ... Receive Related Models MFC J680DW MFC J880DW 1 Press Fax MFC J880DW If Fax Preview is set to On press Fax Sending Faxes 2 Press Options Polling RX 3 Press Standard 4 Enter the fax number you are polling using the Address Book or keyboard 5 Press Fax Start Related Information Polling Receive 268 ...

Page 275: ...lling only works with Brother fax machines To get a fax from a secured Brother machine you must enter the secure code 1 Press Fax MFC J880DW If Fax Preview is set to On press Fax Sending Faxes 2 Press Options Polling RX 3 Press Secure 4 Enter the four digit secure code using the Touchscreen This code is the security code of the fax machine you are polling Press OK 5 Enter the fax number you are po...

Page 276: ...ive at a later time You can set up only one delayed polling operation 1 Press Fax MFC J880DW If Fax Preview is set to On press Fax Sending Faxes 2 Press Options Polling RX 3 Press Timer 4 Enter the time you want to start polling Press OK 5 Enter the fax number you are polling using the Address Book or keyboard 6 Press Fax Start The machine makes the polling call at the time you entered Related Inf...

Page 277: ...r digit secure code using the Touchscreen Press OK If you selected Timer enter the time you want to start polling Press OK 5 Press Options Broadcasting 6 Press Add Number You can add numbers to the broadcast in the following ways Press Add Number and enter a fax number using the Touchscreen Press OK Press Add from Address book Press a or b to display the numbers you want to add to the broadcast Se...

Page 278: ...one of the following To cancel the entire sequential polling job press Entire Seq Poll Press Yes to confirm or press No to exit without cancelling To cancel the current number being dialled press the name or number on the Touchscreen Press Yes to confirm or press No to exit without cancelling To exit without cancelling press Related Information Polling Receive 272 ...

Page 279: ...Receive a Fax Fax Polling Polling Receive Stop Polling Stop Polling Related Models MFC J680DW MFC J880DW To cancel the polling process press while the machine is dialling Related Information Polling Receive 273 ...

Page 280: ... and Fax Numbers Voice Operations and Fax Numbers Voice Operations Store Fax Numbers Set up Groups for Broadcasting A Group which can be stored in the Address Book allows you to send the same fax message to many fax numbers 274 ...

Page 281: ...ions Send Tone Signals If you have a Pulse dialling service but must send Tone signals for example for telephone banking follow these steps If you have a Touch Tone service you will not need this feature to send tone signals Pick up a Voice Call in Fax Tel Receive Mode 275 ...

Page 282: ...e New Zealand MFC J480DW MFC J680DW MFC J880DW MFC J480DW 1 Press Hook 2 Press on the machine s control panel Any digits dialled after this will send tone signals When you are finished with the call the machine will return to the Pulse dialling service MFC J680DW MFC J880DW 1 Press Fax MFC J880DW If Fax Preview is set to On press Fax Sending Faxes 2 Press Hook 3 Press on the machine s Touchpanel A...

Page 283: ...nging to alert you to pick up a voice call If you are at the machine lift the external telephone s handset and then press Hook button or Pickup button to answer If you are at an extension telephone lift the handset during the F T Ring and then press 51 91 for New Zealand between the pseudo double rings If no one is on the line or if someone wants to send you a fax send the call back to the machine...

Page 284: ...ook numbers from the Outgoing Call history Store Address Book Numbers from Caller ID History If you have Caller ID subscriber service from your telephone company you can store Address Book numbers from incoming calls in the Caller ID history Change or Delete Address Book Names or Numbers You can change or delete an Address Book name or number that has already been stored 278 ...

Page 285: ...is not registered with the fax or telephone number d Press a or b to select Complete and then press OK To store another Speed Dial code repeat these steps 4 Press Stop Exit MFC J680DW MFC J880DW You can store up to 100 Addresses with a name and each name can have two numbers 1 Press Fax Address Book 2 Do the following steps a Press Edit Add New Address Name b Enter the name up to 16 characters usi...

Page 286: ...Related Information Store Fax Numbers Set up Groups for Broadcasting 280 ...

Page 287: ...to store the number Press OK d Enter the name up to 16 characters using the dial pad Press OK e Confirm the fax or telephone number Press OK f Select Complete Press OK 3 Press Stop Exit MFC J680DW MFC J880DW 1 Press Fax Call History Outgoing Call 2 Press a or b to display the number you want to store and then press it 3 Press Edit Add to Address Book Name To delete the number from the Outgoing Cal...

Page 288: ...1 Yes to confirm c Select the two digit Speed Dial code where you want to store the number Press OK d Enter the name up to 16 characters using the dial pad Press OK e Confirm the fax or telephone number Press OK f Select Complete Press OK 3 Press Stop Exit MFC J680DW MFC J880DW 1 Press Fax Call History Caller ID history 2 Press a or b to display the name or number you want to store and then press ...

Page 289: ...t Fax Tel and then press OK Enter the fax or telephone number up to 20 digits Press OK How to change the stored name or number To change a character press d or c to position the cursor to under the character you want to change and then press Clear Enter the new character 5 Press a or b to select Complete and then press OK to finish 6 Press Stop Exit MFC J680DW MFC J880DW 1 Press Fax Address Book E...

Page 290: ...hscreen Press OK How to change the stored name or number To change a character press d or c to position the cursor to highlight the character you want to change and then press Enter the new character 5 Press OK to finish 6 Press Related Information Store Fax Numbers 284 ...

Page 291: ...rs using the dial pad and then press OK d To add numbers to the Group repeat the following steps i Select Add Number Press OK ii Select Alphabetical Order or Numerical Order Press OK iii Select a number from the list Press OK e Select Complete to save your Group Press OK To store another Group for broadcasting repeat these steps 4 Press Stop Exit MFC J680DW MFC J880DW First you must store each fax...

Page 292: ... Change a Group Name Delete a Group Add or Delete Group Members Send the Same Fax to More than One Recipient Broadcasting Store Address Book Numbers 286 ...

Page 293: ... stored name To change a character press d or c to position the cursor to under the incorrect character and then press Clear Enter the new character d Select Complete Press OK 4 Press Stop Exit MFC J680DW MFC J880DW 1 Press Fax Address Book Edit Change 2 Press a or b to display the Group you want to change and then press it 3 Press Name 4 Enter the new Group name up to 16 characters using the Touc...

Page 294: ...t Setup Groups and then press OK 3 Press a or b to select the following a Select the Group to delete Press OK b Select Delete Press OK 4 Press 1 Yes to confirm 5 Press Stop Exit MFC J680DW MFC J880DW 1 Press Fax Address Book Edit Delete 2 Press a or b to display the Group you want to delete and then press it 3 Press OK 4 When the Touchscreen displays Erase this data press Yes 5 Press Related Infor...

Page 295: ... OK c Select a number from the list Press OK To delete a number from the Group do the following steps a Select a number to delete Press OK b Press 1 to confirm 5 Press a or b to select Complete and then press OK 6 Press Stop Exit MFC J680DW MFC J880DW 1 Press Fax Address Book Edit Change 2 Press a or b to display the Group you want to change and then press it 3 Press a or b to display Add Delete a...

Page 296: ...External Devices Telephone Services and External Devices Distinctive Ring Caller ID FaxAbility Voice Over Internet Protocol VoIP Telephone Line Interference External TAD Telephone Answering Device External and Extension Telephones 290 ...

Page 297: ...nge the receive mode from Manual mode while the Distinctive Ring is set to on How does your telephone company s Distinctive Ring service work Using Distinctive Ring service of your telephone company is the most efficient way to receive both fax and telephone calls on the same line When the voice call comes in all phones extension and external and the fax machine will ring to alert you to pick it u...

Page 298: ... You can switch it off temporarily then turn it back on When you get a new fax number make sure you reset this function The machine will answer only calls to the Distinctive Ring number Related Information Telephone Services and External Devices Turn on Distinctive Ring Turn off Distinctive Ring Settings Screen Overview Choose the Correct Receive Mode 292 ...

Page 299: ...ve mode is automatically set to Manual Unless you have a TAD or Voice Mail set up on the Distinctive Ring number Manual mode means you must answer all the calls yourself You cannot change the receive mode to another mode while the Distinctive Ring is set to on When Distinctive Ring is on the Touchscreen will show D R as the Receive Mode MFC J480DW MFC J680DW MFC J880DW MFC J480DW 1 Press Settings ...

Page 300: ...g a Select Fax Press OK b Select Miscellaneous Press OK c Select Distinctive Press OK d Select Off Press OK 3 Press Stop Exit When you turn off Distinctive Ring the machine will stay in Manual mode You must set the Receive Mode again MFC J680DW MFC J880DW 1 Press Settings All Settings Fax Miscellaneous Distinctive 2 Press Off 3 Press When you turn off Distinctive Ring the machine will stay in Manu...

Page 301: ...he call came from outside your caller ID service area or a public phone Depends on network function If ID Withheld appears on the display it means the caller intentionally blocked the transmission of his her ID Depends on network function The Caller ID is Stored in Your Machine Memory The machine can store a maximum of the last 30 incoming caller IDs in the memory along with the time and date of r...

Page 302: ...service varies with different carriers Call your local phone company to determine the kind of service available in your area Related Information Telephone Services and External Devices Store Address Book Numbers from Caller ID History Print a Report Error and Maintenance Messages 296 ...

Page 303: ...ut the higher cost of a second line How Does FaxAbility Work For example Your telephone number will have the standard ring pattern of long long tone while the new number will have a ring pattern of long silence long When FaxAbility is On you will not hear the first ring of all incoming calls on the fax machine Extension phones will ring as usual If the fax machine recognises the ring pattern all r...

Page 304: ...FC J880DW MFC J480DW 1 Press Settings 2 Press a or b to select the following a Select Fax Press OK b Select Miscellaneous Press OK c Select FaxAbility Press OK d Select On or Off to set FaxAbility Press OK If you have FaxAbility service select On e Select Call Waiting Press OK f Select On or Off to set Call Waiting Press OK If you have Call Waiting service select On to avoid the trouble caused by ...

Page 305: ...nected to a modem phone adapter splitter or other such device If you have questions about how to connect your machine to the VoIP system please contact your VoIP provider After you have connected your machine to the VoIP system check for a dial tone Lift the external telephone s handset and listen for a dial tone If there is no dial tone please contact your VoIP provider If you are having problems...

Page 306: ... must answer within two rings we recommend setting it to two rings This is because your machine cannot hear the CNG tones until the external TAD has picked up the call The sending machine will send CNG tones for only eight to ten seconds longer We do not recommend using the toll saver feature on your external TAD if it needs more than four rings to activate it 1 1 2 Protective Cap 1 TAD 2 Example ...

Page 307: ...MFC J880DW 1 Set your external TAD to one or two rings The machine s Ring Delay setting does not apply 2 Record the outgoing message on your external TAD 3 Set the TAD to answer calls 4 Set the Receive Mode on your machine to External TAD Related Information External TAD Telephone Answering Device Receive Modes Choose the Correct Receive Mode Telephone and Fax problems 301 ...

Page 308: ...ds of silence at the beginning of your message This allows your machine time to listen for fax tones We recommend beginning your OGM with an initial five second silence because the machine cannot hear fax tones over a loud voice You may try leaving out this pause but if your machine has trouble receiving faxes then you should re record the OGM to include it 2 Limit your speaking to 20 seconds Rela...

Page 309: ...y appear to work with a particular model of fax machine we cannot guarantee that the unit will operate correctly While it is often relatively simple to connect a fax machine to a PABX Private Automatic Branch Exchange we suggest that you contact the company that installed your telephone system and ask them to connect the fax machine for you Brother does not recommend the use of a PABX line PABX li...

Page 310: ...xternal Devices External and Extension Telephones External and Extension Telephones Connect an External or Extension Telephone Operation from External and Extension Telephones Use a Cordless External Telephone Use the Remote Codes 304 ...

Page 311: ...one Connect an External or Extension Telephone Related Models MFC J480DW MFC J680DW MFC J880DW You can connect a separate telephone to your machine as shown in the diagram below 3 1 Extension telephone 2 External telephone 3 Protective Cap 1 2 Example for Australia Related Information External and Extension Telephones 305 ...

Page 312: ...he machine answers a voice call and pseudo double rings for you to take over you can take the call at an extension telephone by pressing the Remote Deactivation Code 51 91 for New Zealand If you answer a call and no one is on the line You should assume that you re receiving a manual fax Press 51 91 for New Zealand and wait for the chirp or until the LCD shows Receiving and then hang up You can als...

Page 313: ...ne Use a Cordless External Telephone Related Models MFC J480DW MFC J680DW MFC J880DW Once the base unit of the cordless telephone has been connected to the same telephone line as the machine you can answer calls on the cordless handset during the Ring Delay Related Information External and Extension Telephones 307 ...

Page 314: ...ive the fax by pressing the Start button and then selecting the option to receive Remote Deactivation Code If you receive a voice call and the machine is in F T mode it will start to sound the F T ring pseudo double ring after the initial Ring Delay If you pick up the call on an extension telephone you can turn the F T ring off by pressing 51 91 for New Zealand make sure you press this between the...

Page 315: ...llowing a Select Fax Press OK b Select Setup Receive Press OK c Select Remote Codes Press OK d Select On Press OK To turn off the Remote Codes select Off Press OK 3 Enter the new Remote Activation Code Press OK 4 Enter the new Remote Deactivation Code Press OK 5 Press Stop Exit MFC J680DW MFC J880DW 1 Press Settings All Settings Fax Setup Receive Remote Codes 2 Do one of the following To change th...

Page 316: ...es sent and whether or not the transmission was successful Set the Fax Journal s Interval Period You can set the machine to print a Fax Journal at specific intervals every 50 faxes 6 12 or 24 hours 2 or 7 days Print Reports Set the Machine to Power Off Automatically The Auto Power Off feature can save power consumption Set the amount of time that the machine will be in Sleep Mode before it automat...

Page 317: ...C J880DW MFC J480DW 1 Press Settings 2 Press a or b to select the following a Select Fax Press OK b Select Report Setting Press OK c Select XMIT Report Press OK d Select the option you want Press OK If you select On Image or Off Image the image will not appear on the Transmission Verification Report if Real Time Transmission is set to On The image will not appear on the report when you send a colo...

Page 318: ...re it is due to print you can print it without erasing the jobs Every 50 Faxes The machine will print the Journal when the machine has stored 50 fax jobs 4 If you selected 6 12 24 hours 2 or 7 days enter the time of day using the dial pad Press OK Enter the time in the same time format as your machine s date and time setting 12 hour format or 24 hour format 5 If you selected Every 7 Days press a o...

Page 319: ...splay the Every Monday Every Tuesday Every Wednesday Every Thursday Every Friday Every Saturday or Every Sunday option and then press the first day of the seven day countdown 6 Press Related Information Fax Reports Set the Machine to Power Off Automatically 313 ...

Page 320: ... FAX PC FAX PC FAX for Windows PC FAX for Macintosh Use Brother s PC FAX software to send faxes directly from your Macintosh without printing them This feature helps reduce your paper consumption and save time 314 ...

Page 321: ...r consumption and save time by using Brother s PC FAX software to send faxes directly from your machine Send a Fax Using PC FAX Windows Receive Faxes on Your Computer Windows Use Brother s PC FAX software to receive faxes on your computer screen them and print only those faxes you want 315 ...

Page 322: ...ing Brother s PC FAX software to send faxes directly from your machine Configure PC FAX Windows Before sending faxes using PC FAX personalise the send options in each tab of the PC FAX Setup dialog box Configure your PC Fax Address Book Windows Add edit and delete members and groups to personalise your Brother Address Book 316 ...

Page 323: ...ties and then click the drop down list and select your model name if not already selected Click PC FAX in the left navigation bar and then click Setup Sending The PC FAX Setup dialog box appears 2 Do one of the following Click the User Information tab and then type your user information in the fields Each Microsoft account can have its own customised User Information screen for custom fax headers ...

Page 324: ...Related Information PC FAX Overview Windows 318 ...

Page 325: ...Brother PC Fax software Create a Group in the Address Book Windows Create a group to broadcast the same PC FAX to several recipients at one time Edit Member or Group Information Windows Delete a Member or Group Windows Export the Address Book Windows You can export the Address Book as an ASCII text file csv a vCard an electronic business card or Remote Setup Dial Data and save it on your computer ...

Page 326: ...e 1 Do one of the following Windows XP Windows Vista and Windows 7 Click Start All Programs Brother Brother Utilities Click the drop down list and select your model name if not already selected Click PC FAX in the left navigation bar and then click Address Book Send Windows 8 Click Brother Utilities and then click the drop down list and select your model name if not already selected Click PC FAX i...

Page 327: ...3 Type the member s information in the corresponding fields Only the Name field is required 4 Click OK Related Information Configure your PC Fax Address Book Windows 321 ...

Page 328: ...llowing Windows XP Windows Vista and Windows 7 Click Start All Programs Brother Brother Utilities Click the drop down list and select your model name if not already selected Click PC FAX in the left navigation bar and then click Address Book Send Windows 8 Click Brother Utilities and then click the drop down list and select your model name if not already selected Click PC FAX in the left navigatio...

Page 329: ...le Names field select each name you want to include in the group and then click Add Members added to the group appear in the Group Members box 5 When finished click OK Each group can contain up to 50 members Related Information Configure your PC Fax Address Book Windows 323 ...

Page 330: ... the drop down list and select your model name if not already selected Click PC FAX in the left navigation bar and then click Address Book Send Windows 8 Click Brother Utilities and then click the drop down list and select your model name if not already selected Click PC FAX in the left navigation bar and then click Address Book Send The Address Book dialog box appears 2 Select the member or group...

Page 331: ...op down list and select your model name if not already selected Click PC FAX in the left navigation bar and then click Address Book Send Windows 8 Click Brother Utilities and then click the drop down list and select your model name if not already selected Click PC FAX in the left navigation bar and then click Address Book Send The Address Book dialog box appears 2 Select the member or group you wa...

Page 332: ...ot already selected Click PC FAX in the left navigation bar and then click Address Book Send Windows 8 Click Brother Utilities and then click the drop down list and select your model name if not already selected Click PC FAX in the left navigation bar and then click Address Book Send The Address Book dialog box appears 2 Click the File menu and then select Export 3 Select one of the following Text...

Page 333: ...them listed 5 If you are exporting to an ASCII file under the Divide Character section select the Tab or Comma option to separate the data fields 6 Click OK 7 Browse to the folder on your computer where you want to save the data type the file name and then click Save Related Information Configure your PC Fax Address Book Windows 327 ...

Page 334: ...ther Utilities Click the drop down list and select your model name if not already selected Click PC FAX in the left navigation bar and then click Address Book Send Windows 8 Click Brother Utilities and then click the drop down list and select your model name if not already selected Click PC FAX in the left navigation bar and then click Address Book Send The Address Book dialog box appears 2 Click ...

Page 335: ...xt file 5 If you are importing an ASCII file under the Divide Character section select the Tab or Comma option to separate the data fields 6 Click OK 7 Browse to the folder where you want to import the data type the file name and then click Open Related Information Configure your PC Fax Address Book Windows 329 ...

Page 336: ...ng methods Click the numbers on the dial pad to type the number and then click Add Send Address If you select the Dial Restriction check box a confirmation dialog box will appear for you to re type the fax number using the keyboard This feature helps to prevent transmissions to the wrong destination Click the Address Book button and then select a member or group from the Address Book If you make a...

Page 337: ...e to receive faxes on your computer screen them and print only those faxes you want Receive Faxes Using PC FAX Receive Windows Brother s PC FAX Receive software lets you view and store faxes on your computer It is automatically installed when you install the Brother software and drivers and works on locally or network connected machines 331 ...

Page 338: ...ax to your computer When you turn off your computer your machine will continue to receive and store faxes in your Brother machine s memory The machine s LCD will display the number of stored faxes received When you start this application the software will transfer all received faxes to your computer at once You can enable the Backup Print option if you want the machine to print a copy of the fax b...

Page 339: ...a and Windows 7 Click Start All Programs Brother Brother Utilities Click the drop down list and select your model name if not already selected Click PC FAX in the left navigation bar and then click Receive Windows 8 Click Brother Utilities and then click the drop down list and select your model name if not already selected Click PC FAX in the left navigation bar and then click Receive 2 Confirm th...

Page 340: ...puter task tray The PC FAX Receive window appears 2 Click Settings 3 Configure these options as needed Preferences Configure to start PC FAX Receive automatically when you start Windows Save Configure the path to save PC FAX files and select the received document format Device Select the Brother machine that you want to receive PC FAX Lock available only for Administrators Restrict users who do no...

Page 341: ...achine following the instructions for a network user then the machine should already be configured for your network 1 Double click the PC FAX Receive icon in your computer task tray The PC FAX Receive window appears 2 Click Settings 3 Click Device Add 4 Select the appropriate connection method Select your machine from the automatic search results below Connected Brother machines will be displayed ...

Page 342: ... computer name that will appear on the machine s LCD type the new name in the Enter your PC display name Max 15 Characters field 6 Click OK Related Information Run Brother s PC FAX Receive on Your Computer Windows 336 ...

Page 343: ...ed Models MFC J480DW MFC J680DW MFC J880DW Receiving Status Icon Indicated Status Standby mode No unread messages Receiving messages Messages received Unread messages 1 Double click the PC FAX Receive icon in your computer task tray The PC FAX Receive window appears 2 Click any faxes in the list to view them 3 When finished click in the right top corner of the window to close it 337 ...

Page 344: ...AX Receive is active and the PC FAX Receive icon will remain in your computer task tray To close PC FAX Receive click the icon in the computer task tray and click Close Related Information Receive Faxes Using PC FAX Receive Windows 338 ...

Page 345: ...intosh PC FAX for Macintosh Use Brother s PC FAX software to send faxes directly from your Macintosh without printing them This feature helps reduce your paper consumption and save time Send Faxes from Your Application Macintosh 339 ...

Page 346: ...colour and the receiving fax machine supports colour faxes 1 Create a document in a Macintosh application 2 From an application such as Apple TextEdit click the File menu and then select Print 3 Click the application pop up menu and then select the Send Fax option 4 Click the Output pop up menu and then select the Facsimile option 5 Type a fax number in the Input Fax Number field and then click Ad...

Page 347: ...click the Add button after entering the first fax number and type the next fax number The destination fax numbers will be listed in the Destination Fax Numbers field 6 Click Print to send the fax Related Information PC FAX for Macintosh 341 ...

Page 348: ...lash drive When your machine is connected to a computer you can use your computer to access a memory card or USB flash drive inserted in the front of the machine Copy Photos from Media to a Computer If you would like to copy photos stored in a memory card or USB flash drive to a folder on your computer follow the steps for your connection type and Operating System Print Photos from ControlCenter4 ...

Page 349: ...ectly to a memory card or USB flash drive When your machine is connected to a computer you can use your computer to access a memory card or USB flash drive inserted in the front of the machine Compatible Memory Cards and USB Flash Drives Your Brother machine has media drives slots for use with common data storage and digital camera media Important Information about PhotoCapture Center Print Photos...

Page 350: ...al cameras that use the USB mass storage standard Other USB devices are not supported MFC J680DW MFC J880DW Compatible Memory Cards Slot USB flash drive USB slot DCP J562DW MFC J680DW MFC J880DW Compatible Memory Cards Slot Memory Stick Duo Memory Stick PRO Duo Upper slot Memory Stick Micro M2 Adapter required SD Memory Card SDHC Memory Card SDXC Memory Card MultiMediaCard MultiMediaCard plus Lowe...

Page 351: ...lowing When printing an index or image the PhotoCapture Center will print all the valid images even if one or more images have been corrupted Corrupted images will not be printed Memory card users Your machine is designed to read memory cards that have been formatted by a digital camera When a digital camera formats a memory card it creates a special folder into which it copies image data If you m...

Page 352: ...ing Print ID Photos Select a photo stored in a memory card or USB flash drive and print ID photos for your resume passport and so on You can print four ID photos on one sheet of paper and crop large images to preset sizes Print Photos from Media in Digital Print Order Format DPOF Major digital camera manufacturers Canon Inc Eastman Kodak Company FUJIFILM Corporation Panasonic Corporation and Sony ...

Page 353: ...ile size is 2 GB or more the shooting time is about 60 minutes they are too large to be printed If the movie file for a divided scene is corrupted the part for that scene will be blank 1 Open the media slot cover 2 Put the memory card or USB flash drive in the correct slot 3 Press Photo View Photos 4 Press d or c to display the photo you want to print and then press it If you want to print all the...

Page 354: ...s that your digital camera or computer has used to identify the pictures Only file names that are 20 characters or less will be printed correctly on the index sheet File names cannot be printed correctly if they contain non alphanumeric characters but non alphanumeric characters do not affect PhotoCapture Center settings 1 Open the media slot cover 2 Put the memory card or USB flash drive in the c...

Page 355: ...he image numbers press OK Enter multiple numbers at one time using a comma or a hyphen For example enter 1 3 6 to print images No 1 No 3 and No 6 Print a range of images using a hyphen For example enter 1 5 to print images No 1 to No 5 Enter up to 12 characters including commas and hyphens for the image numbers you want to print 5 Enter the number of copies in one of the following ways Press or on...

Page 356: ... and then press OK 6 Press the effect you want to add and then press OK There are 10 ways to add effects to your photo Option Description Auto Correct The machine decides the appropriate effect for your photo Enhance Skin Use for adjusting portrait photographs It adjusts skin colour Press d or c to adjust the level of contrast Enhance Scenery Use for adjusting landscape photographs It highlights g...

Page 357: ...rn to the list of effects If your photo is very small or has irregular proportions the Touchscreen displays Image Too Small or Image Too Long You may not be able to crop or enhance the photo 7 Enter the number of copies in one of the following ways Press or on the Touchscreen Press to display the keyboard on the Touchscreen and then enter the number of copies using the Touchscreen keyboard Press O...

Page 358: ...es 4 Press a photo thumbnail 5 Press Crop and then press OK 6 Adjust the red frame to surround the portion of the photo you want to print Press or to enlarge or reduce the frame size Press a b d or c to move the position of the frame Press to rotate the frame When finished press OK If your photo is very small or has irregular proportions the Touchscreen displays Image Too Small or Image Too Long Y...

Page 359: ...dia slot cover 2 Put the memory card or USB flash drive in the correct slot 3 Press Photo ID Photo Print 4 Press d or c to display the photo you want and then press it 5 Press a or b to adjust the size of the crop you want and then press it The machine crops the photo to the selected size To crop to a different size repeat these steps 6 Confirm the displayed image Rotate the image if needed by pre...

Page 360: ... Memory Stick PRO Duo SD Memory Card SDHC Memory Card SDXC Memory Card MultiMediaCard or MultiMediaCard plus containing DPOF information is put into your machine you can print the selected image A DPOF File error can occur if the print order that was created on the camera has been corrupted Delete and recreate the print order using your camera to correct this problem For instructions on how to del...

Page 361: ...int the whole image change this setting to Off If you set the Cropping setting to Off set the Borderless setting to Off also Cropping On Cropping Off 1 Open the media slot cover 2 Put the memory card or USB flash drive in the correct slot 3 Press Photo View Photos 4 Press d or c to display each photo When the photo you want is displayed press it and then press OK 5 Press OK 6 Press Print Settings ...

Page 362: ...a to the edges of the paper Printing time will be slower 1 Open the media slot cover 2 Put the memory card or USB flash drive in the correct slot 3 Press Photo View Photos 4 Press d or c to display each photo When the photo you want is displayed press it and then press OK 5 Press OK 6 Press Print Settings Borderless 7 Press On or Off 8 When finished press or OK 9 Press Start Related Information Pr...

Page 363: ...e this setting the photo must include the date The Digital Print Order Format DPOF setting on your camera must be turned off to use the Print Date feature 1 Open the media slot cover 2 Put the memory card or USB flash drive in the correct slot 3 Press Photo View Photos 4 Press d or c to display each photo When the photo you want is displayed press it and then press OK 5 Press OK 6 Press Print Sett...

Page 364: ... is selected View Photos and Slide Show only Set the machine to decide the appropriate effect for your photo Images that are very small or very elongated may not be corrected Brightness Does not appear when Enhance is selected Adjust the brightness Contrast Does not appear when Enhance is selected Adjust the contrast Increasing the contrast will make an image look sharper and more vivid Colour Enh...

Page 365: ...n Print Photos from Media Using the Photo Button on the Brother Machine Enhance Photos Using Advanced Editing Options Preview and Print Photos and Movie Files from Media Print Photos by Image Number Print Photos with Custom Cropping Print Photos from Media in Digital Print Order Format DPOF 359 ...

Page 366: ...uter follow the steps for your connection type and Operating System Before Copying Photos Copy Photos from Media Over a Local Connection You can copy photos from media to your computer when it is locally connected via USB to your machine Copy Photos from Media Over a Network Connection You can copy photos from media to your computer when it is connected to the machine using a Network connection 36...

Page 367: ...uter with a memory card or USB flash drive in the media drive of the machine You could lose your data or damage the media The PhotoCapture Center will read only the media that was put in first While the machine is printing from the PhotoCapture Center your computer cannot access the PhotoCapture Center for any other operation Related Information Copy Photos from Media to a Computer 361 ...

Page 368: ...mputer screen 4 You can edit a file and save it to another drive on your computer 5 Quit all applications that are running stored data on the memory card or USB flash drive 6 Do one of the following Windows In Windows Explorer right click the removable disk icon and select Eject Macintosh Drag the removable disk icon into the Trash icon 7 Wait until the LCD message disappears before removing the m...

Page 369: ...a using the FTP protocol and the network Host Name of the machine 4 Click the name of the file you want to copy and save it to your computer NOTE When saving files certain characters or symbols may cause a problem accessing the file We recommend using combinations of these characters in a file name 5 Close the web browser 6 Wait until the LCD message disappears before removing the media IMPORTANT ...

Page 370: ...tra sheet of the same photo paper in the paper tray 2 Click the ControlCenter4 icon in the task tray and then click Open 3 Do one of the following If you are using Advanced Mode click the Photo tab and then click the Photo Print button If you are using Home Mode click the Photo tab 4 Select the folder that contains the image you want to print Option Description My CC4 Folder The My CC4 Folder butt...

Page 371: ...Media Type and Layout options 10 Click the Properties button to configure the Print Quality Colour Greyscale and Colour Mode options if needed To print the image s timestamp in the lower right corner of the image select the Print Date check box 11 To change other printer settings click the Print Options button For Advanced Mode only 12 Click OK 13 Click the Preview button to view the image on scre...

Page 372: ... The edited image reverts to its original state Fit to Window Set the zoom level so that the image fits the window Zoom In Zoom Out Enlarge or reduce the selected image Rotate Counterclockwise Rotate Clockwise Rotate the image by 90 degrees clockwise or counter clockwise Previous Next Display the previous or next image 3 Trimming This feature allows you to remove unwanted areas from your photos 4 ...

Page 373: ...Enhancement Nature Scene Select this option to enhance natural colours such as green and blue Night Scene Select this option to optimise the image adjustments for a night scene photo Soft Light Select this option to soften bright edges Related Information Print Photos from ControlCenter4 Windows 367 ...

Page 374: ...ork and explains some useful network features of your Brother machine Network Management Software and Utilities Configure and change your Brother machine s network settings using a management utility Additional Methods of Configuring Your Brother Machine for a Wireless Network To connect your machine to your wireless network we recommend using the Installation CD ROM Advanced Network Features Tech...

Page 375: ...mation on network connection types introduces various methods to manage your network and explains some useful network features of your Brother machine Supported Basic Network Features The print server supports various features depending on the operating system Use this chart to see what network features and connections are supported by each operating system 369 ...

Page 376: ...odels 1 Yes Photo Capture available only for certain models Yes Yes BRAdmin Light 2 Yes Yes Yes BRAdmin Professional 3 3 Yes Yes Remote Setup available only for certain models 1 Yes Yes Status Monitor Yes Yes Driver Deployment Wizard Yes Yes Vertical Pairing Windows 7 and Windows 8 only Yes Go to your model s Downloads page on the Brother Solutions Center at http support brother com to download th...

Page 377: ...nd Utilities Network Management Software and Utilities Configure and change your Brother machine s network settings using a management utility Learn about Network Management Software and Utilities Change Machine Settings from Your Computer 371 ...

Page 378: ...firmware from a Windows computer on your LAN BRAdmin Professional 3 can also log activity of Brother devices on your network and export the log data in an HTML CSV TXT or SQL format Go to your model s Downloads page on the Brother Solutions Center at http support brother com to download the latest version of Brother s BRAdmin Professional 3 utility Node name The node name appears in the current BR...

Page 379: ... for a Wireless Network Configure Your Machine for a Wireless Network Using the One Push Method of Wi Fi Protected Setup WPS or AOSS Configure Your Machine for a Wireless Network Using the PIN Method of Wi Fi Protected Setup WPS Configure Your Machine for a Wireless Network in Ad Hoc Mode Using a New SSID You must connect to a new SSID from your computer when it is configured for Ad Hoc mode Confi...

Page 380: ...reless may not be the best method of connection for all types of documents and applications If you are printing large files such as multi page documents with mixed text and large graphics you may want to consider selecting wired Ethernet for faster data transfer supported models only or USB for the fastest throughput speed Although the Brother machine can be used in both a wired and wireless netwo...

Page 381: ...llowing a Select Network Press OK b Select WLAN Press OK c Select WPS AOSS Press OK 3 When Enable WLAN appears press OK This will start the wireless setup wizard To cancel press Stop Exit 4 When the LCD instructs you to start WPS or AOSS press the WPS or AOSS button on your wireless access point router Then press OK on your machine Your machine will automatically detect which mode WPS or AOSS your...

Page 382: ...ur wireless access point router uses and try to connect to your wireless network If your wireless device is connected successfully the LCD displays Connected For Windows You have completed the wireless network setup Use the Brother Installation CD ROM to install drivers and software necessary for operating your device For Macintosh You have completed the wireless network setup Go to your model s D...

Page 383: ... Wi Fi Alliance By submitting a PIN created by an Enrollee your machine to the Registrar a device that manages the wireless LAN you can set up the wireless network and security settings For more information on how to access WPS mode see the instructions provided with your wireless access point router Type A Connection when the wireless LAN access point router 1 doubles as Registrar 1 Type B Connec...

Page 384: ...s 8 computer as a Registrar you must register it to your network in advance For more information see the instructions supplied with your wireless LAN access point router If you use Windows 7 or Windows 8 as a Registrar you can install the printer driver after the wireless configuration by following the on screen instructions To install the full driver and software package use the Brother Installat...

Page 385: ... computer as a Registrar you must register it to your network in advance For more information see the instructions supplied with your wireless LAN access point router If you use Windows 7 or Windows 8 as a Registrar you can install the printer driver after the wireless configuration by following the on screen instructions To install the full driver and software package use the Brother Installation...

Page 386: ... press OK 8 If you selected the WEP option for Encryption type enter the WEP key and then press OK Your Brother machine supports the use of the first WEP key only 9 To apply the settings press 1 to select Yes To cancel press 2 10 The machine will attempt to connect to the wireless device you have selected If your wireless device is connected successfully the machine s LCD displays Connected For Wi...

Page 387: ...f your wireless device is connected successfully the LCD displays Connected For Windows You have completed the wireless network setup Use the Brother Installation CD ROM to install drivers and software necessary for operating your device For Macintosh You have completed the wireless network setup Go to your model s Downloads page on the Brother Solutions Center at http support brother com to insta...

Page 388: ...pported for WPA PSK only For example Network Name SSID HELLO Communication Mode Authentication Method Encryption Mode Network Key Infrastructure WPA2 PSK AES 12345678 If your router uses WEP encryption enter the key used as the first WEP key Your Brother machine supports the use of the first WEP key only 2 Press Settings 3 Press a or b to select the following a Select Network Press OK b Select WLA...

Page 389: ...ation CD ROM to install drivers and software necessary for operating your device For Macintosh You have completed the wireless network setup Go to your model s Downloads page on the Brother Solutions Center at http support brother com to install drivers and software necessary for operating your device DCP J562DW MFC J680DW MFC J880DW Before configuring your machine we recommend writing down your w...

Page 390: ... option press either TKIP AES or AES Enter the WPA key and then press OK For more information about how to enter text see the Appendix Your Brother machine supports the use of the first WEP key only 10 To apply the settings press Yes To cancel press No 11 The machine will attempt to connect to the wireless device you have selected If your wireless device is connected successfully the LCD displays ...

Page 391: ...ess Network Use Wi Fi Direct Use Wi Fi Direct Print or Scan from Your Mobile Device Using Wi Fi Direct Configure Your Wi Fi Direct Network Configure your Wi Fi Direct network settings from your machine s control panel I Cannot Complete the Wireless Network Setup Configuration 385 ...

Page 392: ... iPrint Scan from Google Play Store app Android Market or the App Store For more information see the Mobile Print Scan Guide for Brother iPrint Scan Go to your model s Manuals page on the Brother Solutions Center at http support brother com to download the guide 1 2 1 Mobile device 2 Your Brother machine Although the Brother machine can be used in both a wired supported models only and wireless ne...

Page 393: ...following instructions offer five methods for configuring your Brother machine in a wireless network environment Select the method you prefer for your environment Configure Your Wi Fi Direct Network Using the One Push Method Configure Your Wi Fi Direct Network Using the One Push Method and Wi Fi Protected Setup WPS Configure Your Wi Fi Direct Network Using the PIN Method Configure Your Wi Fi Direc...

Page 394: ... Yes Go to Step 4 No See Related Information Configure Your Wi Fi Direct Network Manually 4 Does your mobile device support one push configuration for Wi Fi Protected Setup WPS Option Description Yes See Related Information Configure Your Wi Fi Direct Network Using the One Push Method and Wi Fi Protected Setup WPS No See Related Information Configure Your Wi Fi Direct Network Using the PIN Method ...

Page 395: ...achine is not the G O it will display available device names with which to configure a Wi Fi Direct network Select the mobile device to which you want to connect and press OK Search for available devices again by selecting Rescan 6 If your mobile device connects successfully the machine displays Connected You have completed the Wi Fi Direct network setup For more information on printing from or sc...

Page 396: ...ile device connects successfully the machine displays Connected You have completed the Wi Fi Direct network setup For more information on printing from or scanning to your mobile device download the Mobile Print Scan Guide for Brother iPrint Scan or the AirPrint Guide from your model s Manuals page on the Brother Solutions Center at http support brother com Related Information Configure Your Wi Fi...

Page 397: ... Activate Wi Fi Direct on other device Then press OK appears Press OK on your Brother machine This will start the Wi Fi Direct setup 5 If your mobile device connects successfully the machine displays Connected You have completed the Wi Fi Direct network setup For more information on printing from or scanning to your mobile device download the Mobile Print Scan Guide for Brother iPrint Scan or the ...

Page 398: ...nformation on printing from or scanning to your mobile device download the Mobile Print Scan Guide for Brother iPrint Scan or the AirPrint Guide from your model s Manuals page on the Brother Solutions Center at http support brother com Related Information Configure Your Wi Fi Direct Network Wi Fi Direct Network Configuration Overview 392 ...

Page 399: ...e in the machine Press OK Follow the instructions and go to next step If the PIN is displayed on your Brother machine enter the PIN in your mobile device When your Brother machine is not the G O Group Owner it will display available device names with which to configure a Wi Fi Direct network Select the mobile device to which you want to connect and press OK Search for available devices again by se...

Page 400: ... Direct network Select the mobile device to which you want to connect and press OK Search for available devices again by pressing Rescan Do one of the following Press Display PIN Code to display the PIN on your machine and enter the PIN in your mobile device Follow the instructions and then go to next step Press Input PIN Code to enter a PIN shown on your mobile device in the machine and then pres...

Page 401: ...er machine This will start the Wi Fi Direct setup 5 The machine will wait for a connection request from your mobile device When PIN Code appears enter the PIN displayed on your mobile device in the machine Press OK 6 If your mobile device connects successfully the machine displays Connected You have completed the Wi Fi Direct network setup For more information on printing from or scanning to your ...

Page 402: ...ne displays Connected You have completed the Wi Fi Direct network setup For more information on printing from or scanning to your mobile device download the Mobile Print Scan Guide for Brother iPrint Scan or the AirPrint Guide from your model s Manuals page on the Brother Solutions Center at http support brother com Related Information Configure Your Wi Fi Direct Network Wi Fi Direct Network Confi...

Page 403: ...on on printing from or scanning to your mobile device download the Mobile Print Scan Guide for Brother iPrint Scan or the AirPrint Guide from your model s Manuals page on the Brother Solutions Center at http support brother com DCP J562DW MFC J680DW MFC J880DW If your mobile device does not support Wi Fi Direct or WPS you must configure a Wi Fi Direct network manually 1 Press Settings All Settings...

Page 404: ...twork Advanced Network Features Advanced Network Features Print the Network Configuration Report The Network Configuration Report lists the network configuration including the network print server settings 398 ...

Page 405: ...Address on the report for example IP address 192 168 0 5 Subnet mask 255 255 255 0 Node name BRN000ca0000499 MAC Address 00 0c a0 00 04 99 MFC J480DW DCP J562DW MFC J680DW MFC J880DW MFC J480DW 1 Press Settings 2 Press a or b to select the following a Select Print Reports Press OK b Select Network Config Press OK 3 Press the Mono Start or Colour Start button The machine prints the current Network ...

Page 406: ...ry Default You can use your machine s control panel to reset the print server to its default factory settings This resets all information such as the password and IP address Print the WLAN Report The WLAN Report reflects your machine s wireless status If the wireless connection fails check the error code on the printed report 400 ...

Page 407: ...ure restores all wired supported models only and wireless network settings to the factory settings You can also reset the print server to its factory default settings using BRAdmin Light or BRAdmin Professional 3 MFC J480DW DCP J562DW MFC J680DW MFC J880DW MFC J480DW 1 Press Settings 2 Press a or b to select the following a Select Network Press OK b Select Network Reset Press OK 3 Press 1 or a for...

Page 408: ...LAN Report does not print check your machine for errors If there are no visible errors wait for one minute and then start from the first step to try printing the report again DCP J562DW MFC J680DW MFC J880DW 1 Press Settings All Settings Print Reports WLAN Report OK The machine will print the WLAN Report If the WLAN Report does not print check your machine for errors If there are no visible errors...

Page 409: ...ntication methods WPA Personal TKIP or AES WPA2 Personal AES Open WEP or None without encryption Shared key WEP If your problem is not solved the SSID or network settings you entered may be incorrect Confirm the wireless network settings For Ad Hoc Mode change the authentication and encryption methods of your computer for the wireless setting Your machine supports Open authentication only with opt...

Page 410: ...e has the WPS or AOSS method active and try again Try starting again after a few minutes to avoid interference from other access points Related Information Print the WLAN Report My Brother Machine Cannot Print Scan or PC FAX Receive over the Network I Want to Check that My Network Devices are Working Correctly Configure Your Machine for a Wireless Network in Ad Hoc Mode Using a New SSID 404 ...

Page 411: ...e Settings Before turning on the machine s access lock feature make a careful note of your password If you forget the password you must reset all passwords stored in the machine by calling your administrator or Brother customer service 405 ...

Page 412: ...ess lock feature make a careful note of your password If you forget the password you must reset all passwords stored in the machine by calling your administrator or Brother customer service About Using Memory Security About Using TX Lock Block unauthorised data transmission to and from the machine 406 ...

Page 413: ...On the following operations are available Receiving faxes into memory limited by memory capacity Fax Forwarding if Fax Forwarding was already On Remote Retrieval if Fax Storage was already On While Memory Security is On the following operations are NOT available Operation from the control panel Printing received faxes PC printing PC Fax Receive Printing with NFC Scanning with NFC To print the faxe...

Page 414: ...odels MFC J880DW Make a careful note of your password 1 Press Settings All Settings Fax Miscellaneous Memory Security 2 Enter a four digit number for the password using the Touchscreen Press OK 3 When the Touchscreen displays Verify re enter the password using the Touchscreen Press OK 4 Press Related Information About Using Memory Security 408 ...

Page 415: ... Settings Fax Miscellaneous Memory Security Set Password 2 Enter the registered four digit number for the current password using the Touchscreen Press OK 3 Enter a four digit number for a new password using the Touchscreen Press OK 4 When the Touchscreen displays Verify re enter the new password using the Touchscreen Press OK 5 Press Related Information About Using Memory Security 409 ...

Page 416: ...our digit password using the keyboard on the Touchscreen Press OK The machine goes offline and the Touchscreen displays Memory Security Turning off Memory Security a Press Unlock b Enter the current four digit password and then press OK If you enter the wrong password the Touchscreen displays Wrong Password and stays offline The machine will stay in Secure Mode until the correct password is entere...

Page 417: ...680DW Fax Storage If Fax Storage was already On MFC J680DW Remote Retrieval If Fax Storage was already On MFC J680DW PC Fax Receive If PC Fax Receive was already On While the TX Lock feature is turned on your machine will receive faxes and store them in its memory Then when TX Lock is turned off the faxes will be sent to your chosen PC While TX Lock is On the following operations are NOT available...

Page 418: ...Miscellaneous Press OK c Select TX Lock Press OK 3 Enter a four digit number for the password Press OK 4 When the LCD displays Verify re enter the password Press OK 5 Press Stop Exit MFC J680DW 1 Press Settings All Settings Fax Miscellaneous TX Lock 2 Enter a four digit number for the password using the Touchscreen Press OK 3 When the Touchscreen displays Verify re enter the password using the Tou...

Page 419: ...t number of the current password Press OK 4 Enter a four digit number for the new password Press OK 5 When the LCD displays Verify re enter the new password Press OK 6 Press Stop Exit MFC J680DW 1 Press Settings All Settings Fax Miscellaneous TX Lock Set Password 2 Enter the four digit number of the current password using the Touchscreen Press OK 3 Enter a four digit number for the new password us...

Page 420: ... digit password and then press OK If you enter the wrong password the LCD displays Wrong Password and stays offline The machine will stay in TX Lock Mode until the correct password is entered MFC J680DW 1 Press Settings All Settings Fax Miscellaneous TX Lock Set TX Lock 2 Enter the registered four digit password using the Touchscreen Press OK The machine goes offline and the Touchscreen displays T...

Page 421: ...eb Services also manage cloud servers so you can transfer received faxes Print with Google Cloud Print Print with AirPrint Print with Mopria Print and Scan from a Mobile Device Use Brother iPrint Scan to print and scan from various mobile devices Print and Scan Using Near Field Communication NFC Near Field Communication NFC allows for simple transactions data exchange and wireless connections betw...

Page 422: ...m and print images that are already uploaded to these services 1 2 4 3 1 Printing 2 Scanning 3 Photos images documents and other files 4 Web Service The following services can be accessed from your Brother machine Picasa Web Albums Google Drive Flickr Facebook Evernote Dropbox OneNote OneDrive and Box For more information see the Web Connect Guide Go to your model s Manuals page on the Brother Sol...

Page 423: ...rvice 1 Web Service Copy Outlined Area Use a red pen to outline sections of your document and then scan the document The red outlined areas are extracted and printed together Cut Outlined Area Use a red pen to outline sections of your document and then scan the document The red outlined areas are deleted and the remaining information is printed NotePrint and NoteScan Print different types of note ...

Page 424: ...Related Information Mobile Web Connect 418 ...

Page 425: ...unt using a network compatible device such as a mobile phone or computer without installing the printer driver on the device 1 2 3 4 1 Print request 2 Internet 3 Google Cloud Print 4 Printing For more information see the Google Cloud Print Guide Go to your model s Manuals page on the Brother Solutions Center at http support brother com to download the guide Related Information Mobile Web Connect 4...

Page 426: ...rPrint also lets you send faxes directly from your Macintosh computer without printing them 1 2 3 1 Wired or wireless network 2 Telephone line 3 Your Brother machine AirPrint also lets you scan documents to your Macintosh computer without installing a driver on the device requires OS X 10 9 or later For more information see the AirPrint Guide Go to your model s Manuals page on the Brother Solution...

Page 427: ...to the same network as the printer and print without additional setup Many native Android apps including Google Chrome Gmail and Gallery support printing 1 2 3 1 Android 4 4 or later 2 Wi Fi Connection 3 Your Brother machine You must download the Mopria Plug in from the Google Play Store app and install it on your Android device Be sure to turn the service on before using this feature Related Info...

Page 428: ... use features of your Brother machine directly from your iPhone iPod touch iPad and iPad mini Download and install Brother iPrint Scan from the App Store For Windows Phone Devices Brother iPrint Scan allows you to use features of your Brother machine directly from your Windows Phone without using a computer Download and install Brother iPrint Scan from the Windows Phone Store Windows Phone Marketp...

Page 429: ...you can print data photos PDF files text files web pages and email messages from the device or scan photos and documents to the device by touching it to the NFC logo on the machine s control panel You must download and install Brother iPrint Scan to your Android device to use this feature For more information see the Mobile Print Scan Guide for Brother iPrint Scan Go to your model s Manuals page o...

Page 430: ...olCenter Use Brother s ControlCenter software utility to quickly access your frequently used applications Using ControlCenter gives you direct access to specific applications ControlCenter4 Windows ControlCenter2 Macintosh 424 ...

Page 431: ...er the details of your machine s features and allows you to customise one button scan actions Set Up the Brother Machine Using ControlCenter4 Windows Create a Custom Tab Using ControlCenter4 Advanced Mode Windows You can create up to three customised tabs each including up to five customised buttons with your preferred settings Set Up the Brother Machine from Your Computer Windows Set Up Your Brot...

Page 432: ...enter4 Windows Change the Operation Mode in ControlCenter4 Windows ControlCenter4 has two operation modes Home Mode and Advanced Mode You can change modes at any time Home Mode Advanced Mode Home Mode ControlCenter4 Home Mode lets you access your machine s main features easily 426 ...

Page 433: ...ion mode 1 Click the ControlCenter4 icon in the task tray and then select Open 2 Click the Configuration button and then select Mode Select 3 The mode selection dialog box appears Select either the Home Mode or Advanced Mode option 4 Click OK Related Information ControlCenter4 Windows Scan Using ControlCenter4 Home Mode Windows Scan Using ControlCenter4 Advanced Mode Windows 427 ...

Page 434: ...e Mode Windows Use ControlCenter4 Home Mode to access your machine s main features Scan Using ControlCenter4 Home Mode Windows Save Scanned Data to a Folder as a PDF File Using ControlCenter4 Home Mode Windows Scan Settings for ControlCenter4 Home Mode Windows Change the Operation Mode in ControlCenter4 Windows 428 ...

Page 435: ...computer as PDF files Scan Both Sides of an ID Card Using ControlCenter4 Advanced Mode Windows Scan to E mail Attachment Using ControlCenter4 Advanced Mode Windows Send a scanned document as an email attachment Scan to an Editable Text File OCR Using ControlCenter4 Advanced Mode Windows Your machine can convert characters in a scanned document to text data using optical character recognition OCR t...

Page 436: ...W MFC J680DW MFC J880DW 1 Click the ControlCenter4 icon in the task tray and then click Open 2 Click the Device Settings tab 3 Click the Remote Setup button 4 Configure the settings as needed Export Click to save the current configuration settings to a file Click Export to save your address book or all settings for your machine Import Click to read the settings from a file 430 ...

Page 437: ...to exit the Remote Setup Program without uploading data to the machine Apply Click to upload data to the machine without exiting the Remote Setup Program 5 Click OK If your computer is protected by a firewall and is unable to use Remote Setup you may need to configure the firewall settings to allow communication through port numbers 137 and 161 If you are using Windows Firewall and you installed t...

Page 438: ...nd then click Open 2 Click the Configuration button and then select Create custom tab A custom tab is created 3 To change the name of a custom tab right click the custom tab and then select Rename custom tab 4 Click the Configuration button select Create custom button and then select the button you want to create The settings dialog box appears 5 Type the button name and then change the settings i...

Page 439: ...Related Information ControlCenter4 Windows 433 ...

Page 440: ...s PDFs or other file formats Set Up the Brother Machine Using ControlCenter2 Macintosh Turn the AutoLoad Feature On Macintosh Turn AutoLoad on to launch ControlCenter2 automatically each time you start your Macintosh Set Up Your Brother Address Book Using ControlCenter2 Macintosh Use Remote Setup through ControlCenter2 to add or change Address Book numbers on your computer 434 ...

Page 441: ...es of an ID Card Using ControlCenter2 Macintosh Scan to E mail Attachment Using ControlCenter2 Macintosh Send a scanned document as an email attachment Scan to an Editable Text File OCR Using ControlCenter2 Macintosh Your machine can convert characters in a scanned document to text data using optical character recognition OCR technology You can edit this text using your preferred text editing appl...

Page 442: ...hine Using ControlCenter2 Macintosh Related Models MFC J480DW MFC J680DW MFC J880DW 1 In the Finder menu bar click Go Applications Brother and then double click the ControlCenter icon The ControlCenter2 screen appears 2 Click the DEVICE SETTINGS tab 3 Click the Remote Setup button The Remote Setup Program screen appears 436 ...

Page 443: ...oaded to the machine Click Apply to upload the new data to the machine and then click Print OK Click to start uploading data to the machine and then exit the Remote Setup Program If an error message appears enter the correct data again and then click OK Cancel Click to exit the Remote Setup Program without uploading data to the machine Apply Click to upload data to the machine without exiting the ...

Page 444: ...automatically each time you start your Macintosh 1 In the Finder menu bar click Go Applications Brother and then double click the ControlCenter icon The ControlCenter2 screen appears 2 Click the Configuration button and then select Preferences 3 Select the Start ControlCenter on computer startup check box 4 Click OK Related Information ControlCenter2 Macintosh 438 ...

Page 445: ... installed correctly The Scanner Cover and the Jam Clear Cover are fully closed Paper is inserted correctly in the paper tray The interface cables are securely connected to the machine and the computer or the wireless connection is set up on both the machine and your computer For network models The access point for wireless router or hub is turned on and its link button is blinking The machine s L...

Page 446: ...can confirm the connection status by printing the Network Configuration Report Absorber NearFull The ink absorber box or flushing box is nearly full The ink absorber box or flushing box must be replaced soon Contact Brother customer service or your local Brother dealer B W Print Only Replace Ink One or more of the colour ink cartridges have reached the end of their lives You can use the machine in...

Page 447: ...top all print operations While memory is available monochrome faxes will be stored in the memory If a sending machine has a colour fax the machine s handshake will ask that the fax be sent as monochrome If the sending machine has the ability to convert it the colour fax will be stored in the memory as a monochrome fax Replace the ink cartridges See Related Information Replace the Ink Cartridges Yo...

Page 448: ...the machine to cool down to room temperature Try again when the machine has cooled down Ink Absorber Full The ink absorber box or flushing box is full These components are periodic maintenance items that may require replacement after a period of time to ensure optimum performance from your Brother machine Because these components are periodic maintenance items the replacement is not covered under ...

Page 449: ... length guide is set to the correct paper size Jam C Rear The paper is jammed in the machine Remove the jammed paper See Related Information Paper is Jammed in the Back of the Machine Jam C Rear Make sure the paper length guide is set to the correct paper size Paper dust has accumulated on the surface of the paper pick up rollers Clean the paper pick up rollers See Related Information Clean the Pa...

Page 450: ... rollers Clean the paper pick up rollers See Related Information Clean the Paper Pick up Rollers No Response Busy The number you dialled does not answer or is busy Verify the number and try again Not Registered You tried to access a Speed Dial number that has not been stored in the machine Set up the Speed Dial number Out of Fax Memory The fax memory is full Do one of the following Clear the data ...

Page 451: ...er or foreign object If you cannot find or remove the jammed paper see Related Information Printer Jam or Paper Jam Tray Removed This message is displayed when the setting to confirm the paper type and size is enabled To not display this confirmation message change the setting to Off See Related Information Change the Check Paper Size Setting Unable to Clean XX Unable to Init XX Unable to Print XX...

Page 452: ...ain Paper in the Basic tab and Greyscale is chosen in the Advanced tab of the printer driver you can use the machine as a monochrome printer 2 sided print is not available when this message appears Copying If the paper type is set to Plain Paper you can make copies in monochrome 2 sided copy is not available when this message appears Faxing If the paper type is set to Plain Paper or Inkjet Paper t...

Page 453: ...eds to be replaced Comm Error MFC models Poor telephone line quality caused a communication error Send the fax again or connect the machine to another telephone line If the problem continues contact the telephone company and ask them to check your telephone line Connection Error Wi Fi Direct Other devices are trying to connect to the Wi Fi Direct network at the same time Make sure there are no oth...

Page 454: ...om the USB direct interface Image Too Long MFC J880DW The proportions of your photo are irregular so effects could not be added Choose a regularly proportioned image Image Too Small MFC J880DW The size of your photo is too small to trim Choose a larger image Ink Absorber Pad Full The ink absorber box or flushing box is full These components are periodic maintenance items that may require replaceme...

Page 455: ...Paper is Jammed Inside and in the Front of the Machine Jam A Inside Front Make sure the paper length guide is set to the correct paper size More than one sheet of paper was placed in the manual feed slot OR Another sheet of paper was placed in the manual feed slot before the Touchscreen displayed Where to Place the Paper Do not put more than one sheet of paper in the manual feed slot at any one ti...

Page 456: ...r telephone company If you want to use the Caller ID feature contact your telephone company See Related Information Caller ID No Device Wi Fi Direct When configuring the Wi Fi Direct network the Brother machine cannot find your mobile device Make sure your machine and mobile device are in the Wi Fi Direct mode Move the mobile device closer to your Brother machine Move your Brother machine and the ...

Page 457: ...ry Receive Print the faxes that are in the memory See Related Information Print a Fax Stored in the Machine s Memory Out of Memory The machine s memory is full If a fax sending or copy operation is in progress Press or Quit or Close and wait until the other operations that are in progress finish and then try again Press Send Now to send the pages scanned so far Press Partial Print to copy the page...

Page 458: ...rame Insert a piece of stiff paper between the lower part of the Touchscreen and its frame and slide it back and forth to push out the debris Tray removed This message is displayed when the setting to confirm the paper type and size is enabled To not display this confirmation message change the setting to Off See Related Information Change the Check Paper Size Setting Unable to Clean XX Unable to ...

Page 459: ...t interface Turn the machine off and then on again Wrong Ink Cartridge The ink cartridge model number is not compatible with your machine Verify the cartridge model number will work with your machine See Related Information Supply Specifications Wrong Ink Colour An ink cartridge has been installed in the wrong position Check which ink cartridges are not matched by colour to their ink cartridge pos...

Page 460: ...he Front of the Machine Jam A Inside Front Paper is Jammed in the Front of the Machine Jam B Front Paper is Jammed in the Back of the Machine Jam C Rear Change the Paper Size and Paper Type Print Settings Windows Print Options Macintosh Paper Handling and Printing Problems 454 ...

Page 461: ...so transfer the Fax Journal report to see if there are any faxes you must transfer See Related Information Transfer the Fax Journal Report to Another Fax Machine Related Information Error and Maintenance Messages Transfer Faxes to Another Fax Machine Transfer Faxes to Your Computer Transfer the Fax Journal Report to Another Fax Machine Use PC Fax Receive to Transfer Received Faxes to Your Computer...

Page 462: ...b Select Data Transfer Press OK c Select Fax Transfer Press OK 4 Do one of the following If the LCD displays No Data there are no faxes left in the machine s memory Press Stop Exit Enter the fax number where faxes will be forwarded 5 Press Mono Start MFC J680DW MFC J880DW 1 Press to interrupt the error temporarily 2 Press Settings All Settings Service Data Transfer Fax Transfer 3 Do one of the fol...

Page 463: ... machine s memory will be sent to your computer automatically When faxes in the machine s memory are not sent to your computer Make sure you have set PC Fax Receive on the machine If faxes are in the machine s memory when you set up PC Fax Receive the LCD will ask if you want to transfer the faxes to your computer Press 1 to transfer all faxes in the memory to your computer Press a or b to select ...

Page 464: ...ve the Touchscreen will ask if you want to transfer the faxes to your computer Press Yes to transfer all faxes in the memory to your computer If Fax Preview 1 is set to Off you will be asked if you want to print backup copies Related Information Transfer Your Faxes or Fax Journal Report Use PC Fax Receive to Transfer Received Faxes to Your Computer Windows only 1 MFC J880DW only 458 ...

Page 465: ...top Exit to interrupt the error temporarily 2 Press Settings 3 Press a or b to select the following a Select Service Press OK b Select Data Transfer Press OK c Select Report Trans Press OK 4 Enter the fax number where Fax Journal report will be forwarded 5 Press Mono Start MFC J680DW MFC J880DW 1 Press to interrupt the error temporarily 2 Press Settings All Settings Service Data Transfer Report Tr...

Page 466: ...me Troubleshooting Document Jams Document Jams Document is Jammed in the Top of the ADF Unit Document is Jammed inside the ADF Unit Remove Paper Scraps Jammed in the ADF Error and Maintenance Messages 460 ...

Page 467: ... MFC J480DW MFC J680DW MFC J880DW 1 Take out any paper from the ADF that is not jammed 2 Open the ADF cover 3 Remove the jammed document by pulling it upward 4 Close the ADF cover 5 Press Stop Exit or IMPORTANT To avoid future document jams close the ADF cover correctly by pressing it down in the centre Related Information Document Jams 461 ...

Page 468: ... is Jammed inside the ADF Unit Related Models MFC J480DW MFC J680DW MFC J880DW 1 Take any paper that is not jammed out of the ADF 2 Lift the document cover 3 Pull the jammed document out to the left 4 Close the document cover 5 Press Stop Exit or Related Information Document Jams 462 ...

Page 469: ... Scraps Jammed in the ADF Related Models MFC J480DW MFC J680DW MFC J880DW 1 Lift the document cover 2 Insert a piece of stiff paper such as cardstock into the ADF to push any small paper scraps through 3 Close the document cover 4 Press Stop Exit or Related Information Document Jams 463 ...

Page 470: ...d remove the jammed paper Paper is Jammed Inside and in the Front of the Machine Jam A Inside Front Paper is Jammed in the Front of the Machine Jam B Front Paper is Jammed in the Back of the Machine Jam C Rear Error and Maintenance Messages Paper Handling and Printing Problems 464 ...

Page 471: ...T MFC J480DW MFC J680DW Before you unplug the machine from the power source you can transfer your faxes that are stored in the machine s memory to your computer or another fax machine so you will not lose any important messages 2 Pull the paper tray 1 completely out of the machine 1 3 Pull the two green levers inside the machine to release the jammed paper 4 Place both hands under the plastic tabs...

Page 472: ...f the print head is in the right corner as shown in the illustration 2 you cannot move the print head Close the scanner cover and then reconnect the power cord Open the scanner cover again and then hold down Stop Exit or until the print head moves to the centre Then unplug the machine from the power source and take out the paper If the paper is jammed under the print head unplug the machine from t...

Page 473: ...he scanner cover using both hands 8 Slowly pull the jammed paper 1 out of the machine 1 If the LCD displays Repeat Jam A Inside Front do the following a Make sure you look carefully inside 1 for any scraps of paper 1 b Squeeze both levers 1 and then open the Jam Clear Cover at the back of the machine 467 ...

Page 474: ...aper tray firmly back in the machine 10 While holding the paper tray in the machine pull out the paper support 1 until it locks into place and then unfold the paper support flap 2 2 1 11 Reconnect the power cord Related Information Printer Jam or Paper Jam Transfer Your Faxes or Fax Journal Report Error and Maintenance Messages 468 ...

Page 475: ... J680DW Before you unplug the machine from the power source you can transfer your faxes that are stored in the machine s memory to your computer or another fax machine so you will not lose any important messages 2 Pull the paper tray 1 completely out of the machine 1 3 Pull the two green levers inside the machine to release the jammed paper 4 Slowly pull out the jammed paper 1 1 If the LCD display...

Page 476: ... then open the Jam Clear Cover at the back of the machine 1 c Slowly pull the jammed paper out of the machine d Close the Jam Clear Cover Make sure the cover is closed completely 5 Put the paper tray firmly back in the machine 470 ...

Page 477: ...pull out the paper support 1 until it locks into place and then unfold the paper support flap 2 2 1 7 Reconnect the power cord Related Information Printer Jam or Paper Jam Transfer Your Faxes or Fax Journal Report Error and Maintenance Messages 471 ...

Page 478: ...sfer your faxes that are stored in the machine s memory to your computer or another fax machine so you will not lose any important messages 2 Pull the paper tray 1 completely out of the machine 1 3 Pull the two green levers inside the machine to release the jammed paper Depending on the paper size it is easier to remove the jammed paper from the front of the machine rather than from the back of th...

Page 479: ...the machine 8 While holding the paper tray in the machine pull out the paper support 1 until it locks into place and then unfold the paper support flap 2 2 1 9 Reconnect the power cord Related Information Printer Jam or Paper Jam Transfer Your Faxes or Fax Journal Report Error and Maintenance Messages 473 ...

Page 480: ...rother Solutions Center offers the latest FAQs and troubleshooting tips Visit http support brother com Using non Brother supplies may affect the print quality hardware performance and machine reliability Paper Handling and Printing Problems Telephone and Fax problems Other Problems Network Problems You can resolve most errors yourself If after reading this guide you are unable to resolve the probl...

Page 481: ...ware and Sound group click View devices and printers Right click the Brother MFC XXXX Printer where XXXX is your model name Click See what s printing If printer driver options appear select your printer driver Click Printer in the menu bar and make sure Use Printer Offline is not selected Windows Server 2012 Move your mouse to the lower right corner of your desktop When the menu bar appears click ...

Page 482: ...rint speed is too slow Try changing the printer driver setting The highest resolution needs longer data processing sending and printing time Try the other quality settings in the printer driver as follows Windows In the printer driver clear the Colour Enhancement check box on the Advanced tab Macintosh In the printer driver choose Color Settings click Advanced Color Settings and make sure you clea...

Page 483: ...he machine unplugged for extended periods of time We recommend using to power down the machine Using allows minimal power to the machine resulting in periodic but less frequent cleaning of the print head Characters and lines are blurred Check the printing alignment See Related Information Check the Print Alignment from Your Brother Machine Printed text or images are skewed Make sure the paper is l...

Page 484: ... LCD displays a Paper Jam message and you still have a problem see Related Information Error and Maintenance Messages If the paper tray is empty load a new stack of paper into the paper tray If there is paper in the paper tray make sure it is straight If the paper is curled straighten it Sometimes it is helpful to remove the paper turn the stack over and put it back in the paper tray Reduce the am...

Page 485: ...ing The sender s scanner may be dirty Ask the sender to make a copy to see if the problem is with the sending machine Try receiving from another fax machine Left and right margins are cut off or a single page is printed on two pages If the received faxes are divided and printed on two pages or if you get an extra blank page your paper size setting may not be correct for the paper you are using See...

Page 486: ...ded to 2 sided Shrink Page Size of an Oversized Incoming Fax Paper Weight and Thickness Print Settings Windows Print Options Macintosh Print a Photo Macintosh Prevent Smudged Printouts and Paper Jams When Printing on Both Sides of the Paper Windows Prevent Smudged Printouts and Paper Jams When Printing on Both Sides of the Paper Macintosh 480 ...

Page 487: ...still no answer check that the telephone line cord is plugged into the telephone wall socket and the LINE socket of the machine Make sure your machine has a dial tone by pressing the Hook button in Fax mode If there is no ringing when you call your machine ask your telephone company to check the line Handling Incoming Calls Difficulties Suggestions The machine Hears a voice as a CNG Tone If Fax De...

Page 488: ...t to automatically answer all incoming faxes you should select the Fax Tel mode In Fax Tel mode your Brother machine will receive faxes automatically and produce a pseudo double ring to alert you to answer voice calls If you do not want your Brother machine to answer any incoming faxes automatically you should select the Manual mode In Manual mode you must answer every incoming call and activate t...

Page 489: ...services contact your service provider for connection instructions If you are using a VoIP system try changing the VoIP setting to Basic for VoIP This will lower modem speed and turn off Error Correction Mode ECM See Related Information Telephone Line Interference VoIP Print the Transmission Verification Report and check for an error See Related Information Print Reports Ask the other party to che...

Page 490: ...rmation If You Are Having Difficulty with Your Machine Set Dial Tone Detection Telephone Line Interference VoIP Troubleshooting Set Tone or Pulse Dialling Mode Choose the Correct Receive Mode Set Fax Detect Set the Number of Rings Before the Machine Answers Ring Delay Connect an External TAD External TAD Telephone Answering Device Print Reports Clean the Scanner Turn Off Memory Receive Print a Fax...

Page 491: ...ill shorten the Dial Tone detect pause MFC J480DW MFC J680DW MFC J880DW MFC J480DW 1 Press Settings 2 Press a or b to select the following a Select Initial Setup Press OK b Select Dial Tone Press OK c Select Detection or No Detection Press OK 3 Press Stop Exit MFC J680DW MFC J880DW 1 Press Settings All Settings Initial Setup Dial Tone 2 Press Detection or No Detection 3 Press Related Information T...

Page 492: ...g to Basic for VoIP Normal sets the modem speed at 14 400 bps 3 Press Stop Exit VoIP Voice over IP is a type of phone system that uses an Internet connection rather than a traditional phone line Brother does not recommend the use of a VoIP line VoIP limitations in general can cause some functions of the fax machine not to work correctly MFC J680DW MFC J880DW 1 Press Settings All Settings Initial S...

Page 493: ... Voice Over Internet Protocol VoIP Telephone Line Interference Error and Maintenance Messages 487 ...

Page 494: ...ppear when starting to scan Windows Nuance PaperPort users Make sure the Brother TWAIN or WIA driver is selected as the primary source in your scanning application For example in Nuance PaperPort 14SE 1 click Desktop Scan Settings Select to choose the Brother TWAIN WIA driver Presto PageManager users Make sure the Brother TWAIN or WIA driver is chosen as the primary source in your scanning applica...

Page 495: ... have correctly inserted the memory card or USB Flash drive Part of my photo is missing when printed Make sure Borderless printing and Cropping are turned off See Related Information Print Borderless Photos from Media See Related Information Print Photos with Auto Cropping Software Difficulties Difficulties Suggestions Cannot print Uninstall and reinstall the Brother driver Device Busy appears on ...

Page 496: ...indows Use the Network Connection Repair Tool to fix the Brother machine s network settings It will assign the correct IP address and Subnet Mask Where Can I Find My Brother Machine s Network Settings I Cannot Complete the Wireless Network Setup Configuration My Brother Machine Cannot Print Scan or PC FAX Receive over the Network I Want to Check that My Network Devices are Working Correctly Troubl...

Page 497: ...e For 64 bit OS users double click XXX C where XXX is the name of your local disk drive Program Files x86 Browny02 Brother BrotherNetTool exe If the User Account Control screen appears do one of the following Windows Vista Click Allow Windows 7 Windows 8 Click Yes 3 Follow the on screen instructions 4 Check the diagnosis by printing the Network Configuration Report The Network Connection Repair To...

Page 498: ... I Find My Brother Machine s Network Settings Where Can I Find My Brother Machine s Network Settings Change Machine Settings from Your Computer Print the Network Configuration Report The Network Configuration Report lists the network configuration including the network print server settings 492 ...

Page 499: ...n find the MAC Address in your Brother machine s control panel Wireless Your wireless LAN access point router is in stealth mode not broadcasting the SSID Enter the correct SSID name or Network Key manually Check the SSID name or the Network Key in the instructions supplied with your wireless LAN access point router and reconfigure the wireless network setup Wireless Your security settings SSID pa...

Page 500: ...rother machine as a client confirm how many devices are allowed in the current Wi Fi Direct network and then check how many devices are connected Wi Fi Direct For Windows If your wireless connection has been interrupted and you have checked and tried all of the above we recommend using the Network Connection Repair Tool Related Information Network Problems Configure Your Machine for a Wireless Net...

Page 501: ...any description for example Brother PC FAX Rx In Port number Type 54926 In Protocol UDP is selected See the instruction manual that came with your third party Security Firewall Software or contact the software manufacturer Wired Wireless Your security software blocks your machine s access to the network Some security software might block access without showing a security alert dialog box even afte...

Page 502: ... click View devices and printers Printers Windows Server 2012 R2 Click Control Panel on the Start screen In the Hardware group click View devices and printers OS X v10 8 5 Click System Preferences Print Scan OS X v10 9 x 10 10 x Click System Preferences Printers Scanners Your Brother machine is not connected to the wireless network Print the WLAN Report to check the error code on the printed repor...

Page 503: ...e Windows command prompt or Macintosh Terminal application ping ipaddress or nodename Successful Your Brother machine is working correctly and connected to the same network as your computer Unsuccessful Your Brother machine is not connected to the same network as your computer Windows Ask the network administrator and use the Network Connection Repair Tool to fix the IP address and the subnet mask...

Page 504: ...or the IPv4 address and subnet mask 4 Type exit and then press the Enter key on your keyboard Configure the IP Address on your computer Macintosh 1 Select System Preferences from the Apple Menu 2 Click Network Advanced TCP IP 3 Confirm the values for the IPv4 address and subnet mask Configure the IP Address on your Brother machine Print the Network Configuration Report and confirm the values for t...

Page 505: ... number Version Check your machine s firmware version Firmware Update Update your machine to the latest firmware FirmwareAutoCheck View firmware information on the Home screen 4 Press OK 5 Press Stop Exit DCP J562DW MFC J680DW MFC J880DW 1 Press Settings All Settings Machine Info 2 Press one of the following options Option Description Serial No Check your machine s serial number Firmware Version M...

Page 506: ...J680DW MFC J880DW MFC J480DW 1 Press Settings 2 Press a or b to select the following a Select Initial Setup Press OK b Select Reset Press OK c Select the reset option you want to use Press OK 3 Press 1 for Yes to confirm 4 Press 1 for Yes to reboot the machine DCP J562DW MFC J680DW MFC J880DW 1 Press Settings All Settings Initial Setup Reset 2 Press the reset option you want to use 3 Press Yes to ...

Page 507: ...n 3 Address Book Fax MFC models Address book Fax resets the following settings Address Book Address Book and Setup Groups Programmed fax jobs in the memory MFC J680DW MFC J880DW Polled Transmit Delayed Fax and Delayed Batch Transmission Station ID Name and Number Remote Fax Options MFC J680DW MFC J880DW Fax Forwarding Report Transmission Verification Report Address Book and Fax Journal History Cal...

Page 508: ... the Ink Cartridges Clean Your Brother Machine Check Your Brother Machine Correct the Paper Feed to Clear Vertical Lines Adjust the paper feed to reduce vertical lines This feature is available only for Plain paper Pack and Ship Your Brother Machine 502 ...

Page 509: ...recommends that you do not refill the ink cartridges provided with your machine We also strongly recommend that you continue to use only Genuine Brother Brand replacement ink cartridges Use or attempted use of potentially incompatible ink and or cartridges in the Brother machine may cause damage to the machine and or may result in unsatisfactory print quality Our warranty coverage does not apply t...

Page 510: ... packing as shown IMPORTANT DO NOT shake the ink cartridges If ink stains your skin or clothing wash with soap or detergent at once DO NOT touch the cartridge in the area indicated 2 this can prevent the machine from detecting the cartridge 5 Insert the ink cartridge in the direction of the arrow on the label Each colour has its own correct position 6 Gently push the area marked PUSH until the ink...

Page 511: ...u do not need to replace them the machine will not know the quantity of ink left in the cartridge DO NOT touch the cartridge insertion slots the ink may stain your skin If you mix the colours by installing an ink cartridge in the wrong position the LCD shows Wrong Ink Colour Check which ink cartridges are not matched by colour to their ink cartridge positions and move them to their proper position...

Page 512: ...e is a print quality problem start the cleaning process manually Clean the Print Head from Your Computer Macintosh To maintain good print quality the machine automatically cleans the print head when needed If there is a print quality problem start the cleaning process manually Clean the Machine s LCD Clean the Outside of the Machine Clean the Machine s Printer Platen Clean the Paper Feed Rollers I...

Page 513: ...h a non flammable glass cleaner ADF models only 2 1 ADF models only In addition to cleaning the scanner glass and glass strip with a non flammable glass cleaner run your fingertip over the glass to see if you can feel anything on it If you feel dirt or debris clean the glass again concentrating on that area You may need to repeat the cleaning process three or four times To test make a copy after e...

Page 514: ...Related Information Clean Your Brother Machine Telephone and Fax problems Other Problems 508 ...

Page 515: ...lect PrintHead Cleaning Press OK c Select Black only Colour only or All Press OK d Select Normal Strong or Strongest Press OK 3 Press Mono Start or Colour Start The machine cleans the print head If you clean the print head and the print has not improved try installing a new Genuine Brother Brand replacement ink cartridge for each problem colour Try cleaning the print head again If the print has no...

Page 516: ...Related Information Clean Your Brother Machine Paper Handling and Printing Problems Clean the Print Head from Your Computer Windows Clean the Print Head from Your Computer Macintosh 510 ...

Page 517: ...es and printers For Windows Server 2012 R2 Click Control Panel on the Start screen In the Hardware group click View devices and printers 2 Right click the Brother MFC XXXX Printer icon where XXXX is your model name and then select Printing preferences If printer driver options appear select your printer driver The printer driver dialog box appears 3 Click the Maintenance tab 4 Select one of the fo...

Page 518: ...n appears 5 Click the Control menu and then select Maintenance 6 Select one of the following options Option Description Check Print Quality Use to print the test page and check the print quality Print Head Cleaning Use to start the cleaning process manually Select if a line or blank spaces appear in text or graphics on the test page 7 Do one of the following If you selected the Check Print Quality...

Page 519: ...Machine s LCD IMPORTANT DO NOT use liquid cleaners including ethanol 1 Press and hold down to turn off the machine The LCD displays Shutting Down for a few seconds before the power goes off 2 Clean the LCD with a dry soft lint free cloth Related Information Clean Your Brother Machine 513 ...

Page 520: ...emove dirt from the control panel It may crack the panel 1 If the paper support flap is open close it and then close the paper support 2 Pull the paper tray 1 completely out of the machine 1 3 Wipe the outside of the machine with a dry lint free cloth to remove dust 4 Lift the output paper tray cover and remove anything that is stuck inside the paper tray 5 Wipe the inside and the outside of the p...

Page 521: ...Related Information Clean Your Brother Machine 515 ...

Page 522: ...f the machine to lift the scanner cover into the open position 2 Clean the machine s printer platen 1 and the area around it wiping off scattered ink with a dry soft lint free cloth 1 2 IMPORTANT DO NOT touch the encoder strip the thin strip of plastic that stretches across the width of the machine 2 Doing this may cause damage to the machine 3 Gently close the scanner cover using both hands 4 Rec...

Page 523: ... of the Paper Feed Rollers 1 with a soft lint free cloth moistened with water using a side to side motion After cleaning wipe the rollers with a dry soft lint free cloth to remove all moisture 1 5 Lift the Jam Clear Flap 2 and then clean the back side of the Paper Feed Rollers 1 with a soft lint free cloth moistened with water After cleaning wipe the rollers with a dry soft lint free cloth to remo...

Page 524: ...Related Information Clean Your Brother Machine Paper Handling and Printing Problems 518 ...

Page 525: ...the Base Pad 1 with a soft lint free cloth moistened with water For DCP J562DW MFC J680DW MFC J880DW also clean the Base Pad 2 for the photo paper tray with a soft lint free cloth moistened with water After cleaning wipe the pad with a dry soft lint free cloth to remove all moisture 2 1 4 Clean the Paper Pick up Rollers 1 with a soft lint free cloth moistened with water Slowly turn the rollers so ...

Page 526: ...e machine adjust the print alignment Check the Ink Volume Although an ink volume icon appears on the machine s LCD you can use the ink menu to see a large graph showing the ink left in each cartridge Monitor Machine Status from Your Computer Windows The Status Monitor utility is a configurable software tool for monitoring the status of one or more devices it allows you to get immediate notificatio...

Page 527: ... OK OK Poor 6 The LCD asks you to check the print quality of each colour Press d or c to select the pattern 1 4 that most closely matches the printing result and then press OK 7 Do one of the following If print head cleaning is needed press OK to start the cleaning procedure If print head cleaning is not needed the Maintenance screen reappears on the LCD Press Stop Exit to finish the Print Quality...

Page 528: ...eck the print quality of each colour Press the number of the pattern 1 4 that most closely matches the printing result 6 Do one of the following If print head cleaning is needed press Start to start the cleaning procedure If print head cleaning is not needed the Maintenance screen reappears on the LCD Press 7 After the cleaning procedure is finished the Touchscreen asks if you want to print the Pr...

Page 529: ... Print Quality 2 Press Start The machine prints the Print Quality Check Sheet 3 Check the quality of the four colour blocks on the sheet 4 The Touchscreen asks about the print quality Do one of the following If all lines are clear and visible press No and then press to finish the Print Quality check If lines are missing see Poor below press Yes OK Poor 5 The Touchscreen asks you to check the print...

Page 530: ...rint has not improved try installing a new Genuine Brother Brand replacement ink cartridge for each problem colour Try cleaning the print head again If the print has not improved contact Brother customer service or your local Brother dealer IMPORTANT DO NOT touch the print head Touching the print head may cause permanent damage and may void the print head s warranty When a print head nozzle is clo...

Page 531: ...ress OK 3 Press OK 4 Press Mono Start or Colour Start The machine starts printing the Alignment Check Sheet A 5 For the A pattern press d or c to select the number of the test print that has the fewest visible vertical stripes 1 9 and then press OK In the example above row number 6 is the best choice Repeat this step for the rest of the patterns When the print alignment is not adjusted correctly t...

Page 532: ...al stripes 1 9 and then press it in the example above row number 6 is the best choice Press OK Repeat this step for the rest of the patterns When the print alignment is not adjusted correctly text looks blurry or crooked like this After the print alignment is adjusted correctly text looks like this 4 Press Related Information Check Your Brother Machine Paper Handling and Printing Problems 526 ...

Page 533: ...ck or print the model numbers of the ink cartridges press Clear to go back to the Ink Maintenance menu screen and then select InkCartridge Model Press OK and follow the instruction on the LCD 3 Press Stop Exit You can also check the ink volume from your computer DCP J562DW MFC J680DW MFC J880DW 1 Press Ink Ink Volume The Touchscreen displays the ink volume You can also press Settings Maintenance I...

Page 534: ...Related Information Check Your Brother Machine LCD Overview Settings Screen Overview Print a Document Windows Print a Document Macintosh Monitor Machine Status from Your Computer Windows 528 ...

Page 535: ...eady selected Click Tools in the left navigation bar and then click Status Monitor Windows 8 Click Brother Utilities and then click the drop down list and select your model name if not already selected Click Tools in the left navigation bar and then click Status Monitor Troubleshooting Click the Troubleshooting button to access the troubleshooting website Looking for replacement supplies Click the...

Page 536: ... Turn Off the Show Status Monitor Feature Windows Turn Off the Status Monitor Windows Cancel a Print Job Windows Check the Ink Volume 530 ...

Page 537: ...dicators and What They Mean Windows When you start up your computer the Brother Status Monitor icon appears on the task tray A green icon indicates the normal stand by condition A yellow icon indicates a warning A red icon indicates an error has occurred A grey icon indicates the machine is offline Related Information Monitor Machine Status from Your Computer Windows 531 ...

Page 538: ... default setting is Only when printing from this PC To turn it off follow these steps 1 Right click the Brother Status Monitor icon or window select the Status Monitor Settings option and then click Options The Options window appears 2 Select the Basic tab and then select Off for Show Status Monitor 3 Click OK Even if the Show Status Monitor feature is turned off you can check the machine s status...

Page 539: ... Status from Your Computer Windows Turn Off the Status Monitor Windows Turn Off the Status Monitor Windows 1 Right click the Brother Status Monitor icon or window and then select Exit 2 Click OK Related Information Monitor Machine Status from Your Computer Windows 533 ...

Page 540: ...nd then select the machine 3 Click the Options Supplies button 4 Click the Utility tab and then click the Open Printer Utility button The Status Monitor screen appears Troubleshooting Click the Troubleshooting button to access the Brother Solutions Center offering FAQs and troubleshooting tips Visit the Genuine Supplies website Click the Visit the Genuine Supplies website button for more informati...

Page 541: ...Error icons Icon Description The ink level is low The ink cartridge is at the end of its life There is a problem with the ink cartridge Related Information Check Your Brother Machine 535 ...

Page 542: ...2 Press a or b to select the following a Select Ink Maintenance Press OK b Select Impr PrintQuality Press OK c Select Correct Paper Feed Press OK 3 Press OK and then follow the instructions on the LCD DCP J562DW MFC J680DW MFC J880DW 1 Press Ink Improve Print Quality Correct Paper Feed You can also press Settings Maintenance Improve Print Quality Correct Paper Feed 2 Press the Next button and then...

Page 543: ...king process may lead to print problems and possible damage to the print head 1 Unplug the machine from the electrical socket 2 Unplug the machine from the telephone wall socket and take the telephone line cord out of the machine 3 Place both hands under the plastic tabs on both sides of the machine to lift the scanner cover into the open position Then unplug the interface cable from the machine i...

Page 544: ...chine without it DO NOT leave the ink cartridges in the machine during shipping 8 Wrap the machine in the bag 9 Pack the machine and the printed materials in the original carton with the original packing material as shown below 10 Close the carton and tape it shut 538 ...

Page 545: ...Related Information Routine Maintenance Replace the Ink Cartridges 539 ...

Page 546: ...mise settings and features create shortcuts and work with options displayed on the machine s LCD to make your Brother machine a more efficient work tool Change Machine Settings from the Control Panel Change Machine Settings from Your Computer 540 ...

Page 547: ...ine Settings from the Control Panel Change Machine Settings from the Control Panel In the Event of Power Failure Memory Storage General Settings Save Your Favourite Settings as a Shortcut Print Reports Settings and Features Tables 541 ...

Page 548: ...lost The date and time must be re entered MFC models Programmed fax timer jobs and other fax jobs in the machine s memory will be lost MFC J880DW Your menu settings are stored permanently and will not be lost Temporary settings for example Contrast and Overseas Mode will be lost The date and time and programmed fax timer jobs for example Delayed Fax will be retained for approximately 24 hours Othe...

Page 549: ...ff feature can save power consumption Set the amount of time that the machine will be in Sleep Mode before it automatically powers off When this feature is set to Off you must power off the machine manually Set the Date Time Adjust the LCD Backlight Brightness If you are having difficulty reading the LCD try changing the brightness setting Change How Long the LCD Backlight Stays On You can set how...

Page 550: ...ime after the last Fax Scan Copy or Web operation before the machine returns to Ready Mode If you choose Off the machine stays in the mode you used last 1 Press Settings 2 Press a or b to select the following a Select General Setup Press OK b Select Mode Timer Press OK c Select Off 0Sec 30Secs 1Min 2Mins or 5Mins Press OK 3 Press Stop Exit Related Information General Settings 544 ...

Page 551: ...K 5 Press a or b to select the Off Low Med or High option Press OK 6 Press Stop Exit You can also adjust the speaker volume by pressing Hook Press d or c Each button press decreases or increases the volume When finished press Hook again DCP J562DW MFC J680DW MFC J880DW 1 Do one of the following For MFC models Press Settings All Settings General Setup Volume For DCP models Press Settings All Settin...

Page 552: ...ss or 2 d Press or on the Touchscreen Each press decreases or increases the volume e When finished press Hook again Related Information General Settings 1 MFC J880DW only When Fax Preview is set to On press Sending Faxes 2 MFC J880DW only When Fax Preview is set to On press this icon twice 546 ...

Page 553: ...when selecting Backward Hour Make sure you have set the correct date and time in the Date Time setting This feature is not available in some countries MFC J480DW MFC J680DW MFC J880DW MFC J480DW 1 Press Settings 2 Press a or b to select the following a Select Initial Setup Press OK b Select Date Time Press OK c Select Daylight Save Press OK d Select Forward Hour or Backward Hour Press OK 3 Press S...

Page 554: ...achine such as receiving a fax or a print job The factory setting is five minutes When the machine goes into Sleep Mode the LCD backlight turns off MFC J480DW DCP J562DW MFC J680DW MFC J880DW MFC J480DW 1 Press Settings 2 Press a or b to select the following a Select General Setup Press OK b Select Sleep Mode Press OK c Select 1Min 2Mins 3Mins 5Mins 10Mins 30Mins or 60Mins Press OK 3 Press Stop Ex...

Page 555: ...prevents the Fax Journal report from printing MFC J480DW MFC J680DW The machine is connected to a wired network MFC J880DW The machine is connected to a wireless network WLAN Enable is set to On or WLAN is selected in the Network I F setting MFC J480DW DCP J562DW MFC J680DW MFC J880DW MFC J480DW 1 Press Settings 2 Press a or b to select the following a Select General Setup Press OK b Select Auto P...

Page 556: ...e dial pad and then press OK 6 Select 12h Clock or 24h Clock and then press OK 7 To enter the time do one of the following If you selected 12h Clock enter the time in 12 hour format using the dial pad and then press OK Select AM or PM and then press OK If you selected 24h Clock enter the time in 24 hour format using the dial pad and then press OK 8 Press Stop Exit DCP J562DW MFC J680DW MFC J880DW ...

Page 557: ...Related Information General Settings Set Your Station ID 551 ...

Page 558: ...MFC J480DW DCP J562DW MFC J680DW MFC J880DW MFC J480DW 1 Press Settings 2 Press a or b to select the following a Select General Setup Press OK b Select LCD Settings Press OK c Select Backlight Press OK d Select Light Med or Dark Press OK 3 Press Stop Exit DCP J562DW MFC J680DW MFC J880DW 1 Press Settings All Settings General Setup LCD Settings Backlight 2 Press the Light Med or Dark option 3 Press...

Page 559: ... MFC J880DW MFC J480DW 1 Press Settings 2 Press a or b to select the following a Select General Setup Press OK b Select LCD Settings Press OK c Select Dim Timer Press OK d Select Off 10Secs 20Secs or 30Secs Press OK 3 Press Stop Exit DCP J562DW MFC J680DW MFC J880DW 1 Press Settings All Settings General Setup LCD Settings Dim Timer 2 Press a or b to display the Off 10Secs 20Secs or 30Secs option a...

Page 560: ...bout how to enter text see the Appendix 5 Press Stop Exit MFC J680DW MFC J880DW 1 Press Settings All Settings Initial Setup Station ID 2 Press Fax 3 Enter your fax number up to 20 digits on the Touchscreen and then press OK 4 Press Name 5 Enter your name up to 20 characters using the Touchscreen and then press OK Press to cycle between letters numbers and special symbols The available characters m...

Page 561: ... rotary service you must change the dialling mode This feature is not available in some countries MFC J480DW MFC J680DW MFC J880DW MFC J480DW 1 Press Settings 2 Press a or b to select the following a Select Initial Setup Press OK b Select Tone Pulse Press OK c Select Tone or Pulse Press OK 3 Press Stop Exit MFC J680DW MFC J880DW 1 Press Settings All Settings Initial Setup Tone Pulse 2 Press Tone o...

Page 562: ...ry setting is Off When the Quiet Mode setting is turned on is displayed on the Home screen MFC J480DW DCP J562DW MFC J680DW MFC J880DW MFC J480DW 1 Press Settings 2 Press a or b to select the following a Select General Setup Press OK b Select Quiet Mode Press OK c Select On or Off Press OK 3 Press Stop Exit DCP J562DW MFC J680DW MFC J880DW 1 Press Settings Quiet Mode 2 Press On or Off 3 Press Rela...

Page 563: ...not available in some countries MFC J480DW DCP J562DW MFC J680DW MFC J880DW MFC J480DW 1 Press Settings 2 Press a or b to select the following a Select Initial Setup Press OK b Select Local Language Press OK c Select your language Press OK 3 Press Stop Exit DCP J562DW MFC J680DW MFC J880DW 1 Press Settings All Settings Initial Setup Local Language 2 Press your language 3 Press Related Information ...

Page 564: ...s Change the Keyboard Setting Change the Keyboard Setting Related Models DCP J562DW MFC J680DW MFC J880DW You can choose the type of keyboard for the LCD 1 Press Settings All Settings General Setup Keyboard Settings 2 Press QWERTY or ABC 3 Press Related Information General Settings 558 ...

Page 565: ...ave Your Favourite Settings as a Shortcut Add Shortcuts You can add the fax copy scan and Web Connect settings you use most frequently by saving them as your Shortcuts Later you can recall and apply these settings instead of re entering them Change or Delete Shortcuts You can change the settings in a Shortcut 559 ...

Page 566: ...tcuts 2 Press where you have not added a Shortcut 3 Press a or b to display Copy 4 Press Copy 5 Read the information on the Touchscreen and then confirm it by pressing OK 6 Press a or b to display the available settings and then press the setting you want to change 7 Press a or b to display the available options for the setting and then press the option you want Repeat the previous and this steps ...

Page 567: ...ed are displayed To delete the Shortcut or edit the name press and hold the Shortcut until the options appear and then follow the on screen menus 4 Press Options 5 Change the settings for the Shortcut you selected 6 Press Save as Shortcut when you are finished changing the settings 7 Press OK to confirm 8 Do one of the following If you want to overwrite the Shortcut press Yes Press OK to finish If...

Page 568: ...Home Machine Settings Change Machine Settings from the Control Panel Print Reports Print Reports Reports Print a Report Fax Reports Telephone and Fax problems 562 ...

Page 569: ...x Journal prints a list of information about your last 200 incoming and outgoing faxes TX means Transmit RX means Receive User Settings The User Settings report prints a list of your current settings Network Configuration The Network Configuration report prints a list of your current network settings WLAN Report The WLAN Report prints the wireless LAN connectivity diagnosis Caller ID history MFC m...

Page 570: ...ettings 2 Press a or b to select the following a Select Print Reports Press OK b Select the report you want to print Press OK 3 Press Mono Start 4 Press Stop Exit DCP J562DW MFC J680DW MFC J880DW 1 Press Settings All Settings Print Reports 2 Press a or b to display the report you want to print and then press it 3 Press OK 4 Press Related Information Print Reports Caller ID 564 ...

Page 571: ...m the Control Panel Settings and Features Tables Settings and Features Tables Settings Tables 1 8 44 9 mm Colour LCD Features Tables 1 8 44 9 mm Colour LCD Settings Tables 2 7 67 5 mm Touchpanel models Features Tables 2 7 67 5 mm Touchpanel models 565 ...

Page 572: ...n you pull the tray out of the machine Quiet Mode Decrease printing noise Volume Ring Adjust the ring volume Beeper Adjust the beeper volume Speaker Adjust the speaker volume LCD Settings Backlight Adjust the brightness of the LCD backlight Dim Timer Set how long the LCD backlight stays on after the last finger press Sleep Mode Select how long the machine must be idle before it goes into Sleep Mod...

Page 573: ...ome countries Use with telephone company distinctive ringing service allows you to have a voice number and fax number on the one phone line FaxAbility For New Zealand only If you have FaxAbility from Telecom use this function to store the ringing pattern of your fax number And if you set in to On you should use the registered number only Call Waiting For New Zealand only If you have Call Waiting s...

Page 574: ...ce Info Device Name View your machine s device name SSID View the Group Owner s SSID When the machine is not connected the LCD displays Not Connected IP Address View your machine s current IP Address Status Info Status View the current Wi Fi Direct network status Signal View the current Wi Fi Direct network signal strength When your machine acts as Group Owner the LCD always indicate a strong sign...

Page 575: ...Available only for some countries Change for Daylight Saving Time manually Station ID Enter your name and fax number to appear on each page you fax Tone Pulse Available only for some countries Select the dialling mode Dial Tone Shorten the dial tone detect pause Compatibility Adjust the equalisation for transmission difficulties VoIP service providers offer fax support using various standards If y...

Page 576: ...aller ID history and then send a fax to it add it to the Address Book or delete it Add to AddressBook Delete Advanced Settings Broadcasting Add Number Send the same fax message to more than one fax number Address Book Complete Real Time TX Send a fax without using the memory Overseas Mode Set to On if you have difficulty sending faxes overseas Glass ScanSize Adjust the scan area of the scanner gla...

Page 577: ...D or Poster copies 2 sided Copy Turn off or turn on 2 sided copying and select flip on long edge or flip on short edge Advanced Settings Change the amount of background colour that is removed Set New Default Save your settings as the default Factory Reset Restore all settings back to the factory settings WEB Level 1 Descriptions OneNote OneDrive Box Google Drive Evernote Dropbox Facebook Picasa We...

Page 578: ...ber from the Caller ID history and then send a fax to it add it to the Address Book or delete it Add to AddressBook Delete WiFi You can configure the wireless settings by pressing on the control panel Level 1 Descriptions Setup Wizard Configure your internal print server manually WPS AOSS Configure your wireless network settings using the one button push method WLAN Assistant Configure your wirele...

Page 579: ...screen instructions Print Head Cleaning Clean the print head according to the on screen instructions Ink Volume Check the available ink volume Ink Cartridge Model Check your ink cartridge numbers Wi Fi TCP IP Set TCP IP protocol WLAN Assistant Configure your wireless network settings using the Brother CD ROM Setup Wizard Configure your internal print server manually WPS AOSS Configure your wireles...

Page 580: ...eaker volume LCD Settings Backlight Adjust the brightness of the LCD backlight Dim Timer Set how long the LCD backlight stays on after the last finger press Keyboard Settings Select the type of keyboard for the LCD Sleep Mode Select how long the machine must be idle before it goes into Sleep Mode Auto Power Off Select how long the machine must wait before it automatically turns itself off after en...

Page 581: ...the week Print Document Print received faxes stored in the memory Remote Access Set your own code for Remote Retrieval Remaining Jobs Check which scheduled jobs are in the memory and cancel selected jobs Miscellaneous Memory Security MFC J880DW Prohibit most functions except receiving faxes into memory TX Lock MFC J680DW Prohibit most functions except receiving faxes Distinctive For some countries...

Page 582: ... Server Specify the IP address of the primary or secondary WINS server DNS Server Specify the IP address of the primary or secondary DNS server APIPA Set the machine to allocate the IP address from the link local address range automatically IPv6 Turn the IPv6 protocol on or off for a wireless LAN To use the IPv6 protocol go to the Brother Solutions Center at http support brother com for more infor...

Page 583: ...otice New Function Notice View the latest information about cloud services on the Home screen via the Internet Status Receive status notifications about available web services Web Connect Settings Proxy Settings Proxy Connection Change the Web connection settings Address Port User Name Password Network I F MFC J880DW Select the network connection type WLAN Enable DCP J562DW MFC J680DW Turn wireles...

Page 584: ...ock Type Select the time format from 12 hour or 24 hour Daylight Save MFC models Available only for some countries Change for Daylight Saving Time manually Station ID MFC models Fax Enter your name and fax number to appear on each page you fax Name Tone Pulse MFC models Available only for some countries Select the dialling mode Dial Tone MFC models Shorten the dial tone detect pause Compatibility ...

Page 585: ...Level 1 Level 2 Descriptions Available only for some countries Related Information Settings and Features Tables 579 ...

Page 586: ...it Edit Options Fax Resolution Set the resolution for outgoing faxes Contrast Adjust the contrast Broadcasting Add Number Send the same fax message to more than one fax number Preview MFC J880DW Preview a fax message before you send it Colour Setting Set whether faxes are sent in monochrome or colour Delayed Fax Delayed Fax Set the time of day the delayed faxes will be sent Set Time Batch TX Combi...

Page 587: ...Redial Redial the last number you dialled Outgoing Call Apply Select a number from the Outgoing Call history and then send a fax to it add it to the Address Book or delete it Edit Caller ID history Not available for Taiwan and some countries Apply Select a number from the Caller ID history and then send a fax to it add it to the Address Book or delete it Edit Options Fax Resolution Set the resolut...

Page 588: ...ok numbers Set New Default Save your settings as the default Factory Reset Restore all settings back to the factory settings Save as Shortcut Save the current settings as a shortcut Received Faxes Print Delete Print All New Faxes Print the new received faxes Print All Old Faxes Print the old received faxes Delete All New Faxes Delete the new received faxes Delete All Old Faxes Delete the old recei...

Page 589: ...or flip on short edge Advanced Settings MFC J880DW Select various copy settings such as Ink Save Mode or Watermark Copy Advanced Settings DCP J562DW MFC J680DW Change the amount of background colour that is removed Set New Default Save your settings as the default Factory Reset Restore all settings back to the factory settings Save as Shortcut Save the current settings as a shortcut Scan Level 1 L...

Page 590: ...numbers View Photos OK Print Settings Adjust your photos with the options Print All Print all photos in your memory card or USB flash drive Enhance Photos MFC J880DW Enhance Auto Correct Print Settings Adjust your photos with these settings Enhance Skin Enhance Scenery Remove Red Eye Night Scene Fill Light Whiteboard Monochrome Sepia Auto Correct Remove Red Eye Crop Print Settings Crop your photo ...

Page 591: ...tings Fax Options MFC models Fax Resolution Set the resolution for outgoing faxes Contrast Adjust the contrast Broadcasting Add Number Send the same fax message to more than one fax number Preview MFC J880DW Preview a fax message before you send it Colour Setting Set whether faxes are sent in monochrome or colour Real Time TX Send a fax without using the memory Overseas Mode Set to On if you have ...

Page 592: ...ay have been added and service names may have been changed by the provider since this document was published For more information see the Web Connect Guide Go to your model s Manuals page on the Brother Solutions Center at http support brother com to download the guide OneDrive Box Google Drive Evernote Dropbox Facebook Picasa Web Albums Flickr Apps Connect the Brother machine to the Brother Apps ...

Page 593: ...sing the one button push method WLAN Assistant Configure your wireless network settings using the Brother CD ROM When you have put the memory card or USB Flash drive in the correct slot Level 1 Descriptions Photo Select photo menu Scan to Media Scan documents into a memory card or USB flash drive Web Connect the Brother machine to an Internet service DPOF View the DPOF setting screen Related Infor...

Page 594: ...ne settings from your computer When you start Remote Setup the settings on your Brother machine will be downloaded to your computer and displayed on your screen If you change the settings on your computer you can upload them directly to the machine Where Can I Find My Brother Machine s Network Settings Network Management Software and Utilities Configure and change your Brother machine s network se...

Page 595: ...te Setup program lets you configure many of your Brother machine s machine settings from your computer When you start Remote Setup the settings on your Brother machine will be downloaded to your computer and displayed on your screen If you change the settings on your computer you can upload them directly to the machine Remote Setup Windows Remote Setup Macintosh 589 ...

Page 596: ...Setup Remote Setup Windows Remote Setup Windows Set Up the Brother Machine from Your Computer Windows Set Up the Brother Machine Using ControlCenter4 Windows Set Up Your Brother Address Book Using ControlCenter4 Windows Use Remote Setup through CC4 to add or change Address Book numbers on your computer 590 ...

Page 597: ... Windows 7 Click Start All Programs Brother Brother Utilities Click the drop down list and select your model name if not already selected Click Tools in the left navigation bar and then click Remote Setup Windows 8 Click Brother Utilities and then click the drop down list and select your model name if not already selected Click Tools in the left navigation bar and then click Remote Setup The Remot...

Page 598: ... data until it is uploaded to the machine Click Apply to upload the new data to the machine and then click Print OK Click to start uploading data to the machine and then exit the Remote Setup Program If an error message appears confirm that your data is correct and then click OK Cancel Click to exit the Remote Setup Program without uploading data to the machine Apply Click to upload data to the ma...

Page 599: ...re the firewall settings to allow communication through port numbers 137 and 161 If you are using Windows Firewall and you installed the Brother software and drivers from the CD ROM the necessary firewall settings have already been set Related Information Remote Setup Windows ControlCenter4 Windows 593 ...

Page 600: ...ontrolCenter4 Windows Related Models MFC J480DW MFC J680DW MFC J880DW 1 Click the ControlCenter4 icon in the task tray and then click Open 2 Click the Device Settings tab 3 Click the Remote Setup button 4 Configure the settings as needed Export Click to save the current configuration settings to a file Click Export to save your address book or all settings for your machine Import Click to read the...

Page 601: ...to exit the Remote Setup Program without uploading data to the machine Apply Click to upload data to the machine without exiting the Remote Setup Program 5 Click OK If your computer is protected by a firewall and is unable to use Remote Setup you may need to configure the firewall settings to allow communication through port numbers 137 and 161 If you are using Windows Firewall and you installed t...

Page 602: ...ndows Related Models MFC J480DW MFC J680DW MFC J880DW Use Remote Setup through CC4 to add or change Address Book numbers on your computer 1 Click the ControlCenter4 icon in the task tray and then click Open 2 Click the Device Settings tab 3 Click the Address Book button The Address Book opens in a Remote Setup window 4 Add or update the Address Book information as needed 5 Click OK Related Informa...

Page 603: ...ings Using Remote Setup Remote Setup Macintosh Remote Setup Macintosh Set Up the Brother Machine Using ControlCenter2 Macintosh Set Up Your Brother Address Book Using ControlCenter2 Macintosh Use Remote Setup through ControlCenter2 to add or change Address Book numbers on your computer 597 ...

Page 604: ...ontrolCenter2 Macintosh Set Up the Brother Machine Using ControlCenter2 Macintosh Related Models MFC J480DW MFC J680DW MFC J880DW 1 In the Finder menu bar click Go Applications Brother and then double click the ControlCenter icon The ControlCenter2 screen appears 2 Click the DEVICE SETTINGS tab 3 Click the Remote Setup button The Remote Setup Program screen appears 598 ...

Page 605: ...ck Export to save your address book or all settings for your machine Import Click to read the settings from a file Print Click to print the selected items on the machine You cannot print the data until it is uploaded to the machine Click Apply to upload the new data to the machine and then click Print 599 ...

Page 606: ...rs enter the correct data again and then click OK Cancel Click to exit the Remote Setup Program without uploading data to the machine Apply Click to upload data to the machine without exiting the Remote Setup Program 5 When finished click OK Related Information ControlCenter2 Macintosh Remote Setup Macintosh 600 ...

Page 607: ...FC J880DW Use Remote Setup through ControlCenter2 to add or change Address Book numbers on your computer 1 In the Finder menu bar click Go Applications Brother and then double click the ControlCenter icon The ControlCenter2 screen appears 2 Click the DEVICE SETTINGS tab 3 Click the Address Book button The Address Book opens in a Remote Setup window 4 Add or update the Address Book information as n...

Page 608: ...Home Appendix Appendix Specifications Enter Text on Your Brother Machine Supply Specifications 602 ...

Page 609: ... DCP J562DW MFC J680DW MFC J880DW 2 7 in 67 5 mm TFT Colour Touchscreen LCD and Touchpanel Power Source AC 220 to 240 V 50 60 Hz Power Consumption 2 DCP J562DW Copying 3 Approx 19 W Ready 5 Approx 3 W Sleep 5 Approx 0 8 W Power Off 5 6 Approx 0 2 W MFC J480DW Copying 4 Approx 19 W Ready 5 Approx 3 5 W Sleep 5 Approx 1 1 W Power Off 5 6 Approx 0 2 W MFC J680DW MFC J880DW Copying 4 Approx 19 W Ready...

Page 610: ...nted pattern 4 When using ADF single sided printing resolution standard document ISO IEC 24712 printed pattern 5 Measured according to IEC 62301 Edition 2 0 6 Even when the machine is turned off it will automatically turn itself on periodically for print head maintenance and then turn itself off Noise Level Sound Pressure Operating 50 dB A Approx 1 Temperature Operating 10 to 35 C Best Print Quali...

Page 611: ...mum Paper Capacity Up to 20 sheets thickness 0 25 mm Manual Feed Slot DCP J562DW MFC J680DW MFC J880DW Paper Type 2 Plain Paper Inkjet Paper coated paper Glossy Paper Recycled Paper Paper Size 1 A4 Executive Letter Legal JIS B5 A5 A6 Envelopes Com 10 DL C5 Monarch Photo 10 x 15 cm Photo L 89 x 127 mm Photo 2L 13 x 18 cm and Index Card 127 x 203 mm Maximum Paper Capacity Up to 1 sheet Paper Output ...

Page 612: ...0DW Up to 200 pages 1 Out of Paper Reception MFC J480DW Up to 170 pages 1 MFC J680DW MFC J880DW Up to 200 pages 1 1 Pages refers to the ITU T Test Chart 1 a typical business letter Standard resolution MMR code Specifications and printed materials are subject to change without prior notice Copy Specifications Colour Monochrome Yes Yes Copy Width 204 mm 1 Multiple Copies Stacks Sorts up to 99 pages ...

Page 613: ...Image Format Photo Print JPEG Progressive JPEG format is not supported AVI MOV Motion JPEG only Scan to Media JPEG PDF Colour TIFF PDF Monochrome Number of Files Up to 999 files Folders inside memory cards or USB Flash drives are also counted as files Folder Files can be stored up to four folder levels deep on the memory card or USB Flash drive Borderless A4 Letter Photo 10 x 15 cm Photo 2L 13 x 1...

Page 614: ...in Windows XP Windows Vista Windows 7 and Windows 8 resolution up to 19200 19200 dpi can be selected using the scanner utility Printer Specifications Resolution Up to 1200 6000 dpi Printing Width 1 204 mm 210 mm borderless 2 Borderless A4 Letter A6 Photo 10 x 15 cm Photo L 89 x 127 mm Photo 2L 13 x 18 cm Index card 127 x 203 mm 2 sided Paper Type Plain Paper Recycled Paper Paper Size 3 A4 Letter A...

Page 615: ...rted Operating Systems And Software Functions Computer Platform Operating System Version PC Interface Processor Hard Disk Space to install USB 1 10 100 Base TX Ethernet 2 Wireless 802 11b g n For Drivers For Applications Including Drivers Wind ows Oper ating Syste m Windows XP Home 3 4 Windows XP Professional 3 4 Printing PC Fax 5 Scanning Removable Disk USB or Memory card 6 Network Media Access L...

Page 616: ...x 19200 dpi 4 Nuance PaperPort 14SE supports Windows XP Home SP3 or greater Windows XP Professional 32 bit SP3 or greater Windows Vista SP2 or greater Windows 7 Windows 8 and Windows 8 1 5 PC Fax supports black and white only MFC models 6 Removable disk and Network Media Access are functions of PhotoCapture Center DCP J562DW MFC J680DW MFC J880DW For the latest driver updates visit http support br...

Page 617: ... I 4 G 5 J K L 5 J 6 M N O 6 M 7 P Q R S 7 8 T U V 8 T 9 W X Y Z 9 To move the cursor to the left or right press d or c Inserting spaces To enter a space in a fax number press c once To enter a space in a name press c twice Making corrections If you entered an incorrect character and want to change it press d or c to move the cursor under the incorrect character Press Clear and then enter the corr...

Page 618: ...ess d or c to highlight the incorrect character Press and then enter the correct character To insert a character press d or c to move the cursor to the correct place and then enter the character Press for each character you want to erase or press and hold to erase all the characters Related Information Appendix Send the Same Fax to More than One Recipient Broadcasting Store Address Book Numbers fr...

Page 619: ...Yield Magenta LC231M LC261M Black Yellow Cyan and Magenta Approximately 260 pages 2 For Australia and other Oceania countries For other countries High Yield Black LC233BK LC263BK High Yield Yellow LC233Y LC263Y High Yield Cyan LC233C LC263C High Yield Magenta LC233M LC263M Black Yellow Cyan and Magenta Approximately 550 pages 2 For more information about the replacement supplies visit us http www ...

Page 620: ...ook Address Book List ADF Automatic Document Feeder AES AOSS APIPA ARP ASCII Authentication Auto Reduction Automatic Fax Transmission Automatic Redial B Backup Print Batch Transmission Beeper Volume BOOTP BRAdmin Light BRAdmin Professional 3 Windows Broadcasting C Caller ID Channels CNG Tones Coding Method Colour Enhancement Communication Error or Comm Error Compatibility Group Contrast Custom Raw...

Page 621: ...ode Encryption Extension Telephone External Phone F F T Ring Time Fax Detect Fax Forwarding Fax Journal Fax Storage Fax Tones Fax Tel FaxAbility New Zealand only Fine Resolution G Gateway Grey Scale Group Number I IEEE 802 11b g n Infrastructure Mode Innobella IP Address IPv6 J Journal Period Home Glossary 615 ...

Page 622: ...ort Network Connection Repair Tool Network Key Network PC FAX Network PhotoCapture Center Network Remote Setup Network Shared Printing Node Name O OCR Optical Character Recognition Open System Overseas Mode P Pause Peer to Peer Photo resolution Mono only PhotoCapture Center PictBridge Ping Polling Protocols Pulse R RARP Home Glossary 616 ...

Page 623: ...tup Resolution Ring Delay Ring Volume S Scanning Search Settings Tables SNMP SSID Standard resolution Station ID Status Monitor Subnet Mask Super Fine resolution Mono only Switching Hub T TAD Telephone Answering Device TCP IP Temporary Settings TKIP Tone Transmission Transmission Verification Report U User Settings List V Vertical Pairing W Web Services WEP Home Glossary 617 ...

Page 624: ... Wi Fi Direct WINS WINS Server Wireless LAN Access Point Router WLAN Report WPA PSK WPA2 PSK Authentication Method WPS X Xmit Report Transmission Verification Report Home Glossary 618 ...

Page 625: ...ate IP Addressing APIPA protocol will automatically assign an IP address from the range 169 254 1 0 to 169 254 254 255 ARP Address Resolution Protocol ARP performs mapping of an IP address to a MAC address in a TCP IP network ASCII The acronym for American Standard Code for Information Interchange ASCII codes were established by the American National Standards Institute to serve as numerical repre...

Page 626: ...es the size of incoming faxes Automatic Fax Transmission Sending a fax without picking up the handset of the external telephone or pressing Hook Automatic Redial A feature that enables your machine to redial the last fax number after five minutes if the fax did not go through because the line was busy Backup Print Your machine prints a copy of every fax that is received and stored in memory This i...

Page 627: ...available only for Windows Go to your model s Downloads page on the Brother Solutions Center at http support brother com to download the latest version of Brother s BRAdmin Professional 3 utility Node name The node name appears in the current BRAdmin Professional 3 window The default node name is BRNxxxxxxxxxxxx for a wired network or BRWxxxxxxxxxxxx for a wireless network where xxxxxxxxxxxx is yo...

Page 628: ... between ITU T Groups Contrast Setting to compensate for dark or light documents by making faxes or copies of dark documents lighter and light documents darker Custom Raw Port Custom raw port is a commonly used printing protocol on a TCP IP network that enables interactive data transmission Default is Port 9100 Delayed Fax Sends your fax at a specified later time that day Density Changing the Dens...

Page 629: ...security settings define the authentication how the device identifies itself to the network and encryption how the data is encrypted as it is sent on the network If you do not correctly specify these options when you are configuring your Brother wireless machine it will not be able to connect to the wireless network Therefore care must be taken when configuring these options Encryption Methods for...

Page 630: ...ng fax machines while communicating information Fax Tel You can receive faxes and telephone calls Do not use this mode if you are using a telephone answering device TAD FaxAbility New Zealand only This feature is available only in New Zealand A subscriber service purchased from the telephone company that provides another phone number on an existing phone line The Brother fax machine uses the new n...

Page 631: ...s are connected via an access point router Innobella Innobella is a range of genuine supplies offered by Brother For best quality results Brother recommends Innobella ink and paper IP Address An Internet Protocol IP address is a series of numbers that identifies each device connected to a network An IP address consists of four numbers separated by dots Each number is between 0 and 255 Example In a...

Page 632: ... LPD or LPR protocol is a commonly used printing protocol on a TCP IP network mainly for UNIX based operating systems LPR Line Printer Daemon LPR or LPD protocol is a commonly used printing protocol on a TCP IP network MAC Address The MAC Address Ethernet Address is a unique number assigned for the machine s network interface MAC Address Filtering This security method controls access to the networ...

Page 633: ... entered in an ASCII or hexadecimal format ASCII Hexadecimal 64 40 bit Uses five text characters For example WSLAN case sensitive Uses 10 digits of hexadecimal data For example 71f2234aba not case sensitive 128 104 bit Uses 13 text characters For example Wirelesscomms case sensitive Uses 26 digits of hexadecimal data For example 71f2234ab56cd709e5412aa2ba not case sensitive WPA PSK WPA2 PSK and TK...

Page 634: ...e network authentication methods Under open system authentication any wireless devices are allowed to access the network without requiring a WEP key Overseas Mode Makes temporary changes to the fax tones to accommodate noise and static on overseas telephone lines Pause Allows you to place a delay in the dialling sequence while you are dialling or while you are storing Address Book numbers Press Pa...

Page 635: ...l Internet Protocol TCP IP protocol Pulse This feature is not available in some countries A form of rotary dialling on a telephone line RARP Reverse Address Resolution Protocol RARP finds the logical address for a machine that knows only its physical address To use RARP contact your network administrator Real Time Transmission When memory is full you can send faxes in real time Remaining Jobs You ...

Page 636: ...y and Fax Tel modes Ring Volume Volume setting for the machine s ring Scanning The process of sending an electronic image of a paper document into your computer Search An alphabetical electronic listing of stored Address Book and Group numbers Settings Tables At a glance instructions that show all the settings and options that are available for setting up your machine SNMP The Simple Network Manag...

Page 637: ...he host address and the first three segments are the network address Example Computer 1 can talk to Computer 2 Computer 1 IP Address 192 168 1 2 Subnet Mask 255 255 255 0 Computer 2 IP Address 192 168 1 3 Subnet Mask 255 255 255 0 0 denotes that there is no limit to communication at this part of the address Super Fine resolution Mono only 203 392 dpi Best for very small print and line art Switchin...

Page 638: ...e used for Touch Tone telephones Transmission The process of sending faxes over the telephone lines from your machine to the receiving fax machine Transmission Verification Report A report for each transmission that shows its date time and number User Settings List A printed report that shows the current settings of the machine Vertical Pairing Vertical Pairing is a technology for Windows that all...

Page 639: ...ess LAN Access Point Router A central device in a network that allows individual wireless LAN devices to connect to the network to communicate In addition the wireless LAN access point router also manages the security WLAN Report The WLAN Report prints your machine s wireless status report If the wireless connection fails check the error code on the printed report WPA PSK WPA2 PSK Authentication M...

Page 640: ...Visit us on the World Wide Web http www brother com OCE ASA Version 0 ...

Reviews: