


Scan Using the Scan Button on Your Brother Machine
> Scan-to Media Settings
Scan-to Media Settings
Related Models
: DCP-J562DW/MFC-J680DW/MFC-J880DW
[Scan Type]
/
[Resolution]
/
[File Type]
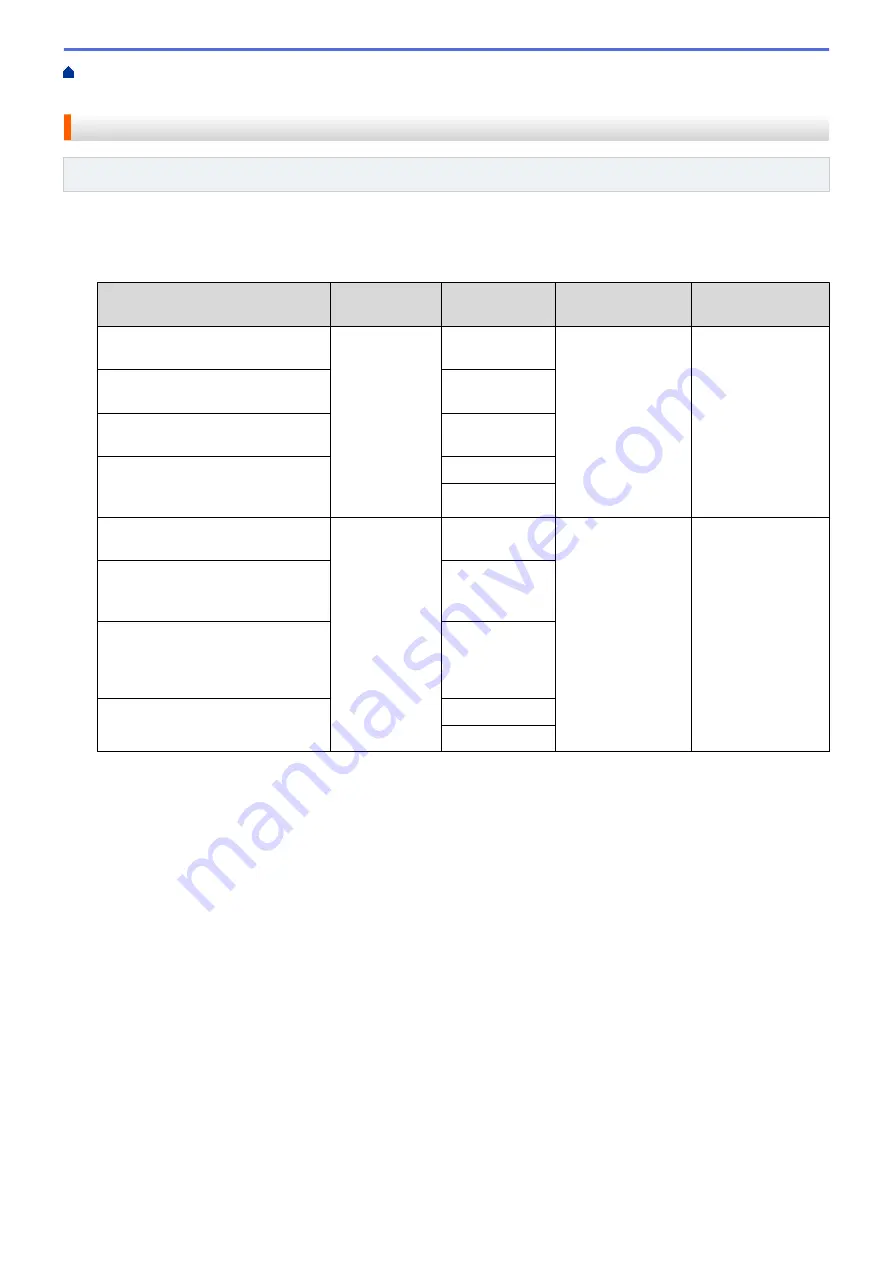
Selecting a higher dots per inch (dpi) setting increases the details captured during the scan; however, file size
and transfer time also increase. The table below shows the available quality settings and file types.
Recommended usage
Scan Type
Resolution
File Type
Default Setting of
File Type
Best for scanning text documents
at the smallest file size
Black and
White
100 dpi
TIFF
/
Best for scanning text documents
at better quality than 100 dpi
200 dpi
Best for scanning text documents
at better quality than 200 dpi
300 dpi
Best for scanning text documents
at the highest Monochrome quality
and largest file size
600 dpi
Auto
Best for scanning Colour
documents at the smallest file size
Colour
100 dpi
JPEG
/
Best for scanning Colour
documents at better quality than
100 dpi
200 dpi
Best for scanning Colour
documents or photos in high
quality at a smaller file size than
600 dpi
300 dpi
Best for scanning photos at the
highest quality and largest file size
600 dpi
Auto
[Scan Size]
Choose the scan size for your document.
[Scan Long Paper]
Scan documents printed on long paper using the ADF. (available only for certain models)
[File Name]
Change the default file name given to your scanned data. The default file name is six digits indicating the date
plus a two-digit sequence number. For example, the first file from 3 May 2013 would be "03051301". You may
replace the first six digits with up to six characters of your choice.
[Auto Crop]
(available only for certain models) Select
[On]
or
[Off]
. You can scan multiple documents placed on the
scanner glass. The machine will scan each document and create separate files or a single multi-page file.
[Remove Background Colour]
Remove the base colour of documents to make the scanned data more recognisable. When you use this
feature, select from three settings: high, medium and low.
[Set New Default]
Save your settings as the default.
112
Summary of Contents for DCP-J562DW
Page 33: ...Home Paper Handling Paper Handling Load Paper Load Documents 27 ...
Page 48: ... Paper Handling and Printing Problems 42 ...
Page 56: ... Paper Handling and Printing Problems 50 ...
Page 71: ... Other Problems 65 ...
Page 73: ...Home Print Print Print from Your Computer Windows Print from Your Computer Macintosh 67 ...
Page 95: ... Change the Default Print Settings Windows 89 ...
Page 121: ...Related Information Scan Using the Scan Button on Your Brother Machine 115 ...
Page 174: ...Related Information Scan from Your Computer Windows WIA Driver Settings Windows 168 ...
Page 286: ...Related Information Store Fax Numbers Set up Groups for Broadcasting 280 ...
Page 324: ...Related Information PC FAX Overview Windows 318 ...
Page 424: ...Related Information Mobile Web Connect 418 ...
Page 439: ...Related Information ControlCenter4 Windows 433 ...
Page 514: ...Related Information Clean Your Brother Machine Telephone and Fax problems Other Problems 508 ...
Page 521: ...Related Information Clean Your Brother Machine 515 ...
Page 524: ...Related Information Clean Your Brother Machine Paper Handling and Printing Problems 518 ...
Page 545: ...Related Information Routine Maintenance Replace the Ink Cartridges 539 ...
Page 557: ...Related Information General Settings Set Your Station ID 551 ...
Page 640: ...Visit us on the World Wide Web http www brother com OCE ASA Version 0 ...


