1 689 989 000
2013-05-02
|
Robert Bosch GmbH
Setup | EPS 200 | 37
en
7.
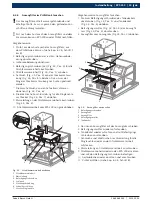
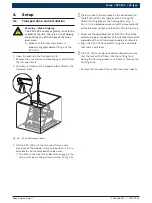
Slide the protective cover onto the protective cover
retainers of the EPS 200 (Fig. 17) whilst sliding the
leg spring legs through the spring holders of the
protective cover (Fig. 17, Pos. 1).
EPS 20
0
1
BOSCH
X20
458824-15_K
o
1
2
1
3
3
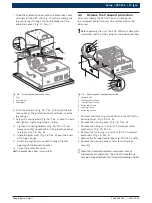
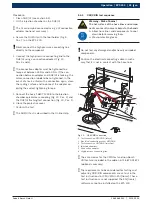
Fig. 18: Attaching the protective cover
1 Pins
2 Spring bolts
3 Grommets
8.
Push the two pins (Fig. 18, Pos. 1) through the pro-
tective cover, the protective cover retainers and the
leg springs.
9.
Screw the spring bolts (Fig. 18, Pos. 2) onto the pins
and tighten. Tightening torque = 6 Nm.
10.
Tighten the spring holders (Fig. 16, Pos. 3) and
hexagon socket head bolts on the protective cover
retainers (Fig. 16, Pos. 6).
11.
Slide the grommets (Fig. 18, Pos. 3) over the ends
of the leg springs.
12.
Guide the high-pressure hose through the rear
opening of the protective cover.
13.
Close the protective cover.
"
The protective cover is mounted.
4.3
Remove the transport protection
After assembling the EPS 200 on the work bench,
the transport protection must be removed from the
drive unit.
!
Before opening the unit, the EPS 200 must always be
turned off and the mains plug must be disconnected.
EPS 200
1
BOSCH
X20
458822-12
Ko
1
1
2
3
4
2
5
6
3
4
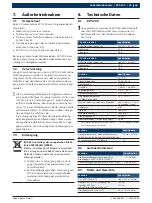
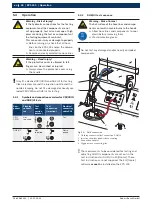
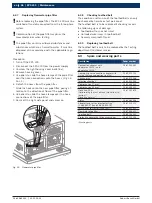
Fig. 19: Removing the transport protection
1 Hexagon nut
2 Transport protection
3 Transport protection
4 Fastening screws
5 Housing cover
6 Fastening screws
1.
Unscrew the fastening screws (8x) on the left of the
housing cover (Fig. 19, Pos. 6).
2.
Remove the housing cover (Fig. 19, Pos. 5).
3.
Remove the hexagon nuts for the transport safety
mechanism (Fig. 19, Pos. 1).
4.
Remove the fastening screws (2x) for the transport
protection (Fig. 19, Pos. 4).
5.
Remove the transport protection (Fig. 19, Pos. 2 and 3).
6.
Replace the housing cover and screw into place
securely.
i
Store the transport protection and screws for any
subsequent transportation. The EPS 200 should only
ever be transported with the transport protection fitted.

