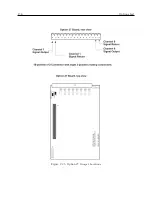
C.15 Option 19: Model 1088B Fault Relay
161
C.15
Option 19: Model 1088B Fault Relay
C.15.1
General Description
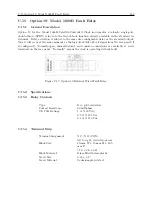
Option 19 for the Model 1088B Satellite-Controlled Clock incorporates a fail-safe single-pole,
double-throw (SPDT) relay into the Out-of-Lock function already available in the standard in-
strument. Relay activation is subject to the same user-configurable delay as the standard output;
thus it will occur at the same moment as the logic-level Out-of-Lock signal from the rear panel (if
so configured). Normally-open, normally-closed, and common connections are available at screw
terminals on the rear panel. “Normally” means the clock is operating without fault.
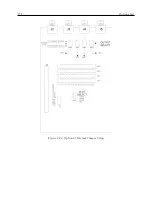
Figure C.17: Option 19 External Wired Fault Relay
C.15.2
Specifications
C.15.3
Relay Contacts
Type:
Dry; gold-clad silver.
Contact Resistance:
60 milliohms
UL/CSA Ratings:
1 A @ 30 Vdc;
0.5 A @ 125 Vac
0.3 A @ 110 Vdc
C.15.4
Terminal Strip
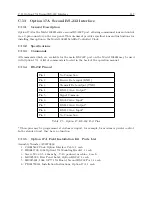
Terminal Assignment:
N.C./N.O./COM.
left to right, viewed from rear.
Block Size:
49-mm W x 15-mm H x 16.5-
mm D
(1.9: x 0.6 x 0.6)
Block Material:
Glass-filled thermoplastic.
Screw Size:
6-32 x 1/4”
Screw Material:
Cadmium-plated steel.
Summary of Contents for 1088A
Page 4: ...iv ...
Page 6: ...vi ...
Page 18: ...xviii LIST OF FIGURES ...
Page 23: ...1 4 Attaching Rack Mount Ears to 1088A B Series Clocks 3 Figure 1 2 Attaching Rack Mount Ears ...
Page 24: ...4 Unpacking the Clock ...
Page 32: ...12 Front and Rear Panels ...
Page 38: ...18 Connecting Inlet Power Input and Output Signals ...
Page 46: ...26 GPS Antenna and Cable Information ...
Page 48: ...28 Setting Internal Jumpers Figure 5 1 Model 1088B Main Board ...
Page 76: ...56 The Setup Menus ...
Page 112: ...92 Serial Communication and Command Set ...
Page 127: ...B 4 Physical Dimensions 107 Figure B 1 Suggested Mounting of the AS0094500 Surge Arrester ...
Page 128: ...108 Using Surge Arresters ...
Page 145: ...C 5 Option 04 Parallel BCD Output 125 Figure C 4 Option 04 Output Jumper Settings ...
Page 146: ...126 Options List Figure C 5 Option 04 Board Layout and Jumper Locations ...
Page 166: ...146 Options List Figure C 12 Option 17 Board Layout and Jumper Locations ...
Page 187: ...C 16 Option 20A Four Fiber Optic Outputs 167 Figure C 22 Option 20A Jumper Locations ...
Page 194: ...174 Options List Figure C 24 Option 23 Internal Jumper Setup ...
Page 196: ...176 Options List Figure C 25 Option 27 Jumper Locations ...
Page 214: ...194 Options List Figure C 28 Option 29 Connector Signal Locations ...
Page 270: ...250 Options List ...

