A.6 System Interface
103
A.6
System Interface
A.6.1
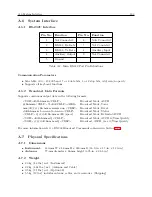
RS-232C Interface
Pin No.
Function
Pin No.
Function
1
Not Connected
6
Note Connected
2
RS-232, Rx Data
7
Not Connected
3
RS-232, Tx Data
8
Auxiliary Input
4
Auxiliary Output
9
Not Connected
5
Ground
–
–
Table A.2: Main RS-232 Port Pin Definitions
Communication Parameters
•
Selectable, 300
−
19,200 baud, 7 or 8 data bits, 1 or 2 stop bits, odd/even/no parity
•
Supports all keyboard functions
A.6.2
Broadcast Data Formats
Supports continuous output data in the following formats:
<
SOH
>
ddd:hh:mm:ss
<
CRLF
>
Broadcast Mode, ASCII
44hhmmss
<
CRLF
>
55ddd
<
CRLF
><
BEL
>
Broadcast Mode, Vorne
mm/dd/yyyy hh:mm:ss.sssssss nnn
<
CRLF
>
Broadcast Mode, Event
ddd:hh:mm:ss I=nn:nn X=nn:nn
<
CRLF
>
Broadcast Mode, Status
<
CRLF
>
Q yy ddd hh:mm:ss.000 (space)
Broadcast Mode, Extended ASCII
<
SOH
>
ddd:hh:mm:ssQ
<
CRLF
>
Broadcast Mode, ASCII w/Time Quality
<
SOH
>
yyyy:ddd:hh:mm:ssQ
<
CRLF
>
Broadcast, ASCII, year w/Time Quality
For more information refer to RS-232 Broadcast Commands contained in Section 9.2.1.
A.7
Physical Specifications
A.7.1
Dimensions
•
Instrument:
430-mm W x 44-mm H x 280-mm D (16.9-in. x 1.7-in. x 11.0-in.)
•
Antenna:
77-mm diameter x 66-mm height (3.05-in. x 2.61-in.)
A.7.2
Weight
•
2.0 kg (4.4 lbs.) net. (Instrument)
•
2.2 kg (4.84 lbs.) net. (Antenna and Cable)
•
0.5 kg (1.1 lbs.) net. (Option 06)
•
5.5 kg (12 lbs.) includes antenna, cables, and accessories. (Shipping)
Summary of Contents for 1088A
Page 4: ...iv ...
Page 6: ...vi ...
Page 18: ...xviii LIST OF FIGURES ...
Page 23: ...1 4 Attaching Rack Mount Ears to 1088A B Series Clocks 3 Figure 1 2 Attaching Rack Mount Ears ...
Page 24: ...4 Unpacking the Clock ...
Page 32: ...12 Front and Rear Panels ...
Page 38: ...18 Connecting Inlet Power Input and Output Signals ...
Page 46: ...26 GPS Antenna and Cable Information ...
Page 48: ...28 Setting Internal Jumpers Figure 5 1 Model 1088B Main Board ...
Page 76: ...56 The Setup Menus ...
Page 112: ...92 Serial Communication and Command Set ...
Page 127: ...B 4 Physical Dimensions 107 Figure B 1 Suggested Mounting of the AS0094500 Surge Arrester ...
Page 128: ...108 Using Surge Arresters ...
Page 145: ...C 5 Option 04 Parallel BCD Output 125 Figure C 4 Option 04 Output Jumper Settings ...
Page 146: ...126 Options List Figure C 5 Option 04 Board Layout and Jumper Locations ...
Page 166: ...146 Options List Figure C 12 Option 17 Board Layout and Jumper Locations ...
Page 187: ...C 16 Option 20A Four Fiber Optic Outputs 167 Figure C 22 Option 20A Jumper Locations ...
Page 194: ...174 Options List Figure C 24 Option 23 Internal Jumper Setup ...
Page 196: ...176 Options List Figure C 25 Option 27 Jumper Locations ...
Page 214: ...194 Options List Figure C 28 Option 29 Connector Signal Locations ...
Page 270: ...250 Options List ...


