9.2 Command Set
71
9.2.1
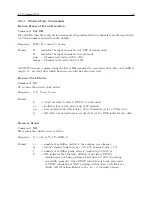
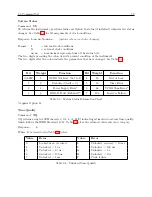
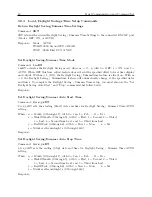
Broadcast Mode Commands
Broadcast Mode – INTERROGATE (Broadcast OFF)
Command:
B0, O0
B0 deactivates the RS-232C broadcast mode (resets to interrogate mode) on the main RS-232C
port. O0 deactivates the RS-232C broadcast mode on the option RS-232C port.
Response:
C
Broadcast Mode – ASCII STD
Command:
B1, O1
B1 configures the clock to broadcast the time-of-day as ASCII standard data from the main RS-
232C port. O1 configures the clock to broadcast ASCII standard data from the option RS-232C
port.
Response:
<
soh
>
ddd:hh:mm:ss
C
Broadcast Mode – VORNE STD
Command:
B2, O2
B2 configures the clock to broadcast data formatted for Vorne large format time displays from the
main RS-232C port. O2 configures the clock to broadcast from the option RS-232C port Vorne-
formatted data. Refer to Arbiter Systems Application Note 103 for more information on using
large format displays with Arbiter Systems’ GPS clocks.
Response: 44hhmmss
C
(UTC/Local Time)
55ddd
C
(day of year)
11nn
C
(out-of-lock time)
bel (bel = Hex 07; sounds at the end of the time code)
The number and order of strings returned depend upon options ordered with clock (for example,
see Option 28 in Appendix C, Options List, page 180):
Data is transmitted ahead of time, and the bel character is transmitted on time. When properly
configured, the Vorne displays update simultaneously upon receipt of the bel character.
Broadcast Mode – EVENT DATA
Command:
B3, O3
B3 configures the clock to broadcast from the main RS-232C port any event data at the time it is
recorded. O3 configures the clock to broadcast from the option RS-232C port any event data at
the time it is recorded. Options 17 and 18 also broadcast events.
Response: (Local)
mm/dd/yyyy hh:mm:ss.sssssss nnnAL (...BL)
C
(UTC)
mm/dd/yyyy hh:mm:ss.sssssss nnnAU (...BU)
C
Where:
nnn = event-buffer read index number
A = Channel A, B = Channel B
U = UTC Time, L = Local Time
Summary of Contents for 1088A
Page 4: ...iv ...
Page 6: ...vi ...
Page 18: ...xviii LIST OF FIGURES ...
Page 23: ...1 4 Attaching Rack Mount Ears to 1088A B Series Clocks 3 Figure 1 2 Attaching Rack Mount Ears ...
Page 24: ...4 Unpacking the Clock ...
Page 32: ...12 Front and Rear Panels ...
Page 38: ...18 Connecting Inlet Power Input and Output Signals ...
Page 46: ...26 GPS Antenna and Cable Information ...
Page 48: ...28 Setting Internal Jumpers Figure 5 1 Model 1088B Main Board ...
Page 76: ...56 The Setup Menus ...
Page 112: ...92 Serial Communication and Command Set ...
Page 127: ...B 4 Physical Dimensions 107 Figure B 1 Suggested Mounting of the AS0094500 Surge Arrester ...
Page 128: ...108 Using Surge Arresters ...
Page 145: ...C 5 Option 04 Parallel BCD Output 125 Figure C 4 Option 04 Output Jumper Settings ...
Page 146: ...126 Options List Figure C 5 Option 04 Board Layout and Jumper Locations ...
Page 166: ...146 Options List Figure C 12 Option 17 Board Layout and Jumper Locations ...
Page 187: ...C 16 Option 20A Four Fiber Optic Outputs 167 Figure C 22 Option 20A Jumper Locations ...
Page 194: ...174 Options List Figure C 24 Option 23 Internal Jumper Setup ...
Page 196: ...176 Options List Figure C 25 Option 27 Jumper Locations ...
Page 214: ...194 Options List Figure C 28 Option 29 Connector Signal Locations ...
Page 270: ...250 Options List ...


