Chapter 3
Connecting Inlet Power, Input and
Output Signals
3.1
Physical Configuration
The Model 1088B Satellite-Controlled Clock is designed for operation in an environment having
an ambient temperature range of 0
◦
to 50
◦
C (32
◦
to 122
◦
F). No external ventilation is necessary.
Operation is possible at temperatures of -20
◦
to +65
◦
C, although operation of the LCD display
will be degraded. Normal operation will be restored once the temperature has returned to the
specified range.
Allow adequate clearance for rear-panel connections, especially in rack-mounting situations. Ad-
equate clearance reduces the possibility of damage to the connectors, cables, or the instrument.
Ideally, the clock should be located close enough to the antenna location so that the standard
15-meter (50-foot) cable can be used. The loss and delay characteristics of the cable are important
factors in the calibration and accuracy of the instrument (refer to Section 4.4.1); thus, the entire
cable length should be used, with any excess coiled up and placed out of the way.
Arbiter Systems offers standard accessories allowing the antenna to be mounted up to 240 m (800
ft) from the clock if longer cable runs are required. These are described in Table 4.2. If a longer
antenna cable than this is required, please contact the factory for advice.
Model 1088B Power Supplies
To provide for a wide range of inlet power sources, the 1088B can be ordered with three different
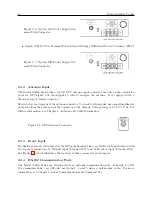
power inlet modules. Each of the power inlet module connectors are illustrated here and also in
Chapter 2. Take time to examine the power inlet module connection on your clock to verify that
it is correct according to your order. Make sure to check the inlet voltage range before connecting
power to the clock.
3.2
Standard IEC-320 Power Inlet Module
The standard IEC-320 power inlet module has a “computer type” power connector with power cord
for the required country code. Voltage and system frequency are given below with an outline of
the connector. Input voltages are 85 to 264 Vac, 47 to 440 Hz, or 110 to 370 Vdc,
<
20 Watts.
Summary of Contents for 1088A
Page 4: ...iv ...
Page 6: ...vi ...
Page 18: ...xviii LIST OF FIGURES ...
Page 23: ...1 4 Attaching Rack Mount Ears to 1088A B Series Clocks 3 Figure 1 2 Attaching Rack Mount Ears ...
Page 24: ...4 Unpacking the Clock ...
Page 32: ...12 Front and Rear Panels ...
Page 38: ...18 Connecting Inlet Power Input and Output Signals ...
Page 46: ...26 GPS Antenna and Cable Information ...
Page 48: ...28 Setting Internal Jumpers Figure 5 1 Model 1088B Main Board ...
Page 76: ...56 The Setup Menus ...
Page 112: ...92 Serial Communication and Command Set ...
Page 127: ...B 4 Physical Dimensions 107 Figure B 1 Suggested Mounting of the AS0094500 Surge Arrester ...
Page 128: ...108 Using Surge Arresters ...
Page 145: ...C 5 Option 04 Parallel BCD Output 125 Figure C 4 Option 04 Output Jumper Settings ...
Page 146: ...126 Options List Figure C 5 Option 04 Board Layout and Jumper Locations ...
Page 166: ...146 Options List Figure C 12 Option 17 Board Layout and Jumper Locations ...
Page 187: ...C 16 Option 20A Four Fiber Optic Outputs 167 Figure C 22 Option 20A Jumper Locations ...
Page 194: ...174 Options List Figure C 24 Option 23 Internal Jumper Setup ...
Page 196: ...176 Options List Figure C 25 Option 27 Jumper Locations ...
Page 214: ...194 Options List Figure C 28 Option 29 Connector Signal Locations ...
Page 270: ...250 Options List ...

