background image

Configure

Except on the first page, right running head:  
Heading1 or Heading1NewPage text (automatic)

17

Alcatel-Lucent

Beta

Beta

OmniAccess 5740 Unified Services Gateway Web GUI Users Guide

C

HASSIS

 C

ONFIGURATION

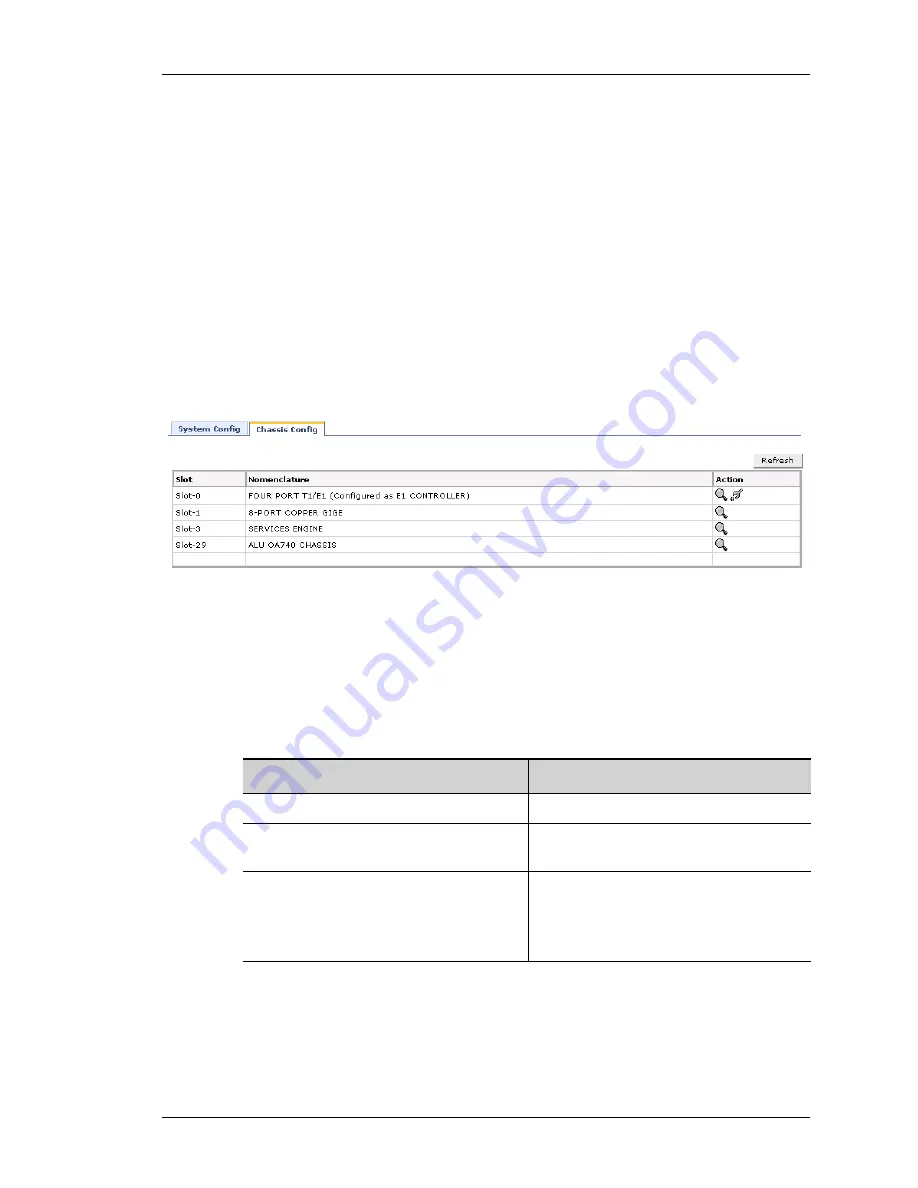
This page lists the respective slot numbers and the line cards associated with it 
that are installed in the system.

This also displays the details of the OmniAccess 5740 USG base system that 
includes the following components: OmniAccess 5740 USG Chassis, Switch 
Fabric, Services Engine, Fan Tray and Power Tray.

V

IEWING

 C

HASSIS

 C

ONFIGURATION

Step 1: 

From the USGM menu bar, click 

Configure

. All submenu/links under 

Configure are displayed in the left navigation panel.

Step 2: 

By default, 

System 

sub-menu is selected. 

System page has two tabs: 

System Config 

and 

Chassis Config

. Click 

Chassis 

Config

 tab. The following page is displayed in the center panel.

Figure 6: Chassis Config

The table below provides description of all the fields in the Chassis Config page.

Table 3: System Config Field Description

Field

Description

Slot

The slot number of the line card.

Nomenclature

The name of the line card/system 
component.

Action

Provides an option to view the details of 
the respective card.

Note: 

Provides an option to set the card 

type to T1 or E1.

Summary of Contents for OmniAccess 5740

Page 1: ... com Website www alcatel lucent com Part No 060314 00 Rev A For final production import color definitions from daldoc01 docteam templates framemaker book template color defs production colors fm Do not import other template elements such as page layout To return to the draft version import color def ns from draft colors fm To switch to the beta version import color def ns from beta colors fm OmniA...

Page 2: ...he Users of the OmniAccess 5740 Unified Services Gateway If it is not installed in accordance with the installation instructions it may not function exactly to the said specifications Modifying the equipment without Alcatel Lucent s written authorization may result in the equipment no longer complying with the said dimensions Copyright 2010 Alcatel Lucent All rights reserved Not withstanding any o...

Page 3: ...ndard Buttons on the GUI 10 Add 10 Edit 10 Delete Remove 10 Reset 10 Apply 10 Cancel 10 Icons and Labels 11 Logout 12 3 Configure 13 Configure 14 System 15 System Configuration 15 Chassis Configuration 17 Interfaces 20 Viewing Interfaces 21 Configure Gigabit Ethernet GigE Interface 23 Configure T1 Controller 29 Configure E1 Controller 33 Configure Channelized Serial Interface 36 Configure Serial I...

Page 4: ...st 126 Firewall 141 Firewall Configuration Wizard 141 Filters 150 NAT 157 DOS Attack 173 Transparent Firewall 178 Firewall Policy 181 VPN IPSec 188 IPSec Configuration Wizard 188 Preshared Keys 204 IKE Policy 206 Transform Set 211 VRRP 214 Viewing VRRP 215 Intrusion Prevention 221 Status 221 Global Settings 226 Signature Policies 228 Sensors 231 Alerts and Reports 235 View Rule File 237 QoS Qualit...

Page 5: ...e Statistics 312 DHCP Bindings 316 Active Routes 318 Traffic Statistics 320 IP Statistics 320 ICMP Statistics 322 SNMP Statistics 325 Firewall Session Statistics 327 Firewall and Security 329 Filters 329 NAT 332 DOS Attack 334 Firewall Policy 337 IPSec VPN Statistics 339 IPS Statistics 341 Summary 341 Preprocessor 343 Rules 345 QoS Statistics 347 Logs 349 ...

Page 6: ...rface 44 Interfaces Configure MLPPP Encapsulation on a Channelized Serial Interface 46 Interfaces Configure MLPPP Encapsulation on a Channelized Serial Interface Advanced Options 47 Interfaces Configure MLFR Encapsulation on a Channelized Serial Interface 49 Interfaces Configuring Serial Interface V 35 X 21 RS 232 50 Interfaces Configure VLAN 53 Interfaces Configure VLAN Add Port 54 Interfaces Con...

Page 7: ...ewall Wizard Interface Selection 143 Firewall Firewall Wizard DMZ Settings 144 Firewall Firewall Wizard DMZ Settings Add DMZ Service 145 Firewall Firewall Wizard Access Management 146 Firewall Firewall Wizard Summary 147 Firewall Filters Generated by the Wizard 148 Firewall DoS Attack Generated by the Wizard 148 Firewall Firewall Policy Generated by the Wizard 149 Firewall Filters 151 Firewall Fil...

Page 8: ...N IPSec Dead Peer Detection 207 VPN IPSec New IKE Policy 208 VPN IPSec View IKE Policy Details 210 VPN IPSec Transform Sets 211 VPN IPSec New Transform Set 212 Virtual Routing Redundancy Protocol VRRP Groups 215 VRRP Group Configuration 216 VRRP Group Configuration Add Secondary IP Address 217 VRRP Group Configuration Add Optional Parameters 219 VRRP Group Configuration View Master Router Details ...

Page 9: ...ment 287 License Management Install License from Device 289 License Management Install License from Device Browse File a 289 License Management Install License from Remote Site a 290 License Management Uninstall Backup License 291 License Management Backup License on USB Device 292 License Management Backup License to Remote Site 293 Maintenance Upgrade Software Upgrade 295 Upgrade Software Upgrad...

Page 10: ...S Attack Statistics 335 Monitor Firewall and Security DOS Attack View 335 Monitor Firewall and Security DOS Attack View Statistics 336 Monitor Firewall and Security Firewall Policy 337 Firewall and Security Firewall Policy Show Policy Statistics 337 Firewall and Security Firewall Policy Show Policy Statistics 338 Monitor IPSec VPN Statistics 339 Monitor IPS Statistics Summary 341 Monitor IPS Stati...

Page 11: ...Manual title to set redefine ManualTitle variable CHAPTER 1 PREFACE ABOUT THIS GUIDE This chapter describes how to configure OmniAccess 5740 Unified Services Gateway OmniAccess 5740 USG using the Web Graphical User Interface GUI tool Unified Services Gateway Configuration Manager USGM The guide contains procedures for configuring interfaces routing parameters SNMP syslog parameters time range list...

Page 12: ...erform system maintenance tasks like Software and Flash OS upgrade among others Chapter 5 Monitor lets you view statistics of various features configured on the OmniAccess 5740 USG DOCUMENT CONVENTIONS Note A note contains helpful suggestions or information that may be easily overlooked OBTAINING DOCUMENTATION Alcatel Lucent provides several ways to obtain technical assistance and other technical ...

Page 13: ...ccess 5740 Unified Services Gateway Web GUI Users Guide OBTAINING TECHNICAL ASSISTANCE For all customers partners resellers and distributors who hold valid Alcatel Lucent service contracts the Alcatel Lucent Technical Support Team provides 24 hour a day technical support services online and over the phone For Customer issues and help contact Alcatel Lucent US Customer Support 800 995 2696 Internat...

Page 14: ...Preface Left running head Chapter name automatic 4 Beta Beta OmniAccess 5740 Unified Services Gateway Web GUI Users Guide Alcatel Lucent ...

Page 15: ...ptional footer Manual title to set redefine ManualTitle variable CHAPTER 2 GUI LAYOUT AND LOGGING ON TO USGM This chapter provides a brief description of the USGM Unified Services Gateway Configuration Manager Web GUI layout and its components USGM WEB GUI TOOL The USGM Web GUI tool is an easy to use interface that helps you configure your OmniAccess 5740 USG without using the Command Line Interfa...

Page 16: ...eb browser from your PC Step 2 In the address bar field type the IP address of the interface obtained from the DHCP server and press the Enter key Example http ip address http 192 168 1 1 The login page for the Web GUI is displayed in the browser window Note Execute show ip interface brief command to view the IP address obtained from the server Step 3 Enter the default user name and password super...

Page 17: ...sword configured using the CLI to login to USGM For more information on configuring AAA user name and password refer the note below Step 2 This will launch the web interface to configure your OmniAccess 5740 USG Figure 1 Logon to USGM Note To enable AAA services on your system enter the command aaa services in configuration mode ALU config aaa services Establish authentication to new users by conf...

Page 18: ...in page is displayed Figure 2 USGM Home Page Top Panel The Top Panel of the USGM home page has a menu bar The menu bar consists of menu items Each menu item and their respective sub menu items are described in the later sections of this guide The Top Panel also has About USGM and Logout menu About USGM sub menu gives details on USGM tool like the version number model name and so on Logout enables ...

Page 19: ...onfiguration Service Availability panel displays the list of all the services available on the system The green icon indicates that the service is available and is running on the system The red icon indicates that the service is not currently available Security Alerts panel displays a graphical representation of the security alerts This gives a real time update on the number of DoS and IDS attacks...

Page 20: ...ibed in the specific section ADD This button is used to enter a new record If certain fields have default values it populates these You can enter data for the new record being created EDIT This button is used to edit a record DELETE REMOVE This button deletes a record RESET Resets the values entered in the fields After updating the entries for an existing record if you want go back to the old valu...

Page 21: ...cted item Delete Click this icon to delete the selected item Attach Interface Policy Click this icon to attach an interface or policy Detach Click this icon to detach an interface Activate Click this icon to activate the interface Shutdown Click this icon to shutdown the interface Select Click this icon to select an item from the available list View Click this icon to view details of the selected ...

Page 22: ...eway Web GUI Users Guide Alcatel Lucent LOGOUT To logout from the USGM click Logout on the Top Panel Confirm at the prompt to logout Note The system automatically logs you out of the tool if there is no activity for 15 minutes When you perform any activity after 15 minutes of inactivity the system prompts you to login again ...

Page 23: ...daldoc01 docteam templates framemaker book template color defs production colors fm Do not import other template elements such as page layout To return to the draft version import color def ns from draft colors fm To switch to the beta version import color def ns from beta colors fm Pagination Numeric continuous with preceding section of book OmniAccess 5740 Unified Services Gateway Web GUI Users ...

Page 24: ...CONFIGURE From the USGM menu bar click Configure All submenu links under Configure are displayed in the left navigation panel as shown below which allows you to configure various features on OmniAccess 5740 USG Figure 3 USGM Configure Main Page By default System is selected and its details are displayed in the Center Panel Submenu Menu Bar ...

Page 25: ... CONFIGURATION Step 1 From the USGM menu bar click Configure All submenu links under Configure are displayed in the left navigation panel Step 2 By default System sub menu is selected System page has two tabs System Config and Chassis Config By default System Config page is displayed in the center panel Figure 4 System Config The table below provides description of all the fields in the System Con...

Page 26: ...PARAMETERS Step 1 From the System Config page click Edit to edit the system parameters The following page is displayed Figure 5 Edit System Configuration Step 2 Enter or edit the system name system contact and system location in the respective fields System Name is mandatory Step 3 Click Apply to save the changes or click Cancel to cancel the operation ...

Page 27: ...IEWING CHASSIS CONFIGURATION Step 1 From the USGM menu bar click Configure All submenu links under Configure are displayed in the left navigation panel Step 2 By default System sub menu is selected System page has two tabs System Config and Chassis Config Click Chassis Config tab The following page is displayed in the center panel Figure 6 Chassis Config The table below provides description of all...

Page 28: ...details is to be viewed The following pop up window is displayed Figure 7 Chassis Config View SETTING CARD TYPE TO T1 OR E1 This enables you to set the T1E1 line card type to T1 or E1 for the first time 1 Click Configure icon in the Action column against the T1E1 line card 2 The following message box is displayed prompting you to set the line card type to T1 or E1 Figure 8 Chassis Config Setting C...

Page 29: ...OmniAccess 5740 Unified Services Gateway Web GUI Users Guide CHANGING CARD TYPE This enables you to change the already configured card type T1 to E1 1 Click Configure icon in the Action column against the T1E1 line card 2 The following message box is displayed Figure 9 Chassis Config Changing Card Type 3 Click OK to continue ...

Page 30: ... installed on your system The list also includes those interfaces that have already been configured through CLI This section explains on how to configure the following interfaces Configure Gigabit Ethernet GigE Interface Configure T1 Controller Configure E1 Controller Configure Channelized Serial Interface Configure Serial Interface V 35 X 21 RS 232 Configure Logical Interface i Add Virtual LAN VL...

Page 31: ...Users Guide VIEWING INTERFACES Step 1 From the USGM menu bar click Configure All submenu links under Configure are displayed in the left navigation panel Step 2 Click Interfaces sub menu The Interfaces page is displayed with the list of all the interfaces available on your system The list also displays those interfaces configured using the CLI commands Figure 10 Interfaces ...

Page 32: ...ce type configured such as GigabitEthernet loopback serial interface etc Address IP address of the interface Operational Status Shows if the interface is operationally active or inactive Action Provides option to edit activate shutdown the interface and associate policy policies to the interface Refresh Update the interface page Add Logical Interface Provides option to configure logical interfaces...

Page 33: ... cable between them making it impractical to connect geographically dispersed locations Modern advancements have increased these distances considerably allowing Ethernet networks to span tens of kilometers Follow the procedure below to configure Gigabit Ethernet interface through the Web GUI Step 1 On the Interfaces page click Configure icon against the Gigabit Ethernet interface that is to be con...

Page 34: ...nterface in the IP Address and Mask column 2 Click Apply to add the secondary IP address or click Cancel to cancel adding secondary IP address 3 Click Delete icon in the Action column to delete the secondary address Step 4 Configure advanced details in the Advanced table The table displays the default values You can retain the same or configure as required 1 Select the required Duplex operation to...

Page 35: ... timer for retransmission of PADI PADR packets in the Retry Timer field This sets the initial timer for re transmission of PPPoE PADI or PADR packets in the absence of a PADO or PADS from a server Wait period doubles between successive PADIs However after three unanswered PADIs wait period is reset to configured retry timer If the retry timer value is set to 0 PPPoE client sends only one PADI PADR...

Page 36: ... Step 3 Configure the PPP parameters on the FE interface 1 Select the IP address option from the IP Address drop down list Static Negotiate IP Address with the Peer If Static option is selected enter the IP address and the Mask in the IP Address and Mask fields This IP address will be advertised during IPCP but not allow its negotiation Click Remove to delete the IP address and re enter the new IP...

Page 37: ...ntication resets or negates the authentication protocol Note Server side credentials are mandatory for CHAP PAP EAP authentication protocol 4 Click Advanced Options to initiate LCP negotiation on a PPP encapsulation and configure PPP Timers The following pop up window is displayed Figure 13 Interfaces Configure PPP Advanced Options on the GigE Interface Configure LCP parameters in LCP Configuring ...

Page 38: ...ber of LCP or NCP without receiving a Terminate Ack before assuming that the peer is unable to respond The default value is 2 seconds iii Enter the max configure value in Max Configure field Configure Request packets Number of LCP or NCP without receiving a valid Configure Ack NaK Reject before assuming that the peer is unable to respond The default value is 10 seconds iv Enter the max failure val...

Page 39: ... prevalent in Europe and most of the Asian countries including India The T1 interface provides a transmission rate of 1 544 Mbps It can support up to 24 user channels each at a 64 kbps access rate and 56 kbps access rate The T1 interface supports 4 different bit structures dictated by the mode of operation Frame Super Frame Extended Super Frame and Unframed These bit structures determine how the b...

Page 40: ...the type Short or Long Select the Long radio button and select the pulse value from the Pulse drop down list Long option configures the transmit and receive levels for a cable length line build out longer than 660 ft for a T1 trunk The default length of the cable for a T1 is Long 0db Select the Short radio button and select the length from the Length drop down list Short option sets the transmit a...

Page 41: ... code for T1 Line Code is configured where the router or access server is intended to communicate with T1 fractional data lines i ami Alternate Mark Inversion AMI line code type AMI is a line encoding technique line code for T1s This three level system uses positive negative and grounded pulses e g 5V 0V 5V to represent logical values A logical 0 is represented with a grounded or absent pulse and ...

Page 42: ...lots that can be associated with the T1 controller in the Time Slot field Time slot can also be provided in a b format E g 1 2 Select the speed from the Speed drop down list Default speed is 64 kbps Click OK The channel group thus configured is displayed under the Channel Group Configuration table Repeat this procedure to configure more channel groups Step 5 Click Apply to save the T1 Controller c...

Page 43: ...ser channels though usually only 30 channels are used as dedicated user channels An E1 basic frame is made up of 256 bits 32 time slots each containing 8 bits Each time slot provides a 64 Kbps data throughput An E1 line connects two points in one of which the information is multiplexed and in the second demultiplexed Follow the procedure below to configure the E1 Controller Step 1 On the Interface...

Page 44: ...onfigured where the router or access server is intended to communicate with E1 fractional data lines i ami Alternate Mark Inversion AMI line code type ii hdb3 High density bipolar 3 hdb3 line code type Clock Source Select the clock source option Internal Line to set the clock source for E1 Clock source is used to transmit clock signals i Internal The controller synchronizes itself to the internal ...

Page 45: ...2 Select the speed from the Speed drop down list Default speed is 64 kbps Click OK The channel group thus configured is displayed under the Channel Group Configuration table Repeat this procedure to configure more channel groups Step 4 Click Apply to save the E1 Controller configuration or click Close to return to the Interfaces page Step 5 The channel group thus configured forms the channelized s...

Page 46: ...RF list The selected VRF is displayed in the VRF Forwarding field Note By default all the interfaces are associated with the Default VRF Step 3 You need to set the encapsulation type on the interface by selecting the required option under Encapsulation HDLC PPP Frame Relay MLPPP MLFR By default HDLC radio button is selected HDLC ENCAPSULATION High level Data Link Control HDLC Layer 2 of the OSI mo...

Page 47: ...e HDLC configuration or click Cancel to cancel the operation PPP ENCAPSULATION The Point to Point protocol PPP emerged as an encapsulation protocol for transporting IP traffic over point to point links PPP also established a standard for the assignment and management of IP addresses asynchronous and synchronous encapsulation network protocol multiplexing link configuration link quality testing err...

Page 48: ...MTU size in the MTU field This should be between 64 and 1500 4 Select the IP address option from the IP Address drop down list Static Negotiate IP Address with the Peer If Static option is selected enter the IP address and the Mask in the IP Address and Mask fields This IP address will be advertised during IPCP but not allow its negotiation Click Remove to delete the IP address and re enter the ne...

Page 49: ...protocols such as PAP CHAP EAP CHAP Challenge Authentication Protocol PAP Password Authentication Protocol EAP Extensible Authentication Protocol Authentication is not mandatory Set the authentication protocol for authenticating the peer by selecting the option from PPP Authentication drop down list Chap Pap Eap None You can set the credentials for PPP authentication on either the server side or c...

Page 50: ...ing head Chapter name automatic 40 Beta Beta OmniAccess 5740 Unified Services Gateway Web GUI Users Guide Alcatel Lucent Figure 20 Interfaces Configure PPP Encapsulation on a Channelized Serial Interface Advanced Options ...

Page 51: ...i Enter the restart timer in Restart Timer field to set the time period for retransmission of LCP and NCP packets The default value is 3 seconds ii Enter the maximum number of pings before terminating to send packets in the Max Terminate field This terminates request packets Number of LCP or NCP without receiving a Terminate Ack before assuming that the peer is unable to respond The default value ...

Page 52: ...interfaces but today it is used over a variety of other network interfaces as well Frame relay is a strictly layer 2 protocol suite which enables it to offer high performance and greater transmission efficiency This makes Frame Relay suitable for current WAN applications like LAN interconnection 1 Set the Frame Relay encapsulation on the interface by selecting Frame Relay radio button under Encaps...

Page 53: ...itting the packet on the link based on the fragment size parameter configured on the FR main interface Data as well as voice packets will be fragmented as long as the packet size is greater than the fragment size QoS will classify the fragments packets stream from any of the FR interface or sub interface and interleaves the voice packets and data fragments before sending on the physical interface ...

Page 54: ...not configured on that interface Enter the LMI Keep Alive interval in the Keep Alive field The default value is 10 seconds The LMI keep alive value should typically be equal to the corresponding interval at the switch Enter the polling interval value in the Polling Interval field The default value is 6 This is used to set the full status polling interval on a DTE interface Enter the DTE error thre...

Page 55: ...eceive Reconstructed Unit configuration option is sent to the peer during LCP negotiation Optionally an Endpoint Discriminator Option or SSHNF Option may also be sent out LCP negotiation and optional link authentication take place on each bundle link IPCP negotiation happens over the bundle meaning IPCP packets may be sent on any one of the bundle links Certain LCP packets like LCP Echo Request an...

Page 56: ...ier drop down list 3 Enter the bundle identification BID name to the bundle interface in the Description field 4 Enter the Maximum Packet size or Maximum Transmission Unit MTU size in the MTU field The default MTU on an MLPPP bundle interface is 1494 5 On some links it may be desirable to require a peer to authenticate itself before allowing network layer protocol packets to be exchanged To enable...

Page 57: ...ntication protocol 6 Click Advanced Options to initiate LCP negotiation on a PPP encapsulation and configure PPP Timers The following pop up window is displayed Figure 24 Interfaces Configure MLPPP Encapsulation on a Channelized Serial Interface Advanced Options Configure LCP parameters in LCP Configuring table This helps in deciding whether the system initiates the LCP negotiation or just respond...

Page 58: ... NCP without receiving a Configure Ack before assuming that configuration is not converging The default value is 5 seconds Click OK to save LCP and PPP Timers configuration or click Cancel to cancel the operation 7 After configuring the parameters click Apply to save the MLPPP configuration or click Cancel to cancel the operation MLFR ENCAPSULATION MLFR is defined in FRF 16 1 It is an extension to...

Page 59: ... the Maximum Packet size or Maximum Transmission Unit MTU size in the MTU field The default MTU on an MLPPP bundle interface is 1494 5 Enter the Link Identification name to the interface that is part of the bundle in the LID field The LID can be a maximum of 255 characters 6 Enter the hello interval in the Hello interval field Hello interval is the duration in seconds between successive hello mess...

Page 60: ...wo types of devices that communicate over a Serial Interface DTE Data Terminal Equipment and DCE Data Circuit Terminating Equipment A DTE connects to a network through a DCE device In a typical scenario a DTE device is connected to a DCE device The DCE device provides a clock signal that paces the communication between the device and the router This page enables you to configure the parameters for...

Page 61: ...ersion check box to invert the transmit clock to correct phase shift between the clock and the data When DTE DCE is using external clock source long cables at high speed might introduce phase shift in transmitted data and clock clock inversion can reduce errors by correcting the phase shift By default the transmit clock is not inverted Enter the CRC in the Cyclic Redundancy Check field Select the ...

Page 62: ...40 USG as a switch to another OmniAccess 5740 USG as a router VLAN information is exchanged between them Hybrid Used to connect to both VLAN aware tagged devices as well as VLAN unaware untagged devices Some points to note By default all the L2 Switch Ports are in Access mode and they are a part of VLAN 1 already configured in the device If a VLAN is configured on a particular L2 card it cannot be...

Page 63: ...rded To provide path redundancy Spanning Tree Protocol defines a tree that spans all switches in an extended network Spanning Tree Protocol forces certain redundant data paths into a standby blocked state If one network segment in the Spanning Tree Protocol becomes unreachable or if Spanning Tree Protocol costs change the spanning tree algorithm reconfigures the spanning tree topology and reestabl...

Page 64: ...fault all the interfaces are associated with the Default VRF Step 6 Click Add Port to add the Switch Port s to the VLAN Add Port pop up window is displayed Figure 28 Interfaces Configure VLAN Add Port Select the switch port from the Switchport drop down list Select the mode from the Mode drop down list Access Trunk Hybrid This command is used configure the L2 interface in the access trunk or hybri...

Page 65: ... option to edit the STP parameters is also enabled i Forward Time Enter the forward time in the range 4 30 seconds Default is 15 seconds ii Max Age Enter the max age value in the range 6 40 seconds Default is 20 seconds iii Hello Time Enter the value in the range 1 10 seconds Default is 2 seconds iv Priority Enter the bridge priority in the range 0 65535 Default is 32768 Selecting Disable option d...

Page 66: ...t bridge configure the PVST cost to prioritize an interface iii Enter the port priority in the Priority field range 0 255 This priority value is used to prioritize an interface when two bridges compete for position as the root bridge Default value for port priority is 128 iv Click OK to configure the switch port parameters or click Cancel to cancel the operation Step 12 Click Apply to save the VLA...

Page 67: ...d IP address and mask Modify if necessary 4 Description given for the VLAN and the VRF associated with the VLAN is displayed in the Description and VRF Forwarding fields Modify if necessary Click Remove to remove the remove the associated VRF 5 You can configure the secondary IP address for the VLAN interface in the Secondary Address table Click New Secondary Address to add a new secondary address...

Page 68: ...ch port gets deleted 7 Click Add Port to add new switch ports 8 After making the necessary changes click Apply to save the changes or click Cancel to cancel the operation EDIT STP CONFIGURATION STP for a VLAN can be configured by selecting a particular VLAN in the Interfaces page 1 In the Interfaces page click Edit STP icon for the VLAN interface whose STP parameters is to be configured STP Config...

Page 69: ...ional path a GRE tunnel must be configured from the remote endpoint as well No intermediary routers need to be configured and the tunnel rides on top of standard IP The only requirement is that the tunnel must be configured in a context where the remote endpoint is reachable If the remote address of a GRE tunnel is not reachable then any circuit associated with that tunnel is brought down Any inte...

Page 70: ...ition IPSec as a tunnel interface is required so that Pre post encryption or decryption policies for QoS Filters ACL can be applied Match list will be route based rather than policy based which means that routing can control what traffic needs to be secure Tunnel fail over can be handled by having traffic routed through another tunnel interface Allows to run dynamic routing protocols over the tunn...

Page 71: ...oposal in IKE policy md5 des ii Default PFS group in IKE policy pfs group2 iii Default IPSec security association lifetime in seconds 28800 iv Default IKE lifetime in seconds 86400 Default authentication mechanism Pre shared Keys PSK If a transform set is not configured the default transform set is applied to the crypto map Following are the default values for transform set i esp sha1 des ii esp m...

Page 72: ... the range 0 14487 Select IPSec GRE radio button to configure the mode on the tunnel interface By default tunnel is configured in the GRE mode Enter the IP address and the subnet mask of the tunnel interface in the IP Address and Mask field Associate a VRF to the tunnel Select the VRF to be associated from the VRF list The selected VRF is displayed in the VRF Forwarding field Note By default all t...

Page 73: ...n the Interfaces page click Configure icon for the GRE IPSec tunnel interface whose parameters are to be configured This displays the Configuration Serial page in the Center Panel Figure 32 Interfaces Configure Tunnel Configuration Step 2 Tunnel number mode IP address description MTU and VRF configured for the interface is displayed in the Basic box Make the necessary changes if necessary Tunnel N...

Page 74: ...nterface in the IP Address field or Select the interface that the tunnel will use from the Interface list Note The source IP address of the tunnel must be of either a loopback interface or one of the physical interfaces Ensure that the interface is reachable from the other end of the tunnel Enter the destination IP address of the tunnel at the remote end in the Tunnel Destination box This is the s...

Page 75: ...re the loopback interface by entering the interface number IP address VRF and description for the interface Enter the number for the interface number in the Interface Number field Enter the IP address and the subnet mask of the interface in the IP Address and Mask field Associate a VRF to the loopback interface Select the VRF to be associated from the VRF list The selected VRF is displayed in the ...

Page 76: ...Loopback interface to be configured Configuring Loopback page is displayed in the Center Panel Figure 34 Interfaces Configure Loopback Interface Step 2 The primary address configured for the interface is displayed in the Basic box 1 IP address and the description configured for the interface is displayed in their respective fields 2 VRF Forwarding displays the VRF configured To remove the VRF clic...

Page 77: ...e IP address is populated 1 Enter the secondary IP address and subnet mask for the interface in the IP Address and Mask column 2 Click Apply to add the secondary IP address or click Cancel to cancel adding secondary IP address 3 Click Delete icon in the Action column to delete the secondary address Step 4 Click Close at the bottom of the page to return to the Interfaces page DELETE LOOPBACK INTERF...

Page 78: ...erface is no longer part of the bundle the policies configured on the individual interface will become active Follow the below procedure to add a MLPPP bundle interface Step 1 Click Add Logical Interface on the Interfaces page A drop down list lists the logical interfaces that can be configured Select MLPPP from the list Configuring MLPPP Bundle Interface page is displayed as shown below Figure 35...

Page 79: ...tory for link fragmentation If only fragment delay is configured and QoS out policy is not configured then the link fragmentation will not come into effect Enter the fragment delay value in the Fragment Delay field in the range 1 256 Fragment delay on the MLPPP interface specifies how long it will take for a fragment to exit the interface in milliseconds The appropriate fragment size to meet the s...

Page 80: ... to a MLPPP bundle go to the respective serial interface page and set the encapsulation type to MLPPP For more details on configuring MLPPP encapsulation see MLPPP Encapsulation section Step 7 Click Advanced Options to configure PPP Timers The following window is displayed Figure 36 Interfaces Configure MLPPP Interface Advanced Options Configure the PPP Timer configuration in Timer Configurations ...

Page 81: ...After configuring the parameters click Apply to configure MLPPP interface or click Cancel to cancel the operation Step 9 The MLPPP interface thus added is displayed in the Interfaces page EDIT MLPPP INTERFACE Follow the procedure below to edit MLPPP interface configuration Step 1 On the Interfaces page click Configure icon for the MLPPP interface to be configured Configuring MLPPP Bundle Interface...

Page 82: ...ffective as long as the interface is part of the MLFR bundle When the interface is no longer part of the bundle the policies configured on the individual interface become active Follow the below procedure to add a MLFR bundle interface Step 1 Click Add Logical Interface on the Interfaces page A drop down list lists the logical interfaces that can be configured Select MLFR from the list Configuring...

Page 83: ...haracters Enter the DLCI value in the DLCI field This should be in the range 16 1007 Data link Connection Identifiers Frame Relay virtual circuits are identified by DLCIs These values are typically assigned by the Frame Relay service provider The DLCIs have a local significance which means that their values are unique to the link The system provides support for point to point FR DLCIs only Step 3 ...

Page 84: ...arameters click Apply to configure MLFR interface or click Cancel to cancel the operation Step 6 The MLFR interface thus added is displayed in the Interfaces page EDIT MLFR INTERFACE Follow the procedure below to edit MLFR interface configuration Step 1 On the Interfaces page click Configure icon for the MLFR interface to be configured Configuring MLFR Bundle Interface page is displayed in the Cen...

Page 85: ...Follow the procedure given below to attach policy to an interface Step 1 In the Interfaces page click Policy icon against the interface to which policy policies is to be attached Policy Association page is displayed Figure 38 Interfaces Policy Association 1 To attach a filter Under the Filters table configure the following i Click In Direction drop down list Filters created in your system are disp...

Page 86: ... QoS Quality of Service section If Transparent Firewall policies are not configured see Creating TF Policy section If Policy Based Routing policies are not configured see Configuring an IP Policy and a Rule for an IP Policy section 3 Attach an IPSec policy Select the IPSec policy policies to be attached to the interface from the list The IPSec policies already configured in your system is displaye...

Page 87: ... Confirm at the prompt to activate the interface This changes the administrative status of the interface to Active Note The Activate icon is displayed only when the interface is in inactive state SHUTDOWN THE INTERFACE To shutdown an interface click Shutdown icon for the selected interface and confirm at the prompt This will administratively bring down the interface and the status changes to Inact...

Page 88: ... Alcatel Lucent Specific Overview Note By default the DHCP service is disabled and you should enable the DHCP server explicitly for the service to become available Currently you can enable the DHCP service only through CLI The DHCP server in OmniAccess 5740 USG provides DHCP clients with an IP address along with other network and boot information based on the DHCP request received from the client ...

Page 89: ...ified Services Gateway Web GUI Users Guide VIEWING DHCP SERVER Step 1 From the USGM menu bar click Configure All submenu links under Configure are displayed in the left navigation panel Step 2 Click DHCP sub menu DHCP page has two tabs DHCP Server and DHCP Relay By default DHCP Server page is displayed in the center panel Figure 39 DHCP Server ...

Page 90: ...for the service to become available Step 1 Select Enable Service DHCP check box to enable the DHCP service Confirm at the prompt to enable the service Step 2 Uncheck the check box to disable the DHCP service Confirm at the prompt to disable the service Field Description DHCP SERVER DHCP Pool DHCP Pool name Property Pool property Value Values of the pool like IP address MAC address and so on Option...

Page 91: ...Add in the DHCP Server page Step 2 Add DHCP Pool window is displayed This window has two tabs DHCP IP Addresses and Options By default DHCP IP Addresses tab is selected and its details are displayed CONFIGURE NETWORK POOL 1 Enter the name for the DHCP pool in the DHCP Pool Name field 2 Select the VRF check box and select the VRF from the drop down list If the VRF name is specified it configures th...

Page 92: ...resses within the network of the pool i Specify the lower and the upper addresses of the network range in the Start Address and End Address fields The range should not include the network address and the broadcast address of the network Select Excluded IP Addresses check box to exclude an IP address of the range from the pool The excluded IP address should exist within the configured range i Click...

Page 93: ...e name for the DHCP pool in the DHCP Pool Name field 2 Select the VRF check box and select the VRF from the drop down list If the VRF name is specified it configures the DHCP pool in the specified VRF If the VRF is not specified the pool is configured for the Default VRF 3 Under the pool type select Host radio button Figure 42 DHCP Server Add DHCP Pool Host 4 Enter the host IP address that exists ...

Page 94: ...y default DHCP IP Addresses tab is selected Step 2 Select Options tab DHCP Options window is displayed This window allows you to configure DHCP Options to a specific pool 1 Enter the name for the DHCP pool in the DHCP Pool Name field 2 Select the VRF check box and select the VRF from the drop down list If the VRF name is specified it configures the DHCP pool in the specified VRF If the VRF is not ...

Page 95: ... Click Edit Edit Option pop up is displayed 2 Make the required changes and click OK to save the changes Delete DHCP Pool Option 1 Similarly select the option to be deleted from the options listed in the Options tab Click Remove 2 Confirm at the prompt to delete EDIT DHCP POOL To edit a DHCP pool follow the procedure given below 1 DHCP Server page displays the list of the DHCP pools configured Sel...

Page 96: ... specified in a pool then the pool specific per pool option overrides the global option for that pool To configure a DHCP global option follow the procedure given below Step 1 Click Global Options in the DHCP Server page Step 2 Configure Global Options pop up window is displayed Figure 45 DHCP Server Configure Global Options 3 Click Add to add a global option The following pop up window is display...

Page 97: ...Configure Global Options window Add as many options as required 6 Click OK to save the global options or click Cancel to cancel the operation Edit DHCP Global Option 1 Configure Global Options window lists all the configured global options Select the global option to be edited from the list and click Edit Edit Global Option pop up is displayed 2 Make the required changes and click OK to save the c...

Page 98: ...es the response back to the client The relay agent allows the client and server to reside on different subnets Alcatel Lucent Specific Overview We implement forwarding to the DHCP server directly or via rebroadcast on another interface on the OmniAccess 5740 USG VIEWING DHCP RELAY Step 1 From the USGM menu bar click Configure All submenu links under Configure are displayed in the left navigation p...

Page 99: ...el to cancel the operation Edit Relay DHCP Request to Server 1 Click Edit icon in the Action column to edit the Relay Server IP 2 Edit the Relay Server IP address 3 Click Apply to save the changes or Cancel to retain original parameters Delete Relay DHCP Request to Server 1 Click Delete icon in the Action column to delete the Relay DHCP Server parameters 2 Confirm at the prompt to delete Field Des...

Page 100: ...st DHCP Request to Interface table 2 Select the interface from the Interface column 3 Select the re broadcast interface from the Rebroadcast Interface column 4 Click Apply to save the configuration or click Cancel to cancel the operation Edit Rebroadcast Interface 1 Click Edit icon in the Action column to edit the rebroadcast interface 2 Select the new re broadcast interface 3 Click Apply to save ...

Page 101: ...d not reachable the static route is removed from the IP routing table Router might not be able to determine the routes to all other networks In that case you can configure default static route Note You can override static routes with dynamic routing information by assigning administrative distance You can configure route for same network through different interfaces and with different weights In t...

Page 102: ...Select VRF radio button to view the static routes attached to the VRF selected from the list Network Address IP address and prefix length of the destination network Network Mask Network mask of the destination network Gateway IP IP address of the gateway next hop through which the traffic is routed Interface IP address of the next hop interface through which the traffic is routed Administrative Di...

Page 103: ...nt the static route to be the default route By default 0 0 0 0 0 is configured as the default static route This is not editable Step 4 Configure the Gateway Router Next Hop IP address or the interface through which the traffic is routed Select the Interface check box and select the interface from the list Select the IP Address check box and enter the IP address Note Static routes for Point to poin...

Page 104: ...ciated to the default VRF or the VRF selected from the list is displayed in the Static Route Details page 2 Under Action column click Edit icon against the static route that needs to be edited Only the Administrative Distance can be edited 3 Enter the new administrative distance in the Administrative Distance field 4 Click Apply to save changes or Cancel to retain the original key DELETE STATIC RO...

Page 105: ...rough specific paths By using PBR customers can implement policies that selectively cause packets to take different paths PBR provides the ability to route traffic based on attributes other than the destination IP address Attributes like source IP address protocol type can be used to define policies and apply them to an interface Alcatel Lucent Specific Overview OmniAccess 5740 USG supports PBR th...

Page 106: ...cent VIEWING PBR Step 1 From the USGM menu bar click Configure All submenu links under Configure are displayed in the left navigation panel Step 2 Click Routing sub menu Routing page has three tabs Routing Policy Based Routing and VRF Click Policy Based Routing tab The following page is displayed Figure 50 Routing Policy Based Routing ...

Page 107: ...e IP Policy Interface Interface to which the IP policy is applied Action Provides an option to attach the IP policy to an interface and delete an IP policy PBR POLICY DETAILS Priority Priority set for the IP policy Match List Match list included in the IP policy Not Match List Match list not included in the IP policy For Us Route For Us Next Hop Interface Name of the interface Specifies the egress...

Page 108: ...l Lucent CONFIGURING AN IP POLICY AND A RULE FOR AN IP POLICY Follow the procedure given below to create a new IP Policy and configure a rule for an IP policy Step 1 Click New Policy in the Policy Based Routing page to create a new IP policy Step 2 The following page is displayed Figure 51 Policy Based Routing Create New IP Policy ...

Page 109: ...an have multiple match lists along with the option of any all Match List Include table displays a list of match lists already configured in the system Select the match list to be included from the Available MatchList column and click the button to move it to the Selected MatchList column Select as many match lists from the Available MatchList column and move it to the Selected MatchList column Sel...

Page 110: ...st Select the same to exclude it 4 Select the route option from the Route drop down list For Us Next Hop Select For Us to redirect the packet to the management plane of the OmniAccess 5740 USG Select Next Hop option Interface and IP address options are displayed Select the required option Next hop specified the egress path of the packet Note The interface name and or next hop shall specify the egr...

Page 111: ...MATCH LIST 1 In the Policy Based Routing page select the IP policy whose rule rules is to be deleted The rules already configured for the selected IP policy is displayed in the PBR Policy Details table 2 Click Delete icon in the Action column against the rule to be deleted 3 Confirm at the prompt to delete the rule ATTACH AN IP POLICY TO AN INTERFACE This command is used to attach an IP policy to ...

Page 112: ...lick Apply to attach the selected interface to the IP policy or click Cancel to cancel the operation DETACH IP POLICY FROM AN INTERFACE 1 Select the IP Policy from the Policy list Click Attach Interface icon Interface interfaces already bound to the selected filter is displayed in Attach Interface page 2 Click Detach icon in the Action column to detach the IP policy from the selected interface 3 C...

Page 113: ... default VRF is created by the system A default VRF is similar to any other VRF in the system with one minor difference The default VRF is always present and you cannot modify delete this VRF All interfaces and services are initially associated with the default VRF Notes A VRF system is shared by multiple customers and all the customers have their own routing tables Since multiple VPNs can connect...

Page 114: ...l Routing and Forwarding page Step 2 Configure New VRF page is displayed Figure 55 Routing Add New Static Route Step 3 Enter the VRF name and description in the VRF Name and Description fields Step 4 Click Add to add a new VRF or click Cancel to cancel the operation Field Description VRF VRF Name Name of the VRF Description Description given to a VRF Attached Interfaces Displays the interface inte...

Page 115: ...ding page under Action column click Edit icon against the VRF that needs to be edited 2 Edit the description for VRF 3 Click Apply to save the changes or Cancel to retain original parameters DELETE VRF 1 Under Action column click Delete icon against the VRF to be deleted in the Virtual Routing and Forwarding page 2 Confirm at the prompt to delete the VRF and its details All routing protocol config...

Page 116: ...nagement are the two ways of managing a device connected to a network Local management demands a human intervention where the managed object is situated This becomes cumbersome when the network devices are more and widespread Managing such a system becomes tedious and quite impossible SNMP comes here handy to manage the network remotely Using a workstation running one or more SNMP management appli...

Page 117: ...eb GUI Users Guide VIEWING SNMP Step 1 From the USGM menu bar click Configure All submenu links under Configure are displayed in the left navigation panel Step 2 Click System Access sub menu System Access page has three tabs SNMP Syslog and File Transfer Access By default SNMP tab is active and its details are displayed in the center panel Figure 56 System Access SNMP ...

Page 118: ...heck this check box to enable disable SNMP service Community Settings Traps Enable Enable SNMP trap Read Community Read community string Read Write Community Read Write community string Trap Host Configuration IP Address IP address of the SNMP trap host Port Port number of the SNMP trap host SNMP Version SNMP version configured of the trap host Community String Community string set on the SNMP tra...

Page 119: ...onfigure new SNMP trap hosts click New Trap Host in the Trap Host Configuration box This populates fields to add SNMP trap host details 1 The host IP address to which the trap messages are to be sent in the in the IP Address field 2 Enter the notification host s UDP port number in the Port field 3 Select the SNMP version from the SNMP Version drop down list 4 Set the SNMP community string in the C...

Page 120: ...g information can further be directed to the logging buffer to the console or terminal or to a remote syslog server Logging to the console and the logging buffer is ON by default VIEWING SYSLOG Step 1 From the USGM menu bar click Configure All submenu links under Configure are displayed in the left navigation panel Step 2 Click System Access sub menu System Access page has three tabs SNMP Syslog a...

Page 121: ...Type Buffered If Buffered is enabled it will store the logs in the memory buffer This will apply for logs having severity equal or smaller than the selected severity when enabled Console If Console is enabled it will show logs on the console This will apply for logs having severity equal or smaller than the selected severity when enabled System If System is enabled it will log the system logs This...

Page 122: ...og Parameters Step 1 Enable Logging in the Syslog page By default logging is enabled If not click Edit check the Logging check box click Apply Step 2 Set log options in the Log Options table 1 Click Edit to set the log options 2 Set the watermark in the Watermark field 3 Enter the buffered size in the Buffered Size field Severity The logs of the severity equal or smaller is the sent to the host Ac...

Page 123: ... Critical Errors Warnings Notifications Informational and Debugging 3 Click Apply to save the changes made to Log Options table ADD HOST Configure host details in the Host Configuration table 1 Click New Host to configure new host 2 Enter IP address in the IP Address field port number in the Port field and select severity from Severity drop down list 3 Click Apply to add new host EDIT HOST 1 Click...

Page 124: ...t navigation panel Step 2 Click System Access sub menu System Access page has three tabs SNMP Syslog and File Transfer Access Click File Transfer Access tab File Transfer and Access page is displayed File Transfer Protocol Status table displays the protocols that are supported for file transfer The Access Status table provides an option to enable disable the access protocols Figure 59 Management U...

Page 125: ...re the time range object that can be used across the application VIEWING TIME RANGE Step 1 From the USGM menu bar click Configure All submenu links under Configure are displayed in the left navigation panel Step 2 Click Time Range sub menu Time Range table is displayed in the center panel Note If there is no time range configured There is no Time Range To Display message is displayed in the Time R...

Page 126: ...er panel Step 2 Enter the name for time range in Time Range field Step 3 Select the type of time range Absolute or Periodic radio button By default Absolute is selected ABSOLUTE TIME RANGE To configure time range on a one time basis set the absolute time range 1 Select the Absolute radio button in the time range configuration page Absolute time range table is displayed Field Description TIME RANGE...

Page 127: ...Enter the start time in hh mm ss format in the Time field 3 Set the end date and time Check the End Date Time check box if you want to specify end date and time for the time range you are configuring i Set the end date Click button in the date field and select the end date ii Enter the end time in hh mm ss format in the Time field The end time configured should be more than the current time 4 Clic...

Page 128: ...iodic Time Range 2 Set the periodicity Select the periodicity Daily Weekend or Weekly radio button Daily Select this radio button to apply the time range every day at the specified time Weekend Select this radio button to apply the time range every weekend at the specified time Weekly Select this radio button to apply the time range on the specified day every week 3 Set the start and end time Ente...

Page 129: ...ied Services Gateway Web GUI Users Guide EDIT TIME RANGE 1 Click on the Edit icon in the Action column for the time range to be edited 2 Make changes to the time range settings Click Apply to save changes DELETE TIME RANGE 1 Click on the Delete icon in the Action column for the time range to be deleted 2 Confirm at the prompt to delete time range ...

Page 130: ...p of Interfaces IP addresses and subnets which are referenced by the match lists to create a rule This is helpful when you need to create some complex rules which references several group of interfaces or IP addresses If the list is also referenced in a rule any member of the list can match the rule so the relationship between the members of the list is a boolean Lists may also include other lists...

Page 131: ...xcept on the first page right running head Heading1 or Heading1NewPage text automatic 121 Alcatel Lucent Beta Beta OmniAccess 5740 Unified Services Gateway Web GUI Users Guide Figure 63 Traffic Classification List ...

Page 132: ...Field Description LIST List Name Lists configured on your system Action Provides option to delete the lists Create New List Add a new list LIST DETAILS Element Elements configured for the list Element type Host Prefix Interface or List Host Host IP address Prefix IP address prefix length Interface Interface name List Other lists configured on the system Action Provides option to delete the element...

Page 133: ...he elements for the list in List Details table 1 Select the type of element from the drop down list in the Element column and enter its respective details Host Prefix Interface List For the Host element type enter the IP address For the Prefix element type enter IP address and prefix length For the Interface element type select the interface from the interfaces list For the List element type selec...

Page 134: ... 1 In the List page select the list to which new element is to be added 2 Click New Element The fields to add element is populated in the List Details table as shown below Figure 65 Traffic Classification List Create New Element 3 Select the type of element from the drop down list in the Element column and enter its respective details Host Prefix Interface List 4 Click Apply to add the element to ...

Page 135: ...Action column against the list to be deleted 2 Confirm at the prompt to delete the list DELETE ELEMENTS FROM A LIST Follow the procedure below to delete elements from a list 1 In the List page select the list whose elements are to be deleted Elements already configured for the selected list is displayed in the List Details table 1 Click Delete icon in the Action column against the element to be de...

Page 136: ...IEWING MATCH LIST Follow the procedure given below to view Match List page Step 1 From the USGM menu bar click Configure All submenu links under Configure are displayed in the left navigation panel Step 2 Click Traffic Classification sub menu Traffic Classification has two tabs List and Match List Click the MatchList tab The following page is displayed in the center panel Figure 66 Traffic Classif...

Page 137: ...me Match lists configured on your system Action Provides option to delete the selected match list New MatchList Add new match lists MatchList Details Protocol Type of the protocol IP TCP UDP ICMP AH ESP and other protocols Source Source type Any Host Prefix Interface List Destination Destination type Any Host Prefix Interface List Summary Summary of the list rules Action Provides option to edit an...

Page 138: ...ist in the Match List page to create new match list Step 2 New Match List page is displayed Figure 67 Traffic Classification New Match List Configure Rule Include Match List Step 3 Enter the name for match list in MatchList Name field Select Configure Rule radio button to define the rule for the match list you are creating or select the Include Match List radio button to include rules from the mat...

Page 139: ...e Step 2 Enter the rule number to specify the rule priority in the Priority field Step 3 Select source from the Source drop down list ANY HOST PREFIX INTERFACE LIST Enter the source IP address for Host Enter the source address with prefix length for Prefix Select the interface from the interfaces list for Interface Select the list from the lists configured for List Step 4 Select the destination fr...

Page 140: ...me automatic 130 Beta Beta OmniAccess 5740 Unified Services Gateway Web GUI Users Guide Alcatel Lucent RULE ELEMENTS FOR IP PROTOCOL AH ESP GRE OSPF IGMP Figure 68 Traffic Classification New Match List Rule IP Protocol AH ESP GRE OSPF IGMP ...

Page 141: ...cedence level Check the IP Precedence check box to set IP precedence level in the range between 0 and 7 4 Add fragments Check the Fragment check box to match the IP Fragment bit 5 Select the type of traffic Check the Type check box to apply rule to the type of traffic Select the type of traffic from the list 6 Define rule based on packet length Check the Length check box to apply rule based on the...

Page 142: ...Add the DSCP Check the DSCP check box to add the DSCP Provide the DSCP value in the range between 0 and 63 or select the value from the drop down list 2 Add ToS Check the TOS check box select the ToS value from the drop down list 3 Set the IP precedence level Check the IP Precedence check box to set IP precedence level in the range between 1 and 7 4 Add Fragments Check the Fragment check box to ma...

Page 143: ...following options RPC PORTMAP SMTP SNMP SNMPTRAP SSH TELNET TFTP BGP DNS FTP FTP DATA HTTP HTTPS IMAP POP2 POP3 GT GE LT LE RANGE FIXED NFS 8 Apply rule based on destination Check the Service Destination Port check box apply rule based on destination Select from the following options RPC PORTMAP SMTP SNMP SNMPTRAP SSH TELNET TFTP BGP DNS FTP FTP DATA HTTP HTTPS IMAP POP2 POP3 GT GE LT LE RANGE FIX...

Page 144: ...Add the DSCP Check the DSCP check box to add the DSCP Provide the DSCP value in the range between 0 and 63 or select the value from the drop down list 2 Add ToS Check the TOS check box select the ToS value from the drop down list 3 Set the IP precedence level Check the IP Precedence check box to set IP precedence level in the range between 0 and 7 4 Add fragments Check the Fragment check box to ma...

Page 145: ...and 1500 You have the option to apply the rule for sizes greater than GT greater than or equal to GE less than LT less than or equal to LE between the range RANGE or for the fixed length FIXED 7 Apply rule based on source Check the From Source Port check box to apply rule based on source Select from the following options RPC PORTMAP SNMP SNMPTRAP TFTP DNS GT GE LT LE RANGE NFS SIP 8 Apply rule bas...

Page 146: ...reater than or equal to GE less than LT less than or equal to LE between the range RANGE or for the fixed length FIXED 2 Add fragments Check the Fragment check box to match the IP Fragment bit 3 Apply rule based on ICMP type Check the ICMP type check box to apply rule based on ICMP type 0 255 Specify the ICMP type 4 Apply rule based on ICMP sub type Check the ICMP subtype check box to apply rule b...

Page 147: ...another match list Step 2 Match List Include table is displayed This displays all the configured match lists Figure 72 Traffic Classification New Match List Include Step 3 Select the match list to be included from the Available MatchList column and click the button to move it to the Selected MatchList column Select as many match lists from the Available MatchList column and move it to the Selected...

Page 148: ...elect the match list to which new rule is to be added 2 Under Match list Details table click New Rule New Rule for the Match list page is displayed Figure 73 Traffic Classification Match List New Rule for the Match list 3 Define the rule as required Refer Configure Rule section for details on defining a rule Match list Name is not editable 4 Click Apply to save changes or Cancel to retain the orig...

Page 149: ...tem to another match list 2 Under Included Match list table click Add 3 Add Match List Include page is displayed Figure 74 Traffic Classification Match List Add Match List Include 4 Add match list s as required Refer Include Match list section for more details on adding a match list to another match list 5 Click Apply to save changes or Cancel to retain the original settings 6 The match lists that...

Page 150: ... are to be edited and click Edit 3 Edit Match List Include page is displayed The match list s included for the selected match list is displayed 4 Make the required changes Match list Name is not editable 5 Click Apply to save changes or Cancel to retain the original settings Note You cannot edit rule parameters or included match lists if the match list is attached to an interface DELETING MATCH LI...

Page 151: ...sh the services like ftp mail to the outside world DMZ Services have a local IP addresses in the Intranet and a global IP addresses in the Internet Depending on the Management protocols that are selected a firewall policy is generated that controls the traffic flow from the Untrusted network VIEWING FIREWALL WIZARD Follow the procedure given below to view the Firewall Wizard page Step 1 From the U...

Page 152: ...Follow the procedure below to configure a Firewall Policy using the wizard Step 1 Click Launch Wizard in the Firewall Configuration Wizard Policy page to create new Firewall Policy The following window is displayed Figure 76 Firewall Firewall Wizard Introduction Step 2 Click Next Interface Selection window is displayed This page allows you to attach a firewall policy to an interface ...

Page 153: ... or WAN Untrusted Interfaces box If a policy is already attached to the selected interface the system prompts you a message Step 3 Click Next DMZ Settings window is displayed A Demilitarized Zone DMZ is a network attached to an internetworking device on the border of a trusted and untrusted zones This network typically comprises the servers and related network resources that need exposure to the u...

Page 154: ...Enable DMZ check box and click Next to continue firewall policy configuration without configuring DMZ settings Or To configure DMZ settings follow the procedure given below 1 Select the DMZ interface from the Select DMZ interface drop down list If a policy is already attached to the selected interface the system prompts you a message 2 Add the DMZ service s to be accessed through the internet Clic...

Page 155: ...ss and the Global IP Address fields Local and Global IP Address are those of the respective Server as seen in your DMZ network and internet Click OK The added service is displayed in the Select DMZ Services to be accessed from the Internet list Repeat the procedure to add as many services as required Select the service to be edited and Edit to edit the service parameters and click Delete to delete...

Page 156: ...ic 146 Beta Beta OmniAccess 5740 Unified Services Gateway Web GUI Users Guide Alcatel Lucent Figure 80 Firewall Firewall Wizard Access Management 1 By default all the access protocol are enabled 2 Unselect the check box to disable the access protocol ...

Page 157: ...s DMZ interface if any the management protocols being configured for the firewall policy It also displays the filters and the rules lists and the match lists associated with the filter and the DoS attack that are auto generated by the wizard Step 6 Click Finish to save the configuration and generate the firewall policy Step 7 A status bar is displayed showing the firewall policy creation Once the ...

Page 158: ... head Chapter name automatic 148 Beta Beta OmniAccess 5740 Unified Services Gateway Web GUI Users Guide Alcatel Lucent Figure 82 Firewall Filters Generated by the Wizard Figure 83 Firewall DoS Attack Generated by the Wizard ...

Page 159: ...e first page right running head Heading1 or Heading1NewPage text automatic 149 Alcatel Lucent Beta Beta OmniAccess 5740 Unified Services Gateway Web GUI Users Guide Figure 84 Firewall Firewall Policy Generated by the Wizard ...

Page 160: ...cket filter sequence only the virtual interface ruleset will be used for the packets exiting from a virtual interface The physical interface rules will have no effect on these packets In contrast to other products OmniAccess 5740 USG differentiates between the classification and the actions The classification on OmniAccess 5740 USG is done by the use of match lists and the actions are done by the ...

Page 161: ...ure Except on the first page right running head Heading1 or Heading1NewPage text automatic 151 Alcatel Lucent Beta Beta OmniAccess 5740 Unified Services Gateway Web GUI Users Guide Figure 85 Firewall Filters ...

Page 162: ...or stateful Time Range Time range configured for the filter Action Provides option to edit the filter parameters and delete the filter New Filter Create a new filter Configured Actions Priority Priority set for the filter rule Match list Match lists associated to the filter Rule Action Action for the rule DENY PERMIT Action Provides option to edit delete the configured rule New Action Add a new ru...

Page 163: ...ers New Filter Step 2 Set the filter parameters in the Filter Params table 1 Enter the filter name in the Filter Name field 2 Select the default action for the filter from the Default Action drop down list DENY PERMIT 3 Select the stateless filtering option from the Stateless drop down list YES NO Note You can configure time range for a filter The option to add time range to the filter is enabled ...

Page 164: ...Actions table This populates fields to define action for the filter as shown below Figure 87 Firewall Filters Add Rule to a Filter 3 Enter the priority number in the Priority field Priority number indicates which rule would be applied first when the filter is bound to an interface Lower the number higher the priority If you do not enter any priority the system takes default priority number of 10 o...

Page 165: ...ace list 4 Set the direction to which the filter is to be applied IN OUT 5 Click Apply to attach the filter to the selected interface DETACH FILTER FROM AN INTERFACE 1 Select the filter from the filter list Interfaces already bound to the selected filter are displayed in Interface Bindings table 2 Click Detach icon in the Action column to detach filter from the selected interface 3 Confirm at the ...

Page 166: ... list 2 Click Delete icon in the Action column against the filter to be deleted 3 Confirm at the prompt to delete the selected filter EDIT FILTER RULE 1 Select the filter from the filter list Rules already configured for the selected filter is displayed in Configured Actions table 2 Click Edit icon in the Action column against the filter rule to be edited 3 Edit the rule parameters for the filter ...

Page 167: ...anges used for translation can be explicitly specified For Source NAT if no IP pool or host address is specified the default is the box s IP address of the egress interface on which the NAT policy is applied VIEWING NAT Follow the procedure given below to view NAT page Step 1 Launch the Web GUI tool Step 2 From the USGM menu bar click Configure All submenu links under Configure are displayed in th...

Page 168: ...Configure Left running head Chapter name automatic 158 Beta Beta OmniAccess 5740 Unified Services Gateway Web GUI Users Guide Alcatel Lucent Figure 90 Firewall and Security NAT ...

Page 169: ...selected NAT policy New Nat Create a new NAT Policy NAT Policy Nat Type Type of the NAT configured Source NAT or Destination NAT Configured Rules Priority Priority set for the NAT rule Match List Match list associated to the NAT rule Summary Summary of parameters on the NAT filter Action Provides option to edit delete the configured NAT Rule New Rule Configure new NAT rule Interface Bindings Inter...

Page 170: ...icy page to create a new NAT policy The New NAT Configuration page is displayed Figure 91 Firewall NAT New Source NAT Configuration Step 2 Enter NAT name in the NAT Policy Name field Step 3 Select the NAT type as Source by selecting the Source radio button Step 4 Click Apply to create new NAT NAT Rule Configuration page for the new Source NAT you just created is displayed Step 5 Configure the NAT ...

Page 171: ...tic Address Translation 1 Select the Priority Rule Number check box to set the priority number for the rule to be applied Priority number indicates which rule would be applied first when the NAT policy is bound to an interface Lower the number higher the priority If you do not enter any priority the system takes default priority number of 10 or increments 10 to the last entered value 2 Select the ...

Page 172: ...adio button Enter the IP address of the host in the IP Address field Select IP Pool radio button select the list name from the Pool Name list The Port Range radio button is disabled for Static Address Translation Note If no address is configured the IP address of the egress interface on which the NAT policy is applied will be used If a SNAT policy with the pool configuration is attached to an inte...

Page 173: ... Users Guide Address and Port Translation Figure 93 Firewall NAT Source NAT Configuration NAT Rule Address Port Translation 1 Set Priority Rule Number Check the Priority Rule Number check box to set the priority number for the rule to be applied Higher the number higher is the priority 2 Select match list Select the match list from the Match List field in the Match List box ...

Page 174: ... field ii Configure SNAT with a port range by selecting Port Range check box Enter lower and upper port range values in the Lower and Upper fields This is optional Select IP Pool radio button i Select the list name from the Pool Name list ii Configure SNAT with a port range by selecting Port Range check box Enter lower and upper port range values in the Lower and Upper fields This is optional Sele...

Page 175: ...l NAT Source NAT Configuration NAT Rule Bypass 1 Set Priority Rule Number Check the Priority Rule Number check box to set the priority number for the rule to be applied Higher the number higher is the priority 2 Select match list Select the match list from the Match List field in the Match List box 3 Click Apply to configure NAT rules for the newly created SNAT policy or Cancel to return to the NA...

Page 176: ...olicy page to create a new NAT policy The New NAT Configuration page is displayed Figure 95 Firewall NAT New Destination NAT Configuration Step 2 Enter NAT name in the NAT Policy Name field Step 3 Select type of NAT as destination by selecting Destination radio button Step 4 Click Apply to create new DNAT NAT Rule Configuration page for the new DNAT you just created is displayed Step 5 Configure N...

Page 177: ...tatic Address Translation 1 Select the Priority Rule Number check box to set the priority number for the rule to be applied Priority number indicates which rule would be applied first when the NAT policy is bound to an interface Lower the number higher the priority If you do not enter any priority the system takes default priority number of 10 or increments 10 to the last entered value 2 Select th...

Page 178: ...for a DNAT by selecting Port check box Enter the port number The range for the port is 1 65535 This is optional Select Pool radio button i Select the list name from the Pool Name list ii Configure port number for a DNAT by selecting Port check box Enter the port number The range for the port is 1 65535 This is optional 4 Click Apply to configure NAT rules for the newly created DNAT policy or Cance...

Page 179: ...x 3 Set Internal Mapping This allows you to configure a DNAT with host IP address or an IP address pool Select Host radio button i Enter the IP address of the host in the Host IP field ii Configure port number for a DNAT by selecting Port check box Enter the port number The range for the port is 1 65535 This is optional Select Pool radio button i Select the list name from the Pool Name list ii Con...

Page 180: ...iguration NAT Rule Bypass 1 Set Priority Rule Number Check the Priority Rule Number check box to set the priority number for the rule to be applied Higher the number higher is the priority 2 Select match list Select the match list from the Match List field in the Match List box 3 Click Apply to configure NAT rules for the newly created DNAT policy or Cancel to return to the NAT Policy page ...

Page 181: ... The direction for the interface is set automatically when the interface is selected 4 Click Apply to add the selected NAT to the selected interface or click Cancel to cancel the operation DETACH NAT FROM AN INTERFACE 1 Select the NAT from the NAT list Interfaces already bound to the selected NAT are displayed in Interface Bindings table 2 Click Detach icon in the Action column to detach the NAT f...

Page 182: ... NAT policy from the NAT policy list Rules already configured for the selected NAT policy is displayed in Configured Rules table You can edit the rule settings for the NAT policy 2 Click Edit icon in the Action column against the NAT rule to be edited NAT Rule Configuration page for the selected NAT rule is displayed 3 Configure edit NAT rule Refer Step 5 in the Creating Source NAT SNAT Policy and...

Page 183: ...S ATTACK Follow the procedure below to view DOS Attack page Step 1 Launch the Web GUI tool Step 2 From the USGM menu bar click Configure All submenu links under Configure are displayed in the left navigation panel Step 3 Click Firewall sub menu The Firewall has the following tabs Firewall Wizard Filters NAT DOS Attack Transparent Firewall and Firewall Policy Select DOS Attack tab DOS Attack page i...

Page 184: ...e procedure below to create DOS Attacks Step 1 Click New DOS Attack in DOS Attack page to create new DOS Attack The New Attack page is displayed Field Description DOS ATTACK Configured DOS Attack Attack Name DOS attack configured on your system Firewall Policy Reference Firewall policy to which the DOS attack is attached Action Provides option to view the configured DOS attacks edit and delete the...

Page 185: ...Except on the first page right running head Heading1 or Heading1NewPage text automatic 175 Alcatel Lucent Beta Beta OmniAccess 5740 Unified Services Gateway Web GUI Users Guide Figure 101 Firewall DOS Attack New ...

Page 186: ... If you want to configure stateful attacks select Stateful radio button If you want to configure stateless attacks select Stateless radio button If you want to choose specific DOS attack types select Customize radio button Step 4 To save the newly created DOS Attack click Apply else click Cancel to return to DOS Attack page VIEW CONFIGURED DOS ATTACKS This enables you to view all the DOS attacks c...

Page 187: ...iguration Attack page 3 Click Apply to save configuration changes or Cancel to return to DOS Attack page DELETE DOS ATTACK POLICY 1 Click Delete icon in the Action column against the DOS attack to be deleted 2 Confirm at the prompt to delete DOS attack policy Note You cannot delete DoS attack if the attack is attached to a firewall policy To delete the attack object disassociate the DOS attack fro...

Page 188: ... The TF framework allows ARP packets to be bridged across the TF ed interfaces The TF framework provides configuration for non IP packets to be transparently bridged across the TF ed interfaces VIEWING TF Follow the procedure below to view TF page Step 1 Launch the Web GUI tool Step 2 From the USGM menu bar click Configure All submenu links under Configure are displayed in the left navigation pane...

Page 189: ...he procedure below to create TF policy Step 1 Click New in Transparent Forwarding Details page to create new TF policy Add Transparent Forwarding page is displayed Figure 104 Firewall Transparent Firewall New Field Description TRANSPARENT FORWARDING DETAILS Policy Name Name for the TF policy Protocol Protocol type In Interface Incoming interface on which the TF is configured Out Interface The outg...

Page 190: ...n Interface list This configures the TF feature on the interface Step 5 Select the outgoing interface from the Out Interface list Interface attachment is mandatory Step 6 Click Apply to add the new TF policy or Cancel to cancel the operation EDIT TF POLICY 1 Click the Edit icon in the Action column against the TF policy to be edited 2 Make the required changes Policy Name cannot be modified 3 Clic...

Page 191: ...POLICY Follow the procedure below to view Firewall Policy page Step 1 Launch the Web GUI tool Step 2 From the USGM menu bar click Configure All submenu links under Configure are displayed in the left navigation panel Step 3 Click Firewall sub menu The Firewall has the following tabs Firewall Wizard Filters NAT DOS Attack Transparent Firewall and Firewall Policy Select Firewall Policy tab Firewall ...

Page 192: ...ring DOS attack rule to the firewall Rule The rule number Match List Match list associated with the firewall policy Dos Attack DOS attack policy associated with the firewall policy Action Action defined for the firewall policy Time Range Time range associated with the firewall policy Action Provides option to edit or delete the DOS attack rules New DOS Attack Rule Allows to create new DOS attack r...

Page 193: ...igure 106 Firewall Firewall Policy New Firewall Policy Step 2 Enter the firewall policy name in the Firewall Name field Step 3 Click Add to new firewall policy or click Cancel to cancel the operation Action Provides option to edit or delete the intrusion rules New Intrusion Rule Allows to create new intrusion rule for firewall policy INTERFACE BINDINGS Interface Interface to which the firewall pol...

Page 194: ...on Rules Step 3 Configure rule for selected rule type Adding DOS Attack Rule to the Firewall Policy 1 Select DOS Attack Rules radio button for configuring DOS attack rule to the firewall 2 Fields to add new DOS Attack Rules is populated in the DOS Attack Rule Configuration table Figure 107 Firewall Firewall Policy Add New DOS Attack Rule 3 Enter rule number select match list DOS attack policy defi...

Page 195: ...intrusion prevention settings and view intrusion prevention configuration status see Intrusion Prevention section 1 Click Intrusion Rules radio button for configuring Intrusion rule to the firewall 2 Fields to add new intrusion rule is populated in the Intrusion Rule Configuration table Figure 108 Firewall Firewall Policy Add New Intrusion Rule 3 Enter rule number select match list sensor name ent...

Page 196: ...G FIREWALL POLICY 1 Click Delete icon in the Action column against the Firewall Policy to be deleted 2 Confirm at the prompt to delete the selected firewall policy Note To delete the firewall policy detach the firewall policy from the interface and or disassociate the DOS attack policy or time range EDITING FIREWALL POLICY RULE 1 Select the firewall policy from the Firewall Policy Name list Rules ...

Page 197: ... displayed in DOS Attack Rule Intrusion Rule Configuration table 2 Click Delete icon in the Action column for the firewall policy rule to be deleted 3 Confirm at the prompt to delete the firewall Policy rule DETACH FIREWALL POLICY FROM AN INTERFACE 1 Select the firewall policy from the Firewall Policy Name list Interfaces already configured for the selected firewall policy is displayed in the Inte...

Page 198: ...amely 3DES AES IPSec license is required For more information on how to install the license refer to License Management section in this guide IPSEC CONFIGURATION WIZARD VPN IPSec Wizard allows you to configure VPN IPSec policies using VPN IPSec Profiles Tunnel Interface only or Crypto map other interfaces in a few easy steps VPN IPSec Wizard configures the following Creates Crypto map or IPSec pro...

Page 199: ... displayed in the left navigation panel Step 2 Click VPN IPSec sub menu The VPN IPSec has four tabs IPSec Wizard Preshared Keys IKE Policy and Transform Set By default IPSec Wizard tab is selected and IPSec Wizard page is displayed in the center panel Figure 110 VPN IPSec IPSec Wizard CONFIGURE IPSEC POLICY USING THE WIZARD Follow the procedure below to configure a IPSec Policy using the wizard St...

Page 200: ...rofile is displayed Figure 112 VPN IPSec IPSec Wizard Create IPSec Policy with IPSec Profile 2 Enter the IPSec Profile name in the Policy Name field 3 Tunnel Interface Details is optional By default Tunnel Interface Details check box is enabled Unselect the Tunnel Interface Details check box and click Next to continue IPSec profile configuration Or Configure a Tunnel interface Enter the number for...

Page 201: ...t Note The source IP address of the tunnel must be of either a loopback interface or one of the physical interfaces Ensure that the interface is reachable from the other end of the tunnel ii Enter the destination IP address of the tunnel at the remote end in the IP Address field This is the source interface from the point of view of the other end of the tunnel Make sure that this address is reacha...

Page 202: ...policy during connection or security association negotiation Attach a peer to a crypto map Click Add Peer Peer pop up window is displayed Figure 114 VPN IPSec IPSec Wizard Create IPSec Policy with Crypto map Add Peer i Enter the peer IP address in the Peer IP Address field ii Enter the preshared key in the Pre shared Key field iii Confirm the preshared key by entering it in the Re enter Pre shared...

Page 203: ...n the Match list Name field iii Select any of the protocols from the Protocol Type drop down list iv Enter the source information in the Source box Select the address type from the Address Type drop down list Host Prefix Enter the source IP address for host and enter the source address with prefix length for prefix v Enter the source information in the Destination box Select the address type from ...

Page 204: ...the required one from the drop down list ii The parameters configured for the selected match list is displayed in the respective fields under Existing Match list Parameters None of these parameters are editable iii Click OK The match list thus selected is displayed in the VPN Traffic Match list field Step 3 Click Next IKE Settings window is displayed This window allows you to configure IKE policy ...

Page 205: ... in IKE policy md5 des Default PFS group in IKE policy pfs group2 Default IPSec security association lifetime in seconds 28800 Default IKE lifetime in seconds 86400 Retain the default values or configure as required 2 Configure IKE setting as required To do the same uncheck the Use Default IKE Policy check box Here you have two options Configure a new IKE policy or use an already created IKE Polic...

Page 206: ...figured in the system Following pop up window is displayed Figure 118 VPN IPSec IPSec Wizard IKE Settings Use Existing IKE Policy ii Select an IKE Policy list displays the IKE policies already configured in the system Select the required one from the list and click OK The selected IKE policy is displayed in the IKE Policy Name field iii And the parameters configured for the selected IKE Policy is ...

Page 207: ...ields The default lifetime for IPSec SA is 28800 seconds 3 By default Use Default Transform set check box is enabled A transform set default is created in your system If a Transform set is not configured the default Transform set policy is applied to the IPSec profile Following are the default values for transform set default esp sha1 des esp md5 des Retain the default values or configure as requi...

Page 208: ...orm set name field to use the Transform set already configured in the system Following pop up window is displayed Figure 120 VPN IPSec IPSec Wizard IKE Settings Select Existing Transform set ii Select Transform set list displays the Transform set already configured in the system Select the required one from the list and click OK The selected Transform set is displayed in the Transform set Name fie...

Page 209: ...ng1 or Heading1NewPage text automatic 199 Alcatel Lucent Beta Beta OmniAccess 5740 Unified Services Gateway Web GUI Users Guide Figure 121 VPN IPSec IPSec Wizard Summary IPSec Profile Policy Type Figure 122 VPN IPSec IPSec Wizard Summary Crypto map Policy Type ...

Page 210: ...izard tab as shown below Figure 123 VPN IPSec IPSec Wizard IPSec Policy policies Generated by the Wizard The following information is displayed Table 20 VPN IPSec Policies Field Description Field Description VPN IPSEC POLICIES Name Name of IPSec policy Type IPSec policy type configured Crypto map or IPSec Profile Peer Host IP address of the peer host remote host IKE Policy IKE policy associated wi...

Page 211: ...Edit icon in the Action column against the IPSec policy to be edited 2 Edit IPSec Policy page is displayed This page displays the parameters configured for the selected IPSec policy Modify the required parameters Figure 124 VPN IPSec IPSec Wizard Edit IPSec Policy Transform Set Transform set associated with the IPSec policy Click on this to view the details of the Transform set configured for the ...

Page 212: ...d 7 Click Apply to save the IPSec policy parameters or Cancel return to VPN IPSec Policies page 8 Interface Bindings table displays the interfaces to which the IPSec policy is attached Modify if required Click Attach in the Interface Bindings table This populates fields to select the interface Select the interface from the list of interfaces to which you want to attach the IPSec policy The same IP...

Page 213: ...GUI Users Guide VIEW IPSEC POLICY DETAILS 1 Click on the View Details icon in the Action column against the IPSec policy whose details are to be viewed 2 A pop up window displays the IKE Policy Peer Host Match list Transform Set PFS Lifetime in Seconds and KB details for the selected IPSec policy as shown below Figure 125 VPN IPSec IPSec Wizard View IPSec Policy Details ...

Page 214: ...From the USGM menu bar click Configure All submenu links under Configure are displayed in the left navigation panel Step 3 Click VPN IPSec sub menu The VPN IPSec has four tabs IPSec Wizard Preshared Keys IKE Policy and Transform Set Select Preshared Key tab Preshared Key page is displayed in the center panel Figure 126 VPN IPSec Preshared Keys The table below provides field description for Preshar...

Page 215: ... in the Peer Host field Step 3 Enter the preshared key in the Key field Currently the preshared key length is restricted to 128 characters and the minimum length is 8 characters The same preshared key can be assigned to multiple hosts however a host cannot have different preshared keys Step 4 Click Apply to create a new preshared key EDIT PRESHARED KEYS 1 Click Edit icon in the Action column again...

Page 216: ...ecure channel to negotiate the final keys The more often the key is changed the more a channel is secure This page allows you to create IKE policy VIEWING IKE POLICY Follow the procedure below to view IKE Policy page Step 1 Launch the Web GUI tool Step 2 From the USGM menu bar click Configure All submenu links under Configure are displayed in the left navigation panel Step 3 Click IPSec VPN sub me...

Page 217: ...s supported in GUI You can configure the DPD at the crypto map level through CLI The DPD provided in the IKE page configures the DPD globally with the interval in seconds for which the keep alive messages will be sent and the time out in seconds after which the peer will be declared to be dead The default value for DPD time out is three times that of the DPD interval specified Follow the procedure...

Page 218: ...ocedure below to create a new IKE Policy Step 1 Click New in the IKE Policy page to create a new IKE policy New IKE Policy page is displayed Figure 130 VPN IPSec New IKE Policy Step 2 Enter the name for IKE policy in Name field IKE policy name can be any alphanumeric name not exceeding 128 characters Step 3 Select the encryption algorithm in the Proposal field The default algorithm is md5 des Maxi...

Page 219: ...hich lifetime expires first When rekeying happens both lifetimes get reset Step 7 Click Apply to add new IKE policy or Cancel return to IKE Policy page EDITING IKE POLICY 1 Click on the Edit icon in the Action column against the IKE policy you want to edit 2 Edit IKE Policy page is displayed 3 Edit the IKE policy settings Name field cannot be edited 4 Click Apply to save changes or Cancel to retai...

Page 220: ...ide Alcatel Lucent VIEW IKE POLICY DETAILS 1 Click on the View Details icon in the Action column for the IKE policy which you want to view the details 2 A pop up window displays the Proposal PFS Lifetime IP Security Association details for the selected IKE policy as shown below Figure 131 VPN IPSec View IKE Policy Details ...

Page 221: ...b GUI tool Step 2 From the USGM menu bar click Configure All submenu links under Configure are displayed in the left navigation panel Step 3 Click VPN IPSec sub menu The VPN IPSec has four tabs IPSec Wizard Preshared Keys IKE Policy and Transform Set Select Transform Set tab Transform Sets page is displayed in the center panel Figure 132 VPN IPSec Transform Sets The table below provides descriptio...

Page 222: ...te a new transform set The fields to add name and encapsulation for transform set are populated Figure 133 VPN IPSec New Transform Set Step 2 Enter the name for the transform set The Transform Set name can be any alphanumeric name not exceeding 128 characters Step 3 Select the encapsulation The default encapsulation is esp sha1 des and esp md5 des A maximum of four encapsulations can be assigned f...

Page 223: ...e encapsulation for transform set Name field cannot be edited 3 Click Apply to save changes or Cancel to retain the original values DELETING TRANSFORM SET 1 Click Delete icon in the Action column against the transform set you want to delete 2 Confirm at the prompt to delete the transform set Note A transform set associated with any IPSec policy cannot be deleted To delete a transform set associate...

Page 224: ...sts The advantage gained from using VRRP is a higher availability default path without requiring configuration of dynamic routing or router discovery protocols on every end host VRRP is an election protocol that dynamically assigns responsibility for one or more virtual routers to the VRRP routers on a LAN allowing several routers on a multiaccess link to utilize the same virtual IP address A VRRP...

Page 225: ...onfigure new groups edit delete the configured VRRP groups Figure 134 Virtual Routing Redundancy Protocol VRRP Groups The table below provides field description for VRRP page Table 24 VRRP Field Description Field Description VRRP Interface Name Interface on which VRRP is configured Group ID Group ID configured for the VRRP group Virtual IP Address The virtual IP address configured for the VRRP Pri...

Page 226: ...first select an interface on which VRRP is to be configured Note that operational state of the interface must be up Select the interface on which VRRP is to be configured from the list VRRP State Indicates whether the current router is a Master Slave in its VRRP group Master router acts as a default gateway for receiving or transmitting packets for a network The backup virtual routers are referred...

Page 227: ...e Note The IP address must be unique across the system That is the IP address used for a VRRP group cannot be used as interface address primary or secondary on any interface except on the interface on which the group is being configured and it cannot be used as the group address for any other group on the same interface or on any other interface Enter the primary IP address in the IP Address field...

Page 228: ...ield This sets the interval between sending successive advertisements by the master virtual router in a group i If you have selected In Sec radio button enter the interval value in seconds The valid time range for an advertisement packet is between 1 and 255 seconds with the default being 1 one second ii If you have selected In MSec radio button enter the interval value in milliseconds The valid t...

Page 229: ...face to be tracked for the VRRP group The priority of the group is lowered when the tracked interface state changes to down Disabling the track on interface mode removes tracking of the interface iii Set the authentication sting for the VRRP in the Group Authentication String field OmniAccess 5740 USG supports null authentication and plain text authentication Maximum of 8 characters are allowed in...

Page 230: ...Down Interval values for the selected interface in a table as shown below Figure 138 VRRP Group Configuration View Master Router Details EDIT VRRP CONFIGURATION 1 Click Edit icon in the Action column against the interface whose VRRP configuration is to be edited VRRP Group configuration for the interface is displayed 2 Make necessary changes in the respective fields Interface and the Group ID fiel...

Page 231: ...you to View IPS configuration Status Set IPS Global Settings Configure Signature Policies Configure Sensors View Alerts and Reports View Rule File Note IDS IDS and IDS signature update is a licensed feature and not part of the basic security package To enable this functionality you need to first install the license For more information on how to install the license refer to License Management sect...

Page 232: ...tus Field Description Field Description STATUS Intrusion Sensor IPS Status Signature Database Version The version of the signature database which will have the vendor version information as well as the local version information Signature Database TimeStamp This displays the timestamp of the signature file Signature Update Report This displays the last time the security appliance on device checked ...

Page 233: ...ically update the signature set on the OmniAccess 5740 USG This sets the time at which the signature update is scheduled Rebuild This allows to manually rebuild the latest updated signature database Rollback This allows to rollback to different versions of Snort rule database Rollback is not allowed if Rebuild is in progress Report Status This displays conflicts between the user changes in the cur...

Page 234: ...tatus table Signature Schedule page is displayed Figure 140 Intrusion Prevention Status Signature Update 2 Select the protocol from the Protocol drop down list HTTPS HTTP 3 Select the server option Default Server Other Server from where you want to download the signature files If you have selected Other Server option enter the URL of the location from where Signature file has to be downloaded in t...

Page 235: ... Choose the Effective When option by selecting Rebuild Passive radio button Based on the chosen option the new signature file comes into effect and gets updated in the IDS database Rebuild Downloads the latest signature database The signature database will come into effect immediately after download Passive Downloads the latest signature database Changes will not come into effect even on next rebo...

Page 236: ...ors Alerts and Reports and View Rule File Select the Global Settings tab Global Settings page is displayed in the center panel Figure 142 Intrusion Prevention Global Settings The table below provides field description for Global Settings page Table 26 Global Settings Field Description Field Description GLOBAL SETTINGS Intrusion Sensor Allows to select the intrusion sensor type Group Type Allows to...

Page 237: ...ype Category or Priority from Group Type list and click GO The selected group type is displayed in the table with options to edit rule and status Step 3 Click Edit Rule icon against the rule to be edited under the Action column Editable fields for the selected rule is populated in Rule and Status column Step 4 Set the rule from the Rule drop down list Select Prevent Reset Prevent Detection to set ...

Page 238: ...ft navigation panel Step 2 Click Intrusion Prevention sub menu The Intrusion Prevention menu has six tabs Status Global Settings Signature Policies Sensors Alerts and Reports and View Rule File Select Signature Policies tab Signature Policies page is displayed in the center panel Figure 144 Intrusion Prevention Signature Policies Step 3 Select the intrusion sensor type from the Intrusion Sensor li...

Page 239: ...n Field Description VIEWING SIGNATURE POLICIES Intrusion Sensor Allows to select the intrusion sensor type Options Class Allows to select class type Category Allows to select category type Priority Allows to set priority SID Lookup Signature ID SID The database ID number of the signature Status The status of the signature policy Enabled Disabled Priority Defines the attack signature as Low Medium ...

Page 240: ...inst the Signature Policy you want to edit Signature Configuration page is displayed Figure 145 Intrusion Prevention Edit Signature Policy 2 Modify the rule content and the choose enabled or disabled in the Enable field Based on the selected option the signature is enabled or disabled The Sensor Type and the SID cannot be modified 3 Click Update to save changes or Cancel to retain the original val...

Page 241: ...rusion Prevention sub menu The Intrusion Prevention menu has six tabs Status Global Settings Signature Policies Sensors Alerts and Reports and View Rule File Select Sensors tab Sensors page is displayed in the center panel Figure 146 Intrusion Prevention Sensors The table below provides field description for Sensors page Table 28 Sensors Field Description Field Description SENSORS Intrusion Sensor...

Page 242: ...ep 2 Enter the name for new sensor in Name field in Sensor box Step 3 Enter the Rate Threshold values These are optional Enter the rate threshold packet value for the sensor in Packets field in Rate Threshold box The rate threshold packet value is in the range of 1 4294967295 Enter the rate threshold time in Per Milli Seconds field The rate threshold time value is in the range of 1 4294967295 mill...

Page 243: ...olicy 3 Change the existing sensor parameters if required 4 Click New in the Associate Firewall Policy table This populates fields to associate the Firewall Policy 5 Enter the rule number in the Rule field This is optional 6 Select the firewall policy from the Firewall Policy list to which you want to associate a sensor The same Sensor can be associated to multiple Firewall Policies and the same F...

Page 244: ... displayed 2 Click Delete icon in the Action column against the firewall policy to be removed in Associate Firewall Policy table 3 Confirm at the prompt to delete the rule firewall policy from a Sensor DELETING A SENSOR 1 Click Delete icon in the Action column against the Sensor you want to delete 2 Confirm at the prompt to delete the Sensor Note A Sensor assigned to a Firewall Policy cannot be de...

Page 245: ...lick Configure All submenu links under Configure are displayed in the left navigation panel Step 2 Click Intrusion Prevention sub menu The Intrusion Prevention menu has six tabs Status Global Settings Signature Policies Sensors Alerts and Reports and View Rule File Select Alerts and Reports tab IDS Alerts and Reports page is displayed in the center panel Figure 149 Intrusion Prevention Alerts and ...

Page 246: ...d description for Alerts and Reports page Table 29 Alerts and Reports Field Description Field Description IDS ALERTS AND REPORTS Severity Severity of the alert message Date Date the alert message is posted Module Module for which the alert message is posted Sub Module Sub module for which the alert message is posted Message The alert message Refresh Refresh the messages ...

Page 247: ...Intrusion Prevention sub menu The Intrusion Prevention menu has six tabs Status Global Settings Signature Policies Sensors Alerts and Reports and View Rule File Select View Rule File tab View Rule File page is displayed in the center panel Figure 150 Intrusion Prevention View Rule File The table below provides field description for View Rule File page Table 30 View Rule File Field Description Fiel...

Page 248: ... Services Gateway Web GUI Users Guide Alcatel Lucent Step 3 Select the rule file to be viewed from the File Name drop down list Step 4 Click View File to view the contents of the selected rule file in File Contents box as shown below Figure 151 Intrusion Prevention View Rule File View File ...

Page 249: ...of a given server or router or in terms of specific applications like the source destination TOS control information and data A network monitoring system must typically be deployed as part of QoS to insure that networks are performing at the desired level ALCATEL LUCENT SPECIFIC OVERVIEW ON QOS QoS functionality and features supported are implemented at two stages ingress QoS processing and egress...

Page 250: ...o handle routing traffic like OSPF BGP Best Effort To handle the traffic that does not fall under the above three classes You can associate link bandwidth for each of these classes Depending on the bandwidth distribution for each of the classes a QoS policy map is generated that controls the traffic flow for the selected interface VIEWING QOS WIZARD Step 1 Launch the Web GUI tool Step 2 From the U...

Page 251: ...r a customized QoS policy and attach it to an interface Configure Auto QoS Policy Auto QoS is a feature that enables you to configure QoS with minimal effort Normally QoS configuration involve definition of class match list association with the class definition of policy class association with the policy and defining class traffic attributes like bandwidth police shape etc Auto QoS option in the w...

Page 252: ...t to Point link Auto VoIP configurations are applied only in the egress direction of the interface as queuing is involved Auto QoS Diff serv create policies and classes as required by standard Diff serv application Auto Diff serv is applied only in the egress direction of an interface as RED and marking of outgoing packets are involved Auto Diff serv is applied only in the egress direction of an i...

Page 253: ...ard Policy Configuration Customized QoS Policy 2 Enter the Qos policy name in the QoS Policy Name field 3 Choose the interface on which you want to configure the QoS policy Select the interface from the Select Interface to apply QoS policy list Note By default the policy will be attached to the interface in the egress direction Step 3 Click Next Bandwidth Allocation window is displayed The wizard ...

Page 254: ...ntage and as well as value in Kbps Only Voice and Business Critical bandwidth values are editable Bandwidth for Network Control and Best Effort class is not editable 2 Enter the required bandwidth in percentage for Voice and Business Critical in the Bandwidth in field The value in Kbps for the entered bandwidth is displayed in the Value in Kbps field 3 Click Details to view the QoS classes created...

Page 255: ...Web GUI Users Guide Figure 157 Quality of Service QoS Wizard Bandwidth Allocation Details Note Voice bandwidth get precedence over the others The amount of bandwidth left after the Voice bandwidth is distributed assigned for Business Critical Network Control and Best Effort classes Step 4 Click Next Summary window displays the summary of the QoS policy configuration ...

Page 256: ... with it It also displays the classes auto created by the wizard configured bandwidth and the policing parameters Step 5 Click Finish to save the configuration and generate the QoS policy Step 6 A status bar is displayed showing the QoS policy creation Once the QoS policy is configured successfully a successful message is displayed The policy map the interface associated with the policy map and th...

Page 257: ...or Heading1NewPage text automatic 247 Alcatel Lucent Beta Beta OmniAccess 5740 Unified Services Gateway Web GUI Users Guide Figure 159 Quality of Service Policy Map Generated by the Wizard Figure 160 Quality of Service Interface Association Generated by the Wizard ...

Page 258: ...onfigure Left running head Chapter name automatic 248 Beta Beta OmniAccess 5740 Unified Services Gateway Web GUI Users Guide Alcatel Lucent Figure 161 Quality of Service Class Map Generated by the Wizard ...

Page 259: ... edit class map VIEWING CLASS MAP Step 1 Launch the Web GUI tool Step 2 From the USGM menu bar click Configure All submenu links under Configure are displayed in the left navigation panel Step 3 Click Quality of Service sub menu Quality of Service has four tabs QoS Wizard Class Map Policy Map and Interface Association Select Class Map tab Class Map page is displayed in the center panel Figure 162 ...

Page 260: ...escription CLASS MAP Class Map Name Name of the class map Description Description for the class map Rule Match Criteria Match criteria for rules MATCH ALL or MATCH ANY New Class Map Create new class map CLASS MAP RULES Rule Class map rule ID Match Criteria Match criteria for rules ALL ANY Match list Match list to be associated with the class map Action Provides option to edit and or delete class m...

Page 261: ...age click New Class Map to create a new class map New Class Map page is displayed in the center panel Figure 163 Quality of Service New Class Map Step 2 Enter the name for new class map in New Class Map field Step 3 Enter description for the new class map in the Description field optional Step 4 Set the rule match criteria for the class map from the Rule Match Criteria drop down list MATCH ALL MAT...

Page 262: ...match criteria by selecting it from the Match Criteria drop down list ALL ANY Step 4 Associate the match list with the class map You can configure any number of match lists Select the match list s from the Match List field in the Match List box It lists out all the match lists available Select the match list to be included from the Available MatchList column and click the button to move it to the ...

Page 263: ...etails are to be edited The rules already configured for the selected class map is displayed in the Class Map Rules table 2 Click Edit icon under the Action column Fields to edit class map rules are populated 3 Edit the class map rule match criteria and the match list Class map rule ID cannot be edited 4 Click Apply to save changes or Cancel to cancel the operation DELETE CLASS MAP Note A class ma...

Page 264: ...n a tunnel interface and configure hierarchical policy VIEWING POLICY MAP Step 1 Launch the Web GUI tool Step 2 From the USGM menu bar click Configure All submenu links under Configure are displayed in the left navigation panel Step 3 Click Quality of Service sub menu Quality of Service has four tabs QoS Wizard Class Map Policy Map and Interface Association Select Policy Map tab Policy Map page wi...

Page 265: ...der the Policy Map table and also in the tree structure Clicking sign under a policy map displays the default class and all the other traffic classes configured under it Click sign under a traffic class to view the child policies added to the policy map This tree structure also allows you to define hierarchical policies i e add child policies within a policy map Field Description POLICY MAP Policy...

Page 266: ...te policy Select the Use template to automatically generate class maps for this policy check box and select Diff serv VoIP option from the drop down list Auto QoS template creates a set of match lists traffic classes and a policy map automatically You can edit or modify these match lists and class maps The policy is not applied on to the interface automatically you have to explicitly apply this te...

Page 267: ...shaping can be done for leaf class only A traffic class that does not have a child policy within it is called a Leaf Class 9 Queue limit can be configured in every level But queue limit will be applicable in the leaf level only 10 You are not allowed to configure the queue limit of a parent class if one of its child is having the queue limit configured The queue limit of the traffic class should b...

Page 268: ...isplayed as shown below Figure 167 Quality of Service Policy Map New Traffic Class Basic Configuration 2 Configure the traffic class as a Network Control class Priority class or Best Effort Default class Select the Network Control Priority or Best Effort radio button in Set Class Priority box By default Best Effort radio button is selected Network control class will have highest priority among all...

Page 269: ...different sources so that the network resources are optimally utilized for better performance Typically this is achieved by applying a Token Bucket Filter at the egress of an interface Tokens will be generated per each flow at a sustained rate configured as CIR and are emptied as and when the packets are transmitted i Enter the committed rate in the Committed Rate of Traffic field Committed rate d...

Page 270: ...ed to mark the IP datagram with a certain value This value can be interpreted by devices This packet passes through on the way to its destination ii Select IP Precedence ToS radio button to set IP precedence value At least one IP Precedence or ToS value must be configured Select the IP Precedence check box and select IP Precedence value from the drop down list Select Type of Service check box and ...

Page 271: ...on 2 Excess Burst cannot be less than Committed Burst 3 Exceed Action will be of no effect if Commit Action is set to drop 4 Violate Action will be of no effect if Exceed Action is set to drop 5 Peak rate cannot be less than the Committed rate 6 Policing is allowed at leaf class only 1 Click Policing Configuration tab in the New Traffic Class page Policing Configuration page is displayed Figure 16...

Page 272: ...he policing parameters This configures the policer on the particular traffic class of the policy map There are three Police Parameters available Committed Rate Committed Burst and Excess Burst i Select Committed Rate option in the Police Parameters box The Committed Rate Parameters fields are displayed as shown below Figure 169 Quality of Service Policy Map New Traffic Class Policing Configuration...

Page 273: ... as Drop Transmit or IP Mark Select the required option from the Commit Action drop down list If you set Commit Action as IP Mark set also the DSCP or IP Precedence ToS values i Select DSCP radio button to set the DSCP values Select DSCP values from the DSCP drop down list ii Select IP Precedence TOS radio button to set IP precedence value At least IP Precedence or TOS value parameters must be con...

Page 274: ...smit or IP Mark Select the required option from the Exceed Action drop down list If you set Exceed Action as IP Mark set also the DSCP or IP Precedence TOS values i Select DSCP radio button to set DSCP values Select DSCP values from the DSCP drop down menu ii Select IP Precedence ToS radio button to set IP precedence value At least one IP Precedence or TOS values must be configured Select the IP P...

Page 275: ...I Users Guide 4 Select Excess Burst in the Police Parameters box Excess Burst Parameters fields are displayed as shown below Figure 171 Quality of Service Policy Map New Traffic Class Policing Configuration Excess Burst Check Excess Burst Parameters check box to set the excess burst values Set Excess Burst rate in the Excess Burst field The default burst rate is 1500 bytes ...

Page 276: ...recedence value At least one IP Precedence or TOS values must be configured Select the IP Precedence check box and select IP Precedence value from the drop down list Select Type of Service check box and select the type of service from the drop down list 5 Click Apply to create a new Traffic Class with policing configuration Traffic Class with Congestion Avoidance Note RED WRED is applicable only o...

Page 277: ...echnique 4 Set Exponential Weight Factor by selecting the value from the Exponential Weight Factor drop down list Default values is 9 5 Select Weighted RED using IP DSCP radio button to set the congestion avoidance based on IP DSCP values The DSCP Min Threshold Max Threshold and Drop Probability and Action fields are displayed in a table DSCP Displays DSCP value set earlier in the Policing Configu...

Page 278: ...on to configure congestion avoidance using default IP Precedence values If you want to change any IP precedence value click Edit icon under the Action column Only the Minimum and Maximum Threshold values can be edited Make the required changes in the respective fields and click Apply or click Cancel to cancel the operation 7 Click Apply to create a new Traffic Class with congestion avoidance or cl...

Page 279: ...lick Delete icon under the Action column against the policy map to be deleted 2 Confirm at the prompt to delete the selected policy map DELETE TRAFFIC CLASS Follow the procedure below to delete a traffic class under a policy map 1 From the Policy Map table select the policy map whose traffic class is to be deleted Traffic classes configured for the selected policy map is displayed in the Policy Ma...

Page 280: ...cy to the traffic class disable fair queue on the Default Class Step 1 From the tree structure click sign for a policy map Step 2 The traffic classes configured for the selected policy map is displayed in the tree structure Select the traffic class to which a service policy is to be added Step 3 Right mouse click and select Add Service Policy Add Service Policy window is displayed Figure 173 Quali...

Page 281: ...ch a policy to the tunnel interface you have to explicitly attach a policy root policy to the physical interface to which the tunnel is associated You can then attach the tunnel to the policy Notes 1 You are not allowed to configure a tunnel on a policy map already applied to any tunnel interface 2 You can configure tunnel class only if there is a policy map attached to the tunnel interface 3 The ...

Page 282: ...icy map to an interface see Attaching Policy Map to an Interface If the selected tunnel does not have a policy already associated with it an error message is displayed Enter the bandwidth for the tunnel interface in percentage in the Bandwidth Percentage field This should be in the range 1 100 Enter the absolute bandwidth bps value in the Bandwidth Absolute field This should be in the range 101 70...

Page 283: ...ice sub menu Quality of Service has four tabs QoS Wizard Class Map Policy Map and Interface Association Select Interface Association tab Interface Association page will be displayed in the center panel Figure 175 Quality of Service Interface Association The table below provides field description for the Interface Association page Table 33 Interface Association Field Description Field Description I...

Page 284: ...the direction will be populated Figure 176 Quality of Service Interface Association Attach Interface Step 2 Select the available interface from the Interface list Step 3 Select the policy map from the Policy Map list Step 4 Set the ingress or egress direction IN or OUT from the Direction drop down list Step 5 Click Apply to attach selected policy map to selected interface or click Cancel to cancel...

Page 285: ...it icon in the Action column Make necessary changes in the associated Policy Map and the direction for the selected interface 2 Click Apply to make the changes or click Cancel to cancel the operation DETACH POLICY MAP FROM AN INTERFACE 1 Click Detach Interface icon in the Action column to detach the policy map from the selected interface 2 Confirm at the prompt to detach the policy map from the in...

Page 286: ...Configure Left running head Chapter name automatic 276 Beta Beta OmniAccess 5740 Unified Services Gateway Web GUI Users Guide Alcatel Lucent ...

Page 287: ... production colors fm Do not import other template elements such as page layout To return to the draft version import color def ns from draft colors fm To switch to the beta version import color def ns from beta colors fm Pagination Numeric continuous with preceding section of book OmniAccess 5740 Unified Services Gateway Web GUI Users Guide Optional footer Manual title to set redefine ManualTitle...

Page 288: ...he USB Also this page provides an option to ping trace route and establish telnet connection to the OmniAccess 5740 USG VIEWING UTILITIES Follow the procedure below to view the Interface statistics Step 1 Launch the Web GUI tool Step 2 From the USGM menu bar click Maintenance All submenu links under Maintenance are displayed in the left navigation panel Step 3 Click Utilities sub menu Utilities pa...

Page 289: ...r Maintenance page Table 34 Maintenance Field Description Field Description MAINTENANCE Save Config Saves the running configuration of the system Reboot Device Reboots the OmniAccess 5740 USG Cleanup USB Deletes the selected file s from the USB Ping Sends ICMP echo requests and checks the connectivity to a specific host Telnet Starts a telnet connection to a remote host Note This option is availab...

Page 290: ...tel Lucent SAVE CONFIGURATION You can save the running configuration to the start up configuration 1 Click Save Config to save the current running configuration The following window is displayed Figure 178 Maintenance Utilities Save Running Configuration a Click Save Once the configuration is saved the following window is displayed ...

Page 291: ...e first page right running head Heading1 or Heading1NewPage text automatic 281 Alcatel Lucent Beta Beta OmniAccess 5740 Unified Services Gateway Web GUI Users Guide Figure 179 Maintenance Utilities Save Running Configuration b ...

Page 292: ... to reboot the system The following window is displayed asking you to confirm the reboot Figure 180 Maintenance Utilities Device Reboot 2 You will be asked if you want to save the current configuration before rebooting If the information is not saved any changes made since the system was last started will be lost 3 To save the current configuration select the Save Running Configuration check box 4...

Page 293: ... user area of the USB 1 Click Cleanup USB to cleanup the files from the USB Cleanup USB window is displayed Figure 181 Maintenance Utilities Cleanup USB 2 Click Browse to select the files to be deleted The files selected is displayed in the Files box Note that it may take a few seconds to fetch the files from the storage medium 3 Click Delete to delete the selected files 4 Click Clear to clear the...

Page 294: ...he Ping page Figure 182 Maintenance Utilities Ping Enter the IP address of the remote host in the Ping field Select the VRF from the VRF list This is not mandatory If the VRF name is specified the packets will be routed using the routing table of the specified VRF on a interface associated with the VRF Click Ping A status bar is displayed showing the ping status Once the ping is successful the fol...

Page 295: ...ssion you connect to the Telnet host and login The connection enables you to work with the remote machine as though you were a terminal connected to it Note In order to establish Telnet connection for accessing remote computers make sure Access Status of the Telnet protocol is enabled To do this click Configure System Access File Transfer Access tab Select Telnet check box For more information see...

Page 296: ...he license file is in XML format Based on the user requirement Alcatel Lucent would generate an appropriate license Currently the following features are license enabled IDS IDS and IDS signature update IPSec IPSec with advanced encryption algorithms like 3DES AES VIEWING LICENSE MANAGEMENT Follow the procedure below to view the License Management page This page helps in viewing all the licensable ...

Page 297: ...cept on the first page right running head Heading1 or Heading1NewPage text automatic 287 Alcatel Lucent Beta Beta OmniAccess 5740 Unified Services Gateway Web GUI Users Guide Figure 184 Maintenance License Management ...

Page 298: ...nstalled from a remote location it is temporarily downloaded into the user area and deleted after the installation So care must be taken to have enough space for the license file before proceeding with the installation Step 1 Click Install License in the License Management page Step 2 Install License window is displayed The license file can be installed either from the device USB or from the remot...

Page 299: ...icense from the Device 1 By default From Device radio button is selected in the Install License window Figure 185 License Management Install License from Device 2 Click Browse to select the path for the license file The following window is displayed Note that it may take a few seconds to fetch the files from the storage medium Figure 186 License Management Install License from Device Browse File a...

Page 300: ...e Site a 2 Select protocol from the Protocol drop down list FTP TFTP HTTP HTTPS 3 Enter the IP address of the remote host in the IP Address field Entering port number of the remote site in the Port field is optional 4 Authentication at the remote site is optional If the remote site requires you to authenticate check select the Use the below credentials to authenticate check box for authentication ...

Page 301: ...from the running system to a given destination Step 1 Click Uninstall Backup License in the License Management page Uninstall Backup License window is displayed Figure 188 License Management Uninstall Backup License Step 2 Select the license file whose backup is to be taken from the Select License File drop down list Step 3 Click Backup License Backup window is displayed The license backup can be ...

Page 302: ...ckup window Figure 189 License Management Backup License on USB Device 2 Click Browse to select the path for taking the backup of the license The Browse File window opens up Select the required license file and click Open Note that it may take a few seconds to fetch the files from the storage medium 3 The selected file is displayed in the File Name field in the License Backup window 4 Click Ok to ...

Page 303: ...se the below credentials to authenticate check box for authentication Enter the user name in the User Name field and the password in Password field Authenticate is applicable only for FTP protocol 5 Enter the relative path of the license file to in the License File Path field 6 Click OK to backup the license file or click Cancel to cancel the operation UNINSTALL LICENSE This is used to delete a li...

Page 304: ... The Upgrade submenu allows you to perform Software Upgrade Flash Upgrade Packages are the vehicles for software delivery on a Alcatel Lucent system There are three kinds of packages 1 LoL version npm This is the collection of files that installs the operating system components It contains the flash image for SC Switch Card Services Engine SE and other line cards 2 ALU apps version npm This is the...

Page 305: ...TP HTTP It also allows to backup the default package remove packages other than default and to set another package as a default package VIEWING SOFTWARE UPGRADE Follow the procedure below to view Software Upgrade page Step 1 Launch the Web GUI tool Step 2 From the USGM menu bar click Maintenance All submenu links under Maintenance are displayed in the left navigation panel Step 3 Click Upgrade sub...

Page 306: ...omponents of the default package Install Package Install a new package Cleanup USB Clean up files from the USB This deletes the selected files from the user area of the USB SWITCH CARD USB CAPACITY Provides information on the capacity used space and free space on the image area and the user area of the Switch Card USB drive OTHER PACKAGE Package Name Displays packages other than the Default Packag...

Page 307: ...t is temporarily downloaded into the user area and deleted after the installation So care must be taken to have enough space for the package before proceeding with the installation Step 1 Click Install Package in the Software Upgrade page Step 2 The Package Installation Details page is displayed The package can be installed either from the device USB or from the remote location Install Package fro...

Page 308: ...5740 Unified Services Gateway Web GUI Users Guide Alcatel Lucent Figure 193 Upgrade Software Upgrade Install Package from Device Browser page b 4 Select the required file and click Open 5 The selected file is displayed in the Package field in the Package Installation Details page ...

Page 309: ...age from Device c 6 Click Continue to install the package or click Cancel to quit installing the package Clicking Continue verifies the package and leads to next page based on the Package Type being installed and also if the verification succeeds There can be two kinds of Package Type Release and Component Upgrade The following page is displayed for Package Type Release Figure 195 Upgrade Software...

Page 310: ...ng Configuration check box to save the running configuration Once the system is rebooted the system will boot up with the saved running configuration If this check box is not selected a confirmation message to proceed the installation without saving the running configuration is displayed Confirm at the prompt to continue installation 7 Click Install This installs the new package and is displayed i...

Page 311: ...Entering port number of the remote site in the Port field is optional 4 Authentication at the remote site is optional If remote site requires you to authenticate select the Authenticate check box Enter the user name in the User Name field and the password in Password field Authenticate is applicable only for HTTP FTP protocol 5 Enter the relative path of the package to be installed from the remote...

Page 312: ...ed If the above check box is not selected then the package installed will be displayed in the Other Package table Select the Save Running Configuration check box to save the running configuration Once the system is rebooted the system will boot up with the saved running configuration If this check box is not selected a confirmation message to proceed the installation without saving the running con...

Page 313: ...t Package icon in the Software Upgrade page Backup Details page is displayed Step 2 The package backup can be taken either on the device USB or at the remote location Backup Package on the Device 1 Select Backup Package on USB Device radio button in the Backup Details page Figure 199 Upgrade Software Upgrade Backup Package on USB Device 2 Click Browse to select the path for taking backup of the de...

Page 314: ...s host name of remote site in IP Address Host Name field Entering port number of the remote site in the Port field is optional 4 Authentication at the remote site is optional If remote site requires you to authenticate select the Authenticate check box Enter the user name in the User Name field and the password in the Password field Authenticate is applicable only for FTP protocol 5 Enter the rela...

Page 315: ...kages like 3 0 0 80 0 3 0 0 81 0 The package being set as default should exist in the system 1 Install a new package Refer Install Package section to install new package The newly installed package is listed under Other Package table 2 Click Set as Default icon under the Action column in Other Package table This opens Set as Default page Figure 201 Upgrade Software Upgrade Set as Default 3 Select ...

Page 316: ...he components present in the running package 1 To view all the components in the package click View Components icon under the Action column in Default Package table 2 The details such as component name component version and the component size in kilobytes and the total number of components in the package is displayed in the Component Details window Figure 202 Upgrade Software Upgrade Package Compo...

Page 317: ...grade Software Upgrade Cleanup USB 2 Click Browse to select the files to be deleted The files selected is displayed in the Files box Note that it may take a few seconds to fetch the files from the storage medium 3 Click Delete to delete the selected files 4 Click Clear to clear the file selection and add new files for deletion 5 Click Cancel to cancel the cleanup operation REMOVE PACKAGE 1 To remo...

Page 318: ...u bar click Maintenance All submenu links under Maintenance are displayed in the left navigation panel Step 3 Click Upgrade sub menu The Upgrade menu has two tabs Software Upgrade and Flash Upgrade Select Flash Upgrade tab Flash Upgrade page is displayed in the center panel Figure 204 Upgrade Flash Upgrade The table below provides field description for Flash Upgrade page Table 37 Flash Upgrade Fie...

Page 319: ... the device USB or from the remote location Upgrade Flash on USB Device 1 Select Flash on USB radio button in the Flash Upgrade box Figure 205 Upgrade Flash Upgrade Flash Upgrade on USB 2 Click Browse to select the path for the flash in the USB drive The Browse window opens up Select the file and click Open The selected file is displayed in the Flash field Note that it may take a few seconds to fe...

Page 320: ...me field Entering port number of the remote site in the Port field is optional 4 Authentication at the remote site is optional If remote site requires you to authenticate select the Authenticate check box Enter the user name User Name field and the password in User Password field Authenticate is applicable only for HTTP FTP protocol 5 Enter the relative path of the Flash to be installed from the r...

Page 321: ...production colors fm Do not import other template elements such as page layout To return to the draft version import color def ns from draft colors fm To switch to the beta version import color def ns from beta colors fm Pagination Numeric continuous with preceding section of book OmniAccess 5740 Unified Services Gateway Web GUI Users Guide Optional footer Manual title to set redefine ManualTitle ...

Page 322: ...niAccess 5740 USG VIEWING INTERFACE STATISTICS Follow the procedure below to view the Interface statistics Step 1 Launch the Web GUI tool Step 2 From the USGM menu bar click Monitor All submenu links under Monitor are displayed in the left navigation panel Step 3 Click Interface Statistics sub menu Interfaces page displays the details of all the interfaces configured on the system in the center pa...

Page 323: ...ics Field Description Field Description INTERFACES Interface Name Name of the interface configured on the system Type Interface type configured Address IP address assigned to the interface Encaps Encapsulation configured on the interface Admin Status Indicates if the interface is administratively up or down Oper Status Indicates if the interface is active or inactive Action Provides option to view...

Page 324: ...ACES STATISTICS Follow the procedure given below to view the statistics of a selected interface 1 In the Interfaces page click View icon in the Action column against the interface whose statistics are to be viewed 2 The interface statistics is displayed in a pop up window as shown below Figure 208 Monitor Interfaces Statistics View Interface Statistics ...

Page 325: ...phical representation Note The statistics graph is shown only for active and administratively up interfaces only 1 In the Interfaces page click Real Time Graph icon in the Action column against the interface whose statistics are to be viewed 2 The graphical representation of the interface statistics is displayed in a pop up window as shown below Figure 209 Monitor Interfaces Statistics View Interf...

Page 326: ...llocated to the hosts of all the network pools and manually linked leases of all the host pools VIEWING DHCP BINDINGS Follow the procedure below to view the DHCP Bindings Step 1 Launch the Web GUI tool Step 2 From the USGM menu bar click Monitor All submenu links under Monitor are displayed in the left navigation panel Step 3 Click DHCP Bindings sub menu The following page is displayed in the cent...

Page 327: ...dings Field Description Field Description DHCP BINDINGS IP Address IP address allocated to the host Hardware Address Hardware address of the host Start Date End Date Specifies the start date and end date for which the clients can use the IP address assigned to them Lease Time Specifies the time for which the clients can use the IP address assigned to them This will be Infinite for Manual bindings ...

Page 328: ... the Web GUI tool Step 2 From the USGM menu bar click Monitor All submenu links under Monitor are displayed in the left navigation panel Step 3 Click Active Routes sub menu Active Route Details page is displayed in the center panel Step 4 Select Default VRF radio button to view the static routes attached to default VRF Step 5 Select Select VRF radio button Choose the required VRF from the list Thi...

Page 329: ...ield Description Field Description ACTIVE ROUTE DETAILS Network Address IP address of the destination network Network Mask Network mask of the destination network Gateway IP IP address of the gateway through which the traffic is routed Interface IP address of the interface through which the traffic is routed Administrative Distance The administrative distance of the routing protocol Protocol Stati...

Page 330: ...e left navigation panel Step 3 Click Traffic Statistics sub menu The Traffic Statistics has two tabs IP Statistics and ICMP Statistics By default IP Statistics tab is selected and IP Statistics page is displayed in the center panel The IP Statistics page allows to view the IP statistical details It displays received sent fragment and other parameter counter values Step 4 Select Default VRF radio b...

Page 331: ... IP Statistics Field Description Field Description IP STATISTICS Other Parameters Counter Name Counters supported Value The value of each of the counters Received Counter Name Counters supported for incoming traffic Value The value of each of the counters Sent Counter Name Counters supported for outgoing traffic Value The value of each of the counters Fragment Counter Name Counters supported Value...

Page 332: ...menu links under Monitor are displayed in the left navigation panel Step 3 Click Traffic Statistics sub menu The Traffic Statistics has two tabs IP Statistics and ICMP Statistics Step 4 Click ICMP Statistics tab The ICMP Statistics page displays the ICMP statistical details like the received and sent counter values Step 5 Select Default VRF radio button to view the IP statistics attached to defaul...

Page 333: ...the first page right running head Heading1 or Heading1NewPage text automatic 323 Alcatel Lucent Beta Beta OmniAccess 5740 Unified Services Gateway Web GUI Users Guide Figure 213 Monitor Traffic Statistics ICMP Statistics ...

Page 334: ...e below provides description for Traffic Statistics ICMP Statistics page Table 42 ICMP Statistics Field Description Field Description ICMP STATISTICS Sent Counter Name Counters supported Value The value of each of the counters Received Counter Name Counters supported Value The value of each of the counters Refresh Refresh the ICMP Statistics page ...

Page 335: ...ays the information about the SNMP Statistics VIEWING SNMP STATISTICS Follow the procedure below to view the SNMP Statistics Step 1 Launch the Web GUI tool Step 2 From the USGM menu bar click Monitor All submenu links under Monitor are displayed in the left navigation panel Step 3 Click SNMP Statistics sub menu SNMP Statistics page displays the SNMP statistics in the center panel Figure 214 Monito...

Page 336: ... Lucent The table below provides field description for Active Routes page Table 43 SNMP Statistics Field Description Field Description SNMP STATISTICS Received Counter Name Number of SNMP requests received Value The value of each of the counters Sent Counter Name Number of SNMP requests sent Value The value of each of the counters ...

Page 337: ...rewall module The Firewall Session Details section displays detailed information about each of these sessions VIEWING FIREWALL SESSION STATISTICS Follow the procedure below to view the Firewall Session statistics Step 1 Launch the Web GUI tool Step 2 From the USGM menu bar click Monitor All submenu links under Monitor are displayed in the left navigation panel Step 3 Click Firewall Session Statist...

Page 338: ...GRE Sessions Number of GRE sessions maintained by the firewall module Total Sessions Total number of sessions maintained by the firewall module Free Sessions Number of free sessions available to the firewall module Firewall Session Details Displays details of each of the above sessions Source Address IP address of the source Source Port Port number at the source Destination Address IP address of t...

Page 339: ...policies have been applied On clicking the Show Policy Statistics global statistics for that Filter policy is displayed VIEWING FILTER STATISTICS Follow the procedure below to view the Filter statistics Step 1 Launch the Web GUI tool Step 2 From the USGM menu bar click Monitor All submenu links under Monitor are displayed in the left navigation panel Step 3 Click Firewall and Security sub menu The...

Page 340: ...s Indicates if the filter is stateless or not Time Range Time range associated with the filter Default Hits Number of default hits associated with the filter Configured Actions Priority Priority set for the filter Match List Match list associated with the filter Rule Action Action for the rule DENY PERMIT Packet Hits Number of packets hit for that particular action This field is displayed Show Pol...

Page 341: ...fied Services Gateway Web GUI Users Guide TO VIEW POLICY STATISTICS Step 1 Select the filter whose statistical information is to be viewed from the Filter List drop down list Step 2 Click Show Policy Statistics Global statistics for the selected Filter policy is displayed Figure 217 Monitor Firewall and Security Filters Show Policy Statistics ...

Page 342: ... statistics Step 1 Launch the Web GUI tool Step 2 From the USGM menu bar click Monitor All submenu links under Monitor are displayed in the left navigation panel Step 3 Click Firewall and Security sub menu The Firewall and Security has four tabs Filters NAT DOS Attack and Firewall Policy By default Filters tab is selected Click the NAT tab Step 4 Select the NAT policy whose statistical information...

Page 343: ...y NAT Type Destination NAT or Source NAT Dropped Number of packets dropped Bypassed Number of packets bypassed Enqueued Number of packets enqueued Configured Rules Priority Priority of the rule Match list Match list associated with the rule Summary Displays information about the rule Dynamic NAT Static NAT Bypass Packet hits Number of packets that got hit for that particular rule Interface Binding...

Page 344: ...abs Filters NAT DOS Attack and Firewall Policy Select DOS Attack tab DOS Attack page is displayed in the center panel with the statistical information of all the DOS Attacks configured in the system Figure 219 Monitor Firewall and Security DOS Attack The table below provides description for DOS Attack page Table 47 DOS Attack Field Description Field Description DOS ATTACK Show DOS Attack Statistic...

Page 345: ...tics button This displays the DOS Attack counters for the configured attacks in a pop up window Figure 220 Firewall and Security DOS Attack Show DOS Attack Statistics TO VIEW DOS ATTACK STATISTICS FOR AN ATTACK 1 In the DOS Attack page click View icon in the Action column against the attack whose statistics are to be viewed 2 The configured threshold for an attack is displayed in a pop up window a...

Page 346: ...ess 5740 Unified Services Gateway Web GUI Users Guide Alcatel Lucent 3 Click View Statistics icon in the Action column against the attack The attack counters is displayed in a pop up window as shown below Figure 222 Monitor Firewall and Security DOS Attack View Statistics ...

Page 347: ...ty sub menu The Firewall and Security has four tabs Filters NAT DOS Attack and Firewall Policy Select Firewall Policy tab Firewall Policy page is displayed in the center panel with the statistical information of all the firewall policies configured in the system Step 4 Select the Firewall Policy whose statistical information is to be viewed from the Firewall Policy Name drop down list The Firewall...

Page 348: ...splays the firewall statistics for the rule in a pop up window as shown below Figure 225 Firewall and Security Firewall Policy Show Policy Statistics Field Description FIREWALL POLICY Firewall Policy Name Lists the firewall policies configured in the system Show Policy Statistics Displays the firewall policy statistics Rules Configuration Rule Rule number Match List Match list associated with the ...

Page 349: ...rocedure below to view the Interface statistics Step 1 Launch the Web GUI tool Step 2 From the USGM menu bar click Monitor All submenu links under Monitor are displayed in the left navigation panel Step 3 Click IPSec VPN Statistics sub menu Select the interface and the IPSec policy from the Interface and the IPSec Policies drop down list IPSec VPN Statistics page displays the details of all the IP...

Page 350: ...th Number of packets authenticated Errors Number of packets with errors Time left The duration left after which the lifetime lifetime in kilobytes lifetime in seconds gets reset Re negotiation of new SA is triggered depending on which lifetime expires first Outbound Statistics SA ID The Security Association ID for the outbound SA Peer IP address of the peer Encaps Number of packets encapsulated En...

Page 351: ...e displays snort statistics VIEWING IPS SUMMARY Follow the procedure below to view the snort statistics Step 1 Launch the Web GUI tool Step 2 From the USGM menu bar click Monitor All submenu links under Monitor are displayed in the left navigation panel Step 3 Click IPS Statistics sub menu The IPS Statistics has three tabs Summary Preprocessor and Rules By default Summary tab is selected and Summa...

Page 352: ...Statistics Packets Received The number of packets received by snort Packets Passed The number of packets that were passed by snort Packets Dropped The number of packets that were dropped because an intrusion was detected Packets Queued The number of packets that are queuing up for detection by snort Packets Detected The number of packets that were identified as an intrusion Clear Counter s Clears ...

Page 353: ...PROCESSOR STATISTICS Follow the procedure below to view the snort preprocessor statistics Step 1 Launch the Web GUI tool Step 2 From the USGM menu bar click Monitor All submenu links under Monitor are displayed in the left navigation panel Step 3 Click IPS Statistics sub menu The IPS Statistics has three tabs Summary Preprocessor and Rules Select Preprocessor tab Preprocessor page is displayed in ...

Page 354: ...on PREPROCESSOR Aggregated Statistics HTTP Inspect Type of preprocessor Back Orifice Type of preprocessor Stream4 Type of preprocessor RPC Type of preprocessor All Includes all types of preprocessors Counter Name Displays the names of counters under each preprocessor Value Displays the number of intrusions detected for each of the corresponding counters Clear Counter s Clears the statistics counte...

Page 355: ...nfigured for IPS VIEWING PREPROCESSOR STATISTICS Step 1 Launch the Web GUI tool Step 2 From the USGM menu bar click Monitor All submenu links under Monitor are displayed in the left navigation panel Step 3 Click IPS Statistics sub menu The IPS Statistics has three tabs Summary Preprocessor and Rules Select Rules tab Rules page is displayed in the center panel with information about the intrusions ...

Page 356: ... Description RULES Options Class Type Snort rule class type Category Snort rule category Priority Snort rule priority SID Number SID number All SIDs All SID numbers Counter Name Displays the names of counter under each rule Value Number of intrusions detected as per the particular counter for that rule Action Clears the individual counter Clear Counter s Clears the statistics counters Refresh Refr...

Page 357: ... The Egress Statistics table displays the QoS statistics for the interface in the ingress direction Note QoS statistics page displays only those QoS policies that are attached to the active interfaces VIEWING QOS STATISTICS Follow the procedure below to view the QoS statistics Step 1 Launch the Web GUI tool Step 2 From the USGM menu bar click Monitor All submenu links under Monitor are displayed i...

Page 358: ...on Ingress Statistics Class The class map attached to the policy map Packets Dropped Number of packets dropped from a queue Packets Dequeued Number of packets transmitted by the traffic class Bytes Dequeued Total amount of bytes dequeued by the traffic class Clear Ingress Statistics Clears the ingress statistics Egress Statistics Class The class map attached to the policy map Packets Dropped Numbe...

Page 359: ... 0 7 Lower the numerical value of priority higher is the criticality of the message 0 emergency 1 alert 2 critical 3 errors 4 warnings 5 notifications 6 informational 7 debugging VIEWING LOGS Follow the procedure below to view the Logs Step 1 Launch the Web GUI tool Step 2 From the USGM menu bar click Monitor All submenu links under Monitor are displayed in the left navigation panel Step 3 Click L...

Page 360: ... Logs page Table 54 Logs Field Description Field Description LOGS Severity The severity of the log message like warning alert etc Date The date the log was generated Module The module for which the log was generated Sub Module The sub module for which the log was generated Message The detailed log message Delete All Deletes all the logs from the Logs page Refresh Refreshes the logs in the Logs pag...

Reviews: