background image

Chapter 4  Setting Up Single-Host

27

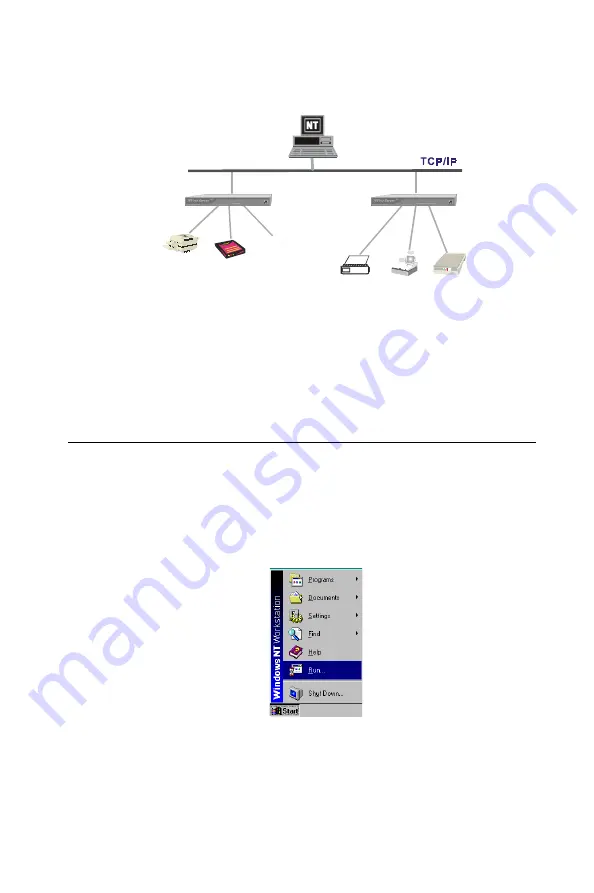
Figure 4-1 Application with one host and two EDG-4508/4516

Note:

If you need to set up Multi-Host Mode or Custom Mode,
refer to Chapters 5 and 6, respectively, for complete de-
scriptions of these types of application.

Driver and Software Installation

1. Insert the EDG-4508/4516  disk into either the floppy disk drive or CD

ROM drive, depending on the type of disk that was provided.

From the Windows NT/95/98 desktop, click on Start and then choose
Run.

2. TypeA:\setupin the Open input box if using drive A and then click OK

(replace A with the correct drive letter if you are using a different
drive).


Summary of Contents for EDG-4508

Page 1: ...on provided in this manual is intended to be accurate and reliable However Advantech Co Ltd assumes no responsibility for its use nor for any infringements upon the rights of third parties which may r...

Page 2: ...t the maximum performance from your products So if you run into technical difficulties we are here to help For most frequently asked questions you can easily find answers in your product documentation...

Page 3: ...hink you have a defective product follow these steps 1 Collect all the information about the problem encountered e g type of PC CPU speed Advantech products used other hardware and software used etc N...

Page 4: ...508 4516 User s Manual product returned without dated proof of purchase is not eligible for warranty service 5 Write the RMA number visibly on the outside of the package and ship it prepaid to your de...

Page 5: ...etwork 14 Connecting the Power 14 Connecting Asynchronous Serial Devices 15 3 IP Address Configuration 17 Telnet Console 18 DHCPServer 21 4 Setting Up Single Host 25 DriverandSoftwareInstallation 27 U...

Page 6: ...6 Setting Up Custom 67 DriverandSoftwareInstallation 70 Using EDG 4508 4516 Manager 73 Saving Your Configuration 74 Adding an EDG 4508 4516 Add Server Wizard 74 Deleting a Server 78 Modifying COM Name...

Page 7: ...stic 111 Toolbar Functions 111 Uninstalling the Software 117 8 Changing Your Installation Type 119 A Troubleshooting 121 InstallationandConfigurationTroubleshooting 122 LEDDescription 126 B Cable Pino...

Page 8: ...16 s 11 Figure 2 4 A remote control link diagram 12 Figure 2 5 Rack Mount 14 Figure 4 1 Application with one host and two EDG 4508 4516 27 Figure 4 2 EDG 4508 4516 Manager menus and toolbar functions...

Page 9: ...1 Overview CHAPTER...

Page 10: ...works like an add on multi port serial board to the NT 95 98 server but with one major advantage the TCP IP network Since the Windows NT 95 98 host com municates with the COM ports on EDG 4508 4516 ov...

Page 11: ...over the Internet and Intranet Driver for Windows NT 95 98 platform Fixed TTY driver for SCO Unix and Linux Easy configuration and management under Windows NT 95 98 Secured access control to network...

Page 12: ...4 EDG 4508 4516 User s Manual Front Panel View Figure 1 1 8 Port EDG 4508 Front Panel Figure 1 2 16 Port EDG 4516 Front Panel...

Page 13: ...5 Rear Panel View Figure 1 3 16 Port EDG 4516 Rear Panel Figure 1 4 8 Port EDG 4508 Rear Panel AC Power Switch 10 100M Ethernet Power Connector Serial Ports AC Power Switch 10 100M Ethernet Power Conn...

Page 14: ...6 EDG 4508 4516 User s Manual...

Page 15: ...2 C HAPTER Getting Started...

Page 16: ...this chapter with a brief explanation of the operation modes available when using EDG 4508 4516 and then discuss the basics of setting it up This chapter includes Knowing Your Application Single Host...

Page 17: ...TCP IP network you will need to know some basic facts about networking in order to get the server hooked up correctly In the next section we discuss the Single Host Mode Single Host Mode Traditional...

Page 18: ...in your computer Figure 2 2 Single Host Mode using two EDG 4508 4516 Multi Host Mode For advanced applications you may share one EDG 4508 4516 with mul tiple hosts on a Local Area Network LAN Unlike s...

Page 19: ...mode the administrator and general users The administrator assigns a dedi cated IP address to EDG 4508 4516 so that other Windows NT 95 98 hosts on the network i e the general users are able to locate...

Page 20: ...r remote control and adding complicated routing protocols Setting up these types of applica tion requires more network knowledge and possibly knowledge about the Internet and Intranet Figure 2 4 shows...

Page 21: ...xed to a 19 inch rack mount Desktop This option involves placing EDG 4508 4516 on a clean flat well venti lated desktop There are four rubber pads fixed to the bottom of the server and we recommend le...

Page 22: ...configuring drivers and software you will find it convenient to hook EDG 4508 4516 directly to your com puter s Ethernet card To do this you will need to use a crossed cable such as the one supplied...

Page 23: ...l Devices You may use the RJ 45 to female DB 25 cable included with EDG 4508 4516 to connect serial devices to the server Plug the RJ 45 connector into one of the serial port jacks on the server s rea...

Page 24: ...16 EDG 4508 4516 User s Manual...

Page 25: ...3 C HAPTER IP Address Configuration...

Page 26: ...erver s network The example in this sec tion was generated using a Windows NT 95 98 host Note After activating the Telnet Console you will need to use the keyboard keys to maneuver about the VT100 scr...

Page 27: ...elect ansi vt100 for Console terminal type and then press Enter on the computer key board 4 A connection between your computer and EDG 4508 4516 should now be established and the ADVANTECH EDG 4508 45...

Page 28: ...window 7 Use the keyboard arrow keys to highlight serverConfig as shown below and then press Enter to select this option 8 Use the keyboard arrow keys to position the cursor over the first digit of th...

Page 29: ...anager window will show a list of DHCP hosts currently hooked up to the network Note that before you can make changes to the host s parameters there must be a minus sign located to the left of the ser...

Page 30: ...ion is checked This prevents the system from automatically disconnecting devices that are using IP addresses in the specified range 8 Assign a name to the scope and if you would like include a comment...

Page 31: ...values 12 To check that the numbers just entered are correct return to the DHCP Manager main window click on Scope and then choose Active Leas es from the pull down menu The IP address reserved for yo...

Page 32: ...24 EDG 4508 4516 User s Manual...

Page 33: ...4 C HAPTER Setting Up Single Host...

Page 34: ...serial board We cover the following topics Driver and Software Installation UsingEDG 4508 4516Manager Saving Your Configuration Adding an EDG 4508 4516 Add Server Wizard Deleting a Server Modifying CO...

Page 35: ...tions of these types of application Driver and Software Installation 1 Insert the EDG 4508 4516 disk into either the floppy disk drive or CD ROM drive depending on the type of disk that was provided F...

Page 36: ...l 3 The Welcome to EDG 4508 4516 window opens giving you the op tion to continue with the installation process Click on Next to contin ue 4 When the Setup Wizard window opens choose Single Host and th...

Page 37: ...oose a different directory click on Browse navigate to the desired directory and then click on Next 6 The Installing window shows the progress of the installation process Click on Cancel at any time t...

Page 38: ...ervers or change COM names To start EDG 4508 4516 Manager click on Start Programs EDG 4508 4516 EDG 4508 4516Manager This activates the EDG 4508 4516 Manager main window shown below with server names...

Page 39: ...of EDG 4508 4516 or changes to port configurations must be saved in order to be activated Choose Save Configuration from the Server menu or click on the toolbar Save all Servers icon to automat icall...

Page 40: ...to highlight the server Model and then click on Next to continue Note If the server you want to add is not listed in the above window you will receive the warning window shown below Check to make sur...

Page 41: ...tify it 3 Select the COM port name that you would like the first port on the server to map to This will add all of EDG 4508 4516 s ports 8 or 16 depending on the server model number to your NT 95 98 s...

Page 42: ...95 98 system to remember the password 5 Check the Add Server Wizard Complete window to verify that all of the information is correct Click on Finish if everything is correct or click on Back to return...

Page 43: ...rver icon and then repeat the above steps 9 Before exiting EDG 4508 4516 Manger you should save the new con figuration Choose Save Configuration from the Server menu or click on the toolbar Save all S...

Page 44: ...d you want the COM port numbers to be consecutive or you may change the names one port at a time The procedure is as follows Changing All COM Names Consecutively 1 Click on the server name whose port...

Page 45: ...o activate the function 4 Select the COM name that the port will be mapped to 5 Click OK to activate the change Un Mapping a Port If you do not need to use a port any more you may use the UnMap Port f...

Page 46: ...g a DHCP server Server Properties Password To add more security to your EDG 4508 4516 it is highly recommended that you set a password as soon as you complete the installation If you did not set the p...

Page 47: ...you want Windows NT 95 98 to remember your password Note If you do not check the Auto Save Password on this com puter box you will need to enter the correct password each time you want to view Server...

Page 48: ...nable to the get the best performance from the board Set to Disable to avoid data loss when communicating with plain commu nication devices using S W flow control In this case only one byte will be pu...

Page 49: ...4508 4516 Manager pro gram from your NT 95 98 host s hard drive and then in stall the new one Replacing a Server In the unlikely event that your EDG 4508 4516 needs to be replaced you can use EDG 450...

Page 50: ...server is password protected enter the pre set password when prompted to do so 6 Click OK to save the current settings to the new server 7 Click on Save Configuration to activate Note Previous configu...

Page 51: ...5 C HAPTER Setting Up Multi Host...

Page 52: ...a Server Modifying COM Name Mappings Change All COM Names Consecutively Change the COM Name of One Port Un Mapping a Port UpgradingEDG 4508 4516 Firmware Configuring Server Properties Server Propertie...

Page 53: ...riptions of these types of application Driver and Software Installation 1 Insert the EDG 4508 4516 disk into either the floppy disk drive or CD ROM drive depending on the type of disk that was provide...

Page 54: ...tup Wizard window opens choose Multi Host and then click on Next to continue 5 The Select Destination Directory window gives you the option to change the directory which program files will be copied t...

Page 55: ...that the installation process has completed Click on Next to continue Note If you click on Cancel you will need to run Add Server Wizard at a later time to install your EDG 4508 4516 8 Clicking on Nex...

Page 56: ...left info box When a particular EDG 4508 4516 is highlighted the ports associated with that server the associated COM port names and other relevant information are shown in the right info box EDG 450...

Page 57: ...click on the toolbar Save all Servers icon to automatically detect any changes and save them in the appropriate places Adding an EDG 4508 4516 Add Server Wizard The Add Server Wizard is activated aut...

Page 58: ...will receive the warning window shown below Check to make sure that the power cord is connected and the power switch is in the on position Click OK to return to the window shown above and then click...

Page 59: ...aram eter settings Click on Next to continue 4 The next window lists EDG 4508 4516 s current IP address Change the number if needed and then click on Next to continue 5 Select the COM port name that y...

Page 60: ...f you see ports with status Non authorized and you are a general user be sure to ask your server administrator to add access permission so that you may make modifica tions to the server Note The EDG 4...

Page 61: ...ing COM Name Mappings You may use EDG 4508 4516 Manager to change previously as signed COM names Choose Map Port from the Port menu or click on the toolbar Map Port icon You will be asked to choose fr...

Page 62: ...ck on the toolbar Map Port icon to activate the function 4 Select the COM name that the port will be mapped to 5 Click OK to activate the change Un Mapping a Port If you do not need to use a port any...

Page 63: ...rade function located on EDG 4508 4516 Man ager s toolbar to carry out the upgrade procedure Access Advantech s Web site at www Advantech com to download the required computer file contact our sales d...

Page 64: ...d then in stall the new one Configuring Server Properties The Server Properties function can be used to change the server s name password and transmission parameters Choose Server Prop erties from the...

Page 65: ...to saving the pass word you will not be asked to enter the password when modifying serv er properties from this computer Note Keep in mind that other people using your computer will also have ready ac...

Page 66: ...notify the user that the transmission is completed when the output data length is lower than the LOW WATER setting Classical Mode lets the port behave like a generic COM port Transmis sion of small da...

Page 67: ...rrect password you can still map the ports to your NT 95 98 but you will not have access to the ports You will need to ask your administrator to add your IP address to the access control list of the s...

Page 68: ...nd that you configure using the view access control list by IP address option 1 Click on the Access Control tab and then select the IP address option next to View access control list by 2 Click on the...

Page 69: ...d Port window opens up highlight the port s that the host will be granted access to Note You can select blocks of ports by holding down the left mouse button while scrolling through the list of ports...

Page 70: ...dress of the host you would like to modify 2 Click on the Modify button 3 Modify the configuration as desired 4 ClickOKtoexit Removing Ports from a Granted Host 1 Select the IP address of the host you...

Page 71: ...ddress is granted 1 Click on the host s IP address to highlight it 2 Click on the Remove button and then click OK to exit Configuring Through View by Port By choosing the option View access control li...

Page 72: ...ngle computer and then enter the host s IP address in the appropriate text box To add access for a group of computers select a group of computers and then enter the IP address and netmask E g for netw...

Page 73: ...o finish Modifying a Granted Host 1 Click on the port whose host you would like to modify 2 Click on the IP address you want to change and then click on Modify 3 Modify the IP address as needed Note T...

Page 74: ...66 EDG 4508 4516 User s Manual 3 Click OK to finish...

Page 75: ...6 C HAPTER Setting Up Custom...

Page 76: ...8 4516Manager Saving Your Configuration Adding an EDG 4508 4516 Add Server Wizard Deleting a Server Modifying COM Name Mappings Change All COM Names Consecutively Change the COM Name of One Port Un Ma...

Page 77: ...g Routes Removing Routes Examples of Internet Intranet Routing Configurations Configuring Router for Internet Connection Configuring Router for One Internet and One Intranet Connection Replacing a Ser...

Page 78: ...her the floppy disk drive or CD ROM drive depending on the type of disk that was provided From the Windows NT 95 98 desktop click on Start and then choose Run 2 TypeA setupin the Open input box if usi...

Page 79: ...m 71 3 The Welcome to EDG 4508 4516 window opens giving you the op tion to continue with the installation process Click on Next to contin ue 4 When the Setup Wizard window opens choose Custom and then...

Page 80: ...nstalling window shows the progress of the installation process Click on Cancel at any time to terminate the installation 7 The next window verifies that the installation process has completed Click o...

Page 81: ...left info box When a particular EDG 4508 4516 is highlighted the ports associated with that server the associated COM port names and other relevant information are shown in the right info box EDG 450...

Page 82: ...vers icon to automatically detect any changes and save them in the appropriate places Adding an EDG 4508 4516 Add Server Wizard The Add Server Wizard is activated automatically during the driver and s...

Page 83: ...below Check to make sure that the power cord is connected and the power switch is in the on position Click OK to return to the window shown above and then click on Find The new server should now be l...

Page 84: ...your EDG 4508 4516 but you will not be able to change any of the param eter settings Click on Next to continue 4 ThenextwindowliststheEDG 4508 4516 scurrentIPaddress Change the number if needed and th...

Page 85: ...make sure that everything is correct and then click on Finish to continue 7 This evokes the EDG 4508 4516 Manager program with the newly installed server listed 8 Click on the server name to highligh...

Page 86: ...this out 11 Exit EDG 4508 4516 Manager when you finish Deleting a Server If for some reason you need to delete a server from your system click on the server name to highlight it and then choose Delet...

Page 87: ...heck the Mapping COM number consecutively box 6 Click OK to activate the change Change the COM Name of One Port 1 Click on the server name whose port name you would like to modify 2 Click on the port...

Page 88: ...5 Upgrading EDG 4508 4516 Firmware Advantech continually upgrades its driver software and server firm ware to keep pace with the ever expanding world of computing You can use the Upgrade function loc...

Page 89: ...tall the old EDG 4508 4516 Manager pro gram from your NT 95 98 host s hard drive and then in stall the new one Configuring Server Properties The Server Properties function can be used to change the se...

Page 90: ...tion to do so You may also use this function to Auto Save i e to have Windows NT 95 98 remember your password for you By auto saving the pass word you will not be asked to enter the password when modi...

Page 91: ...aximum data throughput when transmitting large amounts of data The driver will notify the user that the transmission is completed when the output data length is lower than the LOW WATER setting Classi...

Page 92: ...granted access to the server you have added You may go to server properties to check that However if you did not enter the correct password you can still map the ports to your NT but you will not hav...

Page 93: ...ontrol list by giving the server IP addresses It is clear to see which IP addresses have been granted access to which ports and which IP addresses are allowed onto the server Adding Access Permission...

Page 94: ...opriate text box To add access for a group of computers select a group of computer and then enter the IP address and netmask E g for network class C computers you might enter 192 168 1 0 for IP addres...

Page 95: ...down the left mouse button while scolling through the list of ports 7 Click OK to finish and return to the Access Control page 8 The ports granted access to will be listed under the host s IP address...

Page 96: ...Modify the configuration as desired 4 ClickOKtoexit Removing Ports from a Granted Host 1 Select the IP address of the host you would like to modify 2 Click on the Port you would like to remove from t...

Page 97: ...hen by default only the connecting host s IP address is granted 1 Click on the host s IP address to highlight it 2 Click on the Remove button and then click OK to exit Configuring Through View by Port...

Page 98: ...3 To add access for only one computer select a single computer and then enter the host s IP address in the appropriate text box To add access for a group of computers select a group of computer and th...

Page 99: ...s Control page to verify that the host was added to the port 6 Click OK to finish Modifying a Granted Host 1 Click on the port whose host you would like to modify 2 Click on the IP address you want to...

Page 100: ...6 To enable access from an Internet Intranet host first make sure your EDG 4508 4516 can be connected through the Internet You may add routes into EDG 4508 4516 if your Windows NT 95 98 host is at a r...

Page 101: ...mask and Metric as needed 3 Click OK to exit Gateway Settings Modifying Routes 1 Select the Advanced tab in the Server Properties window 2 Click on the route setting you would like to modify to highli...

Page 102: ...emove to highlight it 3 Click on Remove Examples of Internet Intranet Routing Configurations Configuring Router for Internet Connection Some routers have the capability to learn routes automatically T...

Page 103: ...Netmask and Metric as shown below Configuring Router for One Internet and One Intranet Connection In the more complex case in which EDG 4508 4516 connects to both the Internet and Intranet you will n...

Page 104: ...you are under the same environment as shown above but your EDG 4508 4516 only needs to be accessed by the private network as opposed to the global Internet then just add the first route to the server...

Page 105: ...7 C HAPTER Utility Programs...

Page 106: ...grade Firmware EDG 4508 4516Monitor Toolbar Functions ConfiguringEDG 4508 4516Monitor Save Configuration Load Configuration Monitor Port Status Refresh Monitor Reset Port Reset Server ExitingEDG 4508...

Page 107: ...com to download the required com puter file contact our sales department if you need assistance with this and then follow these instructions 1 To start Firmware Utility click on Start Programs EDG 450...

Page 108: ...fo from the Server menu or click on the toolbar General Info icon 3 If the server in question is password protected enter the password in the Enter Server Password text input box 4 The EDG 4508 4516 S...

Page 109: ...is complete you will see the EDG 4508 4516 Server firmware upgrade utility window The servers located by the search will be listed in the info box Connect to an EDG 4508 4516 The Connect an EDG 4508 4...

Page 110: ...u need assistance with this 2 Click on the server whose firmware you would like to upgrade to highlight it 3 Choose Upgrade from the Tool menu or click on the toolbar Upgrade firmwareicon 4 The Upgrad...

Page 111: ...uble using this program 1 To start EDG 4508 4516 Monitor click on Start Programs EDG 4508 4516 EDG 4508 4516Monitor 2 The EDG 4508 4516 Monitor window opens Note You will need to configure your server...

Page 112: ...network 2 Select the server that you want to monitor from the Server IP Address pull down menu The server information will appear in the Monitoring EDG 4508 4516Serverinfobox 3 The Port No check box...

Page 113: ...neously Check or uncheck the boxes as needed 6 Click on the General tab to set up the Sampling interval This is the time interval the program waits before updating EDG 4508 4516 s cur rent data Select...

Page 114: ...File menu or click on the toolbar Save Configuration icon 2 Navigate to the directory where you would like to store the file 3 Type the desired file name in the File Name text input box and then click...

Page 115: ...e selected configuration file Monitor Once a configuration has been set up or a configuration file has been loaded EDG 4508 4516 Monitor will automatically start monitoring serv ers and ports Refer to...

Page 116: ...s TX RX CPS history 1 Click on the port item you wish to check to highlight it 2 Choose Port Status from the Monitor menu or click on the toolbar Port Status icon 3 Click OK to return to the EDG 4508...

Page 117: ...from the Monitor menu or click on the toolbar Reset Port icon to reset the port Note If you have previously set up the security password using EDG 4508 4516 Manager a Reset Port dialog box will open...

Page 118: ...eviously set up a security password using EDG 4508 4516 Manager a Reset Server window will open requesting a password before resetting the port If you did not set up the security password the followin...

Page 119: ...ons provided by this utility Toolbar Functions In this section we describe how to use the EDG 4508 4516 Diagnostic toolbar functions Configuration The first time you run EDG 4508 4516 Diagnostics you...

Page 120: ...st click on Search to let the program search the network for all connected EDG 4508 4516 s and then choose the desired server 4 If the EDG 4508 4516 you chose is password protected the following windo...

Page 121: ...emove check marks as necessary by clicking inside the appropriate check box Internal Test If this test item is selected an internal test will be done on the RS 232 serial port and the result successfu...

Page 122: ...e Communication Parameters tab to set up communication parameters 2 Set Baud rate Data bits Parity and Stop bits to the appropriate val ues Exiting Config Click OK in the bottom right corner of the Di...

Page 123: ...ayed is server name IP address model number serial number and firmware version The port information displayed is the COM name COM3 in the example below serial port interface and current port status 2...

Page 124: ...o provide a convenient way to print out test reports 1 Click on the EDG 4508 4516 shown in the To be tested info box to determine which testing report to print 2 Choose Print from the File menu or cli...

Page 125: ...he Uninstall EDG 4508 4516 Server utility to uninstall the driver and software To activate Uninstall EDG 4508 4516 click on 1 Start Programs EDG 4508 4516 UninstallEDG 4508 4516 2 To completely remove...

Page 126: ...118 EDG 4508 4516 User s Manual 3 Click on Finish to complete the uninstall procedure...

Page 127: ...8 C HAPTER Changing Your Installation Type...

Page 128: ...n type If at some point during the server s operation you find it necessary to change the IP address share the ports with another NT server or initiate some type of remote control function you will ne...

Page 129: ...A C HAPTER Troubleshooting...

Page 130: ...nd to simplify operations the Single Host Mode allows only one host to connect to EDG 4508 4516 at a time Thus if while using the single host type of installation you discover that the server has alre...

Page 131: ...server s name and password This is because Single Host users are not sharing their EDG 4508 4516 with other hosts If you do need to modify other properties run the setup program and change to another...

Page 132: ...o enter server prop erties This means that the host cannot find the server Here are some steps you can take to recover from this problem If the host and server are in the same location 1 Make sure EDG...

Page 133: ...a DHCP server on your network Since DHCP servers can assign IP addresses the IP address for either the host or EDG 4508 4516 might have been changed To recover from this problem you should 1 Ask the...

Page 134: ...dicates that EDG 4508 4516 Ethernet connection is running at 100 Mbps 10M Green Steady on indicates that EDG 4508 4516 Ethernet connection is running at 10 Mbps Traffic Green Blinking indicates data i...

Page 135: ...B C HAPTER Cable Pinouts...

Page 136: ...eT Port Pinouts Asynchronous Port Pinouts RJ45 to Male DB25 RS 232 Cable Pinouts 10 100BaseT Port Pinouts Listed below are the pinouts for the 10BaseT port on EDG 4508 4516 Asynchronous Port Pinouts L...

Page 137: ...RS 232 Cable Pinouts RJ45 Plug Pin 1 Opt 1B NPort Server Pro M odem or any DCE Device DCE Device Db25 Femaie Connector DCD DTR CTS GND RxD TxD RTS DSR DCD DSR RTS GND TxD RxD CTS DTR RJ45 Jack Connec...

Page 138: ...130 EDG 4508 4516 User s Manual...

Page 139: ...C C HAPTER Setting Up a Windows NT 95 98 Network...

Page 140: ...ol installed If your computer does not already have an Ethernet card installed you will need to purchase one and then follow the instructions provided by the Ethernet card manufac turer to install and...

Reviews: