


124
C
HAPTER
6: U
SING
RF P
LANNING
2
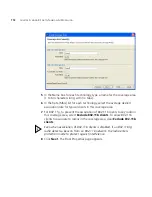
In the 3WXM Services Connection dialog box, enter the IP address of a
host running 3WXM Services, optionally enter a user name and
password, and click
Next
.
If the 3WXM Service is installed on the same machine as the one you are
using to run 3WXM, enter 127.0.0.1 as the IP address. This is a standard
IP loopback address.
3
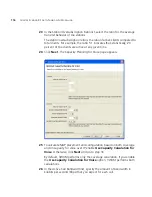
After a connection is established to the specified 3WXM Services host,
select
File > New Network Plan
. The Create Network Plan wizard
appears.
4
In the Network Plan Name box, type a name for the network plan. You
can use 1 to 60 alphanumeric characters, with no spaces, tabs, or any of
the following: slash (/), backslash (\), quotation marks (“ ”), asterisk (*),
question mark (?), angle brackets (< >), or vertical bar (|).
5
In the Country Code list, select the country where the network is to be
deployed.
You must select a country code before continuing.
6
Click
Next
to save the network plan on the server and open it in 3WXM.
Summary of Contents for OfficeConnect WX2200
Page 8: ......
Page 28: ...28 CHAPTER 1 GETTING STARTED...
Page 50: ...50 CHAPTER 2 PLANNING AND MANAGING YOUR WIRELESS NETWORK WITH 3WXM...
Page 88: ...88 CHAPTER 3 CONFIGURING WIRELESS SERVICES 9 Click Next Select WPA and deselect Static WEP...
Page 132: ...132 CHAPTER 6 USING RF PLANNING 5 When you are satisfied with the results click Finish...
Page 154: ...154 CHAPTER 6 USING RF PLANNING...
Page 178: ...178 CHAPTER 7 MANAGING AND MONITORING YOUR NETWORK...
Page 198: ...198 APPENDIX A OBTAINING SUPPORT FOR YOUR 3COM PRODUCTS...
Page 204: ...204 INDEX...


