e-STUDIO2330C/2820C/2830C/3520C/3530C/4520C
© 2008 TOSHIBA TEC CORPORATION All rights reserved
1-6
(1) Enter setting mode [08]. Change the value to adjust the density of a solid area during the copying/printing
operation.
• Use steps (a) to (c) to perform the adjustment.
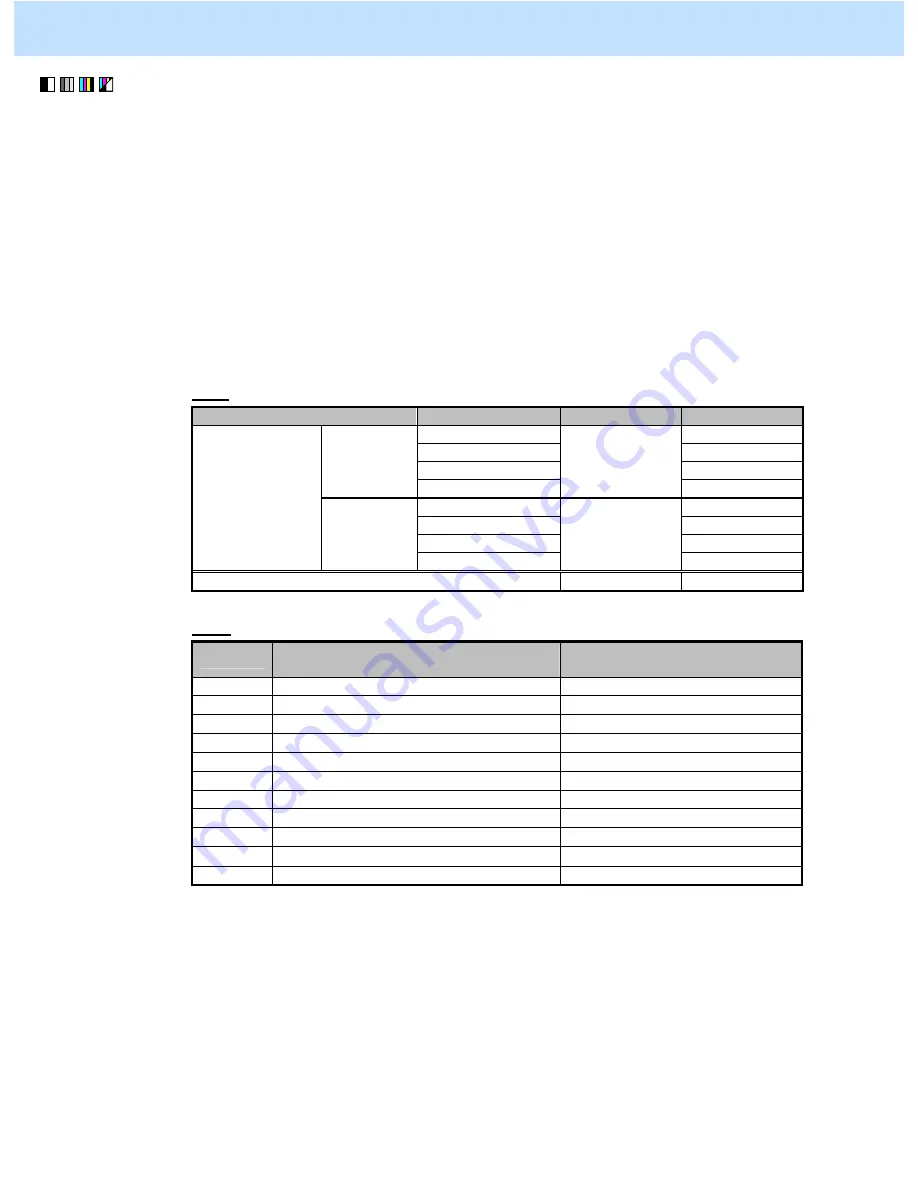
(a) Enter setting mode [08]. Change the values for codes [2513 to 2515] to adjust the developer bias
output value.
• Decreasing the value will make the solid colored area become lighter (decrease the amount of toner
on the solid colored area). On the other hand, increasing the value will make the solid colored area
become darker (increase the amount of toner on the area).
* The value to use varies according to the paper type and color to adjust. Check the code to use in
accordance with the following "Code" list, and refer to the "Value" list to select a proper value.
Code
Paper type
Color to adjust
[08] code
Subcode
Y (yellow)
0
M (magenta)
1
C (cyan)
2
Plain paper
K (black)
08-2513
3
Y (yellow)
0
M (magenta)
1
C (cyan)
2
Full color
Thick
K (black)
08-2514
3
Black
08-2515 ---
Value
Value
Correction value for developer bias
output
Density of the solid colored
area
0
Value automatically set
−
100 Light
1
Value automatically set
−
80
↑
2
Value automatically set
−
60
↑
3
Value automatically set
−
40
↑
4
Value automatically set
−
20
↑
5
Value automatically set
↑
6
Value automatically set +20
Default
7
Value automatically set +40
↓
8
Value automatically set +60
↓
9
Value automatically set +80
↓
10
Value automatically set +100
Dark
<Hint>
Adjust the values for the following codes, in order to adjust colors with RGB.
Adjustment of R (Red):
Adjust Y (Yellow) and M (Magenta).
Adjustment of G (Green): Adjust Y (Yellow) and C (Cyan).
Adjustment of B (Blue):
Adjust M (Magenta) and C (Cyan).
(b) Enter adjustment mode [05]. Select code [396]. Press the [START] button.
• Image quality control will be forcibly performed and the image density will be corrected.
1. General Adjustments – Copying, Printing and e-Filing (Output from Box)


