TANDBERG 2000 MXP
26
3.2.3
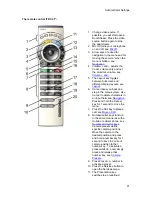
Picture Layout
The layout of the screen can either be shown as Picture in Picture (PIP) or Picture outside Picture
(POP) when displaying more than one video image. The behavior of the Layout button is
dependent on the Picture Layout setting in
Screen Settings
.
3.2.3.1 Picture in Picture
When Picture Layout is set to PIP, the Layout button makes it possible to see a second image in
a smaller view in one of the corners of the screen. The second image will be placed on top of the
main image. The user can decide in which corner the second image is to be displayed.
3.2.3.2 Picture outside Picture
When Picture Layout is set to POP, the Layout button makes it possible to see up to three images
in a composition optimized for wide screens. The second image can be displayed either as a
side-by-side the main image (1+1) or smaller images next to the main image (1+2 and 1+3).
Press the Layout button once to get side-by-side view (1+1). Press again to get the layouts 1+2
and 1+3, and finally go back to full screen view. You can also go back to full screen directly by
pressing and holding Layout for 1 second. It is recommended to use Picture outside Picture for
wide screen monitor systems.
3.2.3.3 Auto Layout
The system will automatically choose the best layout for your call. The layouts vary depending on
how many participants there are and if you use a dual video source or not. You can however
always change layout manually with the Layout button. Auto Layout applies when you open or
close a dual stream, or add or disconnect participants.
Auto Layout also includes the former automatic PIP. That implies that PIP will automatically be
shown when suitable, e.g. to display selfview when you move your near end camera. The
automatic PIP times out after a couple of seconds.
If Auto Layout is Off you will get no automatic layout changes during a call and the user must
manually control the images with the Layout button. Auto Layout is default On. To turn Auto
Layout Off, go to
Screen Settings
.
Содержание 2000 MXP
Страница 14: ......
Страница 24: ...TANDBERG 2000 MXP 10 2 1 Mounting When mounting the TANDBERG 2000 MXP follow the figures below ...
Страница 195: ...Administrator Settings 181 Voice Switched mode ...
Страница 202: ...TANDBERG 2000 MXP 188 5 8 Network The network menu contain ISDN BRI Settings LAN Settings Network Profiles Data Port ...
Страница 247: ...Peripheral Equipment 233 ...
Страница 249: ...Peripheral Equipment 235 6 9 Dual Monitor Note that this requires a system with dual monitor video output ...
Страница 273: ...Appendices 259 ...
Страница 277: ...Appendices 263 Top view ...
Страница 279: ...Appendices 265 Pin 5 GND Pin 4 RXD in Pin 3 TXD out Pin 2 Presence 12V in daisy chain Pin 1 GND ...
Страница 280: ...TANDBERG 2000 MXP 266 Dimensions Front view Side view Rear view Underside view ...
Страница 288: ...TANDBERG 2000 MXP 274 Figure 1 3 Enter the Release key in the Release Key field and press the Install Software button ...

