78
PBX Cascading
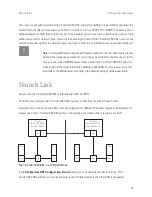
Putting a Cascaded PBX into Operation
Cascaded PBX system
Putting a Cascaded PBX into Operation
Proceed as follows to put a cascaded PBX system into operation:
1.
Take the additional slave system out of its packaging and place it in immediate proximity to the master
system. Connect a system telephone to the slave system for a later performance check. Use the U
pn
1
press-fit terminal of the basic module or one of the U
pn
ports of an interface card.
2. Back up the master system data. For further information, refer to the online help topic
SYS Configuration:
Data Backup
.
3. Switch off the master system if it is operating. Disconnect the module from the power supply by pulling
out the mains plug.
4. If necessary, install the add-on module for the master system. If you use an T-Comfort 930 DSL as the
slave system, you also have to install an add-on module.
5. Connect the two modules by means of two suitable cables as described above.
6. Power on the two PBXs. The order in which you do this does not matter.
7. In the
PBX Configuration: Ports: Slots
dialogue of the master system’s Configurator, click on
Slave
.
Select the slave
Type
in the
Slave: Change
dialogue.
If a possible slave system was detected when the system was started, there is an additional entry in the
Type
field (“Online: PBX type”). If you select this entry, the settings for
Type
and
MAC address
are applied
automatically.
PBX 1
(Master)
Basisbaugruppe
Erweiterungs-
baugruppe
PCM
LAN1
LAN2
LAN0
LAN
PBX 2
(Slave)
Basic module
Add-on module
PCM
LAN1
LAN2
LAN0
LAN
Hub/Switch
(in LAN of company)
Voice data lead (eight
pins assigned, joined
1 to 1)
CAT-5 Ethernet lead
Содержание 930 DSL
Страница 1: ...T Comfort 930 DSL Mounting and Commissioning...
Страница 2: ......
Страница 10: ...8...
Страница 148: ...146 Index Notes...
Страница 149: ...147 Index Notes...
Страница 150: ...148 Index Notes...
Страница 151: ......
Страница 152: ...As of 01 09 2006 Deutsche Telekom AG T Com Bereich Endger te Postfach 20 00 53105 Bonn...


