


•
Satellite Panel
— enter the IP address of a
satellite panel in the
IP Address Satellite X
field.
Note:
The IP address for the control panel must be the
same for the satellite number on the control panel and
frame. For example, if you assign a control panel Satellite
5, you must enter the IP address of that control panel in
the IP Address Satellite 5 field.
10.
Click
Change and Reboot
.
To Set the Panel DNS Resolver
The control panel comes configured with default DNS
entries. You can enter new ones for your facility or delete
the existing ones if you do not have a DNS server for
your network.
Before you begin, you will need the nameserver IP
addresses of your local DNS and any domain names you
want to use.
Note:
If the network settings for the control panel are set to
DHCP, the DNS entries are gathered from the server and the
local settings are overwritten.
Tip:
If the control panel cannot reach the IP address set for the
DNS nameserver, network connection may slow down.
1.
Press
HOME
>
Setup
>
Network Setup
>
DNS
Setup
.
Tip:
The Current DNS Settings area lists the domain
name entries and nameserver IP addresses currently stored
on the panel. You can remove these entries by using the
IP/Domain Name Selection knob to select each entry and
pressing Remove.
2.
Use the
IP/Domain Name Selection
knob to
select the IP address you want to edit or remove.
3.
Use the
IP Address
keypad to enter a the IP
address of a nameserver on your network. Enter the
value for each segment and press
Enter
on the
keypad.
Note:
If you are using a mouse with the keypad, the value
you enter will default back to the current segment value if
the mouse leaves the keypad.
4.
Press
Add
to add the new IP address to the list or
Replace
to replace the currently selected IP address.
Note:
The DNS resolver can have a maximum of 3
nameserver entries.
5.
Use the
IP/Domain Name Selection
knob to
select the domain name you want to edit or remove.
6.
Enter a new domain name in the
Domain Name
field.
Tip:
If you do not have a keyboard connected to the control
panel, press Show Keyboard and use the internal keyboard
to enter the new name.
7.
Press
Add
to add the new domain name to the list
or
Replace
to replace the currently selected domain
name.
Note:
The DNS resolver can have a maximum of 6 domain
name entries.
8.
Press
Save
and
Yes
to save the DNS settings and
restart the panel.
Default Network Settings
The control panel and frame are set with default network
addresses from the factory. The frame can be manually
configured to these settings using a DIP switch on the
Frame CPU board.
Table 1: Default Network Settings
Panel
Frame
192.168.1.2
192.168.1.1
IP Address
255.255.0.0
Subnet Mask
0.0.0.0
Gateway
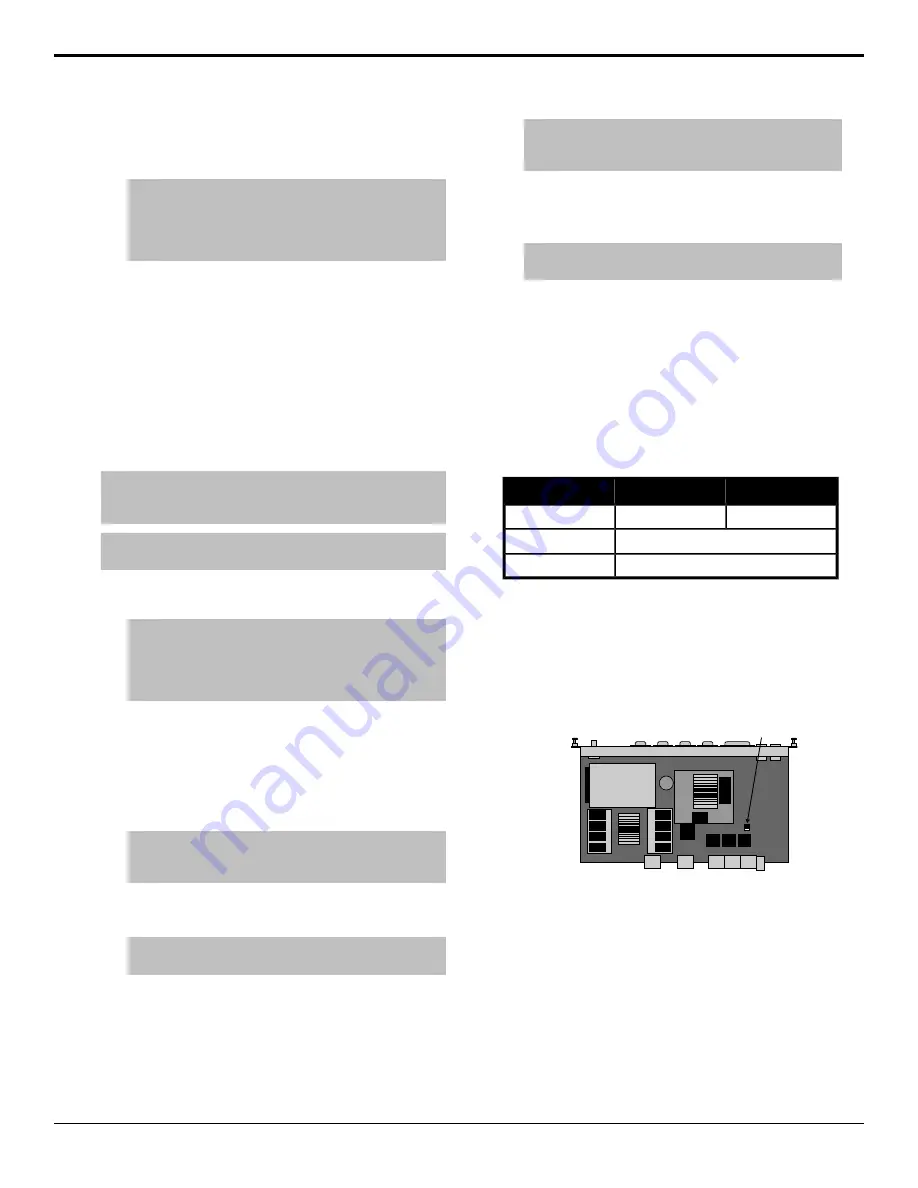
To Default the Frame Network Settings
1.
Power off the frame.
2.
Remove the Frame CPU board and place on a clean,
dry, and static-free surface.
3.
Locate the DIP switch.
DIP Switch
Figure 1: DIP Switch
4.
Move DIP switch
1
to the
ON
position.
5.
Re-install the Frame CPU into the frame and power
the frame up.
The frame boots up with the default IP address.
You can now log into the frame and set a new IP address.
The new IP address will not be used until the DIP switch
1 is moved back to
OFF
position.
16
• Network Setup — Acuity Setup Manual (v9.2)
Содержание Acuity 4410AR-020
Страница 1: ...Acuity Setup Manual v9 2...


