background image

APPENDIX 


A-


IMR01N12-E7 

12


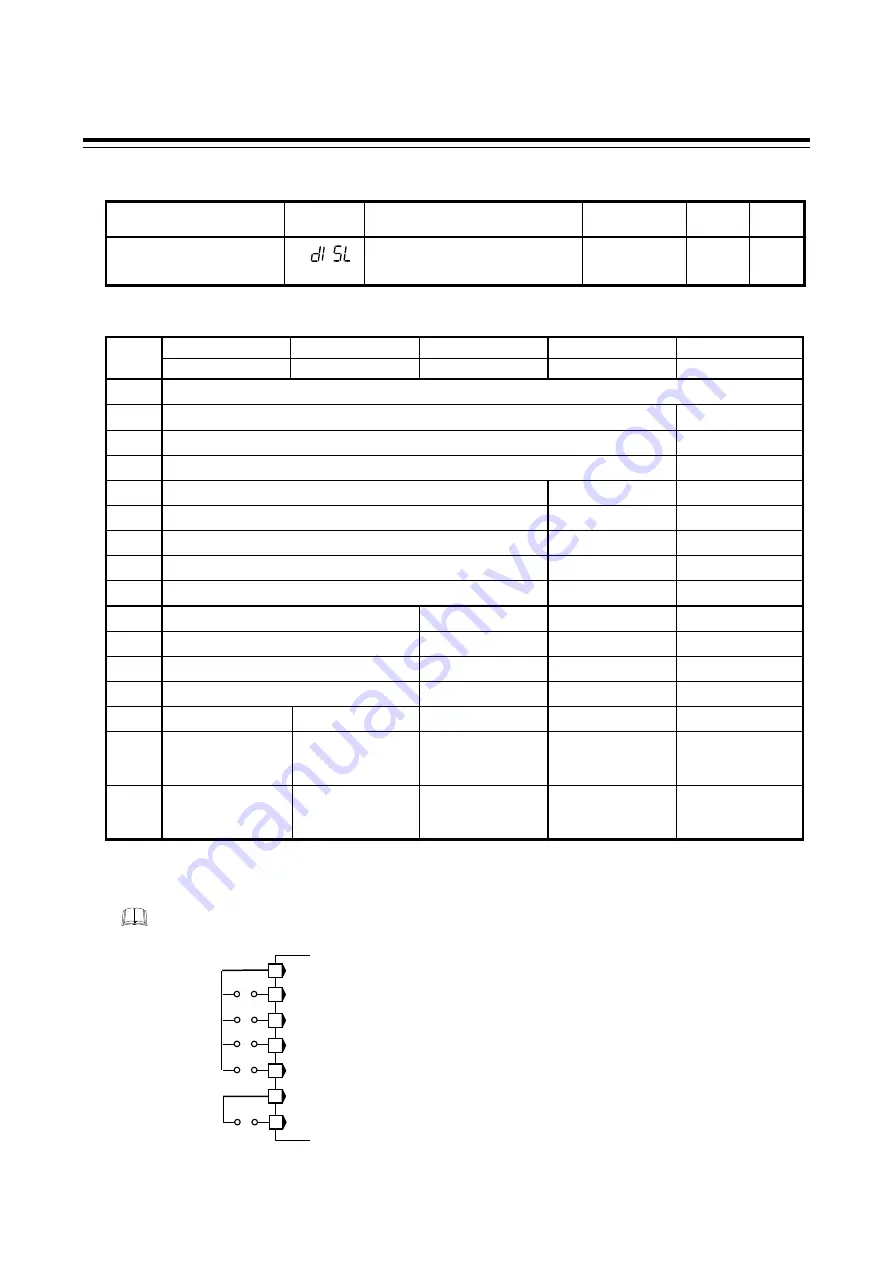
Function block F23: Event input   

Name Parameter  Data 

range 

Factory set 

value 

User set 

value 

Page

Event input logic selection 


(dISL) 

0 to 15 
(Refer to the following table.) 

1  

P. 

73


Event input logic selection 

Set 

value 

DI 1 

DI 2 

DI 3 

DI 4 

DI 5 

Terminal No. 30-31  Terminal No. 30-32

Terminal No. 30-33

Terminal No. 30-34  Terminal No. 35-36

Unused (No function assignment)


Memory area number selection (1 to 16) 

Memory area set 

Memory area number selection (1 to 16) 

Memory area set 

Memory area number selection (1 to 16) 

Memory area set 

Memory area number selection (1 to 8) 

Memory area set 

RUN/STOP transfer

Memory area number selection (1 to 8) 

Memory area set 

Remote/Local transfer

Memory area number selection (1 to 8) 

Memory area set 

Auto/Manual transfer

Memory area number selection (1 to 8) 

Memory area set 

Hold reset 

Memory area number selection (1 to 8) 

Memory area set 

Interlock release 

Memory area number selection (1 to 4) 

Memory area set 

RUN/STOP transfer  Auto/Manual transfer

10 

Memory area number selection (1 to 4) 

Memory area set 

RUN/STOP transfer  Remote/Local transfer

11 

Memory area number selection (1 to 4) 

Memory area set 

Remote/Local transfer  Auto/Manual transfer

12 

Memory area number selection (1 to 4) 

Memory area set 

Hold reset 

Interlock release 

13 

Auto/Manual transfer 

RUN/STOP transfer

Remote/Local transfer

Hold reset 

Interlock release 

14 

Auto/Manual transfer 

Input 1_ 
manual output down
(motor RPM down) 

1

Input 1_ 
manual output up 
(motor RPM up) 

2


Input 1_manual 
output 0 % reset 
(motor RPM reset) 

3


RUN/STOP transfer

15 

Auto/Manual transfer 

Input 2_ 
manual output down
(motor RPM down) 

1

Input 2_ 
manual output up 
(motor RPM up) 

2


Input 2_manual 
output 0 % reset 
(motor RPM reset) 

3


RUN/STOP transfer

1


Decreases manipulated output value (motor RPM) under Manual control with contacts closed. 

2


Increases manipulated output value (motor RPM) under Manual control with contacts closed. 

3


Manipulated output value (motor RPM) is reset to 0 % based on the edge discrimination of “open” to “closed.” 


With Event input, terminals 30 to 36 are allocated to Event input. Event input must be specified when ordering. 


Contact input from external devices or equipment should be dry contact input.   
If it is not dry contact input, the input should have meet the specifications 
below. 

Contact specifications: At OFF (contact open): 500 k

 or more 

At ON (contact closed) 10 

 or less 


Dry contact input 

DI1 

30


35


36


32 

31


DI2 

34


33

DI3 

DI4 

DI5 

COM 

COM 

Содержание HA430

Страница 1: ... IMR01N12 E7 RKC INSTRUMENT INC Resin Pressure Digital Controller HA430 HA930 Operation Manual ...

Страница 2: ... of Schneider Electric DeviceNet is a registered trademark of Open DeviceNet Vender Association Inc CC Link is a registered trademark of Mitsubishi Electric Co Ltd Company names and product names used in this manual are the trademarks or registered trademarks of the respective companies ...

Страница 3: ...racy of all information contained herein RKC makes no warranty expressed or implied with respect to the accuracy of the information The information in this manual is subject to change without prior notice No portion of this document may be reprinted modified copied transmitted digitized stored processed or retrieved through any mechanical electronic optical or other means without prior written app...

Страница 4: ...ction The power must be turned off before repairing work for input break and output failure including replacement of sensor contactor or SSR and all wiring must be completed before power is turned on again To prevent instrument damage as a result of failure protect the power line and the input output lines from high currents with a suitable overcurrent protection device with adequate breaking capa...

Страница 5: ...al 1 2 PROFIBUS IMR01N14 E This manual explains PROFIBUS communication connection and configuration HA430 HA930 Communication Instruction Manual 1 2 DeviceNet IMR01N15 E This manual explains DeviceNet communication connection and node address setting HA430 HA930 Communication Instruction Manual 1 2 CC Link IMR01N21 E This manual explains CC Link communication connection and relating to the communi...

Страница 6: ...ts conversion 1 MPa 10 bar 10 1972 kgf cm2 145 038 psi CAUTION This mark indicates precautions that must be taken if there is danger of electric shock fire etc which could result in loss of life or injury This mark indicates that if these precautions and operating procedures are not taken damage to the instrument may result This mark indicates that all precautions should be taken for safe usage WA...

Страница 7: ...ounting procedures 12 Removing procedures 12 3 WIRING 13 3 1 Wiring Cautions 13 3 2 Terminal Layout 14 HA430 14 HA930 14 3 3 Wiring of Each Terminal 15 Power supply 15 Output 1 to 3 OUT1 to OUT3 16 Output 4 to 5 OUT4 to OUT5 16 Input 1 pressure sensor input 17 Input 1 voltage and current inputs 18 Input 2 thermocouple RTD voltage and current inputs 19 Remote input optional 19 Event input optional ...

Страница 8: ...ue SV Setting 31 6 PARAMETER SETTING MODE 32 6 1 Display Sequence 32 6 2 Parameter List 34 6 3 Description of Each Parameter 35 Event 1 set value EV1 Event 2 set value EV2 Event 3 set value EV3 Event 4 set value EV4 35 Control loop break alarm LBA time LbA1 LbA2 35 LBA deadband Lbd1 Lbd2 36 Proportional band 1 P 2 P for PI PID control 37 Integral time 1 I 2 I for PI PID control 37 Derivative time ...

Страница 9: ...to calibration ACAL 49 Set lock level LCK 49 8 ENGINEERING MODE 50 8 1 Display Sequence 50 8 2 Parameter List 54 8 3 Precaution Against Parameter Change 58 8 4 Screen Configuration F10 63 STOP display selection SPCH 63 Bar graph display selection dE 63 Bar graph resolution setting dEUT 64 Decimal point position of MV scaling MVdP 64 MV scaling high MVHS 64 MV scaling low MVLS 65 8 5 Direct key F11...

Страница 10: ...TT5 77 Alarm lamp lighting condition setting ALC1 ALC2 77 Interlock function oTIL 78 The setting item ALC2 is not used in the HA430 930 8 9 Transmission Output 1 F31 Transmission Output 2 F32 Transmission Output 3 F33 79 Transmission output type selection Ao1 Ao2 Ao3 79 Transmission output scale high AHS1 AHS2 AHS3 79 Transmission output scale low ALS1 ALS2 ALS3 79 8 10 Event 1 F41 Event 2 F42 Eve...

Страница 11: ...L 2 oLL 92 MV transfer function 1 MVTS 2 MVTS 92 The setting items 1 PFF 1 PFFS 2 PFF and 2 PFFS are not used in the HA430 930 8 13 Autotuning 1 AT1 F53 Autotuning 2 AT2 F54 93 AT bias 1 ATb 2 ATb 93 AT cycle 1 ATC 2 ATC 94 AT differential gap time 1 ATH 2 ATH 95 AT action 1 ATt 2 ATt 96 8 14 Communication Function F60 97 Communication protocol selection CMPS2 97 The setting item CMPS1 is not used...

Страница 12: ... Remote Local transfer by Direct key R L operation 111 Remote Local transfer by Event input 112 9 6 RUN STOP Transfer 112 RUN STOP transfer by Front key operation 112 RUN STOP transfer by Direct key R S operation 113 RUN STOP transfer by Event input 113 9 7 Control Area Transfer 114 Control area transfer by Front key operation 114 Control area transfer by Event input 114 9 8 Start Action at Recove...

Страница 13: ...e APPENDIX A Setting Data List A 1 A 1 SV setting Monitor mode A 1 A 2 Setup setting mode A 2 A 3 Parameter setting mode A 5 A 4 Engineering mode F10 to F91 A 7 B Specifications A 24 C Memory Area Data List A 29 INDEX B 1 ...

Страница 14: ...i 12 IMR01N12 E7 MEMO ...

Страница 15: ...nal Communication function can be selected from serial communication RS 232C RS 422A RS 485 and Open Network PROFIBUS DeviceNet CC Link Sensor power supply optional Sensor power supply is used to supply power to pressure sensor with amplifier or 2 wire pressure transmitter however the number of output points is limited 1 1 Checking the Product Before using this product check each of the following ...

Страница 16: ...thermocouple S S thermocouple R R thermocouple A PLII thermocouple N N thermocouple E E thermocouple B B thermocouple W W5Re W26Re D RTD 3 wire Factory set value Pt100 3 Voltage low input group 0 to 10 mV 0 to 100 mV 0 to 1 V 10 mV 100 mV Factory set value 0 to 1 V 6 Voltage high input group 0 to 5 V 1 to 5 V 0 to 10 V 1 V 5 V 10 V Factory set value 1 to 5 V 8 Current input group 0 to 20 mA 4 to 2...

Страница 17: ... 4 to 20 mA DC P Sensor power supply If Sensor power supply is specified OUT4 and OUT5 code becomes N 7 Output 4 OUT4 Output 5 OUT5 N None 1 OUT4 Relay contact output OUT5 No output 2 OUT4 Relay contact output OUT5 Relay contact output If Sensor power supply is specified OUT4 and OUT5 code becomes N 8 Event input optional N None 1 Event input Dry contact input 5 points for Memory area selection Op...

Страница 18: ...et value 1 to 5 V DC Current 0 to 20 mA DC 4 to 20 mA DC Factory set value 4 to 20 mA DC To change the input type refer to 8 ENGINEERING MODE P 50 The second measured input can be used as non isolated remote input Event input Optional Event input hardware is necessary Specify when ordering Event input can be used for the following functions Refer to P 73 Memory area selection Number of areas 1 to ...

Страница 19: ...on between output and power supply terminals OUT3 can be selected for Sensor power supply Specify when ordering Output 4 to 5 OUT4 to OUT5 The output type for OUT4 and OUT5 is relay only OUT4 and OUT5 can be used for Allowable load vent output Refer to P 76 to 84 Relay contact output 250 V AC 1A Resistive load 1a contact If the sensor power supply is selected for OUT3 OUT4 and OUT5 cannot be used ...

Страница 20: ...te max 5 points Control area number 4 points Operation state 3 points LOC MAN REM Output Computed output from OUT1 to OUT5 ALM LED 1 point COMMUNICATION Communication optional Communication port is available to communicate with a computer or programmable controller The protocols available for a port is shown in the table below Interface RS 485 RS 232C or RS 422A Protocol RKC communication Modbus O...

Страница 21: ...m lamp Bar gragh display Operation keys Direct keys HA430 Upper display Area display Lower display Output Alarm lamp Bar gragh display Direct keys Operation keys OUT1 OUT2 OUT3 OUT4 OUT5 ALM AREA PV2 MAN REM AT SV PV1 PV2 MAN REM AT MODE SET A M R L R S Infrared port Infrared port SET MODE OUT1 OUT2 OUT3 OUT4 OUT5 ALM A M R L R S AREA PV1 PV2 MAN REM AT PV2 MAN REM AT SV ...

Страница 22: ...is displayed Memory area display Displays memory area number 1 to 16 Output Alarm lamp Output OUT1 to OUT5 lamp Green Lights when the output corresponding to each lamp is ON Alarm ALM lamp Red Lights when alarm Event function is turned on The type of alarm which is on can be checked on the event monitor display These lamps works with outputs control alarm retransmission which are assigned to OUT1 ...

Страница 23: ... it is possible to select among Auto Manual transfer for 1 Input 1 2 Input 2 or 3 both Input 1 and Input 2 Refer to P 65 Use Unuse of Direct key functions are programmable Refer to P 65 Operation keys Set SET key Used for calling up parameters and set value registration Shift key Shifts digits when settings are changed Used to selection operation between modes Down key Decreases numerals Up key In...

Страница 24: ...onditions Provide adequate ventilation space so that heat does not build up Do not mount this instrument directly above the equipment that generates large amount of heat heaters transformers semi conductor functional devices large wattage resistors If the ambient temperature rises above 50 C cool this instrument with a forced air fan cooler etc Cooled air should not blow directly on this instrumen...

Страница 25: ... panel thickness must be between 1 to 10 mm When mounting multiple HA430s or HA930s close together the panel strength should be checked to ensure proper support Unit mm Close mounting 2 3 L 48 n 3 n Number of units 2 to 6 0 8 0 92 L 0 6 0 Individual mounting 25 45 0 6 0 30 0 8 0 92 25 45 0 6 0 30 0 8 0 92 Unit mm Individual mounting 25 92 0 8 0 30 0 8 0 92 Close mounting 2 3 L 96 n 4 n Number of u...

Страница 26: ...ting brackets so that upper and lower mounting brackets are positioned diagonally The waterproof dustproof supplied as standard on the front of the instrument conforms to IP65 when mounted on the panel Checked and confirmed its compliance through the internal test at RKC For effective waterproof dustproof the gasket must be securely placed between the instrument and the panel without any gap If th...

Страница 27: ...is turned on Use a delay relay when the output line is used for an external interlock circuit Power supply wiring must be twisted and have a low voltage drop This instrument is not provided with an overcurrent protection device For safety install an overcurrent protection device such as a fuse with adequate breaking capacity close to the instrument Fuse type Time lag fuse Approved fuse according I...

Страница 28: ...ation Modbus PROFIBUS DeviceNet CC Link 1 OUT3 can be used for Sensor power supply optional Specify when ordering 2 If OUT3 is selected for Sensor power supply OUT4 and OUT5 cannot be used 13 14 15 16 17 18 19 20 21 22 23 24 25 26 27 28 29 30 31 32 33 34 35 36 Optional Communication RKC communication Modbus PROFIBUS DeviceNet CC Link Power supply voltage 100 to 240 V AC 24 V AC 24 V DC Output 5 OU...

Страница 29: ... If there is electrical noise in the vicinity of the instrument that could affect operation use a noise filter Power supply wiring must be twisted and have a low voltage drop This instrument is not provided with an overcurrent protection device For safety install an overcurrent protection device such as a fuse with adequate breaking capacity close to the instrument Fuse type Time lag fuse Approved...

Страница 30: ...d resistance 600 or less Output resolution 11 bits or more OUT3 is isolated from both OUT1 and OUT2 OUT1 and OUT2 are not isolated from each other except for relay or triac output When relay or triac output is used there is isolation between outputs There is isolation between input and output There is isolation between output and power supply terminals If OUT3 is used for the Sensor power supply r...

Страница 31: ...Rated output 0 500 to 4 000 mV V Maximum supply voltage More than 8 V DC Directly connect the pressure sensor without amplifier connection cable to terminal numbers 14 to 18 23 and 24 As for the sensor cable connection refer to the instruction manual for Pressure sensor used Terminal numbers 14 and 15 are not used Blue Wiring example Connection to our CZ 100P or CZ200P Cable color Black Shield Bro...

Страница 32: ... DC with amplifier output type is connected Resin pressure sensor without amplifier Wiring example 3 Connection to 2 wire pressure transmitter 4 to 20 mA DC type 4 to 20 mA Pressure transmitter Resin pressure sensor with amplifier Sensor connection cable Sensor power supply Sensor power supply Sensor output signal Sensor output signal Instrument inside 8 7 24 23 HA430 930 Be sure to insulate the u...

Страница 33: ...ed to Remote input Any one of the following input types can be selected Voltage low 0 to 100 mV DC 0 to 10 mV DC 0 to 1 V DC 10 mV DC 100 mV DC Voltage high 0 to 5 V DC 1 to 5 V DC 0 to 10 V DC 1 V DC 5 V DC 10 V DC Current 0 to 20 mA DC 4 to 20 mA DC Measured input is not isolated from Remote input non isolated type Event input optional With Event input terminals 30 to 36 are allocated to Event i...

Страница 34: ...pply Instrument inside 8 7 21 20 HA430 930 Resin pressure sensor with amplifier Sensor output signal Instrument inside 8 7 21 20 HA430 930 Voltage input Input2 0 to 5 V DC 0 to 10 V DC Sensor power supply Current input Input 2 4 to 20 mA DC Sensor power supply Current input Input 2 4 to 20 mA DC Sensor power supply Be sure to insulate the unused cable end In addition conduct such treatment as not ...

Страница 35: ...imum including a host computer Paired wire T B T A R B R A SG 25 26 27 28 29 SG T B T A R B R A 25 26 27 28 29 SG T B T A R B R A HA430 930 Slave RS 422A Shielded twisted pair wire Host computer master Example 1 Connection to the RS 232C port of the host computer master Number of connection 1 instrument Host computer master RS 232C Shielded wire HA430 930 Slave SD TXD RD RXD SG GND RS RTS CS CTS S...

Страница 36: ... refer to 7 SETUP SETTING MODE P 42 Entry to data sheet Be sure to check the parameters for the following settings and change them according to the application if necessary Other parameters should be also changed according to the application Input 1 Input type Gain setting Presser input range Linearize type and Shunt resistance output value Input 2 type RTD input voltage input current input specif...

Страница 37: ...ING MODE P 32 Up to 16 individual sets of parameters in Parameter setting mode and SVs can be stored and used in Multi memory area function Yes No Is Multi memory area function used Set value SV setting Set the control set value SV which is target value of the control Refer to P 30 The Set value SV can be stored up to 16 areas in Multi memory area function as well as parameters in Parameter settin...

Страница 38: ...ti memory area function Setup setting mode SetsettingitemsnotbeingintheMemoryarea and Lock levels Operation mode Change Operation status mode such as PID AT Auto Manual andRemote Local Engineering mode Change basic control functions such as Input Output assignment Press and hold the SET key for 2 seconds Press and hold the SET key for 2 seconds Press the shift key while pressing the SET key Press ...

Страница 39: ...600 0 C 328 0 to 1112 0 F Voltage mV V Programmable range Current mA 19999 to 99999 Pressure MPa 0 0 to 250 0 MPa After the input type symbol and the input range are displayed on the display unit the PV1 SV1 monitor screen SV setting Monitor mode is displayed These displays are not displayed for the 1 input controller Symbol Unit for input and SV display MP MPa br bar kg kgf cm2 PS psi Pressure se...

Страница 40: ...e SV2 from 200 0 C to 100 0 C 1 Press the shift key to light brightly the hundreds place 2 Press the DOWN key three times to change to 1 The display changes to 100 0 To store a new value for the parameter always press the SET key The display changes to the next parameter and the new value will be stored A new value will not be stored without pressing SET key after the new value is displayed on the...

Страница 41: ...arameters except for EV1 to EV4 00010 SV 00011 All parameters except for SV 00100 EV1 to EV4 00101 All parameters except for SV and EV1 to EV4 00110 No parameter All Locked 00111 Data lock level can be changed in both RUN and STOP mode Parameters protected by Data lock function are still displayed for monitoring How to restrict operation of the direct keys Three Direct function keys on the front p...

Страница 42: ...turn to the SV setting Monitor mode For the mode transfer refer to 4 2 Operation Menu P 24 2 Select the parameter Press the SET key until 1 SV Input 1_SV1 setting screen is displayed To go to the next parameter press SET key To go back to the first parameter keep pressing SET keys until it is displayed again Continued on the next page SV setting Monitor mode Input 1_SV1 setting screen SET MODE SV ...

Страница 43: ... the hundreds digit 4 Change the set value Press the UP key to change the number to 2 5 Store the set value Press the SET key to store the new set value The display goes to the next parameter SET MODE SET MODE SET MODE SET MODE SV setting Monitor mode Input 1_SV1 setting screen SV setting Monitor mode Input 1_MV1 monitor screen SET MODE SET MODE ...

Страница 44: ...nge Input 2_setting limiter low to Input 2_setting limiter high AREA AREA SET key Input 1_measured value PV1 set value SV1 monitor Measured value 1 PV1 Set value 1 SV1 Remote state The remote set value is displayed Local state The set value is displayed Manual operation Manipulated output value MV1 of Input 1 can be set An MV scaling value motor RPM is displayed in the monitor state SET key SET ke...

Страница 45: ...T key to store the new value The display goes to the next parameter Example Input 2_SV2 setting screen Change the Set value SV of another Memory area which is not selected for ongoing control While Memory area 1 is selected for ongoing control change SV1 of Input 1 in Memory area 3 from 150 0 MPa to 100 0 MPa 1 Go to Input 1_SV1 setting screen Press the shift key until the Memory area display unit...

Страница 46: ...ng mode Press and hold the SET key for 2 seconds Event 1 set value EV1 SET key SET key SET key AREA Event 2 set value EV2 AREA When LBA is selected in Event 3 or Event 4 Event 3 set value EV3 AREA Control loop break alarm 1 LBA1 time AREA SET key SET key Event 4 set value EV4 AREA LBA1 deadband AREA SET key AREA SET key LBA2 deadband AREA SET key Input 1_proportional band SET key Input 1_integral ...

Страница 47: ...mber and Setting change rate limiter up down in Parameter setting mode Area soak time of memory area 1 Setting change rate limiter up of memory area 2 Setting change rate limiter up of memory area 1 Area soak time of memory area 2 Setting change rate limiter down of memory area 3 Area soak time of memory area 3 Measured value PV Set value SV of memory area 2 Set value SV of memory area 1 Set value...

Страница 48: ...EV4 P 35 Input 2_setting change rate limiter down 2 SVrd P 39 Control loop break alarm 1 LBA1 time LbA1 P 35 Area soak time AST P 40 LBA1 deadband Lbd1 P 36 Link area number LnKA P 41 Control loop break alarm 2 LBA2 time LbA2 P 35 LBA2 deadband Lbd2 P 36 Input 1_proportional band 1 P P 37 Input 1_integral time 1 I P 37 Input 1_derivative time 1 d P 37 Input 1_control response parameter 1 rPT P 38 ...

Страница 49: ...r controller magnet relay etc or a failure in the control loop caused by an input sensor break The LBA function is activated when control output reaches 0 low limit with output limit function or 100 high limit with output limit function LBA monitors variation of the Measured value PV for the length of LBA time When the LBA time has elapsed and the PV is still within the alarm determination range t...

Страница 50: ... of the control loop in order The LBA function does not detect a location which causes alarm status If LBA alarm is ON check each device or wiring of the control loop LBA function is not operative when AT function is activated The controller is in STOP mode LBA function is set to OFF LBA function is not assigned to Event ES3 or Event 4 ES4 If the LBA time is too short or does not match the control...

Страница 51: ...ange OFF PD action 1 to 3600 seconds 0 1 to 3600 0 seconds or 0 01 to 360 00 seconds Varies with the setting of the Integral Derivative time decimal point position selection Factory set value Input 1_integral time 1 I 5 00 Input 2_integral time 2 I 240 00 Related parameters Integral Derivative time decimal point position selection P 87 Derivative time 1 d 2 d for PID control Derivativeactionistopr...

Страница 52: ...rshoot is critical Slow is chosen Measured value PV Set value SV2 Change Set value SV change point Time Fast Medium Slow Set value SV1 Setting change rate limiter up 1 SVrU 2 SVrU This function is to allow the Set value SV to be automatically changed at specific rates when a new Set value SV SVrU is used when the SV is changed to a higher SV Data range OFF Unused 0 1 to Input span unit time Varies...

Страница 53: ...p down by the function at power on and operation mode change from STOP to RUN If the Autotuning AT function is activated while the SV is ramping up or ramping down by the Setting change rate limiter AT will starts after the SV finishes ramp up or ramp down by the limiter and the controller is in PID control mode until AT starts When the value of Setting change rate limiter is changed during normal...

Страница 54: ...d the following example carefully how the time change affects Ramp Soak control time For example the memory area which has 5 minute soak time is executed When 3 minutes passed the Area soak time is changed from 5 minutes to 10 minutes The remaining time of the currently executed Memory area is calculated as follows The new soak time 10 minutes lapsed time 3 minutes remaining time 7 minutes The old...

Страница 55: ...y using Area soak time Link area number and Setting change rate limiter up down in Parameter setting mode The Area soak time for the memory area linked last becomes invalid to continue the state of the Set value SV reached Usage example Area soak time of memory area 1 Area soak time of memory area 2 Setting change rate limiter down of memory area 3 Area soak time of memory area 3 Measured value PV...

Страница 56: ... SET key Return to first parameter setting item of Setup setting mode SET key SET key Device address Slave address Communication speed Data bit configuration Interval time Press the shift key while pressing the SET key SET key SET key Input 1_PV bias SET key Input 1_ proportional cycle time SET key SET key SET key SET key SET key Input 1_ PV digital filter Input 1_PV ratio Input 1_PV low input cut...

Страница 57: ...1_PV low input cut off 1 PLC P 45 Input 1_ proportional cycle time 1 T P 45 Input 2_PV bias 2 Pb P 44 Input 2_PV digital filter 2 dF P 44 Input 2_PV ratio 2 Pr P 44 Input 2_PV low input cut off 2 PLC P 45 Input 2_ proportional cycle time 2 T P 45 Device address Slave address Add2 P 46 Communication speed bPS2 P 46 Data bit configuration bIT2 P 46 Interval time InT2 P 47 Infrared communication addr...

Страница 58: ...er 2 dF OFF PV ratio 1 Pr 2 Pr PV ratio is a multiplier to be applied to the Measured value PV The PV ratio is used to compensate the individual variations of the sensors or correct the difference between the Measured value PV of other instruments Data range 0 500 to 1 500 Factory set value Input 1_PV ratio 1 Pr 1 000 Input 2_PV ratio 2 Pr 1 000 Related parameter Auto calibration P 49 When using o...

Страница 59: ...value less than the PV low input cut off is ignored to calculate control output in order to prevent control disturbance caused by input variation at low measured value range Proportional cycle time 1 T 2 T Proportional cycle time is to set control cycle time for time based control output such as voltage pulse for SSR triac and relay output Data range 0 1 to 100 0 seconds Factory set value Input 1_...

Страница 60: ... 1 2500 2 5 Mbps 2 19 2 19200 bps 5000 5 Mbps 2 38 4 38400 bps 10000 10 Mbps 2 1 A communication speed of 125 to 500 kbps can be selected for DeviceNet 2 A communication speed of 156 kbps 625 kbps and 2 5 to 10 Mbps can be selected for CC Link Factory set value 9 6 RKC communication Modbus 125 DeviceNet 156 CC Link Set the same communication speed for both the HA430 930 slave and the host computer...

Страница 61: ...ns of the host computer Infrared communication address Add3 Infrared communication address is used to set the device address of the controller for Infrared communication function Data range 0 to 99 Factory set value 0 Infrared communication speed bPS3 This item is communication speed of the Infrared communication function Data range 9 6 9600 bps 19 2 19200 bps Factory set value 19 2 The factory se...

Страница 62: ...state 4 Change the operation state to the control STOP 5 Pressing the shift key for 1 second while displaying the Auto zero screen automatically starts Auto zero operation If this Auto zero operation normally end the screen returns to the Auto zero screen The result of Auto zero adjustment is also reflected to the Input 1_PV bias 1 Pb value Manual zero point adjustment can be performed by changing...

Страница 63: ... Input 1_PV ratio 1 Pr value Manual full scale point adjustment can be performed by changing this PV ratio value Set lock level LCK The Set lock level restricts parameter setting changes by key operation Set data lock function This function prevents the operator from making errors during operation Data range 1 Parameters other than Set value SV and Event set value EV1 to EV4 0 Unlock 1 Lock 2 Even...

Страница 64: ...nput 1_burnout direction Input 1_squrae root extraction selection Power supply frequency selection Input 2_squrae root extraction selection Screen configuration SET key UP or DOWN key Direct key Auto Manual transfer key operation selection Input 1 SET key SET key Remote Local transfer key operation selection RUN STOP transfer key operation selection Bar graph display selection Bar graph resolution...

Страница 65: ...y SET key Event 1 hold action Event 1 differential gap Event 1 action at input error Event 1 assignment Event 2 Event 2 type selection SET key SET key SET key UP or DOWN key SET key SET key SET key Event 2 hold action Event 2 differential gap Event 2 action at input error Event 2 assignment Event 3 Event 3 type selection SET key SET key SET key UP or DOWN key SET key SET key SET key Event 3 hold a...

Страница 66: ... AT1 SET key SET key SET key SET key UP or DOWN key Control Hot Cold start selection SET key SET key SET key UP or DOWN key SET key SET key SET key Input 2_ use selection SV tracking Input 1_AT bias Input 1_AT cycle Input 1_AT differential gap time Input 1_control action type selection Input 1_ integral derivative decimal point position Input 1_ON OFF action differential gap upper Input 1_derivati...

Страница 67: ...uration SV Setting change rate limiter unit time Soak time unit selection SET key SET key SET key UP or DOWN key SV1 SET key SET key UP or DOWN key SV2 Input 2_setting limiter high Input 2_setting limiter low SET key SET key SET key UP or DOWN key System information ROM version display Integrated operating time display SET key SET key SET key Holding peak value ambient temperature display UP or DO...

Страница 68: ...value SHnT Input 1_decimal point position 1 PGdP P 69 Input 1_input scale high 1 PGSH Input 1_input scale low 1 PGSL P 70 Input 1_input error determination point high 1 PoV Input 1_input error determination point low 1 PUn P 71 Input 1_burnout direction 1 boS Input 1_square root extraction selection 1 SQr P 72 Input 1_PV1 hold function 1 HLdS Power supply frequency selection PFrQ Input 2 Input 2_i...

Страница 69: ...ransmission output 2 type selection Ao2 P 79 F32 output 2 Transmission output 2 scale high AHS2 Transmission output 2 scale low ALS2 Transmission Transmission output 3 type selection Ao3 P 79 F33 output 3 Transmission output 3 scale high AHS3 Transmission output 3 scale low ALS3 Event 1 Event 1 type selection ES1 P 80 F41 Event 1 hold action EHo1 P 82 Event 1 differential gap EH1 P 83 Event 1 acti...

Страница 70: ... Input 1_ON OFF action differential gap upper 1 oHH P 88 Input 1_ON OFF action differential gap lower 1 oHL Input 1_action at input error high 1 AoVE P 89 Input 1_action at input error low 1 AUnE Input 1_manipulated output value at input error 1 PSM P 90 Input 1_manipulated output value when transferred to Auto from Manual 1 PSM Input 1_output change rate limiter up 1 orU Input 1_output change rat...

Страница 71: ...ion 1 ATt P 96 Autotuning 2 Input 2_AT bias 2 ATb P 93 F54 AT2 Input 2_AT cycle 2 ATC P 94 Input 2_AT differential gap time 2 ATH P 95 Input 2_AT action 2 ATt P 96 These are function blocks unused in the HA430 930 F55 Their settings are invalid Communication This item is not used for the HA430 930 CMPS1 F60 Communication protocol selection CMPS2 P 97 Set value SV Setting change rate limiter unit t...

Страница 72: ...ting Monitor mode Setup setting mode Parameter setting mode and Engineering mode by comparing them with the record taken before the change When any one of the following parameters settings are changed Input Type Selection of Input 1 1 InP Input Type Selection of Input 2 2 InP Engineering Display Unit Selection of Input 1 1 UnIT Engineering Display Unit Selection of Input 2 2 UnIT all parameter set...

Страница 73: ...ent 3 differential gap Event 4 differential gap ON OFF action differential gap upper 1 0 MPa 1 0 C F 0 1 of input span ON OFF action differential gap lower AT bias 0 Setting limiter high Input scale high Setting limiter low Input scale low Setup setting PV bias 0 mode PV ratio 1 000 PV low input cut off 0 00 Event 1 set value 50 Event 2 set value Event 3 set value Event 4 set value Control loop br...

Страница 74: ...k alarm1 LBA1 time Event 3 only 480 seconds Control loop break alarm2 LBA2 time Event 4 only 480 seconds LBA1 deadband Event 3 only 0 0 LBA2 deadband Event 4 only 0 0 When any one of the following parameters settings are changed Transmission Output 1 Type Selection Ao1 Transmission Output 2 Type Selection Ao2 Transmission Output 3 Type Selection Ao3 all parameter settings shown in the table below ...

Страница 75: ...n point high Input error determination point low Transmission output 1 scale high Transmission output 2 scale high Transmission output 3 scale high Transmission output 1 scale low Transmission output 2 scale low Engineering mode Transmission output 3 scale low Event 1 hold action Event 2 hold action Event 3 hold action Event 4 hold action ON OFF action differential gap upper ON OFF action differen...

Страница 76: ...put 2 and Input Scale Low 2 PGSL is 200 C the decimal point position is changed from 0 to 2 Input scale low becomes 199 99 because 200 00 is out of the display range When a number of decimal place for the set value is reduced due to the decimal point change the set value is rounded off to the first decimal place and will be displayed without any decimal place Example When the decimal point positio...

Страница 77: ...vent input RUN Contact closed STOP Contact open RUN RUN STOP RUN STOP with key operation STOP is not displayed dSTP STOP STOP STOP KSTP SToP Bar graph display selection dE Use to select the contents of the bar graph display Data range 0 No display 1 Input 1_manipulated output value MV 2 Input 1_measured value PV 3 Input 1_set value SV 4 Input 1_deviation value 5 Unused Not available 6 Input 2_mani...

Страница 78: ...eral digits per 1 dot of the bar graph Data range 1 to 100 digit dot Factory set value 100 Related parameters Bar graph display selection P 63 Decimal point position of MV scaling MVdP Use to select the decimal point position of the MV scaling function Data range 0 No decimal place 1 One decimal place 2 Two decimal places 3 Three decimal places 4 Four decimal places Factory set value 1 Related par...

Страница 79: ...rpm Input 1_MV scaling high MV1 100 0 80 0 rpm 8 5 Direct Key F11 Auto Manual transfer key operation selection Fn1 Use to select Use Unuse of Auto Manual transfer key A M Data range 0 Unused 1 Auto Manual transfer for Input 1 2 Auto Manual transfer for Input 2 3 Common Auto Manual transfer for Input 1 and Input 2 Factory set value 3 Remote Local transfer key operation selection Fn2 Use to select U...

Страница 80: ... Input type Input range Hardware 0 TC input K 200 to 1372 C or 328 0 to 2501 6 F Voltage Low 1 J 200 to 1200 C or 328 0 to 2192 0 F input group 2 R 50 to 1768 C or 58 0 to 3214 4 F 3 S 50 to 1768 C or 58 0 to 3214 4 F 4 B 0 to 1800 C or 32 0 to 3272 0 F 5 E 200 to 1000 C or 328 0 to 1832 0 F 6 N 0 to 1300 C or 32 0 to 2372 0 F 7 T 200 to 400 C or 328 0 to 752 0 F 8 W5Re W26Re 0 to 2300 C or 32 0 t...

Страница 81: ... becomes invalid when the Voltage Current input is selected as input type Gain setting GAIn F21 Use to set the gain of the pressure sensor Data range 0 500 to 4 000 mV V Factory set value CZ 100P CZ 200P 1 500 mV V Setting procedure CZ 100P CZ 200P Set the rated output value mV V engraved on the rated nameplate attached to the pressure sensor housing The rated output value mV V of the CZ 100P CZ 2...

Страница 82: ...auge type sensors other than RKC product Set it to 0 fixed Shunt resistance output value SHnT F21 When the strain gauge type sensor other than RKC product is used it is set What percentage of the rated output is output when the full scale point of the Input 1_measured value PV1 is adjusted by Auto calibration Data range 40 0 to 100 0 Factory set value 80 0 For details of the shunt resistance outpu...

Страница 83: ...put scale low P 70 Input scale high 1 PGSH 2 PGSH This value is high limit of the input scale range Data range Pressure sensor input Input scale low to Maximum value of the selected input range TC RTD inputs Input scale low to Maximum value of the selected input range Voltage V Current I inputs 19999 to 99999 Varies with the setting of the decimal point position Factory set value Input 1_input sca...

Страница 84: ...et by setting the Input scale high low When a Voltage Current input type is selected the Input scale high can be set lower than the Input scale low Input scale high Input scale low Input error determination point high 1 PoV 2 PoV Use to set Input error determination point high Input error determination function is activated when a measured value reaches the limit and control output value selected ...

Страница 85: ...le is 0 0 to 250 0 Input span 250 0 5 of input span 12 5 Setting range 12 5 to 262 5 Burnout direction 1 boS 2 boS Use to select Burnout direction in input break When input break is detected by the controller the measured value go either Upscale or Downscale according to the Burnout direction setting Data range Pressure sensor input Input 1 0 Upscale 1 Downscale TC input Input 2 0 Upscale 1 Downsc...

Страница 86: ...by using Square root extraction function without using a square root extractor PV hold function 1 HLdS 2 HLdS Use to select Use Unuse of the peak hold bottom hold function for a Measured value PV Data range 0 Unused 1 Used Factory set value Input 1_PV1 hold function 1 HLdS 0 Input 2_PV2 hold function 2 HLdS 0 Related parameters PV1 peak hold value monitor P 103 PV1 bottom hold value monitor P 104 ...

Страница 87: ...set RUN STOP transfer Auto Manual transfer 10 Memory area number selection 1 to 4 Memory area set RUN STOP transfer Remote Local transfer 11 Memory area number selection 1 to 4 Memory area set Remote Local transfer Auto Manual transfer 12 Memory area number selection 1 to 4 Memory area set Hold reset Interlock release 13 Auto Manual transfer RUN STOP transfer Remote Local transfer Hold reset Inter...

Страница 88: ... input or not selected RUN STOP transfer RUN Control RUN STOP Control STOP RUN Control RUN Auto Manual transfer Auto Manual Auto Remote Local transfer Remote or cascade control Local Local Hold reset Hold reset execution By key operation Interlock release Interlock release execution Manual output down Motor RPM down 1 Manual output down Motor RPM down Manual output up Motor RPM up 2 Manual output ...

Страница 89: ... Contact closed Auto MAN mode lamp ON Contact open Manual Contact closed Manual MAN mode lamp OFF Contact open Remote Local transfer Mode select from front key or communication Status of event input DI Actual operation mode Display lamp Remote Contact closed Remote REM mode lamp ON Contact open Local Contact closed Local REM mode lamp OFF Contact open Transfer timing of RUN STOP Auto Manual and Re...

Страница 90: ...rgized EV1 De energized De energized alarm corresponding to two loops control 9 This set value is not used for the HA430 930 10 This set value is not used for the HA430 930 11 MV1 EV4 Energized EV 3 Energized EV 2 Energized EV 1 Energized Energized alarm MV 1 Manipulated output value of Input 1 MV 2 Manipulated output value of Input 2 EV 1 Output of Event 1 EV 2 Output of Event 2 EV 3 Output of Ev...

Страница 91: ...tput ON Set value SV Event set value Measured value PV Event timer setting time 100 0 seconds Event state Event output OFF Alarm lamp lighting condition setting ALC1 ALC2 Use to set an alarm ALM lamp lighting conditions to Event 1 to Event 4 Data range ALC1 screen ALC2 screen 1 Event 1 6 As this screen is not used for 0 ALM lamp is not lit 1 ALM lamp is lit the HA430 930 do not change 2 Event 2 th...

Страница 92: ...value is out of the event zone after it enters the event zone once This interlock is released through key operation Event input optional or Communication optional Example Process high The Interlock function is released for any of the following When the power is turn on However the Interlock function becomes ON when set to the event state simultaneously with the control started When the control is ...

Страница 93: ...tput 3 output 3 OUT3 The transmission has priority over the Output logic selection LoGC Transmission output scale high AHS1 AHS2 AHS3 Use to set a scale high limit value of the transmission output Data range Measured value PV and Set value SV Input scale low to Input scale high Manipulated output value MV 5 0 to 105 0 Deviation Input span to Input span Factory set value Measured value PV and Set v...

Страница 94: ...7 Alarm lamp lighting condition setting P 77 Event hold action P 82 Event differential gap P 83 Event assignment P 84 Event action at input error P 84 Event set value P 35 Control loop break alarm LBA time P 35 LBA deadband P 36 Event action type Continued on the next page Event set value is greater than 0 Event set value is greater than 0 Deviation high Deviation low Deviation high low Band Proce...

Страница 95: ... reverse action When the LBA time has passed and the PV has not fallen below the alarm determination range the alarm will be turned on When the output exceeds 100 low limit with output high function For direct action When the LBA time has passed and the PV has not fallen below the alarm determination range the alarm will be turned on For reverse action When the LBA time has passed and the PV has n...

Страница 96: ...nt range With hold action Without hold action ON ON Event status Time Deviation Hold action area Measured value PV Measured value PV Event set value Set value SV OFF Time Deviation Measured value PV Event set value Set value SV ON Event status OFF Measured value PV Re hold action When Re hold action is ON the event action is also suppressed at the control set value change until the Measured value ...

Страница 97: ...e to set a differential gap of the Event 1 2 3 or 4 Data range 0 to Input span Varies with the setting of the Decimal point position Factory set value Pressure sensor input Input 1 2 0 MPa TC RTD inputs Input 2 2 0 C F Voltage V Current I inputs Input 1 Input 2 0 2 of input span Related parameters Event type selection P 80 Event hold action P 82 Event assignment P 84 Event action at input error P ...

Страница 98: ... error determination point high 0 0 MPa 5 0 MPa 240 0 MPa Forcibly turned on 1 250 0 MPa Select one of these Select one of these Normal processing Manipulated output value MV obtained by control computing a measured value PV Normal processing 2 1 The event output is forcibly turned on regardless of the event action status when the input is abnormal Forcibly turned on 1 Normal processing 2 2 The ev...

Страница 99: ...ated by the controller before power failure Hot start 2 the controller will return to the same operation mode which was used by the controller before power failure In the Manual mode the output value will be at the low output limit value In the Auto mode the controller will calculate the manipulated output value regardless that before power failure So the manipulated output varies Cold start the c...

Страница 100: ...t value change Operation mode Local Remote Local Set value used Local set value Remote set value Local set value SV tracking used Local set value Remote set value Local set value Remote set value Local set value Remote set value SV tracking unused Local set value Remote set value Local set value Remote set value Local set value Remote set value Time t Set value SV Remote set value Remote Local tra...

Страница 101: ...ime decimal point position selection 1 IddP 2 IddP Use to select a decimal point position of Integral time and Derivative time in PID control Data range 0 No decimal place 1 One decimal place 2 Two decimal places Factory set value Input 1_integral derivative time decimal point position selection 1 IddP 2 Input 2_integral derivative time decimal point position selection 2 IddP 2 Related parameters ...

Страница 102: ... PV is smaller than the Set value SV the Manipulated output MV is 100 or ON When the PV is higher than the SV the MV is 0 or OFF Differential gap setting prevents control output from repeating ON and OFF too frequently Differential gap Upper Set value SV Manipulated output value MV Time ON OFF ON OFF ON OFF Differential gap Lower ON OFF action differential gap lower 1 oHL 2 oHL Use to set the ON O...

Страница 103: ...ifferential gap 0 1 of input span Input error determination point high Input range 0 0 MPa 5 0 MPa 240 0 MPa Manipulated output value at input error 250 0 MPa Select one of these Manipulated output value MV obtained by PID control PID control output Within input scale range Input error determination point low Manipulated output value at input error Select one of these PID control output Action at ...

Страница 104: ...anual control Data range 5 0 to 105 0 Factory set value Related parameters MV transfer function P 92 This manipulated output value is used as a manipulated output value under Manual control when transferred to Manual control from Auto control for event input with MV transfer function 1 Used selected Output change rate limiter up 1 orU 2 orU Use to set the Output change rate limiter up to limit of ...

Страница 105: ...is particularly effective when a sudden MV change may create uncontrollable situation cause a large current flow Also it is very effective current output or voltage output is used as control output Output change rate limiter down 1 ord 2 ord Use to set the Output change rate limiter down Data range 0 0 to 1000 0 second of manipulated output 0 0 Unused Factory set value Input 1_output change rate l...

Страница 106: ... 2 oLL 5 0 Related parameters Output change rate limiter up P 90 Output change rate limiter down P 91 Output limiter high P 92 Description of function Refer to Output limiter high The setting items 1 PFF 1 PFFS 2 PFF and 2 PFFS displayed hereafter are not used in the HA430 930 MV transfer function 1 MVTS 2 MVTS The final Manipulated output value MV used under Manual control with the control mode t...

Страница 107: ... 101 AT action P 96 Functional description The AT bias is used to prevent overshoot during Autotuning in the application which does not allow overshoot even during Autotuning RKC Autotuning method uses ON OFF control at the set value to calculate the PID values However if overshoot is a concern during Autotuning the desired AT bias should be set to lower the set point during Autotuning so that ove...

Страница 108: ... Factory set value Input 1_AT cycle 1 ATC 1 Input 2_AT cycle 2 ATC 1 Related parameters PID AT transfer P 101 AT action P 96 Example When the AT cycle is set to 1 5 cycle and the Autotuning AT function is executed just after the power is turned on Measured value PV Set value SV Time AT start AT cycle 1 5 AT cycle 1 0 Start the PID computation in accordance with PID parameters calculated by AT AT e...

Страница 109: ...ed to the other Set AT differential gap time to 1 100 Time required for temperature rise Example A AT cycle time the AT differential gap time set to 0 00 second The output chatters due to the fluctuation of the Measured value PV caused by noise and Autotuning AT function is not able to monitor appropriate cycles to compute suitable PID values B AT cycle time when the AT differential gap time is se...

Страница 110: ...UN The Measured value PV is without input error range Input error determination point high Measured value PV Input error determination point low The Output limiter high is 0 1 or higher and the Output limiter low is 99 9 or less When the Autotuning is finished the controller will automatically returns to PID PI control AT cancellation The Autotuning is canceled if any of the following conditions e...

Страница 111: ...ring If the Communication function is for PROFIBUS or DeviceNet the selection of the Communication protocol CMPS2 becomes invalid For the details of communication functions RKC communication Modbus refer to the Communication Instruction Manual IMR01N13 E Refer to Communication Instruction Manual IMR01N14 E for PROFIBUS Communication Instruction Manual IMR01N15 E for DeviceNet and Communication Ins...

Страница 112: ...se to set a low limit of the set value Data range Input scale low to Setting limiter high Factory set value Input 1_setting limiter low 1 SLL Input 1_input scale low Input 2_setting limiter low 2 SLL Input 2_input scale low Related parameters Decimal point position P 69 Input scale low P 70 Setting limiter high P 98 Description of function Refer to Setting limiter high PV transfer function 1 PVTS ...

Страница 113: ...ays the version of loaded software Integrated operating time display WT Displays the integrated total operating time of the controller Display range 0 to 99999 hours Holding peak value ambient temperature display TCJ Displays the maximum ambient temperature of the instrument Display range 10 0 to 100 0 C This screen is displayed but not used for the HA430 930 Press the SET key Press the SET key Pr...

Страница 114: ...9 3 Monitoring Display in Operation P 102 To change the Set value SV go to SV setting Monitor mode 5 SV SETTING MONITOR MODE P 30 To change parameters related to control go to the Parameter setting mode 6 PARAMETER SETTING MODE P 32 7 SETUP SETTING MODE P 42 To change the control Memory area go to SV setting Monitor mode 5 SV SETTING MONITOR MODE P 30 To activate Autotuning AT go to the Operation ...

Страница 115: ... the SET key If the key is not pressed within 1 minute the display will automatically return to the SV setting Monitor mode PID AT transfer 1 OFF Input 1_PID control ON Input 1_Autotuning PID AT transfer 2 OFF Input 2_PID control ON Input 2_Autotuning Auto Manual transfer 2 AUTO Input 2_Auto operation MAN Input 2_Manual operation Remote Local transfer LOC Local set value REM Remote set value RUN S...

Страница 116: ...the MV scaling value Display range MV scaling low to MV scaling high SET key Power ON Parameter setting mode Setup setting mode Operation mode Engineering mode Press the shift key while pressing the SET key Parameters related to multi memory area function Parameters displayed when function is specified A AREA PV1 MAN MV scaling function Scaling of an Input 1_manipulated output value MV1 is conduct...

Страница 117: ...ET key SET key AREA PV2 PV1 OUT1 Input 1_measured value PV1 Input 2_measured value PV2 monitor Measured value 1 PV1 Measured value 2 PV2 A SET key OUT1 Displays the remote set value which is the control target value in the Remote REM mode Displayed only when the Remote input function is provided Display range Input 1_setting limiter low to Input 1_setting limiter high Remote input value monitor SE...

Страница 118: ...ld value is not backed up Bottom hold function The Bottom hold function is used to store hold the minimum bottom measured value PV The bottom hold value is updated regardless of the STOP or RUN state if the power to this controller is turned on Each of this value is updated when the Measured value PV becomes less than the value now being held However if the following operation is performed the val...

Страница 119: ...ovided Display range Input 2_input scale low to Input 2_input scale high Peak hold function Refer to PV1 peak hold value monitor P 104 PV2 peak hold value monitor SET key PV2 hold reset Input 2_peak and bottom hold value is reset when the UP and DOWN keys a simultaneously pressed Displayed only when the Hold function is provided Hold reset can be made by Event input optional Hold resetting by Even...

Страница 120: ... MV scaling low P 64 MV scaling high P 65 When at a high MV scaling limit value of 100 0 and at a low MV scaling limit value of 0 0 MV1 is displayed When set to high MV scaling limit value low MV scaling limit value the zero value is displayed OUT1 MAN D SET key Input 1_manipulated output value MV1 monitor E OUT1 MAN Input 2_manipulated output value MV2 monitor Displays Input 2_manipulated output ...

Страница 121: ...unction Parameters displayed when function is specified Area soak time 2 minutes Measured value PV SV of memory area 2 Present set value SV Time Memory area 1 Memory area 2 Memory area 3 Area soak time 4 minutes Area soak time 3 minutes Start of monitoring the area soak time for Memory area 1 End of monitoring Memory area 1 Control area is changed to Memory area 2 and the time displayed on the mon...

Страница 122: ...E OUT1 OUT2 OUT3 OUT4 OUT5 ALM A M R L R S AREA PV1 PV2 MAN REM AT PV2 MAN REM AT SV The above figure is an image of Auto Manual transfer of Input 1 When Auto Manual mode is changed from Auto to Manual or from Manual to Auto the balanceless bumpless function is activated to prevent control disturbance caused by a sudden output change a Transfer from Auto mode to Manual mode However when the mode i...

Страница 123: ...r by Event input Auto Manual transfer by the Event input is possible with the Event input logic selection P 73 of the Engineering mode The table below shows the actual operation modes and lamp status under different combinations of settings by front key communication and Event input Mode select from front key or communication Event input state Actual operation mode Lamp state Auto Contact closed A...

Страница 124: ...ontact state and the operation state is shown in the following Relationship between contact state and each operation state Contact closed Contact open Key operation equivalent Manual output down Motor RPM down 1 Manual output down Motor RPM down DOWN key Manual output up Motor RPM up 2 Manual output up Motor RPM up UP key Manual output 0 reset Motor RPM reset 3 Manual output 0 reset Motor RPM rese...

Страница 125: ... the Local mode alternately SET MODE OUT1 OUT2 OUT3 OUT4 OUT5 ALM A M R L R S AREA PV1 PV2 MAN REM AT PV2 MAN REM AT SV SET MODE OUT1 OUT2 OUT3 OUT4 OUT5 ALM A M R L R S AREA PV1 PV2 MAN REM AT PV2 MAN REM AT SV For the Operation mode refer to 9 2 Configuration of Operation Mode P 101 Remote Local transfer by Direct key R L operation Every time the Remote Local R L transfer key is pressed the Remo...

Страница 126: ...n refer to the Communication Instruction Manual IMR01N13 E Refer to Communication Instruction Manual IMR01N14 E for PROFIBUS Communication Instruction Manual IMR01N15 E for DeviceNet and Communication Instruction Manual IMR01N21 E for CC Link If the controller is transferred to STOP mode from RUN mode the controller status is the same as the Power off However for the specification with current out...

Страница 127: ... with the Event input logic selection P 73 of the Engineering mode The table below shows the actual operation modes and displays under different combinations of settings by front key communication and Event input Mode select from front key or communication Event input state Actual operation mode State of STOP character display RUN Control RUN Contact closed RUN STOP is not displayed Contact open S...

Страница 128: ...he SET key to store the new setting SET MODE OUT1 A M R L R S AREA PV1 PV2 MAN REM AT PV2 MAN REM AT SV or The Memory area number stored at last is taken as Control area The Memory area number control area can be changed at either RUN or STOP For the SV setting Monitor mode refer to 5 SV SETTING MONITOR MODE P 30 Control area transfer by Event input Memory area control area transfer by the Event i...

Страница 129: ...d value which were used or calculated by the controller before power failure Hot start 2 the controller will return to the same operation mode which was used by the controller before power failure In the Manual mode the output value will be at the low output limit value In the Auto mode the controller will calculate the manipulated output value regardless that before power failure So the manipulat...

Страница 130: ...Memory area No 1 The following is based on assumptions described below 1 Input controller measured input 1 point Present operating condition Control STOP Control area before operation start Memory area 1 Setting of operation related parameters All parameters other than the following items have been set to each of Memory areas 1 2 and 3 SV Setting change rate limiter Area soak time and Link area nu...

Страница 131: ...icant digit 18 Press the UP key to change the number to 6 19 Press the SET key to store the new value The display goes to the next parameter 20 Press the UP key to change the number to 3 21 Press the SET key to store the new value The display goes to the next parameter 22 Set the Memory area 3 Press the SET key several times until Input 1_setting change rate limiter up setting screen is displayed ...

Страница 132: ...ET key until Input 1_set value SV1 setting screen is displayed 3 Press the shift key to high light the tens digit 4 Press the UP key to change the number to 5 5 Press the SET key to store the new value The display goes to the next parameter 6 Set the Set value SV of Memory area 2 Press the SET key several times until Input 1_set value SV1 setting screen is displayed Continued on the next page STEP...

Страница 133: ...rea number display flashes 15 Press the shift key to high light the tens digit 16 Press the UP key to change the number to 5 17 Press the SET key to store the new value The display goes to the next parameter The SV setting is finished Press the SET key several times at SV setting Monitor mode until Memory area selection setting screen is displayed Check that the memory area at the time of operatio...

Страница 134: ...y range limit low or 19999 Prior to replacing the sensor always turn OFF the power or change to STOP with RUN STOP transfer As for care which should be taken when replacing the pressure sensor refer to the instruction manual for Pressure sensor used Input error determination point high Manipulated output at input error Select one of these Manipulated output value MV obtained by PID control Input r...

Страница 135: ...version count value is out of the specified range Display Error display Output OFF Communication Possible 8 RAM check error Display All display is OFF Output OFF Communication No response 16 Hardware configuration error Hardware is abnormal except A D conversion circuit Display Error display Output OFF Communication Possible 32 Software configuration error There is an abnormality on download data ...

Страница 136: ...nal P 15 Power supply terminal contact defect Retighten the terminals Proper power supply voltage is not being supplied Apply the normal power supply by referring to B Specifications A 27 Display is abnormal Noise source is present near the instrument Separate the noise source from the instrument Remote setting signal is input in parallel to two or more this instruments which use grounding type th...

Страница 137: ...ue around 0 C 32 F the input function of the controller is working correctly When the controller is configured as Voltage Current input Input a certain voltage or current from a voltage current generator to the controller If the controller shows the equivalent input value the input setting and function of the controller is working correctly 11 2 Control Problem Possible cause Solution Control is a...

Страница 138: ... Acceptable PID values cannot be calculated by Autotuning AT The Autotuning AT function does not appropriately much the characteristics of the controlled object Set PID constants manually The Output change rate limiter is set Set PID constants manually No output change in step The Output change rate limiter is set Set the Output change rate limiter to 0 0 OFF by referring to 8 12 Control 1 Control...

Страница 139: ...e limiter is set Set the Setting change rate limiter to OFF by referring to Setting change rate limiter up P 38 Setting change rate limiter down P 39 11 4 Other Problem Possible cause Solution Event action is abnormal Event action is different from the specification Change the action by referring to 8 10 Event 1 Event 2 Event 3 Event 4 P 80 after the specification is confirmed Event output relay c...

Страница 140: ...nstrument can only be removed with an appropriate tool Procedures Recommended tool Slotted screwdriver Tip width 6 mm or less Lock Upper 2 places Lock Lower 2 places Unlock using such a slotted screwdriver Gently press down on handle for the upper lock and lift up for the lower lock To prevent electric shock or instrument failure only qualified personnel should be allowed to pull out the internal ...

Страница 141: ...ing limiter high P 30 P 103 PV1 peak hold value monitor 1 PHLd The maximum PV1 value peak value of Input 1 is held and displayed P 30 P 103 PV1 bottom hold value monitor 1 bHLd The minimum PV1 value bottom value of Input 1 is held and displayed P 30 P 104 PV1 hold reset 1 HLdr PV1_hold value is reset when the UP and DOWN keys a simultaneously pressed P 30 P 105 PV2 peak hold value monitor 2 PHLd T...

Страница 142: ...t 1_PV bias 1 Pb Input span to Input span 0 P 44 Input 1_PV digital filter 1 dF OFF Unused 0 01 to 10 00 seconds OFF P 44 Input 1_PV ratio 1 Pr 0 500 to 1 500 1 000 P 44 Input 1_PV low input cut off 1 PLC 0 00 to 25 00 of input span 0 00 P 45 Input 1_proportional cycle time 1 T 0 1 to 100 0 seconds Other outputs Voltage pulse output and Triac output Relay contact output 20 0 Other outputs 2 0 P 45...

Страница 143: ...s 2 125 125 kbps 1 250 250 kbps 1 500 500 kbps 1 1 DeviceNet only 2 CC Link only RKC communication Modbus 9 6 DeviceNet 125 CC Link 156 P 46 Data bit configuration bIT2 Refer to Data bit configuration on the next page 8n1 P 46 Interval time InT2 0 to 250 ms 10 P 47 Infrared communication address Add3 0 to 99 0 P 47 Infrared communication speed bPS3 9 6 9600 bps 19 2 19200 bps 19 2 P 47 Auto zero I...

Страница 144: ...7 Odd 1 7E2 7 Odd 2 7o1 7 Even 1 7o2 7 Even 2 7n1 to 7o2 Invalid for Modbus Set lock level list Set value Parameters which can be changed 00000 All parameters Factory set value 00001 SV EV1 to EV4 Memory area selection Parameters in F10 to F91 00010 All parameters except for EV1 to EV4 00011 SV 00100 All parameters except for SV 00101 EV1 to EV4 00110 All parameters except for SV and EV1 to EV4 00...

Страница 145: ...n 0 0 P 36 Event 4 set value EV4 Deviation Input span to Input span Process SV Input scale low to Input scale high 50 0 P 35 Control loop break alarm 2 LBA2 time LbA2 OFF Unused 1 to 7200 seconds 480 P 35 LBA2 deadband Lbd2 0 0 to Input span Varies with the setting of the Decimal point position 0 0 P 36 Input 1_proportional band 1 P 0 0 to 1000 0 of input span 0 0 ON OFF action 100 0 P 37 Input 1_...

Страница 146: ...ut 2_derivative time 2 d OFF PI action 1 to 3600 seconds 0 1 to 3600 0 seconds or 0 01 to 360 00 seconds Varies with the setting of the Integral Derivative time decimal point position selection 60 00 P 37 Input 2_control response parameter 2 rPt 0 Slow 1 Medium 2 Fast 0 P 38 Input 1_setting change rate limiter up 1 SVrU OFF Unused 0 1 to Input span unit time OFF P 38 Input 1_setting change rate li...

Страница 147: ... 2_manipulated output value MV 7 Input 2_measured value PV 8 Input 2_set value SV 9 Input 2_deviation value 0 P 63 Bar graph resolution setting dEUT 1 to 100 digit dot 100 P 64 Decimal point position of MV scaling MVdP 0 No decimal place 1 One decimal place 2 Two decimal places 3 Three decimal places 4 Four decimal places 1 P 64 Input 1_MV scaling high MVHS 1999 9 to 9999 9 100 0 P 64 Input 1_MV s...

Страница 148: ...vailable Based on model code When not specifying Pressure sensor input P 66 Input 1_display unit selection 1 UnIT 2 MPa 3 bar 4 kgf cm2 5 psi The display unit selection becomes invalidated when the Voltage V Current I input is selected as input type Pressure sensor input 2 V I 0 P 67 Gain setting GAIn 0 500 to 4 000 mV V Relevant pressure sensors CZ 100P CZ 200P CZ 100P CZ 200P 1 500 P 67 Lineariz...

Страница 149: ...ts 19999 to 99999 Varies with the setting of the Decimal point position Pressure sensor input 50 0 V I 100 0 P 69 Input 1_input scale low 1 PGSL Pressure sensor input Minimum value of the selected input range to Input scale high Voltage V Current I inputs 19999 to 99999 Varies with the setting of the Decimal point position Pressure sensor input 0 0 V I 0 0 P 70 Input 1_input error determination po...

Страница 150: ...2300 C 32 0 to 4172 0 F 9 PLII 0 to 1390 C 32 0 to 2534 0 F RTD input 3 wire system 12 Pt100 200 to 850 C 328 0 to 1562 0 F 13 JPt100 200 to 600 C 328 0 to 1112 0 F Voltage V Current I inputs 19999 to 99999 14 0 to 20 mA DC 24 100mVDC 15 4 to 20 mA DC 25 10 mV DC 16 0 to 10 V DC 26 10 V DC 17 0 to 5 V DC 27 5 V DC 18 1 to 5 V DC 28 1 V DC 19 0 to 1 V DC 20 0 to 100 mV DC 21 0 to 10 mV DC 22 23 Unu...

Страница 151: ...0 P 69 Input 2_input scale low 2 PGSL TC RTD inputs Minimum value of the selected input range to Input scale high Voltage V Current I inputs 19999 to 99999 Varies with the setting of the Decimal point position TC RTD Minimum value of the selected input range V I 0 0 P 70 Input 2_input error determination point high 2 PoV Input scale low 5 of input span to Input scale high 5 of input span TC RTD In...

Страница 152: ...mber selection 1 to 4 Memory area set Remote Local transfer Auto Manual transfer 12 Memory area number selection 1 to 4 Memory area set Hold reset Interlock release 13 Auto Manual transfer RUN STOP transfer Remote Local transfer Hold reset Interlock release 14 Auto Manual transfer Input 1_ manual output down motor RPM down 1 Input 1_ manual output up motor RPM up 2 Input 1_manual output 0 reset mo...

Страница 153: ...en thousands digits 0 or 1 OUT5 SV thousands digits 0 or 1 OUT4 SV hundreds digits 0 or 1 OUT3 SV tens digits 0 or 1 OUT2 SV units digits 0 or 1 OUT1 00000 0 Unused 1 Used P 78 This item is not used for the HA430 930 Output logic selection Set value OUT1 OUT2 OUT3 OUT4 OUT5 1 This set value is not used for the HA430 930 2 This set value is not used for the HA430 930 3 MV1 EV3 or EV4 Energized EV2 ...

Страница 154: ... MV 2 PV Input 2_ measured value PV 2 SV Input 2_set value SV 2 dEV Input 2_deviation value 2 MV Input 2_manipulated output value MV PoS Unused Not available None P 79 Transmission output 1_ scale high AHS1 Measured value PV and Set value SV Input scale low to Input scale high Manipulated output value MV 5 0 to 105 0 Deviation Input span to Input span PV SV Input scale high MV 100 0 Deviation Inpu...

Страница 155: ... MV 2 PV Input 2_ measured value PV 2 SV Input 2_set value SV 2 dEV Input 2_deviation value 2 MV Input 2_manipulated output value MV PoS Unused Not available None P 79 Transmission output 2_ scale high AHS2 Measured value PV and Set value SV Input scale low to Input scale high Manipulated output value MV 5 0 to 105 0 Deviation Input span to Input span PV SV Input scale high MV 100 0 Deviation Inpu...

Страница 156: ... MV 2 PV Input 2_ measured value PV 2 SV Input 2_set value SV 2 dEV Input 2_deviation value 2 MV Input 2_manipulated output value MV PoS Unused Not available None P 79 Transmission output 3_ scale high AHS3 Measured value PV and Set value SV Input scale low to Input scale high Manipulated output value MV 5 0 to 105 0 Deviation Input span to Input span PV SV Input scale high MV 100 0 Deviation Inpu...

Страница 157: ...V I 0 2 of input span P 83 Event 1 action at input error EEo1 0 Normal processing 1 Turn the event output ON 0 P 84 Event 1 assignment EVA1 1 For Input 1 2 For Input 2 1 P 84 Function block F42 Event 2 Name Parameter Data range Factory set value User set value Page Event 2 type selection ES2 0 None 1 Deviation high 2 Deviation low 3 Deviation high low 4 Band 5 Process high 6 Process low 7 SV high ...

Страница 158: ...age Event 3 type selection ES3 0 None 1 Deviation high 2 Deviation low 3 Deviation high low 4 Band 5 Process high 6 Process low 7 SV high 8 SV low 9 Control loop break LBA 0 P 80 Event 3 hold action EHo3 0 OFF 1 ON 2 Re hold action ON 0 P 82 Event 3 differential gap EH3 0 to Input span Varies with the setting of the Decimal point position Pressure sensor input 2 0 MPa TC RTD 2 0 C F V I 0 2 of inp...

Страница 159: ... 0 C F V I 0 2 of input span P 83 Event 4 action at input error EEo4 0 Normal processing 1 Turn the event output ON 0 P 84 Event 4 assignment EVA4 1 For Input 1 2 For Input 2 1 P 84 Function block F50 Control Name Parameter Data range Factory set value User set value Page Hot Cold start selection Pd Power failure less than 3 seconds 0 Hot 1 5 Cold 1 Hot 1 6 Hot 1 2 Hot 1 7 Hot 2 3 Hot 2 8 Stop 4 H...

Страница 160: ...sensor input 1 0 MPa V I 0 1 of input span P 88 Input 1_action at input error high 1 AoVE 0 Normal control 1 Manipulated output value at input error 0 P 89 Input 1_action at input error low 1 AUnE 0 P 89 Input 1_manipulated output value at input error 1 PSM 5 0 to 105 0 5 0 P 90 Input 1_manipulated output value when transferred to Auto from Manual 1 PSM 5 0 to 105 0 P 90 Input 1_output change rate...

Страница 161: ...0 C F V I 0 1 of input span P 88 Input 2_action at input error high 2 AoVE 0 Normal control 1 Manipulated output value at input error 0 P 89 Input 2_action at input error low 2 AUnE 0 P 89 Input 2_manipulated output value at input error 2 PSM 5 0 to 105 0 5 0 P 90 Input 2_manipulated output value when transferred to Auto from Manual 2 PSM 5 0 to 105 0 P 90 Input 2_output change rate limiter up 2 o...

Страница 162: ... 2_AT bias 2 ATb Input span to Input span 0 P 92 Input 2_AT cycle 2 ATC 0 1 5 cycles 2 2 5 cycles 1 2 0 cycles 3 3 0 cycles 1 P 94 Input 2_AT differential gap time 2 ATH 0 00 to 50 00 seconds 0 10 P 95 Input 2_AT action 2 ATt 0 AT function PID 1 AT function PI 2 No AT function 2 P 96 Function block F60 Communication function Name Parameter Data range Factory set value User set value Page Unused CM...

Страница 163: ... 98 Input 1_PV transfer function 1 PVTS 0 Unused 1 Used 0 P 98 Function block F72 Set value 2 SV2 Name Parameter Data range Factory set value User set value Page Input 2_setting limiter high 2 SLH Input 2_setting limiter low to Input 2_input scale high Input scale high P 98 Input 2_setting limiter low 2 SLL Input 2_input scale low to Input 2_setting limiter high Input scale low P 98 Input 2_PV tra...

Страница 164: ... Approx 1 mA Digital filter First order lag digital filter Time constant 0 00 to 10 00 seconds 0 00 OFF PV bias Input span PV ratio 0 500 to 1 500 Zero point calibration range Pressure sensor 5 0 to 5 0 mV Input conversion Gain setting range Pressure sensor 0 500 to 4 000 mV V Action at input beak Pressure sensor Upscale or Downscale TC Upscale or Downscale RTD Upscale Voltage low Upscale or Downs...

Страница 165: ...e type of pressure sensor Rated voltage 8 V DC 3 Temperature drift 80 ppm C Rated current 30 mA max OUT1 to OUT3 Used for control output event output or transmission output Number of outputs Up to 3 points Specify when ordering OUT3 is isolated from both OUT1 and OUT2 OUT1 and OUT2 are not isolated from each other except for relay or triac output When relay or triac output is used there is isolati...

Страница 166: ...r input Strain gauge type pressure sensor 0 1 of span 0 5 of span When combined with pressure sensor TC input K J T PL II E Less than 100 C 148 F 1 0 C 2 0 F Less than 100 to 500 C 148 to 932 F 0 5 C 1 0 F 500 C 932 F or more 0 1 of reading 1digit TC input S R N W5Re W26Re Less than 100 C 148 F 2 0 C 4 F Less than 100 C to 1000 C 148 to 1832 F 1 0 C 2 0 F 1000 C 1832 F or more 0 1 of reading 1digi...

Страница 167: ... setting Link area number Communication function Optional Interface Based on RS 232C EIA standard Based on RS 422A EIA standard Based on RS 485 EIA standard Specify when ordering Protocol RKC communication ANSI X3 28 1976 subcategories 2 5 and A4 Modbus PROFIBUS DP EN50170 DeviceNet CC Link Specify when ordering Infrared communication function Communication method Half duplex two way communication...

Страница 168: ...1000 V AC Between power terminal and grounding 1 minute at 1500 V AC Between power and measuring terminals 1 minute at 2300 V AC Power failure A power failure of 20 ms or less will not affect the control action If power failure of more than 20 ms occurs controller will reset HOT start 1 2 or COLD start selectable Memory backup Backed up by non volatile memory EEPROM Number of writing Approx 100 00...

Страница 169: ...value 2 SV2 Proportional band 2 Integral time 2 Derivative time 2 Control response parameter 2 Set value 2 SV2 change rate limiter up Set value 2 SV2 change rate limiter down Common Event 1 Event 2 Event 3 Including LBA and LBD Event 4 Including LBA and LBD Area soak time Link area number Easy program operation 1 2 3 4 5 6 7 8 Link area number Area soak time Setting change rate limiter up Setting ...

Страница 170: ...A 30 IMR01N12 E7 MEMO ...

Страница 171: ... Event set value 35 Event type selection 80 F Full scale adjustment 44 49 G Gain setting 67 H Hold function 104 Holding peak value ambient temperature display 99 Hot Cold start selection 85 115 I Infrared communication address 47 Infrared communication speed 47 Input 1 terminal 17 18 Input 2 terminal 19 Input 2_use selection 85 Input error determination point high 70 Input error determination poin...

Страница 172: ... PV2 hold reset 30 105 PV2 peak hold value monitor 30 105 R Ramp Soak control 40 41 116 Remote input 2 4 67 Remote input terminal 19 Remote input value monitor 30 103 Remote Local transfer key operation selection 65 Remote REM mode lamp 8 Removing procedures 12 Removing The Internal Assembly 126 ROM version display 99 RUN STOP transfer 101 RUN STOP transfer key operation selection 65 S Self diagno...

Страница 173: ...guration of Operation Mode 101 AT action 96 Autotuning AT function 96 Auto Manual needs to be switched Configuration of Operation Mode 101 Auto Manual Transfer 108 Remote Local needs to be switched Configuration of Operation Mode 101 Remote Local Transfer 111 Parameter change due to misoperation needs to be prevented Set lock level 49 Manipulated output value MV under Manual control needs to be ma...

Страница 174: ...ds to be corrected Input 2 side PV bias 2 Pb 44 PV ratio 2 Pr 44 Sudden change in set value or manipulated output value caused by operation mode transfer needs to be avoided When transferred to Remote from Local SV tracking 86 When transferred to Manual control from Auto control PV transfer function 98 Sudden change in output needs to be avoided by changing manipulated output variation Output chan...

Страница 175: ...The first edition OCT 2003 IMQ00 The seventh edition MAR 2018 IMQ00 ...

Страница 176: ...IMR01N12 E7 MAR 2018 RKC INSTRUMENT INC HEADQUARTERS 16 6 KUGAHARA 5 CHOME OHTA KU TOKYO 146 8515 JAPAN PHONE 03 3751 9799 81 3 3751 9799 E mail info rkcinst co jp Website http www rkcinst com R ...

Отзывы: