Bobbin Winder
The optional bobbin winder is
mounted in the left rear table top.
There is no need to remove the
bobbin winder assembly from the
table top to service it. Simply remove
the 4 truss screws holding the table
top over the power distribution
section. As you lift the table top and
bobbin winder assembly upward,
disconnect the two harnesses going to
the bobbin winder motor and switch.
The built in bobbin winder receives its
power from the EMT 1 12 V source.
Winding starts by moving the actuator
lever to the start position. The winding
operation stops when the thread in
the bobbin triggers the switch inside
the actuator lever. The operation may
manually be stopped by moving the
actuator lever away from the start
position by hand.
The bobbin winder motor is equipped
with a thermal switch to protect the
motor and circuitry in the event of an
overload condition. If the bobbin
winder stops due to an overload or
overheating:
1. Move the actuator lever to the OFF
position.
2. Clear the obstruction and/or lubricate the drive shaft.
3. When the motor cools, the thermal switch will reset.
4. Move the actuator lever to the ON position and resume operation.
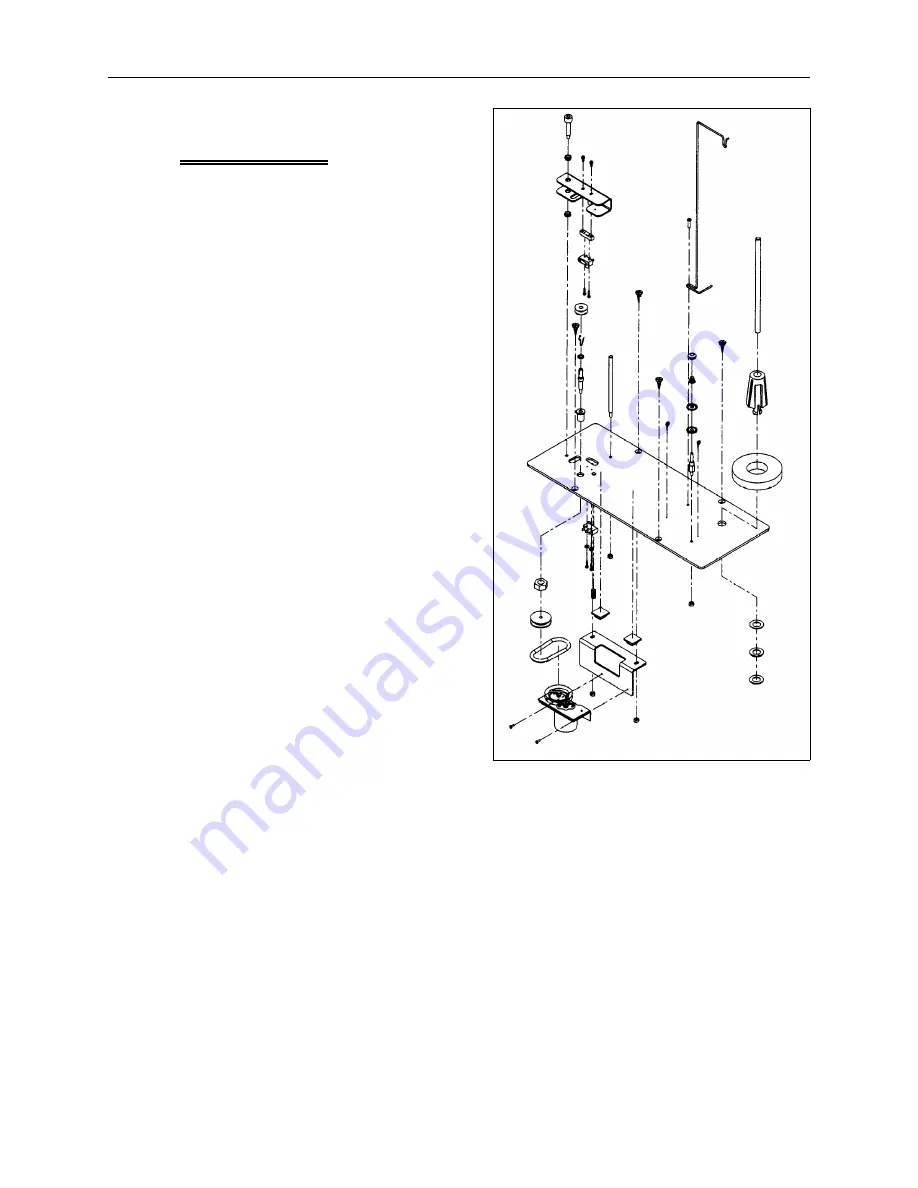
Refer to Figure 2-5 for an illustration of the various parts and their orientation in
making up the bobbin winder assembly.
For proper operation of the bobbin winder option, refer to the bobbin winder
section in the EMT 1 peripheral operation manual.
Bobbin Winder
Assembly Parts
(see EMT 1 illustrated
parts manual for
descriptions)
Figure 2 - 5
Display Screen Intensity
2 - 5
110344-01, Rev B
2. Service Maintenance (except embroidery head )
Содержание EMT 1
Страница 6: ...This page intentionally left blank Table of Contents 110344 01 Revision B iv EMT 1 Technical Manual ...
Страница 44: ...This page intentionally left blank 2 30 X Beam Assembly EMT 1 Technical Manual Melco Embroidery Systems ...
Страница 74: ...This page intentionally left blank 3 30 Rotary Hook EMT 1 Technical Manual Melco Embroidery Systems ...


