ENGLISH
SVENSKA
31
ITALIANO
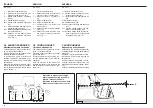
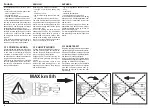
I bulloni che fi ssano le zappette de-
vono avere la testa dalla parte delle
zappette e il dado con relativa rondella
dalla parte della fl angia (Fig. 24).
Rispettare i valori delle coppie di
serraggio come indicato in tabella
pag. 28.
Se si devono sostituire le zappette, fare
attenzione che le nuove assumano la
posizione di quelle smontate (Fig. 24).
3.10 REGOLAZIONE
SPOSTAMENTO
LATERALE
La possibilità di uno spostamento laterale
del gruppo fresante rispetto all’attacco a 3
punti, rende l’attrezzatura estremamente
versatile e funzionale nelle varie condi-
zioni di impiego.
L’utilizzo dell’albero di trasmissione esa-
gonale permette lo scorrimento rapido del
gruppo fresante sulle guide, semplifi can-
do notevolmente le regolazioni.
Le operazioni da eseguire sono le se-
guenti:
1) Pulire accuratamente il telaio e le
guide interessate allo spostamento,
per aumentare la scorrevolezza delle
parti a contatto e facilitare il lavoro.
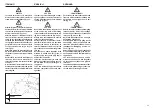
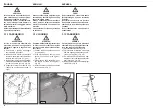
2) Allentare le viti (1 Fig. 25) che fi ssano
la staffa e lasciarle libere.
3) Far scorrere il carrello fi no alla posi-
zione desiderata quindi serrare le 2
viti allentate.
Anteriormente il carrello è provvisto
di 2 pattini di guida (1 Fig. 26), che
possono essere sostituiti in caso di
usura.
3.11 IN LAVORO
Iniziare il lavoro con la presa di forza
a regime, affondando gradualmente la
macchina nel terreno.
Evitare di premere sconsideratamente il
pedale dell’acceleratore con la presa di
forza inserita.
Questo può essere molto dannoso per la
macchina oltreché per il trattore stesso.
Per scegliere lo sminuzzamento più
idoneo del terreno, è necessario tenere
The heads of the bolts fi xing the hoe
blades in place must be on the side of
the hoe blades themselves, while the
nut with relative washer must be on
the fl ange side (Fig. 24).
Apply the tightening torques as listed
in the Chart on page 28.
If the hoe blades must be changed,
remember to set the new blades in the
same positions as the demounted ones
(Fig. 24).
3.10 REGULATION OF
SIDEWAY SHIFT
MOVEMENT
The coltivator unit can be shifted side-
ways in relation to the three-point hitch.
This makes the implement extremely
versatile during the various work condi-
tions.
Use of the hexagonal drive shaft allows
the cultivator unit to quickly slide, thus
notably simplifyng the operation.
The following operations must be car-
ried out:
1) Thorougly clean the frame and reala-
tive guides to make the parts smoothy
able to work.
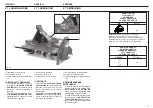
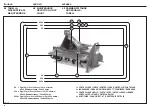
2) Slacken the screws (1 Fig. 25) that
fi x the bracket and leave these free.
3) To move the carriage to the position
required and the tighten the two car-
riage fi xing screws.
At the front, the carriage has two
guide pads (1 Fig. 26) that should be
replaced when worn.
3.11 IN WORK
Start work with the pto at running rate,
gradually lowering the machine into the
soil.
Never excessively press down on the
accelerator pedal when the pto is en-
gaged.
This could be very harmful for both the
machine and the tractor itself.
When choosing how much to break up
the soil which is to be rotary hoed the
kniven och muttern med tillhörande
rundbricka i riktning mot flänsen
(Fig. 24).
Följ de momentvärden som indikeras
i tabellen på sidan 28.
Om hackknivarna behöver bytas ut, ska
ni vara noga med att placera de nya i
samma läge som de tidigare (Fig. 24).
3.10 JUSTERING AV
FÖRFLYTTNING
I
SIDLED
Möjligheten att förlytta jordfräsenheten
i sidled i förhållande tre trepunktskopp-
lingen gör redskapet mycket allsidigt och
funktionellt för olika typer av arbetsför-
hållanden.
Användning av den sexkantiga transmis-
sionsaxeln gör att jordfräsenheten kan
glida snabbt på skenorna och förenklar
avsevärt regleringarna.
Följande moment ska utförasi:
1) Rengör ramen och skenorna för
förfl yttning noga för att delarna ska
kunna glida lättare och underlätta
arbetet.
2) Lossa skruvarna (1 Fig. 25) som håller
fast hållaren och låt dem vara lösa.
3) Låt släden glida till önskat läge och
dra sedan åt de 2 lösa skruvarna.
Fram på släden fi nns det 2 styrme-
dar (1 Fig. 26) som kan bytas ut vid
slitage.
3.11 UNDER ARBETE
Påbörja arbetet med kraftuttaget på
normal hastighet och sänk gradvis ner
maskinen i jorden.
Trampa inte ned gaspedalen onödigt
mycket medan kraftuttaget är tillkopp-
lat.
Detta kan skada både maskinen och
traktorn.
För att välja lämplig plöjningsnivå ska ni
beakta följande faktorer


