


279
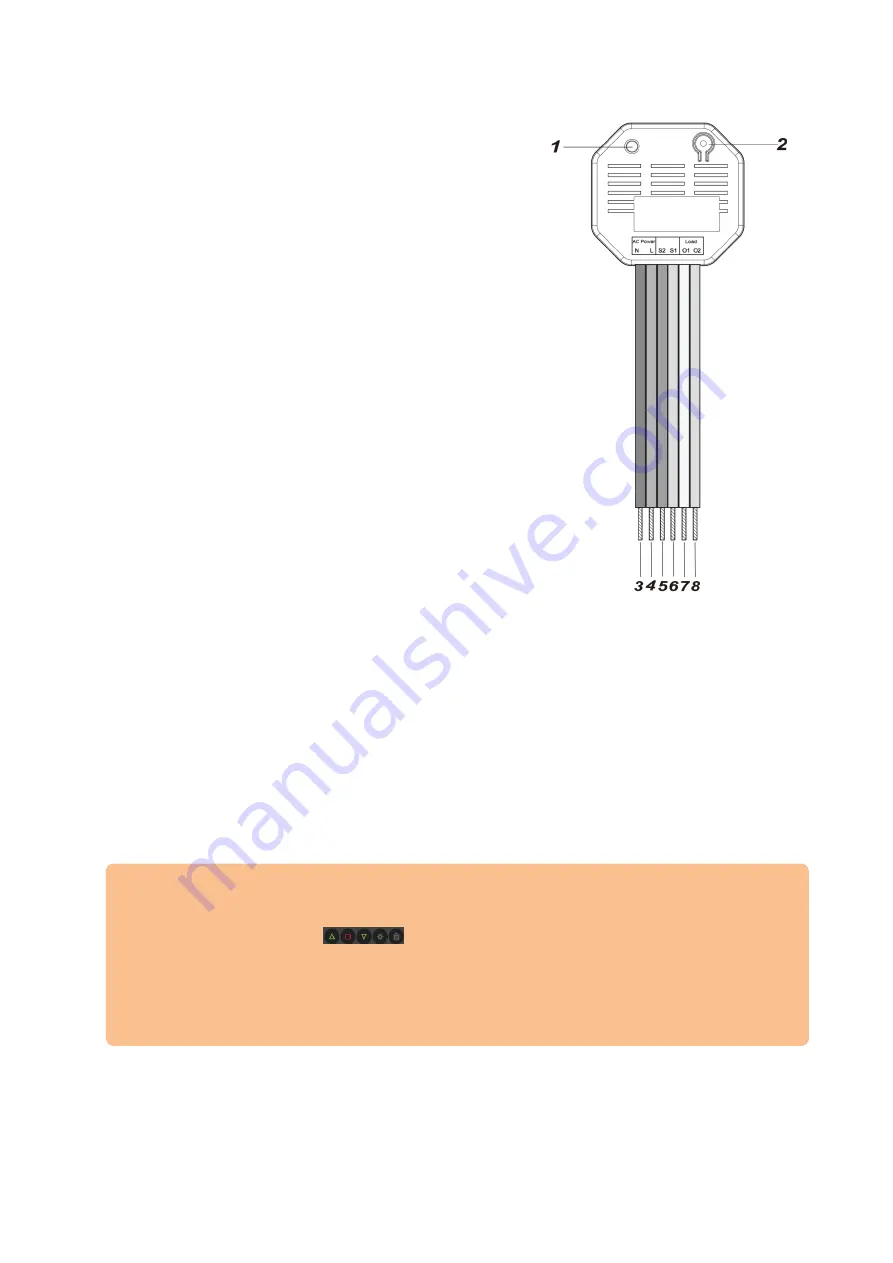
1.
LED indicator
Flashes once: relay was reset
Flashes twice: relay was added to the
alarm panel
Flashes once every 20 minutes:
Connection to the alarm panel lost
2.
Learn button
Briefly press it to transmit a status signal to
the alarm panel
Press it for 10 seconds to reset the relay
and send a connection request to the
alarm panel.
3.
N (230V – AC input – blue)
Power supply – neutral conductor (blue –N).
4.
L (230V – AC input – brown)
Power supply – phase (brown – L)
5.
S2 – Push button connector (230V – AC –
Up direction)
If you have connected the shutter relay with a
push button (according to the wiring diagram
below), you can use your push button to send
a brief impulse to the relay. The relay will open your shutters. The required time
for opening them can be entered in the alarm panel. If you want to stop the relay
before that time, press the push button connected to S1 (down direction).
6.
S1 – Push button connector (230V – AC – down direction)
See 5.
7.
O1 (230V – AC – Output for shutter motor – yellow)
Depending on the location of the motor of your shutter (left or right of the shutter),
you need to connect the correct cable coming from the motor.
Motor on the right:
Connect the wiring for up
Motor on the left:
Connect the wiring for down
Please note:
Test the wiring via the
web interface
of the alarm panel and check if your
shutters move in the right direction when you press the corresponding
control icons:
In case the shutter moves the wrong way, you need to change the wiring of
O1 and O2.
For a detailed description of the wiring of your motor, please check the
manual of the motor of your shutter.
8.
O2 (230V – AC – Output for shutter motor – green)
See 7.
Содержание XT 1 Plus
Страница 1: ...Manual version 1 3 Firmware 0 0 3 0K XT 1 Plus XT2 Plus XT3 Alarm panel User Manual ...
Страница 37: ...37 ...
Страница 133: ...133 Using the assistant 1 Follow the instructions of the app and click on continue 2 Select which alarm panel you have ...
Страница 329: ...329 Remarks ...
Страница 330: ...330 Remarks ...
Страница 331: ...331 Remarks ...
Страница 332: ...332 Remarks ...


