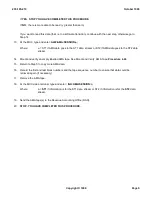


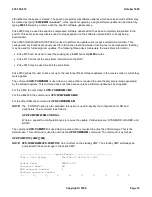


_____________________________________________________________________________
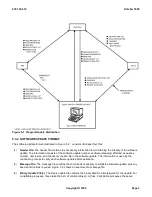
Figure 5-4 Easy BWM Installation Page 1940
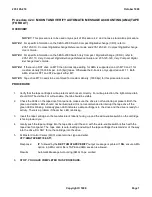
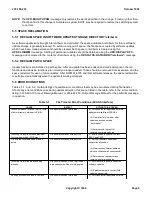
SYS EMER CRITICAL MAJOR MINOR BLDG/PWR BLDG INH CKT LIM SYS NORM
OVERLOAD SYS INH AM AM PERPH OS LINKS SM CM MISC
________________________________________________________________________________
_________1960 - BWM INSTALLATION BWM = BWM89-0001
9000,Y START BWM Y 9570 NEXT WINDOW 91xx DISPLAY (xx = 10 APPLY
9010 VERIFY CMPL 9575 PREV WINDOW 92xx PRINT 20 SOAK 30 OFC
9560 STOP EXC (Y = 10 CHAR BWM NAME) 93xx EXEC ALL 40 BKOUT 50 FILE)
9565,Z RESET LINE Z (Z = 3 DIGIT LINE NO) 94xx EXEC NEXT
(F = FILENAME IN BWM) 9260,F PRINT FILE F
__________________________SECTION EXECUTION STATUS______________________________
APPLY CMPL SOAK CMPL OFC INPG BKOUT
RESPONSE:_______________________________________________________________________
21 "
22 "OFFICIAL--------------------------------------------------------------------
23 "To make the update applied in this BWM official, wait the
24 "prescribed SOAK interval and then enter sequentially the
25 "following command(s):
26 "
27 UPD:OFC:DATA, UPNM="BWM89-0001";
28 "
29 UPD:RECLAIM:DATA, ALL;
30"END BWM89-0001
________________________________________________________________________________
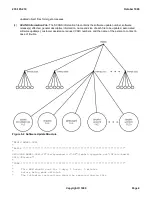
Figure 5-5 BWM Installation Menu Page 1960
5.8 SOFTWARE UPDATE INSTALLATION
CAUTION:
The craft interface recovery feature (CIRF) provides the capability to recover the craft interfaces from
craft lockout without affecting the call processing. This feature will kill
UNIX
®
system processes including
program-update processes; therefore, it should be used with great care. IT IS STRONGLY
RECOMMENDED NOT TO USE THIS FEATURE WHILE SOFTWARE UPDATE IS IN PROGRESS
because this feature may cause software update application to get into a state which cannot be
recovered by any means.
NOTE:
The master control center (MCC) Display Pages 1941 - BWM Automation Scheduling, 1942 - BWM
Automation Office Profile, and 1943 - BWM Automation Health Check, provide a method to schedule SUs
for automatic installation. With this method, the user is required to schedule a specific SU to be installed on
a given day and time to a specific install state (VERIFY, SOAK, or OFFICIAL). Once the SU has been
scheduled, the user is not required to constantly monitor the SU progress. When the previously specified
day/time arrive, the specified SU will begin auto installation. Refer to 235-105-110 for details on how to use
MCC Display Pages 1941, 1942, and 1943. In addition, many of the capabilities (for example, scheduling
SUs for automatic installation) are also available from CSCANS over the CSCANS interface. For
subscribing offices, follow local CSCANS procedures for accessing the CSCANS data base and
administering these new capabilities. MCC Display Pages 1960 and 1940 may still be used an as
235-105-210
October 1999
Copyright © 1999
Page 12
Содержание 5ESS-2000
Страница 96: ...235 105 210 October 1999 Copyright 1999 Page 2 ...
Страница 184: ...235 105 210 October 1999 Copyright 1999 Page 3 ...
Страница 300: ...13 STOP YOU HAVE COMPLETED THIS PROCEDURE 235 105 210 October 1999 Copyright 1999 Page 55 ...
Страница 339: ...7 STOP YOU HAVE COMPLETED THIS PROCEDURE 235 105 210 October 1999 Copyright 1999 Page 13 ...
Страница 342: ...235 105 210 October 1999 Copyright 1999 Page 2 ...
Страница 359: ...235 105 210 October 1999 Copyright 1999 Page 5 ...
Страница 516: ...Figure 10 24 1 KS 23483 L13 Disk Drive Cable Connection Rear View 235 105 210 October 1999 Copyright 1999 Page 2 ...
Страница 517: ...Figure 10 24 2 KS 23483 L21 Disk Drive Cable Connection Rear View 235 105 210 October 1999 Copyright 1999 Page 3 ...
Страница 518: ...Figure 10 24 3 KS 23841 L15 Disk Drive Cable Connection Rear View 235 105 210 October 1999 Copyright 1999 Page 4 ...
Страница 523: ...Figure 10 24 6 Top View of DUP Showing Internal Cabling 235 105 210 October 1999 Copyright 1999 Page 9 ...
Страница 609: ...2 STOP YOU HAVE COMPLETED THIS PROCEDURE 235 105 210 October 1999 Copyright 1999 Page 12 ...
Страница 628: ...a SM inhibited Response OK 2 STOP YOU HAVE COMPLETED THIS PROCEDURE 235 105 210 October 1999 Copyright 1999 Page 8 ...
Страница 653: ...Response OK 2 STOP YOU HAVE COMPLETED THIS PROCEDURE 235 105 210 October 1999 Copyright 1999 Page 16 ...
Страница 676: ...235 105 210 October 1999 Copyright 1999 Page 9 ...
Страница 792: ...3 STOP YOU HAVE COMPLETED THIS PROCEDURE 235 105 210 October 1999 Copyright 1999 Page 9 ...
Страница 799: ...Figure 11 36 3 1 Cleaning Points 235 105 210 October 1999 Copyright 1999 Page 7 ...
Страница 801: ...235 105 210 October 1999 Copyright 1999 Page 9 ...
Страница 839: ...2 STOP YOU HAVE COMPLETED THIS PROCEDURE 235 105 210 October 1999 Copyright 1999 Page 16 ...
Страница 999: ...2 STOP YOU HAVE COMPLETED THIS PROCEDURE 235 105 210 October 1999 Copyright 1999 Page 13 ...
Страница 1008: ...Figure 11 55 1 CTSNS DIP Switch Settings 235 105 210 October 1999 Copyright 1999 Page 2 ...
Страница 1011: ...235 105 210 October 1999 Copyright 1999 Page 5 ...
Страница 1053: ...235 105 210 October 1999 Copyright 1999 Page 15 ...
Страница 1165: ...Procedure 14 14 RESERVED FOR FUTURE USE PROCEDURE 1 Reserved For future use 235 105 210 October 1999 Copyright 1999 Page 1 ...
Страница 1186: ...Procedure 14 17 RESERVED FOR FUTURE USE PROCEDURE 1 Reserved For future use 235 105 210 October 1999 Copyright 1999 Page 1 ...
Страница 1187: ...Procedure 14 18 RESERVED FOR FUTURE USE PROCEDURE 1 Reserved For future use 235 105 210 October 1999 Copyright 1999 Page 1 ...
Страница 1284: ...Figure 15 15 1 PARADYNE Paradyne Corporation 3810 Modem Diagnostic Control Panel 235 105 210 October 1999 Copyright 1999 Page 6 ...
Страница 1287: ...Figure 15 16 1 153A Adapter Connection Figure 15 16 2 AMATPS Block Diagram 235 105 210 October 1999 Copyright 1999 Page 3 ...
Страница 1289: ...Figure 15 17 2 AMATPS Data Link 235 105 210 October 1999 Copyright 1999 Page 2 ...
Страница 1290: ...Figure 15 17 3 Single Housing B25A Cable Assembly 235 105 210 October 1999 Copyright 1999 Page 3 ...
Страница 1292: ...235 105 210 October 1999 Copyright 1999 Page 5 ...
Страница 1294: ...Figure 15 17 8 201C to TN82 Data Set Cable Drawing 235 105 210 October 1999 Copyright 1999 Page 7 ...
Страница 1303: ...9 STOP YOU HAVE COMPLETED THIS PROCEDURE 235 105 210 October 1999 Copyright 1999 Page 2 ...
Страница 1324: ...11 Type and enter q 12 STOP YOU HAVE COMPLETED THIS PROCEDURE 235 105 210 October 1999 Copyright 1999 Page 2 ...
Страница 1342: ...Figure 15 40 1 SCANS II Dial Up Data Set Installation Diagram 235 105 210 October 1999 Copyright 1999 Page 2 ...
Страница 1344: ...Figure 15 40 4 59A1 Mounting Front in Slot J3 Figure 15 40 5 2048A Data Set Front 235 105 210 October 1999 Copyright 1999 Page 4 ...
Страница 1345: ...Figure 15 40 6 Berg Connector Terminations and Layout 235 105 210 October 1999 Copyright 1999 Page 5 ...
Страница 1346: ...Figure 15 40 7 B25A Cable 4 STOP YOU HAVE COMPLETED THIS PROCEDURE 235 105 210 October 1999 Copyright 1999 Page 6 ...
Страница 1360: ...Figure 15 47 2 Typical SCANS III Link Diagram 235 105 210 October 1999 Copyright 1999 Page 2 ...
Страница 1368: ...Response FA or OK appears 17 STOP YOU HAVE COMPLETED THIS PROCEDURE 235 105 210 October 1999 Copyright 1999 Page 2 ...
Страница 1372: ...235 105 210 October 1999 Copyright 1999 Page 2 ...
Страница 1374: ...235 105 210 October 1999 Copyright 1999 Page 4 ...
Страница 1376: ...Figure 15 55 6 201C to TN83 Data Set Cable Drawing 235 105 210 October 1999 Copyright 1999 Page 6 ...
Страница 1418: ...Figure 15 56 1 PARADYNE 3810 Modem Diagnostic Control Panel 235 105 210 October 1999 Copyright 1999 Page 4 ...
Страница 1421: ...Table 1 1 O M Checklist 235 105 210 October 1999 Copyright 1999 Page 3 ...


