SECTION 3 - CHASSIS & TURNTABLE
3121160
3-21
3.7
DRIVE BRAKE (SN 0300138447 THROUGH
0300185827)
Disassembly
1.
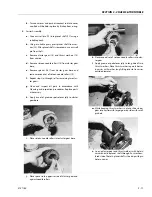
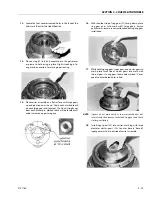
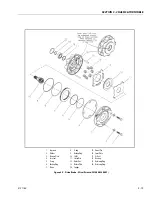
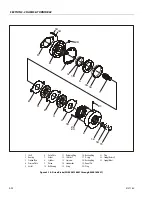
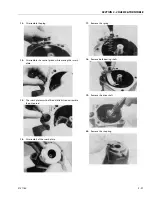
Supporting brake on face A:, remove the six socket head
capscrews and washers (Items 13 & 14) In equal incre-
ments to ensure the spring pressure within the brake is
reduced gradually and evenly.
If a press is available, the cylinder housing (8) can be
restrained on face B while removing the six capscrews
and washers (13 & 14).
The brake assembly can now be fully dismantled and
the parts examined.
2.
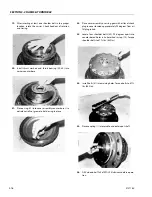
Remove cylinder housing (8), and piston (9) subassem-
bly and dismantle, if required, removing O-ring seals (15
& 17) and backing rings (16 & 18) as necessary.
3.
Remove gasket (7) from housing (2).
4.
Remove friction plates (3 & 6) and pressure plate (4).
5.
Remove 2 dowel pins (19).
6.
Remove springs (22 & 23).
7.
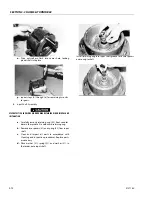
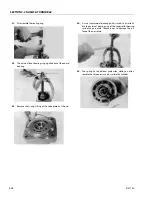
Should it be necessary to replace ball bearing (10) or
shaft seal (12), reverse remainder of brake subassembly,
supporting on face C of housing (2).
8.
Remove internal retaining ring (11).
9.
Using arbor press or similar to break Loctite seal, remove
brake shaft (1) from housing (2) and lay aside.
10.
Reverse housing (2) and press out ball bearing (10).
Shaft seal (12) can also be removed if necessary.
Inspection
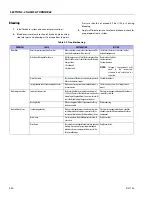
1.
Inspect friction plates (3 & 6) and friction surface on
pressure plate (4) for wear or damage.
2.
Examine friction plates (3) and brake shaft (1) for wear or
damage to the splines.
3.
Examine input and output splines of brake shaft (1) for
wear or damage.
4.
Examine compression springs (22 & 23) for damage or
fatigue.
5.
Check ball bearing (10) for axial float or wear.
6.
Examine o-ring seals (15 & 17) and backing rings (16 &
18) for damage.
Assembly
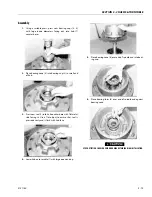
1.
Lightly lubricate rotary shaft seal (12) and assemble to
housing (2) taking care not to damage seal lip.
2.
Apply ring of Loctite 641 or equivalent adhesive to full
circumference of housing (2) bearing recess adjacent to
shoulder.
Apply complete coverage of Loctite 641 to outside
diameter of bearing (10) and assemble fully In housing
(2), retaining with internal retaining ring (11). Remove
excess adhesive with a clean cloth.
Press shaft (1) through bearing (10), ensuring bearing
inner ring Is adequately supported.
3.
Assemble correct quantity of springs (22 & 23) in orien-
tation required.
4.
Lubricate o-ring seals (15 & 17) with Molykote 55M (or
equivalent) silicon grease and assemble together with
backing rings (16 & 18) to piston (9). To ensure correct
brake operation. It is important that the backing rings
are assembled opposite to the pressurized side of pis-
ton.
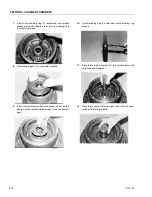
5.
Correctly orientate piston (9) aligning spaces with the
two dowel pin holes and, assemble into cylinder hous-
ing (8) taking care not to damage seals and carefully lay
aside.
6.
Locate 2-off pins (19) in housing (2) followed by pressure
plate (4) and friction plates i.e. an inner (3) followed by
an outer (6) in correct sequence.
7.
Position gasket (7) in correct orientation.
8.
Align two holes in cylinder with dowel pins (19) and
assemble piston & cylinder sub-assembly to remainder
of brake securing with 6 capscrews and washers (13 &
14). Torque to 55 ft.Ibs. (75 Nm).
NOTE:
The use of a suitable press (hydraulic or arbor) pressing
down on cylinder end face B will ease assembly of the cap-
screws (13).
Содержание 740AJ
Страница 1: ...Service and Maintenance Manual Model 740AJ Prior to S N 0300185827 P N 3121160 October 24 2017 AS NZS...
Страница 2: ......
Страница 51: ...SECTION 2 GENERAL 3121160 2 11 Figure 2 2 Engine Operating Temperature Specifications Ford 4150548 E...
Страница 55: ...SECTION 3 CHASSIS TURNTABLE 3121160 3 3 This page left blank intentionally...
Страница 56: ...SECTION 3 CHASSIS TURNTABLE 3 4 3121160 1 Figure 3 2 Axle and Steering Installation Sheet 1 of 2 0258286 C...
Страница 100: ...SECTION 3 CHASSIS TURNTABLE 3 48 3121160 Figure 3 37 Swing Bearing Tolerance Boom Placement Sheet 1 of 2...
Страница 101: ...SECTION 3 CHASSIS TURNTABLE 3121160 3 49 Figure 3 38 Swing Bearing Tolerance Boom Placement Sheet 2 of 2...
Страница 116: ...SECTION 3 CHASSIS TURNTABLE 3 64 3121160 Figure 3 44 Swing Hub Prior to SN 0300074383...
Страница 124: ...SECTION 3 CHASSIS TURNTABLE 3 72 3121160 Figure 3 45 Swing Drive Hub Fairfield SN 0300074383 through 0300134352...
Страница 180: ...SECTION 3 CHASSIS TURNTABLE 3 128 3121160 1 Figure 3 66 Auxiliary Pump Location 1 AuxiliaryPump 2 HydraulicTank...
Страница 203: ...SECTION 3 CHASSIS TURNTABLE 3121160 3 151 Figure 3 77 EFI Component Location...
Страница 206: ...SECTION 3 CHASSIS TURNTABLE 3 154 3121160 Figure 3 78 ECM EPM Identification ECM EPM...
Страница 213: ...SECTION 3 CHASSIS TURNTABLE 3121160 3 161 Megajector Regulator LockoffSolenoid Figure 3 80 LPG System Components Mixer...
Страница 219: ...SECTION 3 CHASSIS TURNTABLE 3121160 3 167 Figure 3 81 Check Out and Initial Start Up Procedures...
Страница 224: ...SECTION 3 CHASSIS TURNTABLE 3 172 3121160 Figure 3 83 Deutz EMR 2 Troubleshooting Flow Chart...
Страница 225: ...SECTION 3 CHASSIS TURNTABLE 3121160 3 173 Figure 3 84 Deutz EMR 2 Vehicle Side Connection Diagram...
Страница 226: ...SECTION 3 CHASSIS TURNTABLE 3 174 3121160 Figure 3 85 Deutz EMR 2 Engine Side Connection Diagram Sheet 1 of 2...
Страница 227: ...SECTION 3 CHASSIS TURNTABLE 3121160 3 175 Figure 3 86 Deutz EMR 2 Engine Side Connection Diagram Sheet 2 of 2...
Страница 228: ...SECTION 3 CHASSIS TURNTABLE 3 176 3121160 Figure 3 87 EMR 2 Engine Plug Pin Identification...
Страница 229: ...SECTION 3 CHASSIS TURNTABLE 3121160 3 177 Figure 3 88 EMR 2 Vehicle Plug Pin Identification...
Страница 230: ...SECTION 3 CHASSIS TURNTABLE 3 178 3121160 Figure 3 89 EMR2 Fault Codes Sheet 1 of 5...
Страница 231: ...SECTION 3 CHASSIS TURNTABLE 3121160 3 179 Figure 3 90 EMR2 Fault Codes Sheet 2 of 5...
Страница 232: ...SECTION 3 CHASSIS TURNTABLE 3 180 3121160 Figure 3 91 EMR2 Fault Codes Sheet 3 of 5...
Страница 233: ...SECTION 3 CHASSIS TURNTABLE 3121160 3 181 Figure 3 92 EMR2 Fault Codes Sheet 4 of 5...
Страница 234: ...SECTION 3 CHASSIS TURNTABLE 3 182 3121160 Figure 3 93 EMR2 Fault Codes Sheet 5 of 5...
Страница 303: ...SECTION 4 BOOM PLATFORM 3121160 4 31 Figure 4 20 Rotator Assembly HELAC...
Страница 335: ...SECTION 4 BOOM PLATFORM 3121160 4 63 THIS SENSOR ON NON ADE MACHINES ONLY Figure 4 27 UMS Sensor Location...
Страница 336: ...SECTION 4 BOOM PLATFORM 4 64 3121160 Figure 4 28 UMS Module Location ADE MACHINES NON ADE MACHINES...
Страница 425: ...SECTION 5 BASIC HYDRAULIC INFORMATION AND SCHEMATICS 3121160 5 81 Figure 5 131 Variable Displacement Pump Rexroth...
Страница 443: ...SECTION 5 BASIC HYDRAULIC INFORMATION AND SCHEMATICS 3121160 5 99 Figure 5 146 Fault Logic Troubleshooting...
Страница 444: ...SECTION 5 BASIC HYDRAULIC INFORMATION AND SCHEMATICS 5 100 3121160 Figure 5 147 Fault Logic Troubleshooting...
Страница 445: ...SECTION 5 BASIC HYDRAULIC INFORMATION AND SCHEMATICS 3121160 5 101 Figure 5 148 Fault Logic Troubleshooting...
Страница 460: ...SECTION 5 BASIC HYDRAULIC INFORMATION AND SCHEMATICS 5 116 3121160 NOTES...
Страница 467: ...SECTION 6 JLG CONTROL SYSTEM 3121160 6 7 Figure 6 2 ADE Block Diagram...
Страница 471: ...SECTION 6 JLG CONTROL SYSTEM 3121160 6 11 Figure 6 6 Analyzer Flow Chart Prior to Version 5 X Software Sheet 4 of 4...
Страница 473: ...SECTION 6 JLG CONTROL SYSTEM 3121160 6 13 Figure 6 8 Analyzer Flow Chart Version 5 X Software Sheet 2 of 4...
Страница 534: ...SECTION 6 JLG CONTROL SYSTEM 6 74 3121160 NOTES...
Страница 545: ...SECTION 7 BASIC ELECTRICAL INFORMATION SCHEMATICS 3121160 7 11 Figure 7 15 Connector Installation...
Страница 580: ...SECTION 7 BASIC ELECTRICAL INFORMATION SCHEMATICS 7 46 3121160 NOTES...
Страница 581: ......

