background image

3

WHEN CONNECTING TO THE NETWORK DIRECTLY

49

o

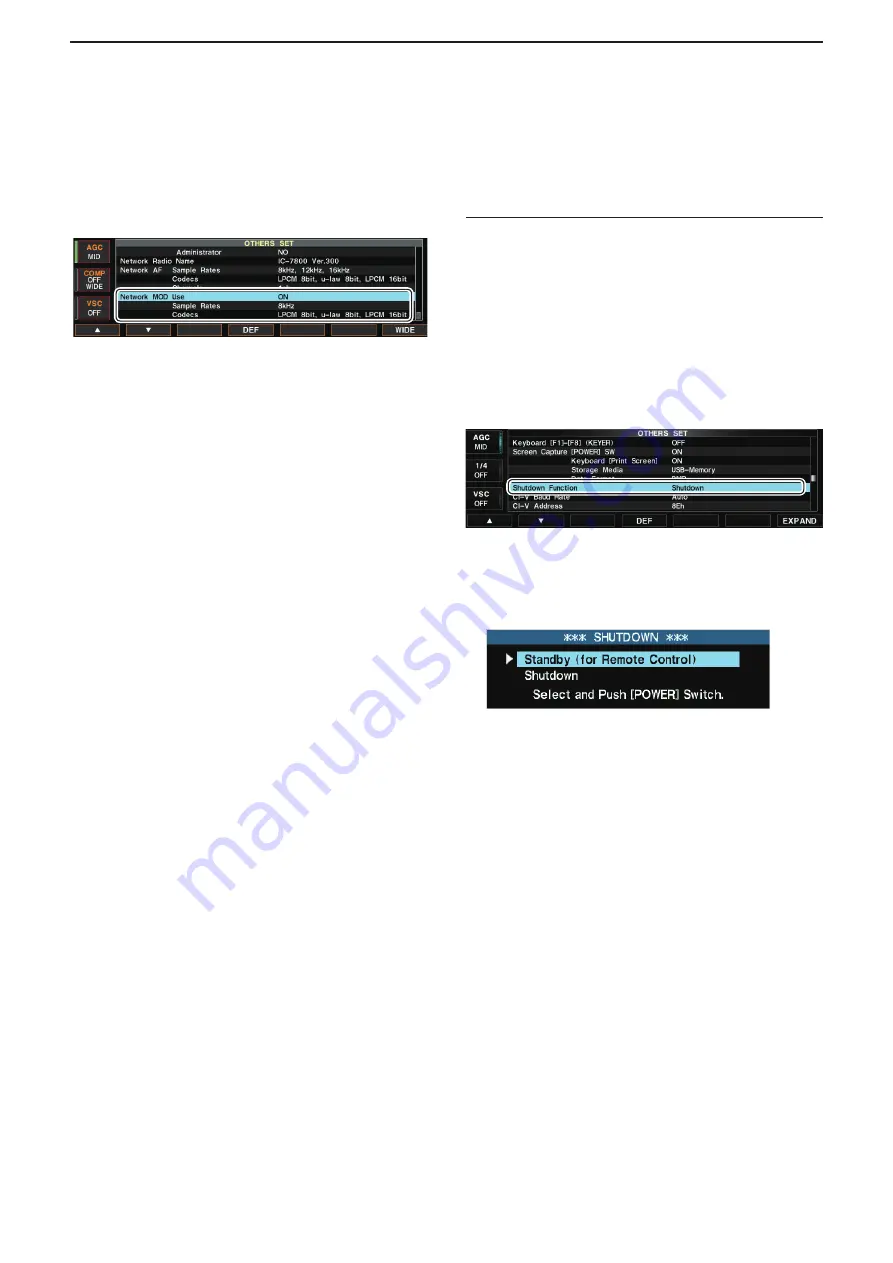
   Push  [F-1•

] or [F-2•

] to select “Network MOD 

Use.”

!0

  Confirm that “ON” is selected in “Network MOD 

Use.”


•  For the IC-7850 and IC-7851, the function is fixed to 

“ON.”

!1

   Push  [F-1•

] or [F-2•

] to select “Network MOD 

Sample Rate.”

!2

  Rotate the main dial to limit the modulation audio 

sampling rate that Remote stations can adjust.

   Higher sampling rates will improve the audio qual-

ity. However, they also increase the amount of data, 
which can cause voice delay or jumpiness, depend-
ing on the network condition.

   Lower sampling rates will decrease the audio qual-

ity. However, they also decrease the amount of data.

  •  For the IC-7850 and IC-7851, the rates are fixed to:
    8kHz, 12kHz, 16kHz, 24kHz, 48kHz

!3

   Push  [F-1•

] or [F-2•

] to select “Network MOD 

Codecs.”

!4

  Rotate the main dial to limit the modulation audio 

codec that Remote stations can adjust.


•  For the IC-7850 and IC-7851, the codecs are fixed to:

    LPCM 8bit, u-law 8bit, LPCM 16bit.

!5

  Push [EXIT/SET] twice to exit the Set mode.

Standby mode setting

To remotely control the transceiver using the RS-BA1, 
the transceiver’s power must be either turned ON or 
set in the standby mode.
Follow the steps described below to set the transceiver 
in the standby mode.

q

  Hold down [EXIT/SET] for 1 second to select the 

set mode menu screen.

w

  Push [F-5•OTHERS] to enter the Others set mode.

e

   Push  [F-1•

] or [F-2•

] to select “Shutdown Func-

tion.”

r

  Rotate the main dial to select “Standby/Shutdown.”

t

  Push [EXIT/SET] twice to exit the Set mode.

y

  Hold down [POWER] for 1 second.

u

  Make sure that “Standby (for Remote Control)” is 

selected, and then push [POWER].

  •  The transceiver is set to the standby mode and 

the LED above [POWER] blinks orange.

Information:

While “Standby (for Remote Control)” is selected in 
step 

u

, and [POWER] is pushed on the Others set 

mode after setting the radio network, the transceiver 
will be turned OFF instead of being in the standby 
mode.
Follow the steps below to set the standby mode.

q

  Push [POWER] to turn ON the transceiver.

w

  Push [POWER] again.

e

  When the screen in step 

u

 is displayed, make sure 

“Standby (for Remote Control)” is selected, and 
then push [POWER].

  •  The transceiver is set in the standby mode, and the LED 

above [POWER] blinks orange. 

 Radio Registration

D

 Adjust limitation setting (continued)

Содержание rs-ba1

Страница 1: ...tration routers or other devices are not described RC 28 Optional Internet Internet Icom radio Base station Remote station Radio Name IC 9100abc CI V address 7C Baud rate 19200 IP address 192 168 0 10 PC Name Base PC PC Name User PC User ID user 1 Password Icom12345 USB cable Supplied to the RS BA1 or a radio Router IC 9100 NOTE The password and other settings in this illustration are only an exam...

Страница 2: ...explains the USB connection as example See the RS BA1 Instruction Manual 2 WHEN CONNECTING TO THE NETWORK THROUGH A PC section when connecting to the radio s REMOTE jack or RS 232C port Radio s connector Outline Model Ref Control command Audio When connecting to the radio s USB port Through a USB cable IC 7100 IC 7200 IC 7300 IC 7410 IC 7600 1 IC 7850 IC 7851 IC 9100 p A 3 When connecting to the r...

Страница 3: ...adio confirm the driver name If the name Silicon Laboratories CP210x USB to UART Bridge Driver Re moval is displayed on the Control Panel screen uninstall it and then install the latest driver The latest driver and installation guide can be downloaded from here http www icom co jp world index html Read the installation guide before installing the driver 3 Connect the radio to the Base station s PC...

Страница 4: ...ement function IC 746PRO IC 7000 IC 7100 IC 7400 IC 9100 Set to OFF Timer Sleep Timer function Radios with the timer function Set the timer to OFF or to your schedule Weather Alert function IC 7100 Set to OFF Display RTTY decode screen IC 746PRO IC 756PROIII IC 7400 Exit the screen Volume Volume for the RX audio All Set the volume to a suitable level CI V CI V address All Set an appropriate CI V a...

Страница 5: ... later Automatically set to OFF SSB CW Synchronous Tuning All Automatically set to OFF Calibration Marker Radios with Calibration Marker function Automatically set to OFF VOX function All Automatically set to OFF Scan function All Automatically cancel the scan RTTY filter IC 746PRO IC 756PROIII IC 7400 Automatically set to OFF Twin Peak Filter IC 746PRO IC 756PROIII IC 7400 Automatically set to OF...

Страница 6: ...el of the device that is connected to your radio When your PC is used as a Remote station adjust the audio level of the device that your microphone speaker or headset is connected to D To allow access from the Internet RS BA1 Instruction Manual p 13 If you configure the remote control system through the Internet you need to configure your Base station and Remote station routers to allow access fro...

Страница 7: ...ype in the Internet Access Line menu ex FTTH e Click Apply to save the network settings qEnter wSelect eClick r After clicking Take effect after restarting the application appears then click OK and restart the Remote Utility 2 To prevent unauthorized access Set a long and strong password so that no one can pos sibly guess it Mix upper and lower case letters numbers or characters User registration ...

Страница 8: ...me for the radio in the Radio Name field ex IC 9100abc w Enter the radio s CI V address in the Address field ex 7C e Click the Public box to insert a check mark r Click the COM Port Audio Auto radio button Select an appropriate one from the drop down list then the COM port and audio device will be automatically set ex IC 9100 00000000 A COM 3 t Click User Permission to display the Radio User Permi...

Страница 9: ...eClick r After clicking Take effect after restarting the application appears then click OK and restart the Remote Utility 2 Connecting to the Base station q Select the Radio Operation mode from a drop down list located at the top of the screen and then click the Server List tab w The Server List screen appears then click Add e The Server Registration screen appears Register a Base station as descr...

Страница 10: ... values and close the Select Network screen y In the Connect Setting screen connect to the radio as described below q Select a COM port number in the Virtual COM Port Number menu ex COM2 w Select an audio device in the AF Output Device and MOD Input Device menu to which your speaker micro phone or headset is connected ex Default Device e Click Connect qSelect wSelect eClick u A dialog appears show...

Страница 11: ...ars Configure the connect settings as described below q Select a radio that you want to control in the Model menu ex IC 9100 w Select the connection between the transceiver and Base station in the Connection item ex USB When the MOD Select has also been changed dialog is displayed click OK The confirmation dialog for the connection setting may be displayed depending on the transceiver If connected...

Страница 12: ...ing the repeater list You can easily program the DV mode repeater information by importing the repeater list prepro grammed for each radio See the RS BA1 Remote Controller s Help file for importing details Selecting a modulation input connector q Click MIC SET on the Remote Controller w The MIC SET screen appears Select an appropriate connector in the MOD Select Remote ON menu ex USB to input tran...

Страница 13: ...se station IC 7851abc 8Eh Auto Network Radio Name CI V address Baud rate Connect to the LAN port These instructions are based on using the IC 7851 IC 7851 A radio with the server function Internet Internet Router NOTE The user ID password and other settings in this illustra tion are only an example Please configure the system using your own settings For your convenience If you use an RC 28 remote ...

Страница 14: ...IC 7800 6Ah IC 7700 74h When another device is connected to the system make sure you do not to set a duplicate address CI V baud rate Set to 19200 bps or Auto If you are using the IC PW1 with the transceiver be sure to set the CI V baud rate to 19200 bps After changing the trans ceiver s CI V settings be sure to reset the CPU of the IC PW1 and set the transceiver s CI V settings on the IC PW1 See ...

Страница 15: ... to allow Internet access Configure the port forwarding settings and IP filter settings on your router for port numbers 50001 50002 and 50003 which are used for the Remote Utility See your router s manual for details of how to configure the settings D Volume adjustment for your audio devices RS BA1 Instruction Manual p 7 Before you start communicating using the RS BA1 the PC s audio volume must be...

Страница 16: ...8 0 1 Control Port UDP 50001 Default Serial Port UDP 50002 Default Audio Port UDP 50003 Default Internet Access Line Your internet access line type Example FTTH Default Setting items and contents Network setting For the IC 7851 and IC 7850 Items Contents Network Control OFF Default ON DHCP ON Default Network Name Desired Network Name Example IC 7851 Control Port UDP 50001 Default Serial Port UDP 5...

Страница 17: ...settings qEnter wSelect eClick r After clicking Take effect after restarting the application appears then click OK and restart the Remote Utility 2 Connecting to the Base station Server q Select the Radio Operation mode from the drop down list located at the top of the screen and then click the Server List tab w The Server List screen appears then click Add e The Server Registration screen appears...

Страница 18: ...played Click Yes to automatically set the displayed settings and close the Select Network screen y In the Connect Setting screen connect to the Base station as described below q Select a COM port number in the Virtual COM Port Number menu Example COM2 w Select an audio device in the AF Output Device and MOD Input Device menu to which your speaker microphone or headset is connected Example Default ...

Страница 19: ...Connection item When the MOD Select has also been changed dialog is displayed click OK The confirmation dialog for the connection setting may be displayed depending on the transceiver If connected correctly click OK e Select a radio that you are accessing using the Remote Utility in the Remote Utility menu Example IC 7851abc The CI V settings are automatically loaded from the Remote Utility to the...

Страница 20: ...e Controller and then close the Remote Utility When you manually select the transmit audio input connector s to be used after finishing the Remote mode right click the icon in the toolbar or click Remote Setting in the File menu to select Regularly it automatically returns to the original setting before you start the Remote mode Remote control operation See the RS BA1 Remote Controller s help file...

Страница 21: ...SYSTEM 2 WHEN CONNECTING TO THE NETWORK THROUGH A PC 3 WHEN CONNECTING TO THE NETWORK DIRECTLY 4 SETTING FOR A REMOTE STATION PC 5 REMOTE CONTROLLER S BASIC OPERATION 6 TROUBLESHOOTING OVERVIEW OF THE RS BA1 ABOUT THE COMMUNICATION IN THE REMOTE CONTROL SYSTEM SETTING ON THE BASE STATION S PC ...

Страница 22: ... to remotely control radios that have a USB port Type B Mini B or LAN port Proper audio communication cannot be guaranteed when you connect the Base station s PC to the radio s ACC socket MIC connector or S P DIF jack Only when using IC 7851 IC 7850 IC 7800 firmware version 3 00 or later IC 7700 firmware version 2 00 or later Depending on your radio a few functions or modes cannot be used or you w...

Страница 23: ... Server PC function When using one of the following transceivers with the Server PC function As of November 2016 IC 7851 IC 7850 IC 7800 Firmware version 3 00 or later IC 7700 Firmware version 2 00 or later 3 WHEN CONNECTING TO THE NETWORK DIRECTLY 2 WHEN CONNECTING TO THE NETWORK THROUGH A PC 4 SETTING FOR A REMOTE STATION PC 5 REMOTE CONTROLLER S BASIC OPERATION 6 TROUBLESHOOTING p i to iii p iv...

Страница 24: ...cting to a radio from the Server 40 D Connecting to a radio 40 D Disconnecting from a radio 41 3 WHEN CONNECTING TO THE NETWORK DIRECTLY 42 49 Radio s presetting 43 D The following manual settings are required when operating the RS BA1 43 D The following settings are automatically set to the radio 43 When configuring the remote control system through a LAN 44 D To let Remote stations access the Se...

Страница 25: ...network internet or LAN To control the Base station radio the radio should be connected to the network through a PC or directly Most Icom radios need a PC and use the PC as the Server to exchange CI V commands control command and audio with the Remote station through either the internet or LAN Fig 1 The radio has a built in Network function that can be directly connected to the network With this f...

Страница 26: ...te Controller Base station Remote station IC 7851 IC 7850 IC 7800 firmware version 3 00 or later IC 7700 firmware version 2 00 or later Radio Server D Base station settings for audio commu nication When connecting to the network through a PC Audio level adjustment for an audio device pp 7 to 12 Audio device selection p 36 Audio sampling rate or audio codec setting p 36 When connecting to the netwo...

Страница 27: ...s icon on the taskbar then click Control Panel w Click System and Security e Click Allow an app through Windows Firewall r The Allowed applications screen appears then click Change settings qRight click wClick Click Click Click Windows 10 Before using the remote control system the following settings are needed Firewall setting p 1 Volume adjustment for your audio devices p 7 To allow access from t...

Страница 28: ...n app screen appears Click Remote Utility and then click Add u Returns to the Allowed applications screen In the Allowed apps and features list confirm that Remote Utility is displayed and a check mark is in the box and then click OK Click w Click q Click q Confirm w Click Windows 10 Continued ...

Страница 29: ...orner of the screen The charms appear on the right of the screen Point the mouse pointer around here Charms appear e Click the Settings charm Click r Click Control Panel Click t The Adjust your computer s settings screen ap pears then click System and Security Click y Click Allow an app through Windows Firewall Click Windows 8 1 ...

Страница 30: ...ther app Click o The Add an app screen appears Click Remote Utility and then click Add w Click q Click 0 Returns to the Allowed applications screen In the Allowed apps and features list confirm that Remote Utility is displayed and a check mark is in the box and then click OK q Confirm w Click Firewall setting Windows 8 1 Continued ...

Страница 31: ...d Programs screen appears then click Change settings t Click Allow another program y The Add a Program screen appears Click Re mote Utility and then click Add q Click w Click u Returns to the Allowed Programs screen In the Allowed programs and features list confirm that Remote Utility is displayed and a check mark is in the box and then click OK q Confirm w Click Windows 7 Click Click Click Click ...

Страница 32: ...serted in Block all incoming connections click to remove it Remove the check mark y Click the Exceptions tab then click Add pro gram u The Add a Program screen appears then click Remote Utility and then OK q Click w Click i Returns to the Exceptions tab in the Windows Firewall Settings screen In the Program or port list confirm that Remote Utility is displayed and a check mark is in the box then c...

Страница 33: ...menu you can adjust the audio input level from the radio Before adjusting connect the radio and your PC and turn ON the radio See page 16 When setting for the Remote station PC Adjust the volume level of the audio device that is connected to the PC In the Playback devices menu you can adjust the output level of the speaker or headset In the Recording devices menu you can adjust the modulation leve...

Страница 34: ...ies q Click w Select e Click y The Microphone Properties screen appears then confirm Use this device enable is displayed in the Device Usage menu on the General tab q Click w Confirm u Click the Listen tab If a check mark is inserted in Listen to this device click to remove it i Click the Levels tab Adjust the microphone s audio level by moving the slide control to the right or left If the mute se...

Страница 35: ... Select e Click e The Speaker Properties screen appears then confirm Use this device enable is displayed in the Device Usage menu on the General tab q Click w Confirm r Click the Levels tab Adjust the speaker s audio level by moving the slide control to the right or left If the mute setting is turned ON in Speakers click the icon to turn OFF After adjusting click OK to close Speaker Proper ties q ...

Страница 36: ...Device Usage menu on the General tab q Click w Confirm u Click the Listen tab If a check mark is inserted in Listen to this device click to remove it q Click w Confirm i Click the Levels tab Adjust the microphone s audio level by moving the slide control to the right or left If the mute setting is turned ON in Microphone click the icon to turn OFF After adjusting click OK to close Microphone Prope...

Страница 37: ... e The Speaker Properties screen appears then confirm Use this device enable is displayed in the Device Usage menu on the General tab q Click w Confirm r Click the Levels tab Adjust the speaker s audio level by moving the slide control to the right or left If the mute setting is turned ON in Speakers click the icon to turn OFF After adjusting click OK to close Speaker Proper ties q Click w Adjust ...

Страница 38: ...s not appear qClick e Click w Confirm i Click the Levels tab Adjust the microphone s audio level by moving the slide control to the right or left After adjusting click OK to close Microphone Properties When the mute setting is turned ON in Micro phone click the icon to turn OFF If you use the Windows Vista without any Service Pack installed and use USB Audio CODEC as the audio device the Levels ta...

Страница 39: ...the network through a PC INTERNET INTERNET IP Adress 192 168 0 100 IP Adress 192 168 0 100 Router Router Icom radio Base station Remote station Default Gateway 192 168 0 1 DNS Server Address 192 168 0 1 Default Gateway 192 168 0 1 DNS Server Address 192 168 0 1 Port numbers 50001 to 50003 Port numbers 50001 to 50003 When connecting to the network directly IC 7851 IC 7850 IC 7800 firmware version 3...

Страница 40: ... w Push F 5 OTHERS to enter the Miscellaneous Others set mode For the IC 7800 and IC 7700 go to step t e Push F 1 or F 2 to select DHCP r Rotate the main dial to select OFF t Push F 1 or F 2 to select IP Address y Push F 3 to select the desired part then ro tate the main dial to set the fixed IP address Example 192 168 0 10 u Push F 1 or F 2 to select Default Gate way i Push F 3 to select the desi...

Страница 41: ... remote control system through the Internet p 29 to 30 D To let Remote sta tions access the Server using its computer name p 23 D To let Remote sta tions access the Server using its IP address D To let Remote sta tions access the Server using its public IP address p 25 to 28 p 29 Network Setting p 31 User Registration p 32 Radio Registration p 33 to 37 To monitor or disconnect a Remote station p 3...

Страница 42: ...uction Manual when connecting to the radio s REMOTE jack or RS 232C port Radio s connector Outline Model Ref Control command Audio When connecting to the radio s USB port Through a USB cable IC 7100 IC 7200 IC 7300 IC 7410 IC 7600 1 IC 7850 IC 7851 IC 9100 p 17 When connecting to the radio s REMOTE jack Through the CT 17 ci v level con verter Through an audio cable connected between the PC s audio...

Страница 43: ...or operating the radio confirm the driver name If the name Silicon Laboratories CP210x USB to UART Bridge Driver Removal is displayed on the Control Panel screen uninstall it and then install the latest driver The latest driver and installation guide can be down loaded from here http www icom co jp world index html Read the installation guide before installing the driver 3 Connect the radio to the...

Страница 44: ...ion manual for details on the connector Radio PC AF Output LINE IN MIC IN Input MOD Input LINE OUT Output D When connecting to the radio s REMOTE jack When using the MIC connector NEVER directly connect an audio cable between the radio s Microphone input and PC It can cause a malfunction without adding the Electrolytic capacitor as illustrated above NEVER connect a monaural plug to the PC s LINE O...

Страница 45: ...eo audio cables purchase separately 2 Connect a remote control system Connect an RS 232C cable between the radio and the base station s PC PC MAIN SUB ACC 1 ACC 2 ACC 1 ACC 2 IN OUT RS 232C A B S P DIF EXT SP Radio Rear panel To an RS 232C port RS 232C cable To the RS 232C port For IC 7800 users When you turn your radio ON or OFF from the Remote Controller connect to the radio s Remote jack or to ...

Страница 46: ... ACC 2 IN OUT RS 232C A B S P DIF EXT SP S P DIF digital cable Radio Rear panel Using other than the S P DIF jack Radio PC AF Output LINE IN MIC IN Input MOD Input LINE OUT Output Rear panel view Connect to the ACC socket Connect to the MIC connector Front panel view 1 2 3 4 5 6 7 8 AF MOD 1 2 3 4 5 6 7 8 AF output PC GND MOD Not used GND GND Connect to the PC s LINE OUT GND AF Not used Connect to...

Страница 47: ...eset the CPU of the IC PW1 and set the transceiver s CI V settings on the IC PW1 See the IC PW1 instruction manual for details Genre Item Model Setting Function RIT function All Set to OFF TX function All Set to OFF Simple band scope IC 746PRO IC 7000 IC 7100 IC 7400 IC 9100 Set to OFF SWR Measurement func tion IC 746PRO IC 7000 IC 7100 IC 7400 IC 9100 Set to OFF Timer Sleep Timer func tion Radios...

Страница 48: ...e version 2 00 or later Automatically set to OFF SSB CW Synchronous Tuning All Automatically set to OFF Calibration Marker Radios with Calibration Marker function Automatically set to OFF VOX function All Automatically set to OFF Scan function All Automatically cancel the scan RTTY filter IC 746PRO IC 756PROIII IC 7400 Automatically set to OFF Twin Peak Filter IC 746PRO IC 756PROIII IC 7400 Automa...

Страница 49: ...er name Base PC PC Icom radio PC Server Request 192 168 0 10 IP address or Base PC Computer name Router Base station Remote station D To let Remote stations access the Server using its computer name A computer name is used on networks to identify a particular workstation on the network Find out your PC s computer name to let Remote stations access the Server using it q Click the folder icon on the...

Страница 50: ... click Computer and then click Properties Right click Click Windows 8 1 q Right click Computer in the Start menu and then click Properties q Click w Right click e Click w The System screen appears then confirm the name that is displayed in the Computer name field Confirm Windows 7 Windows Vista This description is based on Windows 7 e The System screen appears then confirm the name that is display...

Страница 51: ...ng Center screen appears then click Ethernet e The Ethernet Status screen appears then click Details r The Network Connection Details screen appears then confirm the IP address that is displayed in the Address field Click Close to close the window When the DHCP Enabled field is set to Yes in the Network Connection Details screen the DHCP server assigns a dynamic IP address to your PC Because of th...

Страница 52: ...splayed in the Address field Click Close to close the window q Confirm w Click When the DHCP Enabled field is set to Yes in the Network Connection Details screen the DHCP server assigns a dynamic IP address to your PC Because of this Remote stations will have to match the IP address each time to access the Server If the DHCP Enabled field is set to Yes we rec ommend that you let Remote stations ac...

Страница 53: ...ress that is displayed in the Address field Click Close to close the window q Confirm w Click When the DHCP Enabled field is set to Yes in the Network Connection Details window the DHCP server assigns a dynamic IP address to your PC Because of this Remote stations will have to match the IP address each time to access the Server If the DHCP Enabled field is set to Yes we rec ommend that you let Rem...

Страница 54: ...ed in the IP Address field Click Close to close the window q Confirm w Click When the DHCP Enabled field is set to Yes in the Network Connection Details window the DHCP server assigns a dynamic IP address to your PC Because of this Remote stations will have to match the IP address each time to access the Server If the DHCP Enabled field is set to Yes we rec ommend that you let Remote stations acce...

Страница 55: ...nternet If you use a dynamic public IP address it is chosen from a pool of available addresses and changes each time you connect to the Internet Because of this Remote stations will have to match the IP address each time to access the Server If you use a dynamic public IP address we recommend that you utilize the Dynamic DNS service to allow the Re mote stations to access the Server using its doma...

Страница 56: ... sta tions to access the Server through the Internet using its domain name Ask the router s manufacturer about how to configure your router to use the Dynamic DNS services Dynamic DNS server Update with your dynamic IP address IP address 192 168 0 100 Computer name Base PC IP address WAN LAN 192 168 0 1 Domain name Icom rsba1 com PC Icom radio PC Server Router Router Request Icom rsba1 com Domain ...

Страница 57: ...rs DO NOT use the same name for more than one PC on your network e Confirm the port numbers of the Control Serial and Audio ports You should use the default port numbers for these ports r Select your internet access line type in the Internet Access Line menu t Click Apply to save the network settings After clicking the Take effect after restarting the application screen appears then click OK The s...

Страница 58: ...user as an administrator click the Ad ministrator box to make a check mark Administrator users can terminate a connection be tween another user and a radio p 39 t Click Add to save the settings After clicking the User Registration screen ap pears Select radios that you allow the user to use If there are multiple radios to allow the user to use se lect of those radios After selecting click OK to sa...

Страница 59: ...dio s Remote station registration Step 4 Limit the maximum level of the Remote station s audio quality adjustment DAdjust limitation setting Step 5 Set the COM port and audio devices DCOM port and audio device setting Step 6 Save the settings Radio Registration screen OK Step 2 Configure the radio s basic information DRadio s basic information setting NOTE To remove a radio from the Radio List scr...

Страница 60: ...ake a check mark u Click OK to save the settings and close the screen NOTE Be sure to enter the same CI V address and the baud rate that are programmed into the radio If the radio s baud rate is set to Auto select 19200 in the Baud Rate menu If you are using the Spectrum Scope function with the IC 7850 IC 7851 or IC 7300 using a USB for the connection select 115200 in the Baud Rate menu See page 2...

Страница 61: ...n t The Radio User Permission screen appears Select Remote stations in the Registered Users list then click Permit Confirm the selected Remote stations are displayed in the Permitted Users list then click OK to close the screen y Click OK in the Radio Registration screen to save the settings and close the screen NOTE To remove a Remote station from the Permitted Users list select it in the list an...

Страница 62: ...ion screen r Confirm that a check mark is in the AF Use and MOD Use box t In the Sample Rates bar limit the receive or trans mit audio sampling rate that Remote stations can adjust Higher sampling rates will improve the audio qual ity However they also increase the amount of data which can cause voice delay or jumpiness depend ing on the network condition Lower sampling rates will decrease the aud...

Страница 63: ...e Radio Registration screen r Click the COM Port Audio Setting Auto radio button Radios that are connected to your PC using a USB cable are displayed in the drop down list Select an appropriate radio from the list then the COM port and audio device are automatically set t Click OK to save the settings and close the screen NOTE When you physically connect a radio to your PC using other than a USB c...

Страница 64: ... In the Base station s Remote Utility open the Radio List screen How to open Select the Radio Operation mode then click the Radio List tab w Select a radio with Busy under its name The operating user s name PC Name that the Re mote station set in the Network Setting screen and its IP address are displayed under Busy e Click Monitor to display the Monitor screen r Click TX Monitor to turn the Trans...

Страница 65: ...de then click the Radio List tab w Select a radio with Busy under its name The operating user s name PC Name that the Re mote station set in the Network Setting screen and its IP address are displayed under Busy e Click Disconnect r The radio is in use by a client Do you want to dis connect appears Click Yes to terminate the con nection NOTE When you terminate a connection no dialog ap pears on th...

Страница 66: ...tting screen Radios that are connected with the Remote Utility of the Server PC the Connection Setting cannot be changed r Select an audio device in the AF Output Device menu to which your speaker is connected Radio s received audio will be heard from the de vice t Select the audio device in the MOD Input Device menu to which your microphone is connected You can input transmit audio in the device ...

Страница 67: ...ration mode then click the Radio List tab w Select a radio with CONNECT under its name e Click Disconnect r Do you want to disconnect the radio appears Click Yes to disconnect the radio NOTE Be sure to disconnect from the radio when not using it Otherwise other Remote stations cannot connect to it Connecting to a radio from the Server Continued q Select w Select e Click Click ...

Страница 68: ...y its do main name When configuring the remote control system through a LAN p 44 p 45 When connecting to the network directly read this instruction manual in the following order When configuring the remote control system through the Internet p 45 D To let Remote sta tions access the Server using its IP address p 44 D To let Remote sta tions access the Server using its network name D To let Remote ...

Страница 69: ... setting IC 7851 IC 7850 8Eh IC 7800 6Ah IC 7700 74h When another device is connected to the system make sure you do not to set a duplicate address CI V baud rate Set to 19200 bps or Auto If you are using the IC PW1 with the transceiver be sure to set the CI V baud rate to 19200 bps After changing the transceiver s CI V settings be sure to reset the CPU of the IC PW1 and set the transceiver s CI V...

Страница 70: ... screen w Push F 5 OTHERS to enter the Others set mode e Push F 1 or F 2 to select IP Address r Check the IP address that is displayed in the IP Ad dress field Example 192 168 0 10 Check t Push EXIT SET twice to exit the Set mode D To let Remote stations access the Server using its network name A network name is an identification information as signed to each device participating in a computer net...

Страница 71: ...m through the Internet Remote stations can access the Server using its public IP address If you utilize a Dynamic DNS service Remote stations can access the Server by not only its public IP address but also by its domain name D To let Remote stations access the Server using its public IP address A public IP address is an address that is accessible over the global Internet If you use a dynamic publ...

Страница 72: ...n dial to set the IP address of the LAN side on the router Example 192 168 0 1 w Set 3 Control Port UDP Serial Port UDP Audio Port UDP confirmation u Push F 1 or F 2 to show Control Port UDP Serial Port UDP or Audio Port UDP i Confirm the port numbers of the Control Serial and Audio ports You should use the default port numbers for these ports e Confirm NOTE If you configure the remote control sys...

Страница 73: ...using a keyboard connected to the radio q Input y Push F 5 SET to set the User ID 2 Password setting u Push F 1 or F 2 to select Password i Push F 5 EDIT to enter the Password Edit mode o Rotate the main dial to input a Password of 8 to 16 characters case sensitive At least two different characters must be used w Input 0 Push F 5 SET to set the Password 3 Setting the user as an administrator 1 Pus...

Страница 74: ...mum level of the sound quality or audio codec Remote stations cannot program higher values than the values programmed here The following settings are not included with the IC 7850 and IC 7851 However the settings are originally fixed in those transceivers q Hold down EXIT SET for 1 second to select the Set mode menu screen w Push F 5 OTHERS to enter the Others set mode e Push F 1 or F 2 to select ...

Страница 75: ...ontrol the transceiver using the RS BA1 the transceiver s power must be either turned ON or set in the standby mode Follow the steps described below to set the transceiver in the standby mode q Hold down EXIT SET for 1 second to select the set mode menu screen w Push F 5 OTHERS to enter the Others set mode e Push F 1 or F 2 to select Shutdown Func tion r Rotate the main dial to select Standby Shut...

Страница 76: ...DO NOT use the same name for more than one PC on your network e Check the port numbers of the Control Serial and Audio ports You should use the default port numbers for these ports r Select your internet access line type in the Internet Access Line menu t Click Apply to save the network settings After clicking the Take effect after restarting the application screen appears then click OK The settin...

Страница 77: ...the IP address domain name or computer name of the Base station s PC in the Server Ad dress or Network Name field t Enter your user ID and password that are registered in the Base station s Remote Utility in the User ID and Password fields y Click OK to save the data then close the screen NOTE To remove a Server from the Server List se lect it in the list then click Delete e Enter y Click r Enter ...

Страница 78: ...r Address or Network Name field t Enter the user ID and password that are registered in the radio in the User ID and Password fields y Click OK to save the data then close the screen For only the IC 7850 and IC 7851 NOTE To remove a Server from the Server List se lect it in the list then click Delete q Select w Click e Enter y Click r Enter t Enter When connecting to the network directly Before re...

Страница 79: ...t CONNECTING appears under the Server name when the connection has succeeded If the connection fails and an error screen is dis played solve the problem using the 6 TROU BLESHOOTING section p 68 D Disconnecting from the Server q In the Remote station s Remote Utility open the Server List screen How to open Select the Radio Operation mode then click the Server List tab w Select the connecting Serve...

Страница 80: ...Procedure Step 1 Display the Connection Setting screen Radio Operation mode Radio List Screen select a radio Settings Step 2 Set the network audio quality D Network audio quality setting Step 3 Select a virtual COM port number and an audio device D Device setting Step 4 Save the settings and connect to the radio Connection Setting screen Connect NOTE If the connection setting is finished you can s...

Страница 81: ...Recommended t The Select Network screen appears Select the connection to a radio either through a LAN or the Internet and then click Next y The recommended values for your network are displayed Click Yes to automatically set the dis played values in each field of the Network Setting then close the Select Network screen u Click Save in the Connection Setting screen to save the settings and close th...

Страница 82: ...ual COM Port Number menu The selected COM port number is used for CI V opera tion with the radio When you connect to the radio with a control software you have to set the COM port number t Select an audio device in the AF Output Device menu to which your speaker is connected to output the received audio from the network y Select an audio device in the MOD Input Device menu to which your microphone...

Страница 83: ... its name e Click Disconnect r Do you want to disconnect the radio appears Click Yes to disconnect the radio NOTE Be sure to disconnect when not using the radio Otherwise other Remote stations cannot connect to it The Server or administrator Remote stations can terminate a connection between another Remote station and a radio If CONNECT disappears while connecting to a radio the Server or authoriz...

Страница 84: ... mode then click the Radio List tab w Select a radio with CONNECT under its name e Click AF r Slide the adjustment bar on the Volume field up or down to adjust the received audio volume level Click Mute to mute the audio and click once again to hear the audio t Click Close to close the screen NOTE The AF adjustment bar on the Volume field moves together with the AF control of the Remote Con trolle...

Страница 85: ...Select a radio with CONNECT under its name e Click MOD r Select Mic on the MOD Select field t Slide the adjustment bar on the Volume field up or down to adjust the transmit audio volume level y Click Close to close the screen NOTE You cannot adjust the modulation input level of the radio with the Remote Utility Adjust the modulation input level of the radio in the radio s Set mode or using the Rem...

Страница 86: ...n mode then click the Radio List tab w Select a radio with CONNECT under its name e Click AF r Click to start recording While recording click to pause t Click to stop recording NOTE When you click Folder Open the folder in which the recording file is stored will be displayed If you want to change the recording folder click the button then select a folder in the Browse For Folder screen Adjust the ...

Страница 87: ...t Click Open to select an audio file to play or trans mit Only uncompressed linear PCM WAV files are sup ported y Click to start playing transmitting While playing transmitting click to pause u Click to stop playing transmitting NOTE You can also use the Remote Controller s Voice Memory function to play back or transmit an audio file See the Remote Controller s help file for details To display the...

Страница 88: ...of the radio IC 7700 with firmware version 2 00 or later IC 7800 with firmware version 3 00 or later or an IC 7850 or IC 7851 connect to the radio through the network Connecting to a radio with the Remote Controller D Connects to the radio pp 63 64 D About the Remote mode p 65 D Displays the Connect Setting screen pp 63 64 D To use transmit audio input from the PC p 65 NOTE See the RS BA1 Remote C...

Страница 89: ...d The settings include the virtual COM Port number the radio s CI V address and baud rate and the virtual audio device for the Voice Memory function If the desired radio is not displayed in the Remote Utility menu click Search to load the radios infor mation from the Remote Utility y Click the Software closing turns OFF the Radio box to make a check mark to turn OFF the radio when the Remote Contr...

Страница 90: ...19200 in the Baud Rate bps menu If you are using the Spectrum Scope function with the IC 7850 IC 7851 or IC 7300 using a USB for the connection select 115200 in the Baud Rate menu See page 21 for details of radio s presetting To check or change the radio s CI V address and baud rate settings see the instruction manual that comes with the radio i Click the Software closing turns OFF the Radio box t...

Страница 91: ... Remote mode When connected to the radio the Remote Controller automatically turns ON the Remote mode While the Remote mode is ON the Remote Controller transmits CI V commands not only to check the radio s current state but also to remotely control it When you want the Remote Controller to only check the radio s current state or when you want to inhibit the Remote Controller from transmitting CI V...

Страница 92: ...the remote control operation t If you are connecting the radio through the PC close the Remote Utility on the Base Station y Turn OFF the Radio and the PC If you are using a radio that can be turned ON or OFF with the CI V Power ON OFF command the radio is turned OFF when the radio is disconnected using the Remote Controller Operating guide The following windows are displayed by right clicking on ...

Страница 93: ...tting window is displayed when the Tone function is used The setting window differs depending on the used Tone function e This setting window is displayed when the Duplex operation is used NOTE There are items you cannot set depending on the connected radio RS BA1 is for the single band operation Knobs can be changed to sliders on the Set Mode screen for the volume squelch settings and so on q q ...

Страница 94: ...nter the correct port number in the Control Port UDP field in the Sever Registra tion screen The default number is 50001 Possible cause 3 The virtual driver is not installed in the Remote station s PC Solution Install the virtual driver in the Remote station s PC See the RS BA1 Preparations for details LOGON NG is displayed under the Server name Possible cause The user ID or password is different ...

Страница 95: ...nistrator Remote station you can terminate a connection between another Remote station and a radio p 38 CONNECTING ERROR is displayed under the radio name Possible cause 1 Access to the selected radio is inhibited by the Server Solution Allow the Remote station to access the radio with the Base station s Remote Utility p 54 Possible cause 2 The serial port number default 50002 or the audio port nu...

Страница 96: ...NG is displayed under the Server name COM AUDIO ERROR is displayed under the radio name The following messages are displayed for all possible causes described below Possible cause 1 An audio device or COM port has been added to the PC or removed from the PC For the USB device the USB port number has been changed Solution The COM port number or the audio device name may have been changed Reregister...

Страница 97: ...ctly Is the radio turned ON Is the radio in the remote standby mode When directly accessing the radio without using the Remote Utility Possible cause 1 An incorrect COM port number is selected in the Remote Controller s Connect Setting screen Solution qCheck the COM port to which the radio is connected on your PC s Device Manager w Select the correct COM port number in the COM Port menu in the Rem...

Страница 98: ...vice is connected to the computer in place of the speaker Solution Disconnect the device Possible cause 3 The appropriate audio device is not selected in the Remote Utility Solution Select the appropriate audio device in the AF Output Device menu in the Connection Setting screen Radio Operation mode Radio List screen Settings pp 40 56 If you connect a new USB audio device to your PC the audio devi...

Страница 99: ...gs pp 40 56 If you connect a new USB audio device to your PC the audio device which is selected as a default device in your PC can be changed If you select Default Device in the MOD Input Device menu please keep that in mind Possible cause 3 The input level of the audio device is set to too low on your PC Solution Adjust the input level of the audio device pp 7 to 12 Possible cause 4 Audio input i...

Страница 100: ... PC is overloaded Solution 1 Shutdown other applications if running Solution 2 Reduce the number of radios you are accessing with the Remote Utility NOTE If you are accessing the radio through a network removing a check mark from the Retransmission box in the Connection Setting screen Radio Operation mode Radio List screen Settings can solve the problem You can check the simplified packet round tr...

Страница 101: ...1 1 32 Kamiminami Hirano ku Osaka 547 0003 Japan A6894 4EX 8a 2010 2016 Icom Inc ...

Отзывы: