Installtion guide
B
B-7
1.
2.
3.
Step4.
Step4. Remote control operation
This section describes how to connect and remotely control a radio from a Remote station using the Remote Controller.
See the RS-BA1 Instruction Manual (“5. REMOTE CONTROLLER’S BASIC OPERATION” section) for details.
• The description in this section is based on the assumption that the connection to the radio using the Remote Utility has suc-
ceeded (“<<CONNECT>>” is displayed under the radio name).
1
Connect setting using the Remote Controller
q
Double-click the “Remote Control” icon on your desktop to open the Remote Controller.
w
Click the icon to the right in the toolbar, or click “Connect Setting...” in the [Option] menu.
e
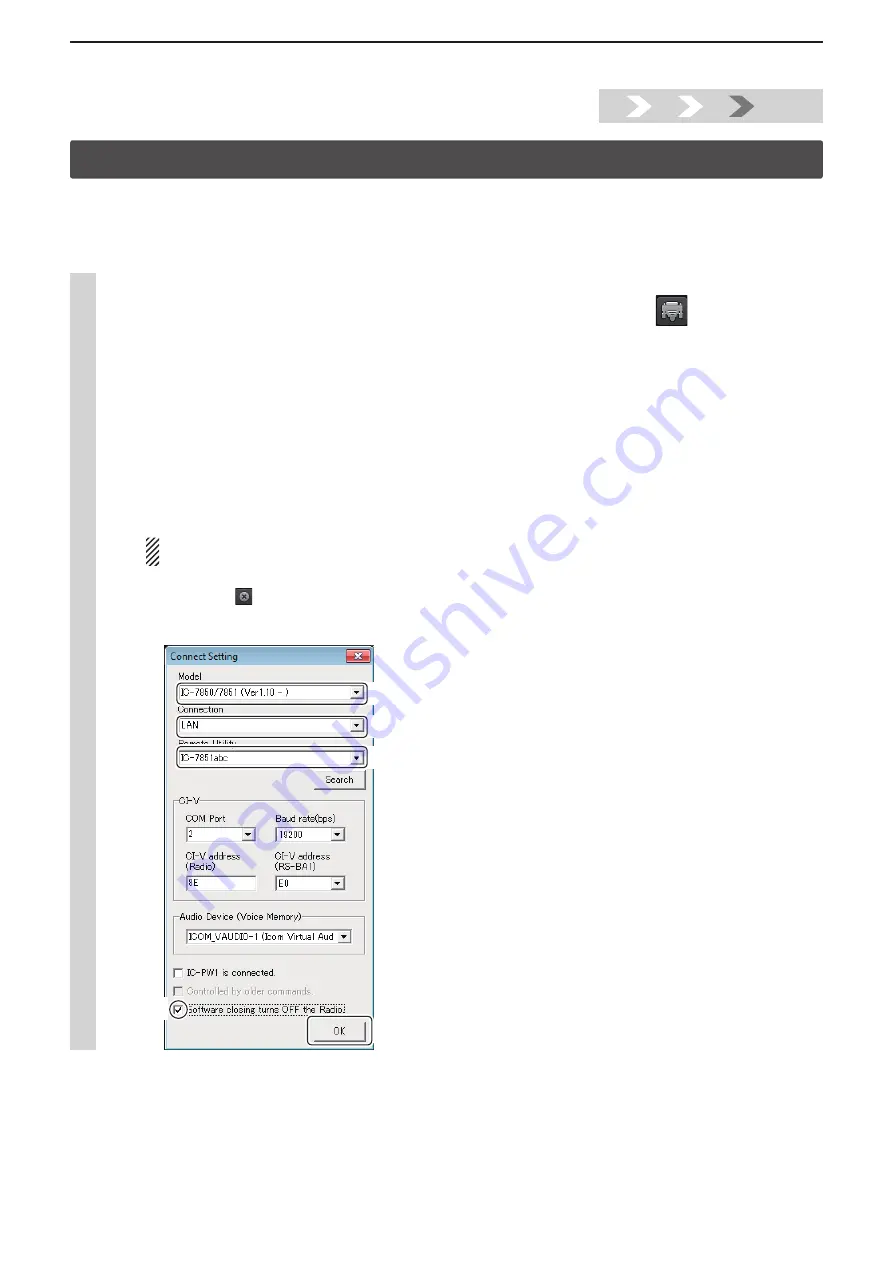
The Connect Setting screen appears.
Configure the connect settings as described below.
q
Select the connecting radio in the “Model”
menu.
(Example:
IC-7850/IC-7851 (Ver1.10-))
w
Select “LAN” for the “Connection” item.
• When the “MOD Select has also been changed.” dialog is displayed, click [OK].
• The confirmation dialog for the connection setting may be displayed, depending on the transceiver. If connected correctly, click
[OK].
e
Select a radio that you are accessing using the Remote Utility, in the “Remote Utility” menu.
(Example:
IC-7851abc)
• The CI-V settings are automatically loaded from the Remote Utility to the CI-V field. The settings include the virtual COM Port
number, radio’s CI-V address and baud rate and the virtual audio device for the Voice Memory function.
If the desired radio is not displayed in the “Remote Utility” menu, click [Search] to load the radios’ information from
the Remote Utility.
r
Check the “Software closing turns OFF the Radio.” box to turn OFF the radio when the Remote Controller is closed
by clicking the <
> button or [Exit] on the File menu.
• When the PC is shut down while the Remote Controller is still running, the transceiver’s power may not be turned OFF.
t
Click [OK] to save the settings and close the screen.
e
Select
q
Select
r
Check
t
Click
w
Select


