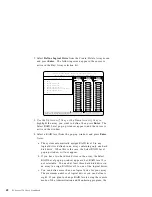
5. Select Yes to delete the logical drive. Select No to keep the
logical drive.
6. Select Exit or Esc to return to the Main Menu.
Note: In some operating systems, deleting an array and associated
logical drives might change the drive letters assigned to the
existing drives.
Redefining Space in an Array
You can redefine space in a disk array in a number of ways. For
example, you can combine a number of small logical drives to create
a larger one, or you can redefine the existing logical drive into
several smaller drives. Also, you can install additional hard disk
drives and create a larger logical drive than was possible with the
existing storage capacity.
One method to redefine space in an array is to change the RAID
level assigned to a logical drive. For example, if you assigned RAID
level 1 to a logical drive and then decided you needed the capacity
offered with RAID level 5, you can use this procedure to replace the
existing logical drive with a logical drive assigned the new RAID
level.
To redefine the space in a disk array, first you must delete the
existing array.
Attention:
In all cases, when you delete an array, all the data and
programs in the array are lost.
Note: You will need a blank 3.5-inch formatted diskette to back up
the configuration file, as described in this procedure.
1. Back up all data and programs in the array.
Note: Back up the data before you delete the existing array.
You might want to use a high-speed back up device, such
as a tape drive, to back up large amounts of data.
2. If needed, install additional hard disk drives. Refer to
“Understanding Hard Disk Drive Capacities” on page 39 for
information about drive sizes.
52
PC Server 330 User's Handbook
Содержание PC Server 330
Страница 1: ...PC Server 330 User s Handbook IBM...
Страница 6: ...vi PC Server 330 User s Handbook...
Страница 10: ...x PC Server 330 User s Handbook...
Страница 32: ...18 PC Server 330 User s Handbook...
Страница 100: ...86 PC Server 330 User s Handbook...
Страница 134: ...120 PC Server 330 User s Handbook...
Страница 143: ...Preparing to Add Options 11 Remove the adapter retention bracket Chapter 4 Installing Options 129...
Страница 233: ...Completing the Installation 2 Reinstall the adapter retention bracket Slot Chapter 4 Installing Options 219...
Страница 240: ...Updating the Server Configuration 226 PC Server 330 User s Handbook...
Страница 326: ...Resolving Configuration Conflicts 312 PC Server 330 User s Handbook...
Страница 382: ...IBM Part Number 76H8834 Printed in U S A September 1996 76H8834...

