5.
Remove the processor board assembly. See
“Removing the Processor Board Assembly”
6.
Open the processor cage (
a.
Grasp the processor cage handle, and apply adequate force to rotate the handle upward.
b.
Use the handle to rotate the cage closure approximately 90 degrees toward the front
of the assembly until it stops.
IMPORTANT:
Ensure that the processor slot is entirely exposed. The processor must
clear the cage closure for proper installation.
7.
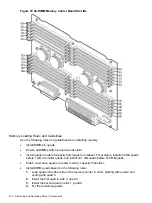
Locate the appropriate processor slot (Module 0 or Module 1) for the processor installation
(
).
8.
Remove the plastic airflow blocker covering the processor slot, if required.
9.
Remove the ZIF socket cover from the processor socket, if required.
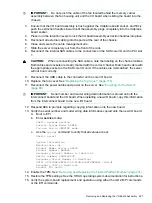
10. Ensure the cam on the processor socket lock is in the unlocked, position (
CAUTION:
The ZIF socket for the processor is locked and unlocked by half of a full turn
of the processor install tool. The counterclockwise 180 degree rotation (half turn) unlocks
the socket. A clockwise 180 degree rotation locks the socket. Attempting to turn the locking
mechanism more than 180 degrees can severely damage the socket.
11. Remove any protective packaging from the new processor.
NOTE:
Protective covers are installed to protect connector pins. Save these covers for
future use.
12. Inspect the processor pins and verify that the pins are not bent.
13. Align the alignment holes on the processor with the alignment posts on the processor cage,
and carefully lower the processor onto the processor socket (
and
).
CAUTION:
Do not press the processor into the socket. When properly aligned, the
processor pins seat into the socket. No additional pressure is required. Damage to the pins
can occur if too much pressure is applied.
14. Lock the processor into the socket on the processor board (
).
a.
Unfasten the processor install tool (2.5 mm driver) from the tool holder on the processor
board.
b.
Insert the processor tool into the hole that runs down the side of the heatsink.
c.
Rotate the processor tool clockwise 180 degrees.
d.
Refasten the processor install tool to the tool holder on the processor board.
15. Reconnect the processor power cable to the connector cable that attaches directly to the
processor board (
16. Close the processor cage (
a.
Grasp the processor cage handle and rotate the cage closure inward toward the rear
of the assembly until it is completely closed.
b.
Apply adequate force to push the handle down until it is flush with the cage.
17. Replace the processor board assembly. See
“Replacing the Processor Board Assembly”
18. Replace the memory carrier assembly. See
“Replacing the Memory Carrier Assembly”
19. Replace the memory carrier assembly cover and latch the top cover release lever closed.
See
“Replacing the Memory Carrier Assembly Cover” (page 180)
Removing and Replacing a Dual-Core Processor
223

