1
IMPORTANT:
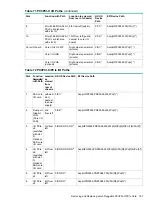
The new version of the PCI/PCI-X/PCIe backplane (version 1.1) shipped on July 1, 2008. For existing
servers, repair and replace should continue to be performed with the version 1 I/O backplane. For servers shipped as
of July 1, 2008, repair and replace should be performed with version 1.1 I/O backplane. The device paths for version
1.1 are as follows.
EFI Device Path
HP-UX Device Path
Location as Viewed
from Rear of Chassis
Function
Associated with
Path
Slot
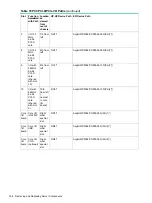
Acpi(HPQ0002,PNP0A08,600)/Pci(0|
0)/Pci(0|0)/Pci(1|0)/Pci(0|*)
0/6/0/0/0/0/1/0/0
3rd from left
I/O PCIe x8
(switched with slot 4)
Optional SAS core
I/O card
3
Acpi(HPQ0002,PNP0A08,600)/Pci(0|
0)/Pci(0|0)/Pci(0|0)/Pci(0|*)
0/6/0/0/0/0/0/0/0
4rd from left
I/O PCIe x8
(switched with slot 3)
Optional SAS core
I/O card
4
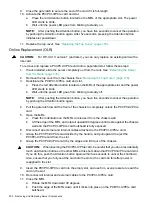
Online Addition (OLA)
IMPORTANT:
Before installing a PCI/PCI-X/PCIe card, ensure you install the proper drivers.
To add a PCI/PCI-X/PCIe card into an empty slot, follow these steps:
1.
If rack installed, slide the server completely out from the rack. See
.
2.
Remove the top cover from the chassis. See
“Removing the Top Cover” (page 178)
3.
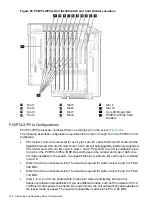
Select an empty slot that is appropriate for the card you are installing. See
for more information.
CAUTION:
Do not accidentally push the manual retention latch (MRL) of a powered-on,
occupied slot; this automatically cuts off the power for that slot.
4.
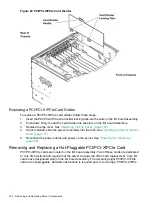
Open the MRL.
a.
Press the indentation on the MRL to release it from the chassis wall.
b.
Lift the edge of the MRL, and rotate it upward 90 degrees until it rests against the chassis
wall and the PCI/PCI-X card bulkhead filler is fully exposed.
5.
Remove the PCI/PCI-X/PCIe bulkhead filler.
CAUTION:
When inserting the PCI/PCI-X/PCIe card, be careful that you do not accidentally
touch an Attention button on the other PCI/PCI-X/PCIe MRLs; this shuts down another
PCI/PCI-X/PCIe card/slot. If you do this, push the Attention button again within five seconds
to cancel the shutdown.
Also, ensure that you fully seat the card into the slot or the card can fail after power is
reapplied to the slot.
6.
Insert the PCI/PCI-X/PCIe card into the empty slot, and use firm, even pressure to seat the
card in the slot.
7.
Connect all internal and external cables to the PCI/PCI-X/PCIe card.
8.
Close the MRL.
a.
Rotate the MRL downward 90 degrees.
b.
Push the edge of the MRL down until it clicks into place on the PCI/PCI-X/PCIe card
bulkhead.
Removing and Replacing a Hot-Pluggable PCI/PCI-X/PCIe Card
199

