


14. Adding and Replacing Modules
14-24
14.8.3 Adding an ET.NET module
(1) Make a note of the information displayed on the indicator of the CPU module, and whether each of its
LEDs(RUN, ALARM, STBY, ERR) is on, off, or blinking.
(2) Slide the LADDER RUN/STOP switch on the CPU module from RUN to STOP, and confirm that
LDRSTP
appears on the indicator.
(3) Use the RAS menu in BASE SYSTEM/S10VE to save the CP and HP error log information for the CPU
module. For details on how to save this information, see
8.4.6.2 RAS menu: Error Log Display
.
(4) Slide the CPU RUN/STOP switch on the CPU module from RUN to STOP, and confirm that
CPUSTP
appears on the indicator.
(5) Turn off the power switch of the power supply module.
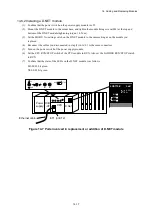
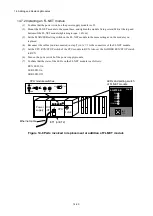
(6) Mount the ET.NET module to the mount base, and tighten the module fixing screws(M4) at the top and
bottom of the ET.NET module(tightening torque: 1.0 N
·
m).
(7) Set the MAIN/SUB and ST No. setting switches on the ET.NET module. For details on how to set these
switches, see the
S10VE User's Manual Option ET.NET (LQE260-E)
(manual number SEE-1-105).
Make sure that the setting of the MAIN/SUB setting switch does not conflict with those of other
ET.NET modules.
(8) Turn on the power switch of the power supply module.
(9) Set the CPU RUN/STOP switch of the CPU module to RUN.
(10) Start BASE SYSTEM/S10VE, and set up the ET.NET module you added. For details on how to set up a
new ET.NET module, see the
S10VE User's Manual Option ET.NET (LQE260-E)
(manual number SEE-
1-105).
(11) Turn off the power switch of the power supply module.
(12) Connect the cable to the connector of the ET.NET module.
(13) Turn on the power switch of the power supply module.
(14) Set the LADDER RUN/STOP switch on the CPU module to RUN.
(15) Confirm that the state of the LEDs on the ET.NET module is as follows:
RUN LED: On
ALARM LED: Off
ERR LED: Off
TX/RX LED: On or blinking
100M LED and 10M LED: One is on and the other off according to the link speed.
(16) Back up the data on the PCs. For details on how to back up the data on the PCs, see
14.11.1 Backup
procedure
.
Содержание S10VE
Страница 1: ...User s Manual General Description SEE 1 001 A ...
Страница 2: ...User s Manual General Description ...
Страница 27: ...S 24 Revision History Revision No History revision details Issue date Remarks A New edition Oct 2019 ...
Страница 53: ...This page is intentionally left blank ...
Страница 59: ...This page is intentionally left blank ...
Страница 67: ...This page is intentionally left blank ...
Страница 75: ...This page is intentionally left blank ...
Страница 77: ...This page is intentionally left blank ...
Страница 103: ...This page is intentionally left blank ...
Страница 129: ...This page is intentionally left blank ...
Страница 295: ...This page is intentionally left blank ...
Страница 309: ...This page is intentionally left blank ...
Страница 341: ...This page is intentionally left blank ...
Страница 345: ...This page is intentionally left blank ...
Страница 475: ...This page is intentionally left blank ...
Страница 489: ...This page is intentionally left blank ...
Страница 505: ......
Страница 506: ...This page is intentionally left blank ...


