9. Settings
9-2
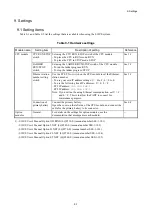
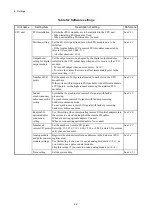
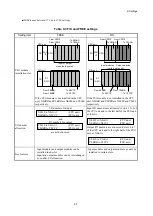
Table 9-2 Software settings
Unit name
Setting item
Description of setting
Reference
CPU unit
PI/O installation Set whether PI/O modules are to be installed in the CPU unit.
- When installing PI/O modules: Used
- When not installing PI/O modules: No used
See
9.3.1
Partition setting
Set the I/O slots (partitions) into which I/O modules are to be
installed.
- If the total number of I/O points of PI/O modules connected by
remote I/O exceeds 2,048:
FIX
- All other situations:
FREE
See
9.3.2
Output hold
setting for digital
output module
Set the output state to be adopted by the digital output modules
installed in the CPU mount base when an error occurs in the CPU
module.
- To turn off output when an error occurs:
RESET
- To retain the values that were in effect immediately prior to the
error occurring:
HOLD
See
9.3.3
Number of I/O
points
Set the number of I/O points allocated to each slot on the CPU
mount base.
If the system will incorporate PI/O modules with different numbers
of I/O points, set the highest number among the installed PI/O
modules.
See
9.3.4
Ladder
synchronous/asy
nchronous mode
setting
Set whether to synchronize remote I/O signals with ladder
processing.
To synchronize remote I/O signals with ladder processing:
Ladder synchronous mode
To not synchronize remote I/O signals with ladder processing:
Ladder asynchronous mode
See
9.3.5
Remote I/O
optical adapter
connection
setting
Use this setting when incorporating remote I/O optical adapters into
the system to extend the length of the remote I/O cables.
When connecting optical adapters: Connect
When not connecting optical adapters: No-connect
See
9.3.6
Number of
remote I/O points
Set the number of remote I/O points.
Select 64, 128, 256, 512, 1,024, 1,536, or 2,048 remote I/O points as
suits your environment.
See
9.3.7
Analog module
and pulse counter
module settings
Registers the module installation addresses in the data area (PI/O
register area).
Use this setting if you want to use an analog module in
MODE2
, or
you want to use a pulse counter module.
Skip this setting if you want to use an analog module in
MODE1
.
See
9.4
Time setting
Set the system time.
See
8.4.5.1
Содержание S10VE
Страница 1: ...User s Manual General Description SEE 1 001 A ...
Страница 2: ...User s Manual General Description ...
Страница 27: ...S 24 Revision History Revision No History revision details Issue date Remarks A New edition Oct 2019 ...
Страница 53: ...This page is intentionally left blank ...
Страница 59: ...This page is intentionally left blank ...
Страница 67: ...This page is intentionally left blank ...
Страница 75: ...This page is intentionally left blank ...
Страница 77: ...This page is intentionally left blank ...
Страница 103: ...This page is intentionally left blank ...
Страница 129: ...This page is intentionally left blank ...
Страница 295: ...This page is intentionally left blank ...
Страница 309: ...This page is intentionally left blank ...
Страница 341: ...This page is intentionally left blank ...
Страница 345: ...This page is intentionally left blank ...
Страница 475: ...This page is intentionally left blank ...
Страница 489: ...This page is intentionally left blank ...
Страница 505: ......
Страница 506: ...This page is intentionally left blank ...

