ASSEMBLE WING BELLY FAIRING
PARTS NEEDED:
D (2) US1 0W22 1/8" Die-cut Balsa Belly Fairing Sides
D (1) US10F39 1/8" Die-cut Balsa Belly Fairing Formers
D (2) US10W18 1/2" x 1-1/2" x 1-1/2" Balsa Fairing locks
D (1) US 10W33 1 /8" x 3" x 24" Balsa Belly Fairing
Sheeting
D (1) US10W19 1/4" x 24" Balsa Triangle Sto
D 1. Attach the wing to the fuse with the wing bolts.
NOTE: To allow for variations in building, the belly
fairing f o r m e r s and sides are supplied slightly
oversize. This gives you a little extra for accurately
sanding and fitting to the wing.
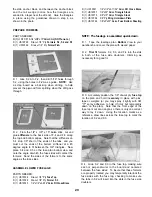
D 3. Glue the die-cut 1/8" balsa front and rear belly
fairing sides in position. The outside edges of these
parts should be approximately on a line from the edge
of the fuse at F-2 to the edge of the fuse at F-4. Then
sand them to flow smoothly into the angles of the fuse
bottom sheeting and the chin block (see the fuse plan
side view).
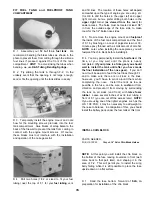
D 2. Trial fit the die-cut 1/8" balsa front and rear
belly fairing formers to the leading and trailing edges
of the wing, using scrap 1/16" balsa or plywood as
temporary spacers to separate these formers from the
fuselage formers. Sand the bottom edges of these
formers to the angle of the wing surface. Also sand
them down until the edge of the formers are 1/8"
below the chin block and aft fuse sheeting, so the belly
fairing sheeting will end up flush with the chin block
and aft fuse sheeting. Center these formers between
the fuse sides and glue them to the wing with medium
or thick CA, being very careful to avoid gluing the wing
to the fuse.
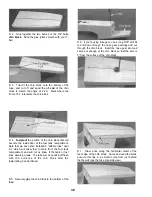
D 4. Make a 1/2" (or slightly larger) hole in the center
of both of the 1/2" x 1-1/2" x 1-1/2" balsa belly fairing
blocks to clear the wing bolts. Center these blocks
over the heads of the nylon bolts and glue them to the
wing bolt plate, in front of the rear belly former. Sand
the top of the blocks flush with the belly fairing sides.
HINT: One way to make a clean 1/2" hole is to
sharpen one end of a 1/2" brass tube in the same
manner as shown in the photo on page 10, and push
and rotate this sharpened tube down through the
block. Another way is to begin by drilling a 1/4" or 3/8"
hole with a conventional drill bit, and then enlarge the
hole with a Dremel sanding drum.
37
Содержание Ultra-Sport 1000
Страница 7: ...7 DIE PATTERNS Use This Drawing To Identify Die Cut Parts...
Страница 57: ...57...
Страница 59: ...2 View Drawing Use This For Planning Your Trim Scheme 59...


