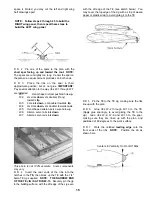
amount protruding on both ends of the wing Using
thin CA, glue the front (beveled) edge of the leading
edge sheeting to the back edge of the leading edge.
Now wet the top surface of the sheeting (if necessary)
to make it bend easier Apply thick CA glue to the top
edge of the ribs and to the front half of the spar Then
immediately bend the sheeting down onto the ribs and
spar Hold the sheeting down with long strips of
masking tape until the glue has set.
D D 15 Using the 3/32" x 3" x 11-1/8" balsa sheets,
glue the top center section sheeting in place as
shown on the plan (Use the scraps trimmed from the
LE sheeting if needed for the aft pieces).
D D 16 From the 3/32" x 3/8" x 36" balsa sticks, cut
and glue cap strips to the top edges of all exposed
ribs, from the TE sheeting to the LE sheeting HINT:
For easier positioning of the cap strips, first mark the
location of each rib on the LE and TE sheeting
D D 17. Remove the wing panel from the building
board Check all glue joints, adding glue as
necessary.
D D 18. Using a razor saw and a sanding block,
carefully cut off and sand all excess sheeting spars,
LE and TE even with W-1 and W-13. Sand the TE
sheeting flush with the TE.
FOR FIXED LANDING GEAR, perform steps 1 9 - 2 2
D D 19 Trial fit the long grooved hardwood LG
block into the notches in ribs W-2, W-3 and W-4 (see
the wing plan for proper positioning) File the notches
if necessary for a good fit. Now use epoxy to securely
glue the block in place.
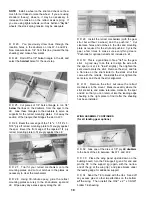
D D 20. Epoxy the 1/2" x 3/4" x 1-1/2" hardwood
block to the LG block and to the 1/8" ply doubter on
rib W-2, as shown on the plan and in the photo Then
epoxy the 1/2" x 3/4" x 1/2" hardwood block to the
other end of the LG block and to the 1/8" ply doubler
on rib W-4.
D D 21 Drill a 3/16" hole down through the grooved
LG block and the 1-1/2" block Line up the drill so you
are drilling straight down through the middle of the 1-
1/2" block.
D D 22 Trial fit the 3/16" diameter main landing
gear wire into the landing gear block at this time Cut
or file the groove and hole in the landing gear block as
necessary for a good fit
FOR RETRACTS, perform steps 23 - 31
NOTE: In the Ultra-Sport 1000 prototype we used
B&D mechanical retracts, and you will see them in the
photographs You may use whatever type of retracts
you prefer, as long as they are of the correct size for
this airplane (see the introductory remarks at the
beginning of this book) If you are using B&D retracts,
it will be necessary to drill them out to accept the 3/16"
wire struts supplied in this kit (see below*) It is also
recommended that you file a "flat" on the 3/16" struts
at the set screw location, to prevent the struts from
turning You should wait until the retracts have been
installed before doing so, to insure proper alignment
(See Step 30).
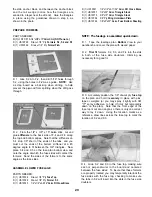
instructions for drilling B&D retracts. Back out the set
screw so it won't interfere with the drill Drill out the
strut hole first with an 11/64" bit, then a 3/16" bit If it
is difficult to insert the strut, re-drill the hole with a #12
(.189") drill bit Stop drilling as soon as you feel the
bit bottom out in the hole. Temporarily install the
gear strut, tighten the setscrew, and check operation.
Due to the larger strut, the setscrew may bind against
the actuator arm and prevent full retraction If this is
the case, you'll have to file a small amount off the top
of the set screw Do this by drilling a 5/32" hole in a
scrap piece of hardwood, screwing the set screw in
with 1/32" protruding, and filing off the top of the set
screw.
NOTE: Most standard wheels have a 5/32" diameter
axle hole, so you'll have to drill the hubs of your
wheels to fit the 3/16" diameter landing gear wire
supplied in this kit Start by using a 3/16" drill bit, but
because the nylon hub material is somewhat flexible, it
may be necessary to use a 13/64" drill bit to get the
hole large enough to allow the wheel to turn freely.
17
Содержание Ultra-Sport 1000
Страница 7: ...7 DIE PATTERNS Use This Drawing To Identify Die Cut Parts...
Страница 57: ...57...
Страница 59: ...2 View Drawing Use This For Planning Your Trim Scheme 59...


