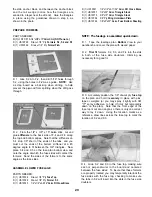
D 3 With the fuselage upside down on a flat surface,
trial fit the wing into the wing saddle You may have to
enlarge the holes in F-2 in one direction or another
(using a round file), and you will probably have to sand
the wing saddle a bit to allow the wing to seat
properly. The wing should be centered, front to back,
in the wing saddle area, with approximately equal
spaces at the LE and TE.
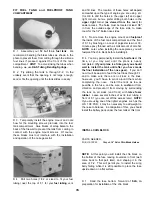
Measurements Must Be Equal
D 4. Carefully align the wing in the saddle as follows:
The wing should now be centered, side to side.
Measure down from the bottom of both tip ribs to the
flat surface If the measurements are not equal (within
1/16"), sand the saddle (and modify the F-2 holes
slightly) until the wing sits level in the saddle Also
measure from the rear corner of each wing tip to the
tail end of the fuselage These measurements must
also agree within 1/16" If not, shift the wing slightly
until they do With the wing in this position you may
now check the wing incidence using an "incidence
meter" or by measuring down to the flat surface from
the center of the leading and trailing edges The
measurements should be the same (zero degrees
incidence) CAUTION: If your flat surface is not
level, you will get erroneous incidence readings' If
you are working on a flat surface that is not level, you
must set the wing incidence the same as your flat
surface.
D 5. After making the necessary corrections to align
the wing, make alignment marks on the wing TE and
the front of F-4 so you may easily re-check the wing
alignment later.
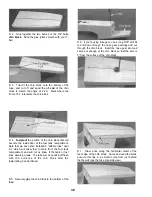
D 6. Holding the wing firmly in place, drill 13/64"
holes at the punch mark locations on the 1/16" ply
wing bolt plate, drilling down through the bolt plate and
through the 3/8" ply hold-down block in the fuselage.
Try to drill straight in, perpendicular to the 1/16" ply
bolt plate IMPORTANT!: Do not allow the wing to
move while drilling!
D 7. Remove the wing and re-drill the holes in the
wing only to 1/4".
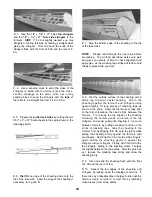
D 8. Use a 1/4-20 tap and a tap wrench to cut
threads in the ply hold-down block in the fuselage.
D 9 Harden the threads in the hold-down block with
thin CA glue, then re-tap the threads after the glue is
completely dry.
D 10 Trial fit the wing to the fuse using the two 1/4-
20 nylon bolts provided You may cut the bolts off to
their proper length, so they protrude about 1/4" below
the hold-down block in the fuselage
D 11. Later you will apply foam wing seating tape or
silicone sealer to the wing saddle To allow space for
this wing cushion material, you may sand the saddle
slightly in the areas where the wing touches the
saddle, to provide a small gap.
34
Содержание Ultra-Sport 1000
Страница 7: ...7 DIE PATTERNS Use This Drawing To Identify Die Cut Parts...
Страница 57: ...57...
Страница 59: ...2 View Drawing Use This For Planning Your Trim Scheme 59...


