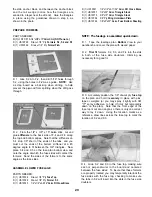
D 5. Add 1/4" balsa triangle along the edges of the
belly f a i r i n g sides to provide e x t r a material for
rounding the corners. Sand the triangles flush with the
sides.
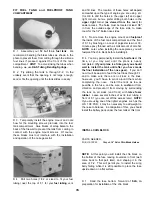
D 6. Remove the wing from the fuse, and using the
1/8" x 3" x 24" balsa sheet, cut and glue pieces of
cross-grain sheeting across the bottom. With a little
careful cutting and fitting of the sheeting in the area of
the wing spar you can minimize the amount of filler
that will be required to finish it off.
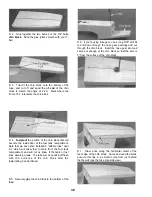
D 7. Now round the corners of the bottom of the
fuselage, the belly fairing and the chin block (forward
to the firewall). Use the drawings of F-2 and F-4 on
the plans as a guide. This is also a good time to get
out the lightweight balsa filler and make nice fillets
between the belly fairing sides and the bottom wing
sheeting.
INSTALL TURTLE DECK
PARTS NEEDED:
D (1) US10F27 1/8" Die-cut Ply Formers F-3A. F-4A and
F-5A
D (1) US1 0F34 1/8" Die-cut Balsa Former F-6A
D (2) US10F11 1/4" x 1/4" x 31" Balsa Top Stringers
D (2) US10F12 1/4" x 1/4" x 21" Balsa Side Stringers
D (2) US1 0F13 3/32" x 3" x 33" Balsa Turtle Deck
Sheeting
D (1) US1 0F14 5/8" x 2-7/8" x 31" Balsa Top Block
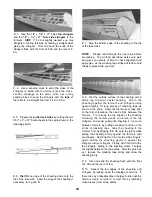
D 1. Trial fit the die-cut 1/8" ply "backrest" (F-3A) to
the fuse top, using the "backrest gauge" (BG) to set it
at the correct angle. Sand the bottom edge of F-3A to
a bevel, to better fit the fuse top. Glue F-3A in place.
NOTE: The gauge is used only for setting the angle
(gluing the gauge in is optional).
D 2. Glue F-4A to the front of F-4.
Glue F-5A to the front of F-5.
Glue F-6A to the front of F-6 (insert the F-6A
tab through the slot in the stab base).
38
Содержание Ultra-Sport 1000
Страница 7: ...7 DIE PATTERNS Use This Drawing To Identify Die Cut Parts...
Страница 57: ...57...
Страница 59: ...2 View Drawing Use This For Planning Your Trim Scheme 59...


