slightly from the photos In those instances you
should assume the plans and written instructions
are correct Also you may notice a slight difference
in length between some of the longer parts and the
plans This is normal and is caused by the plans
expanding and shrinking with the changing moisture
content in the air Do not modify the parts to fit the
plan.
2 You must take time to build straight, true and
strong IMPORTANT - glue should never be
substituted for a good joint Take a little extra time
to get a close fitting joint and glue it properly It will
be stronger neater and much lighter than a bad
joint held together with excess glue
3. You must use a proper R/C radio that is in first
class condition, the correctly- sized engine and
correct components (fuel tank, wheels, etc )
throughout your building process
4 You must properly install all R/C and other
components so that the model operates properly on
the ground and in the air
5 You must test the operation of the model before
the first and each successive flight to insure that all
equipment is operating, and you must make certain
that the model has remained structurally sound Be
sure to check the nylon clevises and horns often,
and replace if they show signs of wear.
6 You must fly the model only with the
competent help of a highly experienced R/C pilot if
you are not already an experienced and
knowledgeable R/C pilot at this time
Note- We, as the kit manufacturer, can provide you
with a top quality kit and great instructions, but
ultimately the quality and flyability of your finished
model depends on how you build it, therefore we
cannot in any way guarantee the performance of
your completed model, and no representations are
expressed or implied as to the performance or
safety of your completed model
Remember: Take your time
and follow directions to end up
with a well-built model that is
light, straight and true.
TYPES OF WOOD
Balsa Basswood Plywood
COMMON ABBREVIATIONS USED IN THIS
BOOK AND ON THE PLANS:
Elev = Elevator
Fuse = Fuselage
LE = Leading Edge (front)
LG = Landing Gear
Lt = Left
Ply = Plywood
Rt = Right
Stab = Stabilizer
TE = Trailing Edge (rear)
"= Inches
ENGLISH/METRIC CONVERSIONS
NOTE All dimensions in this book are given in
inches and fractions of an inch Use the table
below to convert these dimensions to the metric
system, if that is what you are most familiar with
INCHES MILLIMETERS
1" = 25.4mm
7/8" = 22.2mm
3/4" = 19.0mm
5/8" = 15.9mm
1/2" = 12.7mm
3/8" = 9.5mm
1/4" = 6.3mm
3/16" = 4.8mm
1/8" = 3.2mm
3/32" = 2.4mm
5/64" = 2.Omm
1/16" = 1.6mm
1/32" = .08mm
4
Содержание Ultra-Sport 1000
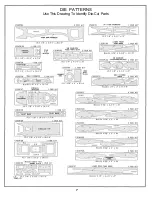
Страница 7: ...7 DIE PATTERNS Use This Drawing To Identify Die Cut Parts...
Страница 57: ...57...
Страница 59: ...2 View Drawing Use This For Planning Your Trim Scheme 59...

