128
For Ethernet Interface Model and shared printer
For E
t
her
n
e
t
I
nt
erface Model a
n
d shared pr
int
er,
t
he pr
inting
i
s performed from a
n
o
t
her
appl
i
ca
ti
o
n
before
u
ser c
ut
s
t
he paper a
n
d paper jam may occ
u
r by draw
ing
t
he paper
int
o
t
he
pr
int
er. Se
t
[Auto Cut]
or c
ut
ma
nu
ally by press
ing
CUT b
utt
o
n
t
o preve
nt
paper jam.
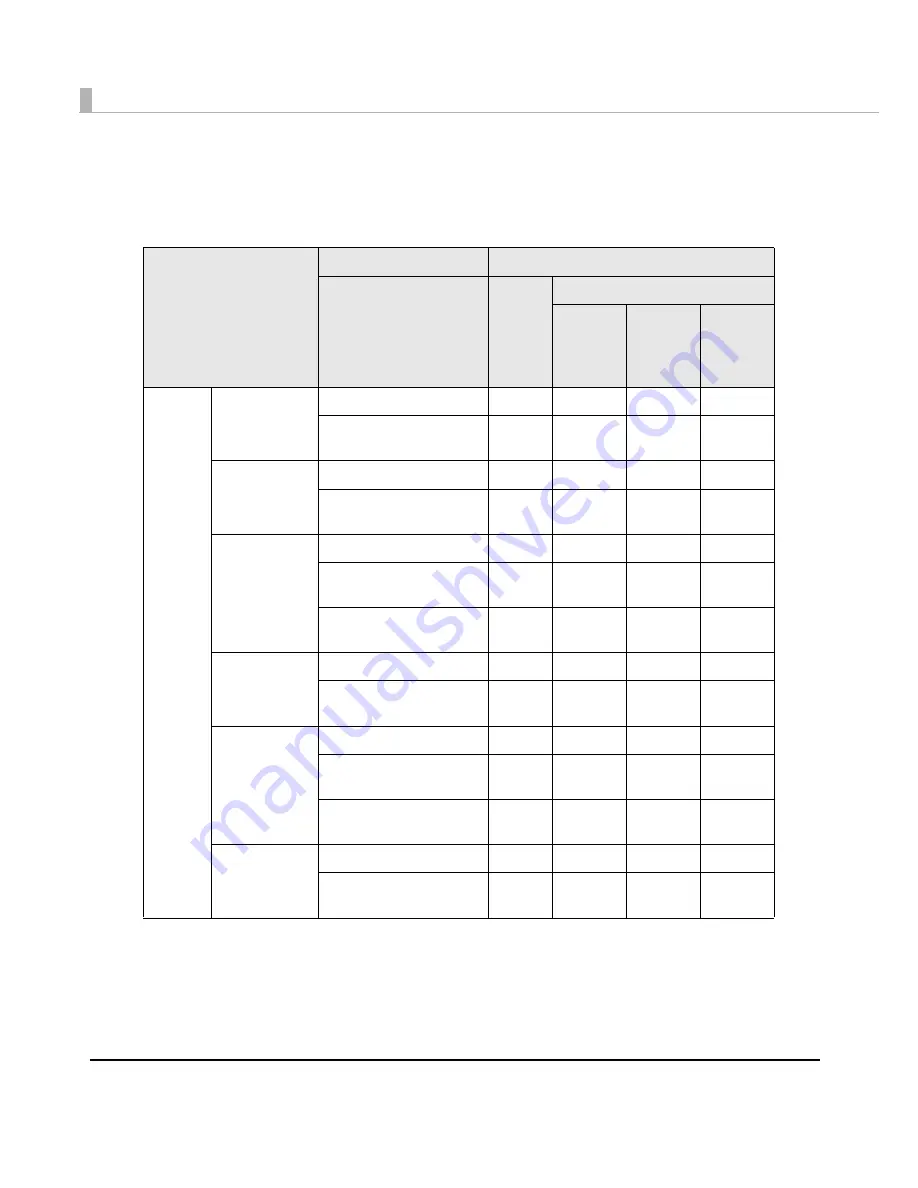
Paper type to use
Printer Diver Settings
Printer Operating
Paper cutting method
Auto
Cut
No Auto Cut
Stop at
the Print
End
Position
Feed To
Cut
Position
Feed To
Peel Off
Position
R o l l
Media
Receipt
Cuts automatically
√
—
—
—
C u t s by p r e s s i n g C U T
button
—
√
√
—
F u l l - p a g e
Label
Cuts automatically
√
—
—
—
C u t b y p r e s s i n g C U T
button
—
√
√
—
Die-cut Label
Cuts automatically
√
—
—
—
Peels the label by user
Backing paper is not cut
*
—
—
—
√
Cuts the backing paper
by pressing CUT button
—
√
√
—
Black Mark
Receipt
Cuts automatically
√
—
—
—
C u t s by p r e s s i n g C U T
button
—
√
√
—
Black Mark
Die-cut Label
Cuts automatically
√
—
—
—
Peels the label by user
Backing paper is not cut
*
—
—
—
√
Cuts the backing paper
by pressing CUT button
—
√
√
—
Black Mark
Receipt
(Wrist Band)
Cuts automatically
√
—
—
—
C u t s by p r e s s i n g C U T
button
—
√
√
—
Содержание SecurColor TM-C3400
Страница 81: ...Chapter 2 Setup 81 2 For fanfold paper 1 Open the fanfold paper cover 2 Remove the remaining paper ...
Страница 86: ...86 7 Lock the paper ejection guide 8 Close the roll paper cover ...
Страница 91: ...Chapter 2 Setup 91 2 For fanfold paper 1 Open the fanfold paper cover 2 Remove the paper left ...
Страница 98: ...98 4 Close the fanfold paper cover This is the end of loading of the fanfold paper ...
Страница 100: ...100 3 Slide the bottom tray to align it with the paper length 4 Lock the paper ejection tray ...
Страница 130: ...130 ...
Страница 155: ...Chapter 4 Handling 155 4 6 Close the fanfold paper cover This is the end of replacing the fanfold paper ...


