INSTALLATION
EATON
Powerware
®
BladeUPS
®
(12 kVA) User's Guide
S
164201649 Rev 3
www.powerware.com
61
NOTE
It is recommended to install the Powerware Hot Sync CAN Bridge Card in
X-Slot Communication Bay 2 (see Figure 32 on page 49), leaving the X-Slot Communication
Bay 1 available for other types of X-Slot cards.
4.
Remove the X-Slot communication bay cover on the UPS and retain
the screws.
5.
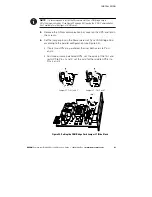
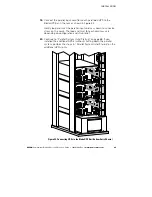
Set the jumper pins on the Powerware Hot Sync CAN Bridge Card
according to the parallel configuration (see Figure 42):
S
If only two UPSs are paralleled, then set both cards to Pins 1
and 2.
S
For three or more paralleled UPSs, set the cards of the first and
last UPS to Pins 1 and 2; set the card for the middle UPS(s) to
Pins 2 and 3.
Jumper J7 - Pins 1 and 2
Jumper J7 - Pins 2 and 3
Figure 42. Setting the CAN Bridge Card Jumper J7 (Side View)
Содержание Powerware BladeUPS
Страница 1: ...Powerware BladeUPS 12 kVA User s Guide ...
Страница 8: ...TABLE OF CONTENTS EATON Powerware BladeUPS 12 kVA User s Guide S 164201649 Rev 3 www powerware com iv ...
Страница 108: ...COMMUNICATION EATON Powerware BladeUPS 12 kVA User s Guide S 164201649 Rev 3 www powerware com 100 ...
Страница 132: ...TROUBLESHOOTING EATON Powerware BladeUPS 12 kVA User s Guide S 164201649 Rev 3 www powerware com 124 ...
Страница 136: ...WARRANTY EATON Powerware BladeUPS 12 kVA User s Guide S 164201649 Rev 3 www powerware com 128 ...
Страница 137: ......
Страница 138: ... 1642016493 164201649 3 ...


