Vigor2912 Series User’s Guide
271
1.
Assume you have a registered domain name from the DDNS provider, say
hostname.dyndns.org
, and an account with username:
test
and password:
test
.
2.
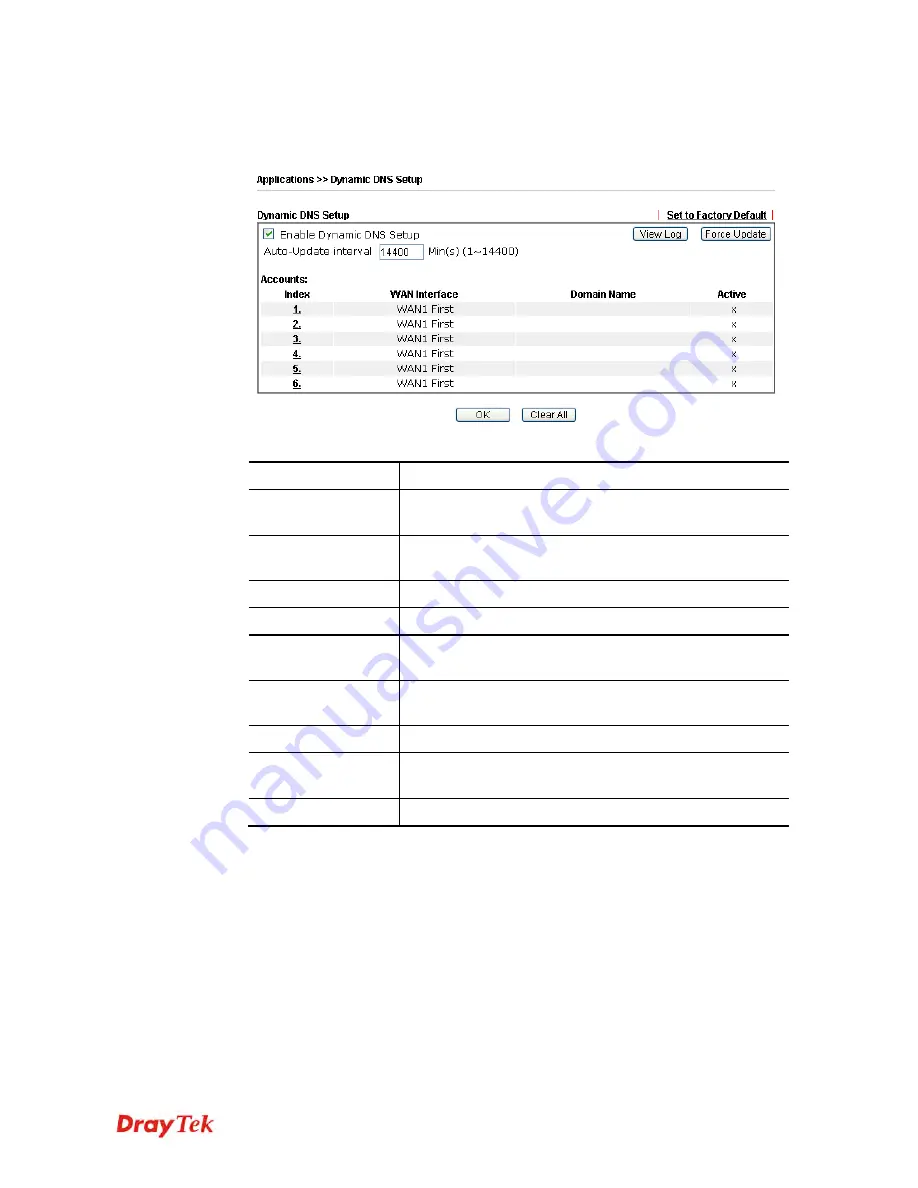
In the DDNS setup menu, check
Enable Dynamic DNS Setup
.
Available settings are explained as follows:
Item Description
Set to Factory
Default
Clear all profiles and recover to factory settings.
Enable Dynamic
DNS Setup
Check this box to enable DDNS function.
View Log
Display DDNS log status.
Force Update
Force the router updates its information to DDNS server.
Auto-Update
interval
Set the time for the router to perform auto update for DDNS
service.
Index
Click the number below Index to access into the setting
page of DDNS setup to set account(s).
WAN Interface
Display the WAN interface used.
Domain Name
Display the domain name that you set on the setting page of
DDNS setup.
Active
Display if this account is active or inactive.
3.
Select Index number 1 to add an account for the router. Check
Enable Dynamic DNS
Account
, and choose correct Service Provider: dyndns.org, type the registered hostname:
hostname
and domain name suffix: dyndns.org in the
Domain Name
block. The
following two blocks should be typed your account Login Name:
test
and Password:
test
.
Содержание Vigor2912 Series
Страница 1: ......
Страница 2: ...Vigor2912 Series User s Guide ii ...
Страница 6: ...Vigor2912 Series User s Guide vi ...
Страница 114: ...Vigor2912 Series User s Guide 104 This page is left blank ...
Страница 188: ...Vigor2912 Series User s Guide 178 5 Click OK to save the settings ...
Страница 221: ...Vigor2912 Series User s Guide 211 After finishing all the settings here please click OK to save the configuration ...
Страница 256: ...Vigor2912 Series User s Guide 246 The items categorized under P2P ...
Страница 377: ...Vigor2912 Series User s Guide 367 ...
Страница 388: ...Vigor2912 Series User s Guide 378 Below shows the successful activation of Web Content Filter ...
Страница 414: ...Vigor2912 Series User s Guide 404 This page is left blank ...