


2-6 General Description
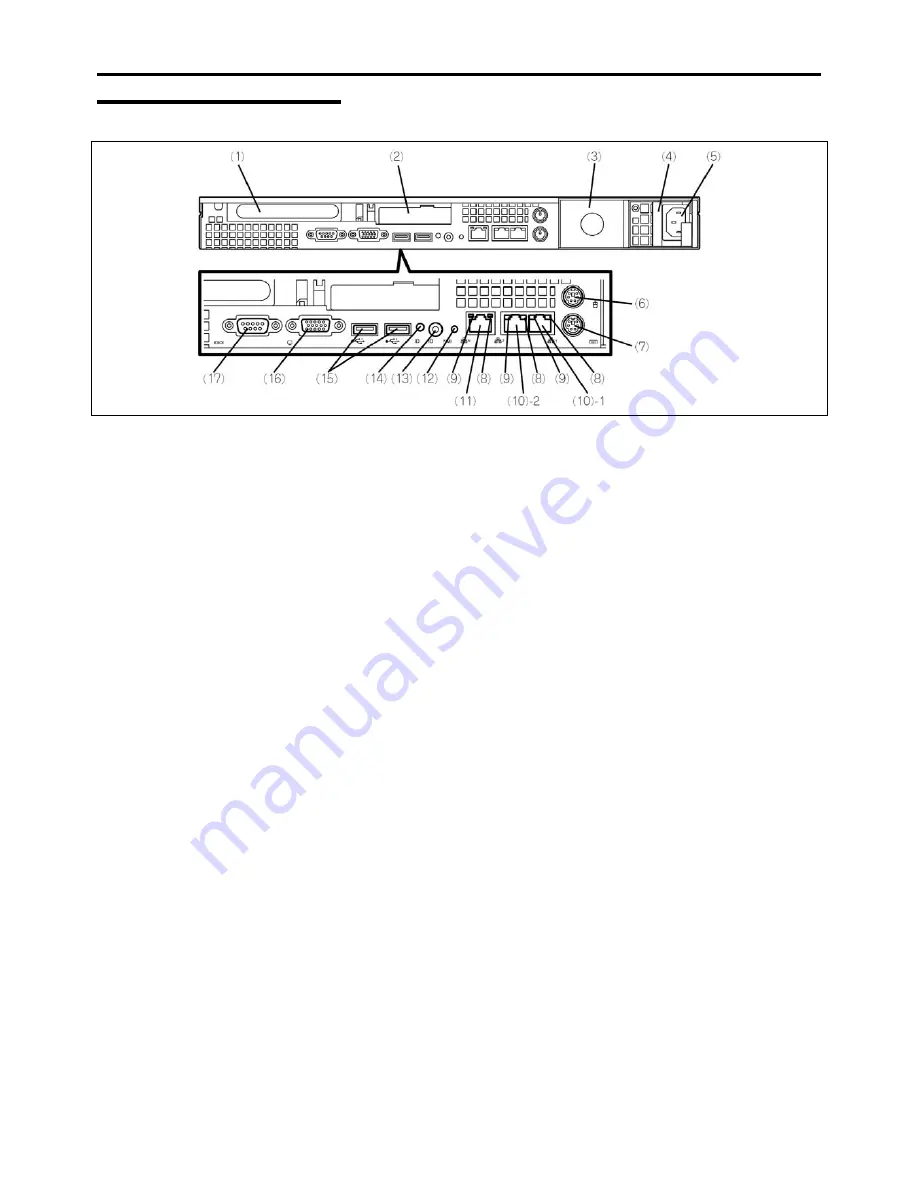
Rear View
1 Full-height PCI board slot
Mount PCI board of the full-height type in the slot.
2 Low-profile PCI board slot
Mount PCI board of the low-profile type into this slot.
NOTE: If an additional LAN board is installed, it is hard to push the catch of the connector
with your finger that is connected to the LAN board. Disconnect the connector
pushing the catch with a standard screwdriver. At this time, be very careful for the
screwdriver not to damage the LAN board.
3 Blank panel (for additional power supply unit)
Install an optional power supply unit in this slot.
4 Power supply unit
Factory-installed power supply unit
5 AC
inlet
Connect the power cord to this socket.
6 Mouse
connector
Connect the mouse to this connector.
7 Keyboard
connector
Connect the keyboard to this connector.
8 LINK/ACT LED (green)
This LED indicates the access status of the LAN.
9 Speed LED (green/amber)
This LED indicates the transmission speed of the LAN.
10 LAN
connectors
Connect network systems on the LAN to the connectors
(1000BASE-T/100BASE-TX/10BASE-T).
The number "1" following the parenthesized number indicates LAN port 1, and the number
"2" indicates LAN port 2.
If [Shared BMC LAN] is set to [Enabled] in BIOS SETUP, the LAN port 2 can be used as
management LAN, and not only as a transmission port. However, it is not recommended for
performance and security reasons, because the LAN port 2 may receive both normal data
and management data.
Содержание NovaScale R440 E2
Страница 1: ...NovaScale R440 E2 User s Guide NOVASCALE REFERENCE 86 A1 46FB 00...
Страница 2: ......
Страница 32: ...1 16 Notes on Using Your Server...
Страница 70: ...2 38 General Description...
Страница 94: ...3 24 Setting Up Your Server This page is intentionally left blank...
Страница 147: ...Configuring Your Server 4 53 Property of Physical Device in the Universal RAID Utility...
Страница 187: ...Configuring Your Server 4 93 6 Click Home at the lower left of the screen to go back to the WebBIOS Top Menu...
Страница 272: ...5 74 Installing the Operating System with Express Setup This page is intentionally left blank...
Страница 281: ...Installing and Using Utilities 6 9 4 Click Parameter File Creator Parameter File Creator appears...
Страница 308: ...7 12 Maintenance This page is intentionally left blank...
Страница 349: ...Troubleshooting 8 41 When you use a local console When you use a remote console 6 Each tool is selected and it starts...
Страница 408: ...9 54 Upgrading Your Server Screws...
Страница 415: ...Upgrading Your Server 9 61 When connecting to the optional RAID controller installed in the low profile slot...
Страница 416: ...9 62 Upgrading Your Server When connecting to the optional RAID controller installed in the full height slot...
Страница 446: ...9 92 Upgrading Your Server This page is intentionally left blank...
Страница 456: ......
Страница 458: ...C 2 IRQ This page is intentionally left blank...
Страница 490: ...D 32 Installing Windows Server 2008 4 Activate Windows The Windows activation is complete...
Страница 494: ......
Страница 544: ...G 2 Using a Client Computer with a CD Drive This page is intentionally left blank...
Страница 548: ...H 4 Product Configuration Record Table This page is intentionally left blank...
Страница 551: ......
Страница 552: ...BULL CEDOC 357 AVENUE PATTON B P 20845 49008 ANGERS CEDEX 01 FRANCE REFERENCE 86 A1 46FB 00...