


112
•
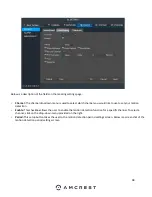
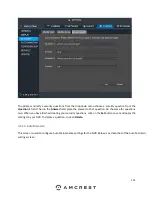
Time Zone: This dropdown box allows the user to specify a time zone for the NVR to use.
DST: This checkbox allows the user to activate DST for the system.
•
DST Type: This field allows the user to pick whether DST starts on a specific day of the week, or on a specified.
•
Start Time: This field allows the user to enter a start date and time for DST to begin.
•
End Time: This field allows the user to enter an end date and time for DST to end on.
•
NTP: NTP stands for Network Time Protocol. This checkbox allows the user to enable the use of an NST server to
synchronize the date and time settings on the NVR.
•
Server IP: This field allows the user to set the NTP server IP address. Clicking the Manual Update button pulls a time
update from the server.
•
Port: This field allows the user to set the NTP server port number.
•
Interval: This field allows the user to set the NTP synchronization interval. This number determines how often the
NVR queries the NTP server to get accurate date and time information. This value can be between 0 and 60 minutes.
To revert to default settings, click the Default button near the bottom left hand corner. To save settings, click the
save button near the bottom right hand corner. To cancel any modifications, click the Cancel button near the bottom
right hand corner. To apply the settings, click the Apply button near the bottom right hand corner.
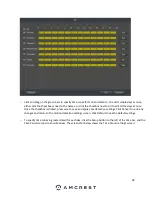
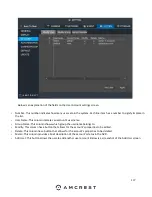
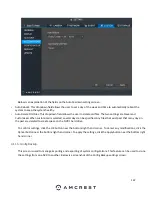
4.9.2. Holiday
This screen displays the holiday settings for the NVR. Below is a screenshot of the Holiday settings screen:
Содержание NV21 Series
Страница 1: ...Network Video Recorder User Manual Version 1 0 4 Revised November 21st 2018 ...
Страница 29: ...29 Now you can go to the smart add interface Click smart add button you can see device enables DHCP function ...
Страница 201: ...201 Figure 5 39 5 9 2 7 Email The email interface is shown as in Figure 5 40 ...
Страница 214: ...214 Figure 5 58 ...
Страница 215: ...215 Figure 5 59 Figure 5 60 Figure 5 61 Figure 5 62 Please refer to the following sheet for detailed information ...
Страница 227: ...227 Figure 5 77 Figure 5 78 ...
Страница 245: ...245 Figure 5 102 5 10 2 Log Here you can view system log See Figure 5 103 Figure 5 103 ...
Страница 257: ...257 3 You will see the Registration Successful message and a confirmation email will be sent to you ...