Deployment Guide
99
R
ACK
M
OUNTING
THE
H
IGH
C
APACITY
H
IVE
M
ANAGER
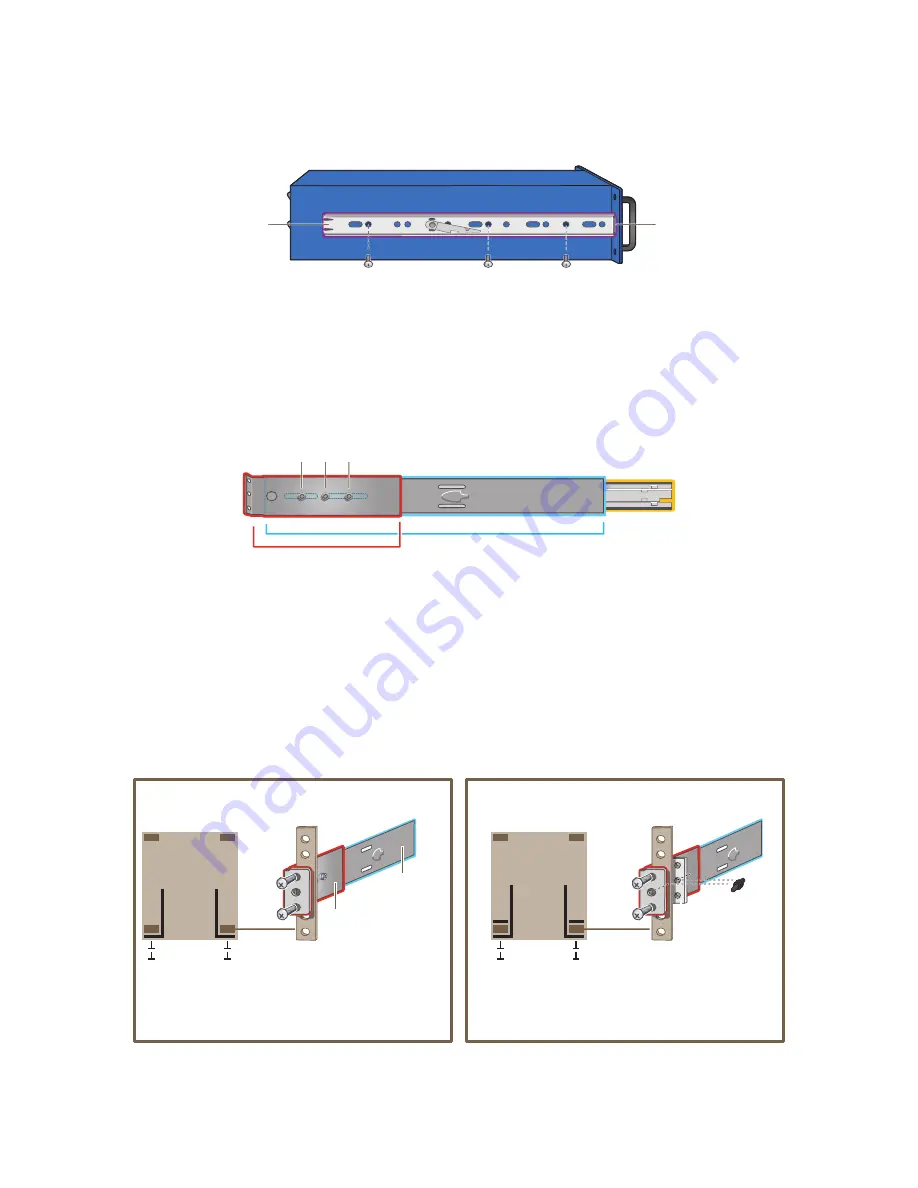
Figure 3
Attaching the chassis rail to the HiveManager
3. Secure the other chassis rail to the other side of the HiveManager.
4. Use three slot-head screws to attach the rear mounting bracket to the outer slide. Insert the screws through the
rounded slots in the outer slide into the threaded holes in the bracket and tighten them as shown in
Figure 4
.
Figure 4
Attaching the rear bracket to the outer slide
5. Use the remaining three slot-head screws to attach the other rear mounting bracket to the other outer slide.
6. Fasten the rear mounting brackets—and the slides attached to them—to the rear equipment rack rails.
Depending on the type of holes in the equipment rack, use one of the following methods:
•
For tapped (threaded) holes, use two screws to fasten the brackets directly to the rack rails. Use the
cross-head screws (with 10-32 threads) if they fit the holes in the rack.
•
For round holes, use the cross-head screws to fasten the brackets through the holes in the rack rails to the
bar nuts. You can use the locator pins to help keep the bar nuts aligned to the holes. See
Figure 5
.
Figure 5
Fastening the rear mounting brackets to the rack rails
Place the slide stop
against the front
mounting bracket.
Chassis Rail
cross head machine screws with 10 32 threads
Outer Slide
Inner Slide
Use three slot head screws to secure one
of the rear brackets to the outer slide.
Rear Bracket
Rear rail
with round holes
Bar Nut
Locator Pin
For equipment racks with round holes, place a bar nut
on the opposite side of the rear rail from the bracket.
(You can use a locator pin to help keep the nut bar
aligned with the holes.) Then screw the bracket
through the rail into the threaded holes in the bar nut.
Rear Bracket
Rear rail
with tapped holes
Outer Slide
Equipment Rack
(bird’s eye view)
Front
Rear
For equipment racks with tapped holes, screw the rear
brackets to the rear rack rails directly. In this case, you
do not need to use the bar nuts and locator pins that
are provided in the rack mounting kit.
Screws
Brackets
Содержание access point
Страница 1: ...Aerohive Deployment Guide ...
Страница 7: ...HiveAP Compliance Information 6 Aerohive ...
Страница 13: ...Contents 12 Aerohive ...
Страница 37: ...Chapter 2 The HiveAP 20 ag Platform 36 Aerohive ...
Страница 71: ...Chapter 4 The HiveAP 340 Platform 70 Aerohive ...
Страница 81: ...Chapter 5 The HiveAP 320 Platform 80 Aerohive ...
Страница 105: ...Chapter 8 The High Capacity HiveManager Platform 104 Aerohive ...
Страница 123: ...Chapter 10 Using HiveManager 122 Aerohive ...
Страница 209: ...Chapter 14 Deployment Examples CLI 208 Aerohive ...
Страница 217: ...Appenidix A Country Codes 216 Aerohive ...


