


Chapter 8 LAN Setup
P-2602HWLNI User’s Guide
126
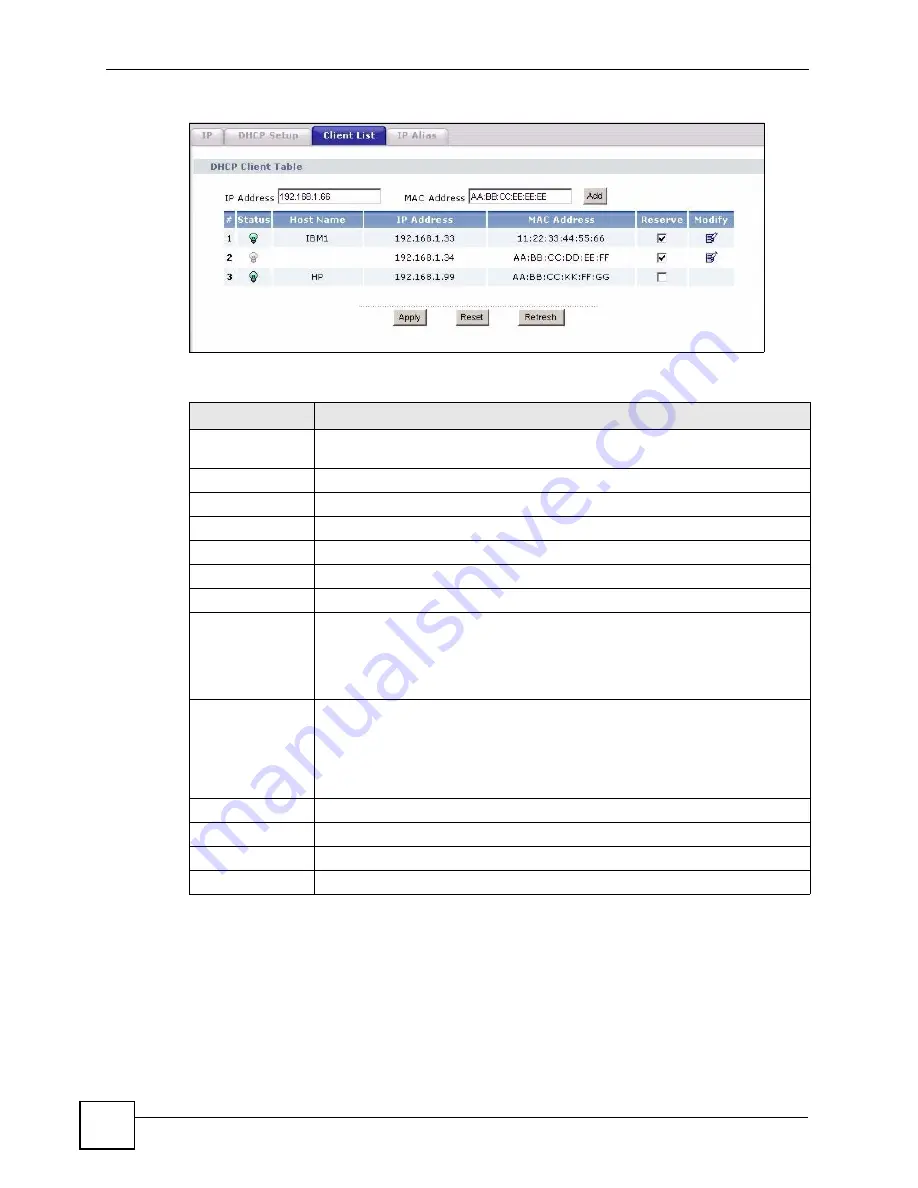
Figure 63
LAN Client List
The following table describes the labels in this screen.
8.7 LAN IP Alias
IP alias allows you to partition a physical network into different logical networks over the
same Ethernet interface. The ZyXEL Device supports three logical LAN interfaces via its
single physical Ethernet interface with the ZyXEL Device itself as the gateway for each LAN
network.
Table 32
LAN Client List
LABEL
DESCRIPTION
IP Address
Enter the IP address that you want to assign to the computer on your LAN with
the MAC address that you will also specify.
MAC Address
Enter the MAC address of a computer on your LAN.
Add
Click
Add
to add a static DHCP entry.
#
This is the index number of the static IP table entry (row).
Status
This field displays whether the client is connected to the ZyXEL Device.
Host Name
This field displays the computer host name.
IP Address
This field displays the IP address relative to the # field listed above.
MAC Address
The MAC (Media Access Control) or Ethernet address on a LAN (Local Area
Network) is unique to your computer (six pairs of hexadecimal notation).
A network interface card such as an Ethernet adapter has a hardwired address
that is assigned at the factory. This address follows an industry standard that
ensures no other adapter has a similar address.
Reserve
Select the check box in the heading row to automatically select all check boxes or
select the check box(es) in each entry to have the ZyXEL Device always assign
the selected entry(ies)’s IP address(es) to the corresponding MAC address(es)
(and host name(s)). You can select up to 128 entries in this table. After you click
Apply
, the MAC address and IP address also display in the
LAN Static DHCP
screen (where you can edit them).
Modify
Click the modify icon to have the IP address field editable and change it.
Apply
Click
Apply
to save your changes back to the ZyXEL Device.
Cancel
Click
Cancel
to begin configuring this screen afresh.
Refresh
Click
Refresh
to reload the DHCP table.
Summary of Contents for P-2602HWLNI
Page 2: ......
Page 7: ...Safety Warnings P 2602HWLNI User s Guide 7...
Page 8: ...Safety Warnings P 2602HWLNI User s Guide 8...
Page 24: ...Table of Contents P 2602HWLNI User s Guide 24...
Page 32: ...List of Figures P 2602HWLNI User s Guide 32...
Page 38: ...List of Tables P 2602HWLNI User s Guide 38...
Page 39: ...39 PART I Introduction Introducing the ZyXEL Device 41 Introducing the Web Configurator 49...
Page 40: ...40...
Page 60: ...Chapter 2 Introducing the Web Configurator P 2602HWLNI User s Guide 60...
Page 62: ...62...
Page 86: ...Chapter 5 Bandwidth Management Wizard P 2602HWLNI User s Guide 86...
Page 98: ...Chapter 6 Status Screens P 2602HWLNI User s Guide 98...
Page 100: ...100...
Page 154: ...Chapter 9 Wireless LAN P 2602HWLNI User s Guide 154...
Page 166: ...Chapter 10 Network Address Translation NAT Screens P 2602HWLNI User s Guide 166...
Page 167: ...167 PART IV VoIP Voice 169 VoIP Trunking 211 Phone Usage 227...
Page 168: ...168...
Page 226: ...Chapter 12 VoIP Trunking P 2602HWLNI User s Guide 226...
Page 230: ...Chapter 13 Phone Usage P 2602HWLNI User s Guide 230...
Page 232: ...232...
Page 264: ...Chapter 15 Firewall Configuration P 2602HWLNI User s Guide 264...
Page 268: ...Chapter 16 Content Filtering P 2602HWLNI User s Guide 268...
Page 274: ...Chapter 17 Introduction to IPSec P 2602HWLNI User s Guide 274...
Page 309: ...Chapter 19 Certificates P 2602HWLNI User s Guide 309 Figure 173 My Certificate Details...
Page 320: ...Chapter 19 Certificates P 2602HWLNI User s Guide 320 Figure 181 Trusted Remote Host Details...
Page 326: ...326...
Page 330: ...Chapter 20 Static Route P 2602HWLNI User s Guide 330...
Page 338: ...Chapter 21 Bandwidth Management P 2602HWLNI User s Guide 338...
Page 342: ...Chapter 22 Dynamic DNS Setup P 2602HWLNI User s Guide 342...
Page 360: ...Chapter 23 Remote Management Configuration P 2602HWLNI User s Guide 360...
Page 372: ...Chapter 24 Universal Plug and Play UPnP P 2602HWLNI User s Guide 372...
Page 374: ...374...
Page 380: ...Chapter 25 System P 2602HWLNI User s Guide 380...
Page 406: ...Chapter 28 Troubleshooting P 2602HWLNI User s Guide 406...
Page 422: ...Chapter 30 Diagnostic P 2602HWLNI User s Guide 422...
Page 432: ...Chapter 31 Product Specifications P 2602HWLNI User s Guide 432...
Page 434: ...434...
Page 446: ...Appendix A Setting up Your Computer s IP Address P 2602HWLNI User s Guide 446...
Page 482: ...Appendix F Legal Information P 2602HWLNI User s Guide 482...
Page 488: ...Appendix G Customer Support P 2602HWLNI User s Guide 488...