background image

Humphrey Field Analyzer II-

i

 series User Manual

2660021145640 A

Networking

14-31

3

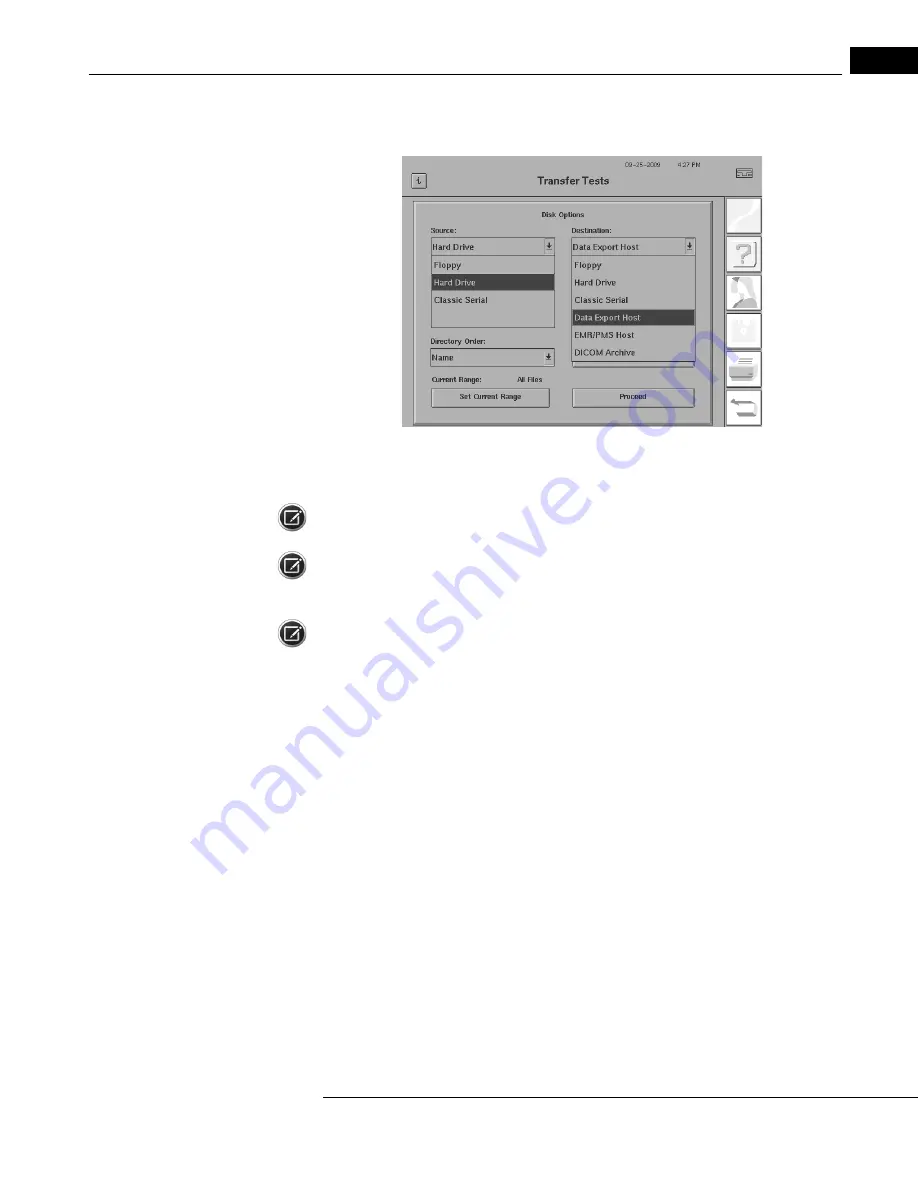
Select your source of test data from the Source drop-down box (

Figure 14.34

) as HARD DRIVE 

or FLOPPY.

Figure 14.34 Transfer Tests Screen (with drop-down boxes open)

4

From the Destination drop-down box (

Figure 14.34

) select DATA EXPORT HOST.

Note: You can think of Data Export Host as the name or destination of your network file server.

Note: If “Enable Patient Folders” was 

not

 selected on the Data Export screen, all files will be placed 

into one common file folder. If it 

was

 selected, each file will be transferred into a specifically named 

file folder for each unique patient (i.e., all files for Williams, Bob will go into his own folder).

Note: The DATA EXPORT HOST or ERM/PMS HOST options in the Destination drop-down box are 
only available in the listing if you have licensed the HFA-NET Pro networking software on your HFA 
II-

i

. The DICOM ARCHIVE option in the Destination drop-down box is only available in the listing if 

you have licensed the DICOM Gateway 2.0 software on your HFA II-

i

. Otherwise, these options will 

not appear in the Destination drop-down box.

Summary of Contents for Humphrey II-i series

Page 1: ...User Manual Humphrey Field Analyzer II i series System Software Version 5 1...

Page 2: ...Windows Server are registered trademarks of Microsoft Corporation in the United States and or other countries Bonjour the Bonjour logo and the Bonjour symbol are trademarks of Apple Computer Inc HP L...

Page 3: ...ory Equipment 1 16 About Visual Fields 1 17 The Humphrey Advantage 1 20 System Components 1 23 Additional Components 1 25 System Assembly 1 31 2 General Operation 2 1 General Information 2 1 Using the...

Page 4: ...ysis GPA 8 1 Introduction to GPA 8 2 Overview of GPA Reports 8 4 Understanding GPA Reports 8 10 Establishing the GPA Baseline 8 12 Clinical Interpretation of GPA Results 8 13 GPA Case Studies 8 15 How...

Page 5: ...c Tests 13 39 Printing Kinetic Tests 13 43 Designing a Custom Kinetic Test Pattern 13 48 Creating the Aphakic SSA Disability Test 13 56 14 Networking 14 1 Chapter Organization 14 2 Network Configurati...

Page 6: ...low E 5 Blue Yellow Specifications E 6 F Test Patterns F 1 Screening Test Patterns F 1 Threshold Test Patterns F 4 Specialty Tests Patterns F 6 G EasyConnect RCT 1 0 G 1 Overview G 1 Before You Run th...

Page 7: ...File I 25 Backing Up and Restoring Your HFA Network Configuration I 27 Network Diagnostics I 28 Network Troubleshooting Error Messages I 31 DICOM Networking Error Messages I 37 Networking Terminology...

Page 8: ...Humphrey Field Analyzer II i series User Manual 2660021145640 A vi...

Page 9: ...y of important instrument features After reading this chapter you will be familiar with the importance of visual field testing general principles of perimetry unique features of the HFA II i installat...

Page 10: ...t s hand and fingers or similar ability are also required to press the Patient Response button Application The Humphrey Field Analyzer II i is designed for continuous use although it is expected that...

Page 11: ...t and initiate a test Review and save a test or try again Generate an analysis report Review the analysis report for completeness Save print or export an analysis report Archive data Power off the ins...

Page 12: ...een images Model Differentiation This guide contains instructions for Models 720i 740i 745i and 750i Although much of the information is relevant to all models some information applies only to particu...

Page 13: ...row Grayed out menu options or buttons are not available Electronic User Manual Access The HFA II i User Manual in Acrobat PDF format for use on a computer is on the HFA II i User Documentation CD inc...

Page 14: ...Authorized European Community Representative Serial number Catalog number part number Model number Patent System Software USB Flash Drive Calibration Software USB Flash Drive GPA Sample Data USB Flash...

Page 15: ...1 7 Additional symbols appearing on the HFA II i Power On Power Off Projector Lamp Brightness Air Intake Filter Serial RS 232 Communication Port VGA Video Port Printer Keyboard Mouse USB Port Network...

Page 16: ...in accordance with the relevant national regulations Disposal of the Product within the European Union EU In accordance with applicable EU guidelines at the time at which the product was brought onto...

Page 17: ...iss Meditec schedules one free on site installation appointment after instrument delivery System installation and operator training require approximately one half business day Care in Handling Use ext...

Page 18: ...power fuses and keyboard there are no user replaceable parts in the instrument For the replacement of any component accessory or peripheral except fuses or the keyboard call Carl Zeiss Meditec Custome...

Page 19: ...d damage to sensitive components Do NOT connect or disconnect cables while power is on Do NOT place any objects on top of the instrument Do NOT place any container holding liquid near the instrument U...

Page 20: ...y to operator and patient CAUTION The appliance coupler shown on the left is the main disconnect device of the instrument Position the instrument in such a way to have easy access to disconnect the ap...

Page 21: ...y for its internal function Therefore its RF emissions are very low and are not likely to cause any interference in nearby electronic equipment RF emissions CISPR 11 Class A The HFA II i is suitable f...

Page 22: ...2 kV common mode Mains power quality should be that of a typical commercial or hospital environment Voltage dips short interruptions and voltage variations on power supply input lines IEC 61000 4 11...

Page 23: ...level in each frequency range b Interference may occur in the vicinity of equipment marked with the following symbol Radiated RF IEC 61000 4 3 3 V m 80 MHz to 2 5 GHz 3 V m Note 1 At 80 MHz and 800 M...

Page 24: ...icable to the frequency of the transmitter where P is the maximum output power rating of the transmitter in watts W according to the transmitter manufacturer Note 1 At 80 MHz and 800 MHz the higher fr...

Page 25: ...Resolution is the ability to identify discrete forms letters numbers symbols and is commonly measured with the visual acuity test Resolution rapidly diminishes with increasing distance from the fovea...

Page 26: ...ard the periphery of the retina It is easy to see why the visual field is often expressed as a hill of vision in a sea of darkness Blind Spot Fovea Figure 1 3 The Normal Hill of Vision Several factors...

Page 27: ...d the center from several directions and the operator marks the location at which the patient first detects the stimulus threshold point Kinetic test results can only be reliably related to specific p...

Page 28: ...tant for wheelchair bound patients The patient response button is easy to operate especially for patients who have limited use of their hands for instance patients with arthritis The uniquely shaped b...

Page 29: ...o Chapter 8 Guided Progression Analysis GPA for further details SWAP Blue Yellow Testing Models 745i and 750i Blue Yellow perimetry is also known as Short Wavelength Automated Perimetry or SWAP availa...

Page 30: ...k Risks of Internet Connectivity CAUTION When connected to the Internet the HFA instrument may be vulnerable to serious security risks including viruses and worms that could disable your system or adv...

Page 31: ...a self diagnostic checkup In the event that the internal computer detects a problem a message will appear on the start up screen Call Carl Zeiss Meditec Customer Service if necessary Should you need...

Page 32: ...panel Cables emerge through opening here Introduction Instrument Setup Humphrey Field Analyzer II i series User Manual 2660021145640 A 1 24 Figure 1 5 The HFA II i Rear View Blue Yellow visor handle M...

Page 33: ...You can designate the printer type to be used with your instrument The choices are Printrex HP LaserJet HP DeskJet and Shared see Printer on page 2 11 There are two ways to print from the HFA through...

Page 34: ...urn on power to the table Turn on power to the Printrex printer 4 Turn on power to the HFA II i 5 From the System Setup screen select PRINTREX from the PRINTER drop down box See Setting Up Printing on...

Page 35: ...ected to the HFA II i you must remove all of them and then insert the new one for it to be available for use CAUTION Only remove a USB storage device or USB floppy drive when it is not reading or writ...

Page 36: ...for further information regarding use of the external input devices External VGA Monitor Your HFA II i allows you to connect an external VGA monitor This can be very useful for training purposes where...

Page 37: ...ed On the rear of the HFA II i a diagram next to the cable connections panel helps to identify each port External input devices such as the glidepad trackball mouse and the keyboard require a PS 2 sty...

Page 38: ...r Parallel Printer USB Ports VGA USB Flash Drives Holder Enlarged View of Cable Connections Panel and Label on Rear of HFA II i Figure 1 9 Rear View of the HFA II i with Panel Removed Serial Data Tran...

Page 39: ...erside of table 3 Connect power cord from back of HFA II i to power outlet on underside of table 4 Attach PS 2 splitter adapter and then keyboard glidepad or mouse to connectors on adapter if desired...

Page 40: ...Introduction Instrument Setup Humphrey Field Analyzer II i series User Manual 2660021145640 A 1 32...

Page 41: ...the Main Menu screen to select tests personalizing printouts with the name of your practice setting the internal clock and calendar customizing the test buttons displayed on the Main Menu screen usin...

Page 42: ...ay appear stacked and overlapping in the upper right corner Touching the top message collapses it revealing the previous message The Screen Body The Screen Body comprises the largest part of every scr...

Page 43: ...ome cases pressing the UNDO icon will appear to take you back two screens This occurs when the previous screen is a pop up window The UNDO icon is not available on the Main Menu screen The Information...

Page 44: ...reen the HFA II i is activated when your finger is removed from the button you select Be careful not to pound or press too hard against the touch screen A light touch works best If you have difficulty...

Page 45: ...e current selection is visible to the left of the arrow To open the menu and reveal the options touch the current selection To change the selection touch any item on the drop down menu The menu will c...

Page 46: ...press the PAGE DOWN key on the external keyboard if you wish to change the setting on a drop down list with the external keyboard This applies to all of the fields on the Parameter Setup screens the...

Page 47: ...n box indicating that it has been selected This procedure is identical to selecting menu items on many popular computer programs Note The cursor may not always be visible To locate the cursor either m...

Page 48: ...er each item selected will have a check mark next to it To deselect a chosen item with your finger just touch the item you wish to deselect The check mark next to the item will disappear For the glide...

Page 49: ...sses the temporary memory storing the results from the last right and left eye tests performed When the HFA II i is first powered on this button appears ghosted until a test is run This temporary memo...

Page 50: ...in that language automatically The original language must be re selected in order to be reactivated Head Tracking Model 750i only When Head Tracking is turned ON the instrument moves the chin rest dur...

Page 51: ...se of the Save Transmit Option screen are provided beginning with Setting the Save Transmit Options on page 2 17 VA Visual Acuity Format Select 20 20 Snellen 6 6 Metric or 1 0 Decimal as the visual ac...

Page 52: ...py disk or the EMR PMS Host With the DICOM Gateway 2 0 software licensed DICOM Archive also becomes an option You also can print a hard copy of the file as a part of the process of exporting it If you...

Page 53: ...p This button allows you to access additional System Setup functions that are found on the Additional Setup screen See Additional Setup on page 2 30 Accessing the System Setup Screen 1From the Main Me...

Page 54: ...e the language or CANCEL to stay in the current language Accessing Head Tracking Model 750i only 1Start at the System Setup screen Select the Head Tracking drop down menu 2Choose either ON or OFF Note...

Page 55: ...ng has been initialized successfully and the trial lens holder is in the Up position For additional information see Vertex Monitor Model 750i on page 5 6 Setting the Time and Date 1Start at the System...

Page 56: ...e saved to a USB storage device as a text file which can be read on a computer 1 Start at the System Setup screen Select PRINT SAVE SYSTEM LOG 2 Insert a USB storage device into a USB port on the HFA...

Page 57: ...nserted into a USB port at the time the test is completed You also have the option to link two HFA II i instruments together via serial cable with the proper settings See How to Transfer Tests from On...

Page 58: ...ime the test ends Save and Transmit Saves your completed exam to the hard drive and transmits the exam data at the end of a test to the Transfer Destination you specify in Step 3 This will also save y...

Page 59: ...box On a licensed HFA II i this option allows you to export patient data test data and exam printouts to your network file server the Data Export Host via ethernet cable EMR PMS Host This option is on...

Page 60: ...al information patient data and test results to a network file server XML and Image Files This choice will only appear if you have HFA NET Pro or XML Data Export software licensed on your HFA II i Oth...

Page 61: ...ED on the Patient Data 1 screen or saving a test if a patient has not been added or recalled since the HFA has been turned on the USB storage device previously selected for the Save to USB function ha...

Page 62: ...tional on page 2 23 Refer to Printer on page 2 11 for additional information Set Default GPA Print Options 2From the System Setup screen select the PRINT SETUP button to open the Print Setup screen th...

Page 63: ...location manually or BROWSE FOR SHARED Printer to search the directories of the network computer for the shared printer that you wish to use To enter a shared printer manually 1 When you select ENTER...

Page 64: ...it via the network EXPORT IMAGE FILE AND PRINT if you wish to print both a hard copy paper printout and export an image file via the network 14If you selected ASK BEFORE PRINT EXPORT IMAGE FILE or EX...

Page 65: ...ge Select an image compression in the IMAGE COMPRESSION drop down box You can select PACKBITS or LZW If you selected PDF DOCUMENT the only compression available is ZIP 18If you are using an EMR PMS Sy...

Page 66: ...Select PERSONALIZED ID 2Select the line button where you wish to enter text 3Enter the desired text maximum of 40 characters per line 4Repeat steps 2 3 for other lines 5Press DONE Note This informati...

Page 67: ...ce between buttons If you wish to have additional customized buttons you will need to delete some of the standard buttons Though some tests have been removed from the Main Menu the tests can still be...

Page 68: ...page 2 26 to see an example of a Main Menu screen displaying personalized test buttons with additional text Note The Humphrey test pattern name Central 24 2 C 40 Screening etc cannot be altered 8 Repe...

Page 69: ...buttons will appear blank on the Main Menu screen as shown however they will be marked Test Position Now Blank on the Alter Main Menu screen Note Any test you remove from the Main Menu screen still ca...

Page 70: ...are cited below Figure 2 9 Additional Setup Screen Simulation You use this button to demonstrate and verify proper software function Press the button to change between ON and OFF If a test runs while...

Page 71: ...change the original Main Menu configuration It also replaces all custom tests in the Custom and Kinetic test libraries Clean Up Hard Disk Database This feature deletes files containing patient data w...

Page 72: ...n to System Setup This button returns you to the main System Setup screen Help Screens The HFA II i is equipped with help screens to assist you with a number of topics concerning the instrument s oper...

Page 73: ...LP icon you will return to the same End of Test screen when you press DONE on the Help Topics screen Consult this User Manual for additional information on the subject of interest The following is the...

Page 74: ...General Operation Humphrey Field Analyzer II i series User Manual 2660021145640 A 2 34...

Page 75: ...luded A complete listing of available tests and their applications The proper use of trial lenses Patient testing instructions Hints on positioning the patient comfortably Selecting the Test Pattern a...

Page 76: ...st buttons that are preset with the most commonly used tests However you can change them to suit your clinical needs See Altering the Main Menu Screen on page 2 26 1From the Main Menu screen choose a...

Page 77: ...ST LIBRARY 2Select the test type Choose from SCREENING THRESHOLD KINETIC SPECIALTY or CUSTOM In this example SCREENING is chosen 3Select the test pattern There are many test patterns from which to cho...

Page 78: ...Specialty tests are specially designed screening tests for specific purposes See Table 3 4 for details about the Specialty tests Models 740i 745i and 750i allow you to create and store your own Custom...

Page 79: ...urological Full Field 120 55 degrees 120 points General retinal glaucoma neurological Full Field 135 87 degrees 135 points 87 degrees temporally Full Field Screening Full Field 246a 60 degrees 246 poi...

Page 80: ...ften refer to Altering the Main Menu Screen on page 2 26 for information on how to place the test on the Main Menu with the 10 dB stimulus permanently set The Full Field tests are run in two parts fir...

Page 81: ...10 dB These settings have been standardized by international agreement and may not be altered by the user You may only change the test speed Refer to Chapter 5 for special testing instructions Enterin...

Page 82: ...can use any character found on your keyboard Pressing the CAPS key will allow you to switch between upper and lower case letters Press ENTER You will automatically be returned to the Patient Data 1 sc...

Page 83: ...r in your EMR PMS DICOM appli cation 4Input a total of up to 60 characters and spaces for at least one of the name fields using the pop up keyboard Pressing the CAPS key will allow you to switch betwe...

Page 84: ...recommended to only change the gender on the EMR PMS DICOM system and not on the HFA to avoid possible patient conflicts This is because if the gender is changed on the HFA a new patient could be crea...

Page 85: ...curately The HFA II i will automatically calculate the proper trial lens prescriptions for the patient or you can input any other trial lens selection manually For whichever method chosen the trial le...

Page 86: ...sabled when recalling patients from any source 4Enter the patient s distance sphere correction Always remember to enter a plus or minus as the first character Press ENTER If the patient has no sphere...

Page 87: ...the Patient Data 1 screen Note For guidelines on selecting the proper trial lens for manual input refer to Using Trial Lenses on page 3 20 and Examples of Trial Lens Correction on page 3 21 Clearing...

Page 88: ...Gateway 2 0 on page 14 48 If you have purchased and registered DICOM Gateway 2 0 you can also transfer patient information from a DICOM Archive See Recall Patients View or Print Tests from a DICOM Arc...

Page 89: ...hange Patient Data for All Tests function is launched Select a field to edit After completing entry of the selected field the keypad closes but the Change Patient Data dialog remains with your entry d...

Page 90: ...t Data 2 Screen The Patient Data 2 screen contains diagnostic data fields When using the external keyboard to enter data press the TAB key to move to the next data field The values you enter for visua...

Page 91: ...racters 0 to 14 5 a decimal point counts as one character from the pop up keypad then ENTER 3Repeat Steps 1 2 for the other eye The pupil diameter value will also appear on the printout Note If you ar...

Page 92: ...he pop up menu Press ENTER 6Repeat Steps 4 5 for the other eye The visual acuity measurement will also appear on the printout Entering Intraocular Pressure IOP 1From the Patient Data 2 screen choose I...

Page 93: ...enter a VERTICAL C D When you have finished entering data on the Patient Data 2 screen and are ready to test choose PROCEED This takes you to the test screen where you can set test parameters if desi...

Page 94: ...rly through the trial lens before beginning testing Young myopes may need additional minus power if the target appears blurry to them prior to beginning testing Many 30 40 year olds may not need the f...

Page 95: ...tion The following are examples of trial lens corrections using Table 3 5 for hyperopic or emmetropic patients or Table 3 6 for myopic patients Example A Emmetropic For an emmetropic plano 70 year old...

Page 96: ...he trial lens must be removed for the peripheral portion of any Full Field test A trial lens is not used for either Superior Field screening test or any Peripheral threshold or screening test Note If...

Page 97: ...ens in the slot farthest away from the patient and align the axis 3Place the sphere lens in the slot closest to the patient in front of the cylinder lens Note Use only the narrow rimmed type of trial...

Page 98: ...ime to blink is whenever you push the response button When your test is over you will hear two beeps You may sit back at that time Note Instructions for Kinetic Testing differ slightly See Chapter 13...

Page 99: ...rest then assist with bringing the forehead against the forehead rest Have the patient slide the chair in close to the HFA II i Adjust the table height to be as high as necessary to keep the patient...

Page 100: ...the forehead rest must be extended You should also allow the patient to adapt to the yellow bowl for about 3 minutes before testing See Chapter 9 Short Wavelength Automated Perimetry SWAP for further...

Page 101: ...his chapter answers these and other questions Which parameters are the default parameters What test parameters can I change during the test Can I slow down the test for an elderly patient What are the...

Page 102: ...ANGE PARAMETERS From the Test in Progress and Pause screen Note that during testing you can change only test speed and fixation monitoring 1Start at the Parameter Setup screen Depending on whether you...

Page 103: ...t setting It is distinguished from the others by the appearance of an asterisk on the parameter button If you wish to return all settings to their defaults at once you can select RESET TO STANDARD Not...

Page 104: ...Settings Description Test Strategy Two Zone For each point in the test pattern a stimulus is presented 6 dB brighter than the expected hill of vision Printouts display circles O for seen stimuli and...

Page 105: ...h activated Gaze Track Model 740i 750i The Gaze Track system automatically measures gaze direction at the time of stimulus presentation Refer to Gaze Tracking Models 740i 745i 750i on page 5 4 for mor...

Page 106: ...at the hill s peak or fovea is called the central reference level This value appears on the test screen and the printout Single Intensity The HFA uses a default intensity level of 10 dB to test the e...

Page 107: ...stPac testing strategy without compromising test reproducibility See Appendix K for more details Full Threshold This is a test strategy that was used in Humphrey automated perimetry prior to the adopt...

Page 108: ...the Small Diamond Bottom LED Some tests have points in the superior visual field that require a lower fixation light than the central target The target used is the Bottom LED of the Large Diamond When...

Page 109: ...mulus with white on white testing Only the Size V stimulus is used for SITA SWAP Stimulus Color White White stimulus projected onto white bowl background SITA Standard and SITA Fast only use the white...

Page 110: ...ith SITA Both SITA Standard and SITA Fast are designed to run with only these threshold tests Central 10 2 Central 24 2 Central 30 2 Peripheral 60 4 SITA SWAP is designed to run with only the followin...

Page 111: ...nsibility shifts to monitoring the patient s progress to ensure a successful outcome and reliable results This section explores your options that are available during the test It helps to answer the f...

Page 112: ...window You cannot change any settings through DISPLAY STATUS These settings must be changed by pressing CHANGE PARAMETERS as described in Chapter 4 Test Parameters and Strategies The test continues to...

Page 113: ...atient s test eye throughout the test process is crucial to obtaining good test results To aid in accomplishing this task all HFA II i models feature a video eye monitor This monitor which is automati...

Page 114: ...layed on the test screen and on the printout Note Some patients with small pupils ptotic lids interfering lashes or strong prescriptions may not be good candidates for gaze monitoring On the Start of...

Page 115: ...trument will move the chin rest in increments of 0 3 mm readjusting the patient to the original Gaze Track initialization position Maintaining proper alignment during testing reduces trial lens scotom...

Page 116: ...ialize the Gaze Tracking feature The Vertex Monitor alarm will beep if the patient has backed away from the trial lens Testing will continue uninterrupted and a message will remain on the screen until...

Page 117: ...START The Foveal Threshold test window will appear 2The small diamond fixation target will light up below the central fixation target Instruct the patient to look at the center of the lower fixation...

Page 118: ...not to blink Ask the patient to open his or her eye wide for about a count of twenty or until you say the process is over 5Press START to initiate gaze setup Pressing CANCEL returns you to the Start...

Page 119: ...r II i series User Manual 2660021145640 A Testing 5 9 7If Gaze Track initialization is unsuccessful press RETRY TO INITIALIZE GAZE Refer to Fixation Monitoring on page 5 11 if you experience repeated...

Page 120: ...of Test screen Non standard parameters will be retained if originally chosen Before the instrument deletes the data you will be asked to confirm your request Display Status This feature is available t...

Page 121: ...ring The test will pause when you press the FIXATION button It will remain paused while the fixation monitoring screen is displayed Pressing any of the available buttons will change the parameter for...

Page 122: ...ad tilts during the test Turn Off All Fixation Monitoring This command will turn off both Gaze Tracking and Blind Spot Monitoring if pressed In this case you can monitor the patient s fixation by watc...

Page 123: ...drying eye will sometimes cause it not to work During the test instruct the patient to blink occasionally when pressing the patient button as this will greatly reduce interruptions to Gaze Tracking R...

Page 124: ...ent to automatically transmit exams when saving see Using the Save Transmit Option on page 14 33 and Setting Up Save Transmit for EMR PMS DICOM Systems on page 14 41 If you have set the Save Transmit...

Page 125: ...ed in Figure 5 7 The top of the Printout Selection screen shows the current test s If you selected the PRINT FUNCTIONS icon button before the second eye was tested or if you intentionally tested only...

Page 126: ...6 Figure 5 7 The Threshold Printout Selection Screen Testing A Step by Step Guide 1At the Main Menu screen select a test Choose either one of the test buttons or SHOW TEST LIBRARY 2Select a test eye C...

Page 127: ...atient Make sure the patient is sitting comfortably Refer to Preparing the Patient on page 3 24 for full details of patient preparation You also may refer to the Help Menus by pressing the HELP icon q...

Page 128: ...tor before resuming the test 10When complete select an end of test option Be sure to save the test results at this point Select YES to save the test or CHANGE PATIENT DATA FIRST if you need to change...

Page 129: ...cular test the following set of instructions will display on the screen when you press START Move chin rest to the far right position Have patient place chin in the chin cup on the left Do not use the...

Page 130: ...Testing Humphrey Field Analyzer II i series User Manual 2660021145640 A 5 20...

Page 131: ...tient Fixation 6 3 Trial Lenses 6 3 Evaluating Reliability 6 4 Fixation Losses 6 4 False Positive Errors 6 4 False Negative Errors 6 6 Visual field testing represents a team effort between the perimet...

Page 132: ...comfortably Use an adjustable office chair with or without arms to accommodate tall and short patients The perimeter and table will accommodate a full size office chair with arms or a wheelchair Be s...

Page 133: ...t them Encourage them to take breaks and pause the test by holding down on the response button if fatigue is a problem Observe the patient by means of the video eye monitor Encourage correct behavior...

Page 134: ...n checks If after hearing the beep the patient appears to be fixating properly you may wish to replot the blind spot High fixation loss scores may be due to an erroneously plotted blind spot caused by...

Page 135: ...n pressing the patient response button It is best to note the results early in the exam and start the test over rather than to allow the test to run to completion and be completely invalid Gaze Graph...

Page 136: ...t it is also commonly seen in reliable patients who have genuine significant visual field loss The HFA screen will display the total number of false negative errors followed by the total number of tri...

Page 137: ...lts This chapter describes the standard HFA print formats and how to generate printouts both immediately after testing and from stored files After reading this section you will be able to answer the f...

Page 138: ...T DATA button as described in Recalling Patient Data on page 3 14 to reduce patient data entry errors 2 Save the test results to disk hard drive and a USB storage device These steps will avoid errors...

Page 139: ...ility but for which the STATPAC analysis is normal may well be normal Results showing poor reliability and for which the STATPAC analysis is outside normal limits require careful analysis Utilize the...

Page 140: ...central threshold test The top of the page presents patient data test reliability indices and the test results in the grayscale and numeric formats The information that STATPAC adds is found in the lo...

Page 141: ...hen test results show that the overall field is depressed severely or exhibits suspiciously high sensitivity The message GENERAL REDUCTION OF SENSITIVITY is printed whenever the field is depressed to...

Page 142: ...ple by cataracts or small pupils Similarly STATPAC corrects for any patients who are supernormal adjusting the expected hill of vision upward by the appropriate amount and thereby making the analysis...

Page 143: ...ed in Pattern Deviation the VFI is relatively insensitive to visual field changes due to cataract The VFI is weighted to give increased importance to thresholds near the point of fixation so that it i...

Page 144: ...te of birth type of test and eye tested appear at the top of the page Results from 30 2 and 24 2 tests may be presented in the same printout STATPAC does not combine 10 2 tests with any other test pat...

Page 145: ...ric thresholds and defect depth are printed No probability plots are available You can also print Overviews of SWAP test results Overview printouts cannot consist of a mixture of tests run with differ...

Page 146: ...ves a five number summary of the test results It displays a concise summary of the Total Deviation decibel values for each test showing the median the two extreme values and the 15th and 85th percenti...

Page 147: ...11 Figure 7 5 The Change Analysis Printout In cases where the patient is suffering from a cataract the visual field is depressed more or less evenly The only change from test to test and from the nor...

Page 148: ...e the index value is significant at the 5 level Similarly if the symbol falls below the 1 line the index value is significant at the 1 level that is less than 1 of the normal population has an index v...

Page 149: ...hange Analysis printout STATPAC modifies this regression analysis whenever marked learning effects are present When at least five tests are chosen for analysis the modified STATPAC regression analysis...

Page 150: ...tation with sub specialists is often the prudent course Three in One Printout If you have selected a threshold test pattern or test parameters that do not meet the criteria for STATPAC analysis result...

Page 151: ...Greytone Numeric Defect Depth Humphrey Field Analyzer II i series User Manual 2660021145640 A STATPAC Analysis Printing 7 15 Figure 7 6 Three In One Printout...

Page 152: ...have made your printout selection s choose PRINT ALL SELECTED ITEMS The information has now been sent to the printer you can proceed with your next command immediately To leave the Printout Selection...

Page 153: ...no defects quantified in the Central 30 degrees the printout will only be one page long The printout will be in the full field format Screening Test Printouts The type of test and test parameters are...

Page 154: ...est Results At the end of a screening test you can print the results for the one eye immediately or you can wait until the second eye has been tested and print both results on one page 1 Make any addi...

Page 155: ...u Screening tests are printed one per page or both on one page 3 One threshold test OR Two threshold tests for the same patient one for right eye and one for left eye Presents the printout selection m...

Page 156: ...eye tested they need not be for the same patient until the instrument is powered off at which time the temporary memory is cleared 1 From the Main Menu screen select RECALL LAST TEST 2 Select the tes...

Page 157: ...An explanation of the relationship between these units of measurement can be found in Appendix E along with Goldmann conversion tables Note SWAP printouts use the same relationship between grayscale...

Page 158: ...STATPAC Analysis Printing Humphrey Field Analyzer II i series User Manual 2660021145640 A 7 22...

Page 159: ...veral report formats are available including the new GPA Summary report that includes an overview of the patient s entire visual field history in a one page report This version of GPA is compatible wi...

Page 160: ...y Bengtsson and Heijl 4 GPA Adds Value to Your Practice The GPA analysis provides value because it Simplifies and standardizes analysis for change in glaucomatous visual fields Provides both trend ana...

Page 161: ...ient test results GPA Provides Automated Exam Selection The GPA software is designed for easy use and implementation Default test selection is automated To assist you in getting exactly the analysis y...

Page 162: ...When statistically significant degradation is seen in the same three or more points on two consecutive Follow up tests the GPA software interprets the patterns for you and automatically alerts you to...

Page 163: ...i series User Manual 2660021145640 A Guided Progression Analysis GPA 8 5 GPA Summary Report Example VFI Plot VFI Value Linear Regression Baseline 2 Baseline 1 Current Exam Analysis of VFI VFI Bar Fig...

Page 164: ...page Figure 8 3 followed by multiple Follow up pages Figure 8 4 The Baseline page provides detailed information on the two GPA Baseline exams including Graytone Plot Threshold dB Plot Total Deviation...

Page 165: ...er II i series User Manual 2660021145640 A Guided Progression Analysis GPA 8 7 Single Field Analysis with GPA SFA GPA Example GPA Information Box Reference Note VFI Value Figure 8 2 Single Field Analy...

Page 166: ...Baseline Test Results from the Full GPA Report The Full GPA Report Figure 8 3 includes similar patient information to that appearing on other HFA printouts The Baseline data presentation mirrors the...

Page 167: ...Test Results from the Full GPA Report The Follow up pages of the Full GPA report Figure 8 4 present data for each of up to 14 Follow up tests For each Follow up test a Graytone Deviation from Baseline...

Page 168: ...eline and Follow up exams to the inter test variability typical of stable glaucoma patients and then shows a plot of point locations which have statistically changed A single solid dot indicates a poi...

Page 169: ...es from SITA exams are represented by filled squares Located in the center of the GPA Summary report or the lower left portion of the Baseline page of the Full GPA and GPA Last 3 Follow up reports the...

Page 170: ...Key Exam is And if the Baseline Exams are Follow up Exams must be SITA Standard SITA Standard All SITA Standard SITA Standard Full Threshold Any combination of SITA Standard and Full Threshold SITA Fa...

Page 171: ...exam may not be a reliable measure of the patient s visual function due to the learning effect see Learning Effect on 8 12 In either case it is often desirable to replace one of the Baseline exams wi...

Page 172: ...e amount of change that might be due to the normal variability experienced in a visual field test Often the out of range points are found to be points that have reached threshold values that are at ma...

Page 173: ...Right Eye Figure 8 6a Progressing Right Eye GPA Summary Here is a GPA example showing visual field loss progression in a patient with moderate glaucomatous field loss Progression can be recognized on...

Page 174: ...One advantage of using GPA is that it can demonstrate change in points that have already been flagged at the highest probability level relative to normal black squares E In the same area on the Progre...

Page 175: ...The example on these two pages shows the GPA printouts of visual fields for the previous patient s left eye Looking at the VFI Plot A and the VFI Slope B there appears to be mild progression Note tha...

Page 176: ...but no GPA Alerts indicating progression D The flagged points are in different parts of the visual field except for the point E Recall that 3 or more points flagged with a progression triangle on two...

Page 177: ...nts do better on threshold testing the second or third time tested In many cases GPA automatically removes the first exam in a series because it shows the learning effect However in this case as can b...

Page 178: ...port shows an example of Full Threshold tests being used as the Baseline When Full Threshold tests are used for the Baseline Full Threshold tests are eligible to be used as Follow up tests In the VFI...

Page 179: ...ect Baseline test A was created when the technician mistakenly tested the patient s right eye as if it were his left eye Note the Blind Spot demarcated on the right hand side of the visual field in th...

Page 180: ...econd Baseline test A seen on the previous page The technician had corrected the mistake by having the patient redo the test Unfortunately the incorrect test was not removed from the GPA list Note the...

Page 181: ...ty Default Baseline The repeated correct test on 8 5 2000 C is now used as the second Baseline test E in this new example Note the similarity in the two Pattern Deviation plots and VFI values between...

Page 182: ...he Out of Range X is no longer present where the blind spot from the other eye had been as shown by the arrows pointing to the former location of the X in three different spots on this illustration Th...

Page 183: ...Range Points Baseline 1 In this example the patient appears to have a deep scotoma in the nasal area of the left visual field as indicated on this Baseline page Note the 0 5 indicators on the Pattern...

Page 184: ...ates either learning by the patient or a trial lens artifact that was present during the Baseline tests but which had been rectified in later tests An additional hint is provided by the VFI Plot seen...

Page 185: ...aseline Improves Out of Range Points Figure 8 13a Improving Out of Range Points Baseline 2 Here the Baseline is changed to utilize the 4th and 5th visual fields available This allows the nasal step po...

Page 186: ...3b Improving Out of Range Points Follow Up 2 The nasal step is still apparent on the Pattern Deviation plot Now the points no longer are marked Out of Range but are considered stable Should progressio...

Page 187: ...e to Step 3 Step 3 Modify the GPA Exam Selection Optional Change the Baseline selection and add remove exams from Follow up See Step 3 Modify the GPA Exam Selection Optional on page 8 32 You may choos...

Page 188: ...ions See Step 2 Select Reports from Threshold Printout Selection Screen on page 8 31 If you have just tested both eyes it is possible to choose different printouts for right and left eye the selection...

Page 189: ...rieve Note The exam you select is the one for which the GPA Summary or SFA GPA will be printed if you have chosen one of these report formats 5 Choose PROCEED to display the test results 6 Select the...

Page 190: ...TED ITEMS Step 3 Modify the GPA Exam Selection Optional If you selected any GPA report in Step 2 the EXAM SELECTION button will be available Figure 8 14 If not the EXAM SELECTION button will be grayed...

Page 191: ...Baseline Mode Follow up Mode allows you to add or remove exams for GPA analysis Baseline Mode allows you to select a different Baseline Select the SELECTION MODE button to toggle between Follow up an...

Page 192: ...oldest previous Baseline will be removed as a Baseline and from selection Figure 8 17 Exam Selection Baseline Selection Mode GPA Exam Selection Features and Constraints To ensure that GPA results are...

Page 193: ...up tests automatically However the maximum number of Follow up tests is 14 This means that if 14 tests were already selected GPA automatically adds the new test and removes the earliest test from the...

Page 194: ...65 6 Heijl A Leske CM Bengtsson B Hussein M for the EMGT Group Measuring visual field progression in the Early Manifest Glaucoma Trial Acta Ophthalmol Scand 2003 81 286 293 7 Heijl A Leske CM Bengtsso...

Page 195: ...or SITA SWAP are presented in the traditional Single Field Analysis style providing all the advantages of the STATPAC statistical analysis After reading this chapter you will be able to answer the fol...

Page 196: ...ory suggests that early diagnosis is achieved simply because SWAP tests one of several pathways of the visual system if only one pathway of the system is tested there is less redundancy to mask damage...

Page 197: ...ay be used to show patients what the new stimulus looks like before testing Unlike the use of the conventional white on white testing process SWAP testing requires a period of time for the patient s v...

Page 198: ...illumination changes from white to yellow 6 Press SELECTION COMPLETE to go to the Start of Test screen That screen now will indicate both Blue Yellow testing and SITA SWAP near the top of the screen...

Page 199: ...ould adapt to the yellow bowl illumination for approximately three 3 minutes before beginning the test Having the patient look into the bowl while you enter patient data and explain the test will help...

Page 200: ...er Main Menu feature to customize a Main Menu button for this application The customized button will make access to this specialized form of testing faster and more convenient Refer to Altering the Ma...

Page 201: ...or the SITA SWAP testing routine on a second visit This leads to an improved recognition of the blue stimulus as well as better pacing of patient responses These factors combine to provide more accura...

Page 202: ...m SITA SWAP is found in the lower right hand portion of the printout This helps to differentiate this printout from the standard white on white SFA printout The Overview printout also is available to...

Page 203: ...is surpassed to alert you to potential fixation problems Attempting to re find the blind spot during the test may help to lower the number of fixation losses recorded and to silence the audible tone I...

Page 204: ...ant nasal step and arcuate scotoma in the superior visual field of this patient s right eye on the SITA SWAP printout Reliability indices and Gaze Tracking indicate the patient was a reliable perimetr...

Page 205: ...with SITA SWAP in the superior hemifield of the patient s right eye The GHT indicates Outside Normal Limits Both the MD and PSD global indices are flagged with the PSD marked at the P 5 limit This pri...

Page 206: ...the SITA SWAP Patient Shown in Figure 9 7a This is the standard white on white visual field printout for this patient as discussed on the opposite page Here the GHT indicates the visual field is With...

Page 207: ...at had various degrees of lenticular change in this age group the patient has a mean deviation MD that is much higher than the norm A significant nasal step scotoma can be seen in the pattern deviatio...

Page 208: ...SWAP software To obtain a SITA SWAP license you must contact Carl Zeiss Meditec In the U S Call Carl Zeiss Meditec at 1 800 341 6968 Outside the U S Contact your local Carl Zeiss Meditec distributor O...

Page 209: ...for short wavelength automated perimetry Invest Ophthalmol Vis Sci 2003 Mar 44 3 1388 94 8 Mok KH Lee VW So KF Retinal nerve fiber layer measurement by optical coherence tomography in glaucoma suspect...

Page 210: ...f glaucomatous field loss Arch Ophthalmol 1993 111 645 650 18 Sample PA Taylor JDN Martinez GA Lusky M Weinreb RN Short wavelength color visual fields in glaucoma suspects at risk Am J Ophthalmol 1993...

Page 211: ...iously stored tests on either an internal hard disk a USB storage device or the hard drive of a network server with the HFA NET Pro or DICOM Gateway 2 0 option This packet of stored information is cal...

Page 212: ...e with this feature PRINT DIRECTORY allows you to print a directory listing the tests stored on the hard disk a USB storage device or on a floppy disk You may print a directory listing of every test s...

Page 213: ...lows you to cancel the operation if necessary Use the TRANSFER TESTS capability to move tests from an older Humphrey Field Analyzer model either the HFA I or an earlier HFA II to the HFA II i series i...

Page 214: ...py transfer retrieval from archive or a restore from backup Patient B This patient is about to be transferred to the local HFA database and has the same Name and Date of Birth as Patient A but does no...

Page 215: ...onic To protect patient confidentiality of your electronic HFA data the use of encryption is recommended and is the responsibility of the user Note The HFA is only compatible with USB storage devices...

Page 216: ...ted Destination The Disk Options screen includes a destination choice Destinations include FLOPPY HARD DRIVE CLASSIC SERIAL and up to two USB storage devices If HFA NET Pro is enabled DATA EXPORT HOST...

Page 217: ...yed alphabetically When displayed by DATE tests appear chronologically with the most recent test at the top of the directory When displaying tests by PATIENT the patients will be displayed in alphabet...

Page 218: ...CURRENT RANGE and CANCEL PROCEED brings up the keyboard to help in finding the patient tests Enter enough letters on the keyboard to locate the patient The SET CURRENT RANGE feature helps to limit the...

Page 219: ...seven tests can be shown at one time however you easily can move through the directory with the aid of a few command buttons Figure 10 5 The File Directory Sorted by Name The page up arrow allows you...

Page 220: ...tests Note Pressing SELECT ALL selects all the available tests not just the seven 7 being viewed on the screen After you have selected all the tests necessary for the File Function choose PROCEED to e...

Page 221: ...instead of Am because the TO ranges are non inclusive The HFA II i selects everything up to but not including the TO field entered So selecting An means the search will stop at Am without including na...

Page 222: ...can cause the HFA II i to treat tests taken by the same patient as tests taken by different patients As a result some of a patient s tests may not be included in STATPAC or GPA analysis For example if...

Page 223: ...ile Functions To execute most File Functions you follow a similar procedure Choose the function Select the Source and Destination of the tests Select a directory order and retrieve the file directory...

Page 224: ...o be changed by using View Test as described above When changing patient data associated with all tests for a given patient you may change the Patient ID Patient Name and Date of Birth Note The Change...

Page 225: ...fter selecting the test from the directory and pressing PROCEED the Change Patient Data for This Test 1 screen appears To move this test to an existing patient select RECALL PATIENT To move this test...

Page 226: ...ert all tests saved on the Hard Drive 5 Select PROCEED to begin converting and exporting tests 6 The selected tests will be copied to the floppy disk CAUTION CONVERT TESTS is not designed for routinel...

Page 227: ...u select OK the next screen displays Formatting disk Remember that the INITIALIZE FLOPPY function permanently erases ALL information currently stored on the floppy disk 5 Remove the disk when you see...

Page 228: ...t to copy or SELECT ALL to copy all tests saved on the Source 4 Select PROCEED to begin copying tests 5 The selected tests will be added to the information on the Destination disk without affecting th...

Page 229: ...ture will recognize the floppy and indicate Backup Please note that when patient information has been entered but not saved with test results the Database Status pop up window may give a false sense o...

Page 230: ...r that consists of Name Date of Birth Patient ID and Issuer of ID To avoid unintentional automatic merging of patient records VERIFY a unique combination of Name Date of Birth Patient ID and Issuer of...

Page 231: ...FA I tests or test results which are not eligible to be transferred The following is a list of restrictions specific to the test type being transferred Threshold Fast Threshold or Master files will no...

Page 232: ...e Configuration Menu screen then select RETURN to the Main Menu 3 Select DISK FUNCTIONS 4 Select TRANSMIT FILES 5 Select the disk drive on which the tests you want to transfer are stored 6 If you want...

Page 233: ...the tests you wish to transfer then press PROCEED to start transferring On the HFA II i Series 1 A pop up window will update you on the progress and success of test transfer on both HFA s Check the HF...

Page 234: ...mplete Press CANCEL If you do not press CANCEL within about 10 minutes the HFA II i will automatically proceed to the next step 2 The transferred tests will then be moved from temporary to permanent s...

Page 235: ...ith recommended backup techniques how to back up and restore menu configurations how to deal with database failures how to keep a similar database on multiple HFA II i s proper handling of USB storage...

Page 236: ...problem and you need to restore your database you will have the solution at hand For the sake of simplicity this manual separates database management into two categories functions which manipulate dat...

Page 237: ...sk network file server or floppy disk is worthy of being protected by being maintained on alternate storage media In the event of database failure alternate copies of your database can be used as a ba...

Page 238: ...two or more USB storage devices for added protection 3 Store backup USB storage devices in a safe location away from the HFA II i It may also be wise to create an extra back up on a USB storage devic...

Page 239: ...ERVER Press PROCEED 5 An alert will appear while data is being backed up to the server 6 When the backup is completed select OK to return to the File Functions menu Note Subsequent backups replace the...

Page 240: ...to the other locations Note Configuration Backup is a separate function from the Patient Database Backup Note Any time you change configuration settings you should back up all your settings to a USB s...

Page 241: ...USB storage device 5Insert a USB storage device into a USB port on the HFA II i 6Select the desired USB storage device by pressing the button with its device name 7When the Configuration Backup is com...

Page 242: ...e HFA II i and you desire consistent configuration settings among all your instruments you may use a single configuration backup to restore settings to all the other units Each instrument must support...

Page 243: ...ION 4Insert the appropriate Configuration Backup media 5Select the appropriate media by pressing the button with its device name 6When restoration is complete press OK After a 15 second pause your HFA...

Page 244: ...the screen that includes an approximate fix time You may elect to address the problem immediately or delay the process You may want to delay the process if you have patients scheduled for testing In t...

Page 245: ...cause you to lose the results from the test just completed Always elect either to fix the problem immediately or to save results to a USB storage device temporarily until you have time to address the...

Page 246: ...Hard Drive Failure USB ONLY Option on page 11 14 To help you decide a screen message alerts you to the approximate recovery time Note If you were to choose FIX NOW and the attempt failed you could alw...

Page 247: ...ays a reminder message After reading the message press OK Copy to your hard drive any test results stored to the USB storage device since the hard drive failure If recovery is unsuccessful a message a...

Page 248: ...device until you can attend to the hard drive problem By choosing this option the hard drive becomes disabled When time permits recycle power to initiate the recovery program see Step 7 below or use t...

Page 249: ...e the previous three screens will display Continue to choose USB ONLY YES to save data to the USB storage device and then select the USB storage device while patients are present 7When you have time t...

Page 250: ...nt Humphrey Field Analyzer II i series User Manual 2660021145640 A 11 16 8If recovery is unsuccessful a user message appears Press OK Go to the next section Hard Drive Failure REBUILD HARD DISK DATABA...

Page 251: ...ts have failed use the rebuild utility REBUILD HARD DISK DATABASE Typically a lengthy process rebuilding the database frequently corrects the original database problem and avoids the inconvenience of...

Page 252: ...021145640 A 11 18 3Press REBUILD HARD DISK DATABASE 4The HFA II i may attempt a recovery process before launching into the more lengthy rebuild process 5Read the warning message Press OK If you press...

Page 253: ...he desired button RETRY repeats the rebuild process Occasionally a second try is suc cessful DELETE initializes the database All data on the Hard Disk will be deleted You will need to restore the data...

Page 254: ...at contains the backup to a USB port on the HFA 3 Choose the USB storage device that contains the backup as the Source 4 Select PROCEED 5 You are given the option of replacing the database or merging...

Page 255: ...censed the networking software on your HFA II i Please refer to Restoring Data from the Server on page 14 16 Removable Media Failure Using the Rebuild Removable Media Database Button A USB storage dev...

Page 256: ...10 000 patient tests it may take up to 75 minutes to merge the backup database with the current hard drive database Note If your HFA II i suffered a hard disk failure that could not be repaired by th...

Page 257: ...leanup operation can be time consuming For offices or clinics that have many thousands of patients and tests stored in their databases we recommend that you start this operation after normal office ho...

Page 258: ...vice and the Destination to HARD DRIVE C Select PROCEED D Press SELECT ALL E Choose PROCEED Note If there are tests on the USB storage device that previously have been copied to the hard disk these te...

Page 259: ...esting strategies are not available for use with Custom tests Creating Custom Tests This section discusses how to create your own Custom static tests You can create these tests as either Screening or...

Page 260: ...sting Humphrey Field Analyzer II i series User Manual 2660021145640 A 12 2 Getting to the Custom Test Screen 1Press the SYSTEM SETUP icon from the Main Menu screen 2Choose ADDITIONAL SETUP 3Select CUS...

Page 261: ...screen via the Alter Main Menu sequence it also will disappear Note There are two buttons on the Custom Test Options screen which deal with Custom Kinetic tests These buttons are discussed in Chapter...

Page 262: ...for each point The Grid X Y pattern is used to place an entire square or rectangular grid of points on the field at one time Each Custom test can contain a maximum of 248 test points When entering sin...

Page 263: ...be to the left negative X values Field Size This lets you choose one of three field sizes for testing Central 10 degrees Central 30 degrees or Full 90 degrees Each field size is independent of the oth...

Page 264: ...t eye only When the left eye is tested the HFA II i will flip the test pattern to accommodate for the mirrored physiological differences Do not attempt to design a left eye Custom test Adding Single P...

Page 265: ...ext point will also appear on the screen once you enter the values When you have completed the entry of Custom points you need to save the pattern for future testing Please review Saving Custom Tests...

Page 266: ...his grid will be tested The number of points in a grid is determined by the grid size and the point spacing 1Enter the X value of the point in a corner of the grid Press ENTER 2Enter the Y value of th...

Page 267: ...nt spacing either by pressing CHANGE OPTIONS and selecting a different spacing option or by placing the grid in a different location Note If you create a Grid where some points fall outside the select...

Page 268: ...2660021145640 A 12 10 3Change the Point Pattern Change the Point Spacing if desired Press SELECTION COMPLETE 4Press ADD ENTRY 5 Input Single Points as previously described in Adding Single Points on p...

Page 269: ...last Single Point or Grid you have entered will automatically be removed from the test field No warning will be issued before deleting the last entry 2Subsequent selections of the ERASE LAST ENTRY bu...

Page 270: ...eating a Custom Screening test the Screening Parameter Setup screen will appear Note SITA Standard and SITA Fast are not available for use with Custom tests 4Name the completed Custom test Press YES i...

Page 271: ...tom test 6Custom test buttons are added automatically down the first column of the Custom Tests screen When five tests have been added the next test buttons will be added to the right hand column Scre...

Page 272: ...Custom Testing Humphrey Field Analyzer II i series User Manual 2660021145640 A 12 14 2Choose ADDITIONAL SETUP 3Select CUSTOM TEST 4Choose DELETE STATIC TEST...

Page 273: ...CEL if this is not the test you wish to delete Your Custom Tests screen will stay unchanged Note If you have placed a button on the Main Menu screen for the Custom test you are deleting this screen ap...

Page 274: ...ou may also place buttons for these tests on the Main Menu screen using the procedure that is described in Altering the Main Menu Screen on page 2 26 As we mentioned earlier Custom tests are automatic...

Page 275: ...sed and it cannot be changed Screening Printouts for Custom Screening tests will look similar to the existing Screening printouts A single printout style will be available for each Custom Screening te...

Page 276: ...ld As is shown in Figure 12 3 Custom Threshold printouts contain only the numeric dB values for each point The visual field takes up the majority of the page There will be no gray scale defect depth o...

Page 277: ...om 80 degrees peripherally 30 degrees centrally or anywhere you choose with Custom Scan Pre set testing sequences are available for automatic or step by step procedures Scotoma mapping blind spot mapp...

Page 278: ...touch screen Display test points automatically by using pre programmed testing sequences There are a number of these tests available each with a different amount of separation between the points Both...

Page 279: ...manual kinetic perimetry You can either refer to each step as needed or read the following pages as a tutorial 1From the Main Menu screen select SHOW TEST LIBRARY Note You can place any KINETIC butto...

Page 280: ...either RIGHT or LEFT 5Enter the appropriate patient data You must enter the patient name and date of birth before saving at the end of the test You can also use the RECALL PATIENT DATA button if the p...

Page 281: ...s the default settings are changed Kinetic testing will begin in the peripheral field at approximately 75 nasally and temporally or 55 in the superior and inferior fields Each Kinetic test can have up...

Page 282: ...is drop down box lists the letters corresponding to the second fine Goldmann intensity filter which also helps to determine the intensity of the stimulus The values corresponding to these filters are...

Page 283: ...dian pattern is indicated by the highlighted number in the center of the button The example in the left hand margin shows that the 8 meridian pattern is chosen Radius Distance This drop down box sets...

Page 284: ...ed Meridians Presenting a Stimulus Along a Meridian When activated the HFA II i will display the stimulus inside the bowl for one second at the starting point of the chosen meridian It then will begin...

Page 285: ...he points that define the isopter One is to use a cursor to point at the meridian to test The other method involves using the keypad and entering the meridian along which to start the stimulus The pre...

Page 286: ...glidepad button to locate the starting position This method only selects the meridian it does not locate the starting position away from fixation the radius The starting position is fixed by whether...

Page 287: ...alues You also can use the RETURN ENTER key to start the test Note Meridians are positive whole numbers between 0 and 359 3 Prepare the patient for the test Explain that the light will not be seen for...

Page 288: ...opter have been mapped 8 To create a different isopter first set the parameters as explained in Setting Parameters on page 13 5 Second repeat Steps 1 through 6 Continue to repeat Steps 1 through 6 unt...

Page 289: ...kinetic results printout However the HFA will use only the point representing the patient s final response in forming the isopter Pre Defined Kinetic Test Patterns Your Humphrey Field Analyzer is prog...

Page 290: ...The BG FS test is identical to the Standard 30 test listed above Press the desired test button found in the Kinetic Tests library You will have the option to run the test in either the Automatic or t...

Page 291: ...Humphrey Field Analyzer II i series User Manual 2660021145640 A Kinetic Testing 13 15 1Starting at the Main Menu press SHOW TEST LIBRARY 2Choose KINETIC 3Select the Kinetic test to run...

Page 292: ...test The meridian to be tested is indicated on the screen 6The stimulus will light but will not move for a short period of time You then will see a small diamond begin to move across the screen and t...

Page 293: ...lso be given the option of using the trial lens holder at this point You do not need to use it Pausing the Test 1You can pause the test at any time by pressing the STOP STIMULUS button 2Choose the act...

Page 294: ...s the test has paused while the HFA II i changes the parameters for the new isopter The new isopter begins testing when the announcement disappears from the screen Saving the Test Results 1At the comp...

Page 295: ...xt meridian to test This allows you the opportunity to retest a point prior to testing the next meridian or to advise the patient during the test You control when each point is to be tested We recomme...

Page 296: ...EED once you have entered all desired patient data 5Press TEST MERIDIAN to begin the first stimulus The meridian to be tested is indicated on the screen The stimulus will light but not move for a shor...

Page 297: ...letter corresponding to the isopter being tested The next meridian to be tested then displays on the screen To start the testing of the next meridian press TEST MERIDIAN again Retesting a Meridian 1Y...

Page 298: ...note the change by looking at the Stimulus Value at the top of the screen You may briefly see the announcement Please Wait Preparing the Instrument For Test as previously shown in the Automatic mode d...

Page 299: ...series User Manual 2660021145640 A Kinetic Testing 13 23 2Confirm you wish to end the testing by pressing the END TEST button 3Press SAVE TEST 4Confirm the patient data is correct before pressing the...

Page 300: ...ly one isopter is determined At the end of the test the Humphrey Field Analyzer will calculate an Efficiency Score and display this value on the printout The exact values of the 8 points should also b...

Page 301: ...TEST for storing test data Prior to ending the test you can activate SPECIAL MAPPING to allow searching for isolated scotomas This extra testing will not change the calculated Efficiency Score The ne...

Page 302: ...145640 A 13 26 5When the test is complete save the test results Press the PRINT FUNCTIONS icon to complete the disability test procedure Choose both the Full Field and the Numerical Values printouts f...

Page 303: ...ble for testing done in the Automatic mode Special Mapping provides you with a number of additional testing options which are described on the following pages Scotoma Mapping Blind Spot Map Static Poi...

Page 304: ...eridians A point within the scotoma is located When activated the Scotoma Map feature sends the stimulus outward from the central point a fixed number of times to outline the boundaries of the scotoma...

Page 305: ...ees where you wish to place the cen ter of the scotoma map Press ENTER 4Enter the radius the distance in degrees from the fixation point where you wish to place the center of the scotoma map 5Prepare...

Page 306: ...8When the Scotoma Mapping finishes the test stops An uppercase letter marks each location where the patient pressed the response button Note Each time you perform a new isopter or test sequence a new...

Page 307: ...he patient to press the response button as soon as he or she sees the light Refer to Preparing the Patient on page 3 24 for more information 4Press SELECTION COMPLETE After a slight pause the HFA II i...

Page 308: ...ressed the response button Note Each time you perform a new isopter or test sequence a new uppercase letter will display on the test screen Even if the same stimulus value used for mapping the blind s...

Page 309: ...e tested Note The point coordinates can also be input using the Keypad option See previous sections for entering Meridian and Radius values with the keypad 3Press SELECT POINT to display the Static po...

Page 310: ...ure may be helpful in describing the boundaries of a hemianopsia for example Using the Cursor method is recommended for selecting the Start and End points of the Custom Scan and the method is describe...

Page 311: ...the Cursor by your preferred method finger on touch screen or with the glidepad to the point from which you wish to start the Custom Scan Use the Meridian and Radius locations at the top of the screen...

Page 312: ...imulus in the test bowl 7To perform another Custom Scan repeat the previous steps Continue until you have determined all desired points for each particular isopter After you have mapped all desired po...

Page 313: ...s SAVE TEST Pressing this button will save the current Kinetic test to the hard disk and a USB external media device if connected and the Save to USB function is on You may view or print this informat...

Page 314: ...0 and 80 field formats This feature especially is useful when you want to see the central 30 of an 80 field in detail Pressing this button does not eliminate the points outside of the central 30 These...

Page 315: ...viously saved Kinetic tests by using the VIEW TEST button on the File Functions screen or from the RECALL LAST TEST button on the Main Menu screen RECALL LAST TEST will automatically take you to the V...

Page 316: ...0021145640 A 13 40 3Designate the desired Source and Directory Order Select PROCEED 4Input the patient name Press ENTER 5Select the Kinetic test you want to view The selected test will be highlighted...

Page 317: ...owing options PATIENT DATA This option allows you to view or change any patient data pertaining to the kinetic visual field Should the test date be wrong you also can change it on this screen The PATI...

Page 318: ...to display on the screen Note You can view only three 3 different isopters at one time ZOOM TO 30 EXPAND TO 80 This option allows you to zoom in or out of the screen Zooming in may allow you to see m...

Page 319: ...formats A Numerical Values format also is available All isopters are printed Full Field Printout The Kinetic Full Field printout shows all isopters and scotomas mapped out to the peripheral 80 degree...

Page 320: ...60021145640 A 13 44 Central Printout The Kinetic Central printout documents the central 30 degrees of the visual field Figure 13 4 shows the central 30 degrees of the Full Field printout that was show...

Page 321: ...y the letter used on the visual field printout as well as the stimulus value Carl Zeiss Meditec Figure 13 5 A Sample Numerical Values Printout Printout Legend Isopter points are shown as uppercase let...

Page 322: ...can Inverse Occasionally an isopter point will appear on the printout but it will not be connected to other isopter points This situation occurs when you have retested a meridian Only the most recent...

Page 323: ...ant to view Kinetic tests are designated Kinetic in the Directory Press PROCEED 5Choose the printout style s Press PRINT ALL SELECTED ITEMS Printing will begin Note When printing at the end of a test...

Page 324: ...ight eye Therefore temporal points will be plotted to the right meridians 0 to 89 and 271 to 359 and nasal test points will be to the left meridians 91 to 269 Testing for the left eye will automatical...

Page 325: ...umphrey Field Analyzer II i series User Manual 2660021145640 A Kinetic Testing 13 49 1Start at the Main Menu Press the SYSTEM SETUP icon 2Press the ADDITIONAL SETUP button 3Press the CUSTOM TEST butto...

Page 326: ...e KINETIC PARAMETER SETUP screen appears Choose the stimulus parameters for the first isopter to be tested Press SELECTION COMPLETE 6You have the option of entering each test point in the order you wi...

Page 327: ...tested by using the Speed pull down menu located in the upper left corner 8The Keypad will appear on the screen Enter the meridian desired eligible range is 0 359 degrees Note You may find it more con...

Page 328: ...ous meridian at 60 degrees has changed to a circle This is to make it easier to identify the most recent meridian that you have programmed 11When you have added all the meridians for the first isopter...

Page 329: ...for the second isopter Repeat the sequence for as many isopters up to 10 as desired Erasing a Meridian 1You can remove a meridian by pressing the ERASE LAST MERIDIAN button 2The gray box moves back on...

Page 330: ...e isopters or meridians to be tested press NO If you are ready to save your Custom Kinetic test press YES Naming the Test Button 1You will have the opportunity to name the Custom Test you just created...

Page 331: ...TEST 3 Choose the test you wish to delete by pressing the appropriate button Confirm that this is your intention Note The BG FS Kinetic test was created specifically for use in Germany The test is ide...

Page 332: ...3 56 Creating the Aphakic SSA Disability Test This Social Security Administration disability test variant uses a Size IV stimulus Use these steps to create the test 1Start at the Main Menu Press the S...

Page 333: ...left appears press CREATE KINETIC TEST 5The KINETIC PARAMETER SETUP screen appears Set the following stimulus parameters for the isopter to be tested Size IV Intensity 4 Intensity Modifier E Speed 4...

Page 334: ...sired Press ENTER The meridians that you must enter are 0 45 90 135 180 225 270 315 9A small gray square will be placed on the meridian entered In this example the square can be seen on the 0 degree m...

Page 335: ...ield The previous meridian at 0 degrees has changed to a circle This is to make it easier to identify the most recent meridian programmed 11When you have added all the meridians for the isopter press...

Page 336: ...will appear Type SSA Aphakic Press ENTER when the name of your test is complete The SSA Aphakic Disability Test will be placed on the Kinetic Testing menu You can access this test by using the tradit...

Page 337: ...meridians presented is not significant If the meridians listed in your test are not identical to those specified you must delete the test and create a new one Deleting the Test If the SSA Aphakic Test...

Page 338: ...Kinetic Testing Humphrey Field Analyzer II i series User Manual 2660021145640 A 13 62...

Page 339: ...hnology IT professional or Network Administrator sets up your HFA with an office network Establishing a network can be a complex and costly task if not undertaken by a professional For the balance of...

Page 340: ...ration s VA VistA system DICOM Gateway software includes DICOM work lists which enables easy scheduling of patient exams on the HFA Work list scheduling eliminates manual lookup of patient records on...

Page 341: ...minimum network requirements prior to having your software licensed for HFA NET Pro or DICOM Gateway 2 0 To activate your license you must contact Carl Zeiss Meditec In the U S Call Carl Zeiss Medite...

Page 342: ...t first be transferred from the HFA I or HFA II to an HFA II i The HFA I or II cannot connect directly to the network and cannot receive data from the network Synchronization via the network cannot be...

Page 343: ...d to your HFA II i in the event that you lose any data on your HFA II i Note We recommend periodic backup of your file server to maintain multiple copies of the database Backing Up and Restoring Your...

Page 344: ...le server or PC These files can be organized into folders viewed on the PC as a TIFF or PDF file or sent to a printer that is connected to the PC To better organize your database you may place any of...

Page 345: ...ve Transmit option you may not need to use the Transfer Tests function again Note Tests can also transfer via a serial connection from an HFA II or HFA I to the HFA II i This option allows you to tran...

Page 346: ...but TIFF image files are the same In Figure 14 3 we see exams from Zeiss Eric listed in the Transfer Tests function Figure 14 3 Exams Shown on Transfer Tests Function When all exams are transferred f...

Page 347: ...rted into other applications For example you might insert a graphic file the TIFF or PDF image of the printout into a Microsoft Word document or Powerpoint presentation The individual file name is a c...

Page 348: ...like on the PC with Adobe Reader You may view the report on the screen or print to your office printer from the PC Figure 14 6 PDF Image of SFA File Displayed on the PC Note PDF images open in Adobe...

Page 349: ...alter the tests selected for Baseline or Follow up on the PC The GPA file you open on the PC looks identical to the GPA printout and cannot be altered If the GPA is changed later on the HFA II i the n...

Page 350: ...Networking Humphrey Field Analyzer II i series User Manual 2660021145640 A 14 12 Figure 14 8 PDF Image of the GPA Summary File Displayed on the PC...

Page 351: ...MS Export Setup Work List Setup DICOM Gateway Setup The networking functions that are described are Backing up HFA II i data to a network file server Restoring backed up HFA II i data from a network f...

Page 352: ...r backup files from the premises and store in a safe place Note Subsequent backups replace the current backup Once you have backed up data to the server you can restore it onto your HFA II i by follow...

Page 353: ...ge shown in Figure 14 11 will appear while data is being backed up to the server Figure 14 11 Hard Drive Backing Up to the File Server Message 7 When the backup has completed the message shown in Figu...

Page 354: ...storing a Database 2 Select FILE SERVER in the Source drop down box 3 Select HARD DRIVE in the Destination drop down box 4 Select PROCEED to begin the data restore A message will appear as is shown in...

Page 355: ...ID exists when patients are copied transferred retrieved from an archive or restored from a backup There is no way to separate the combined records of erroneously merged patients Automatic merging of...

Page 356: ...XACT SAME Name Date of Birth Patient ID and Issuer of ID as a patient that is copied transferred retrieved from an archive or restored from a backup For example consider the following scenario Patient...

Page 357: ...retrieve the previously unretrieved data If you want to ensure that all HFAs have the same patient data at any one time perform a manual archive of all instruments and then after all instruments have...

Page 358: ...wn box appears below the Archive drop down box Use the numeric keypad to enter a date from 1 through 31 On your selected date the HFA II i will archive patient data to the server automatically at inst...

Page 359: ...archive you will receive a reminder message similar to that shown in Figure 14 20 upon starting up the HFA II i Figure 14 20 Initial Reminder to Archive the Database Manually After the first time you...

Page 360: ...e Retrieve Selection Dialog 3 A browser window Figure 14 23 will open to allow you to select the HFAs you wish to retrieve data from The archives are named with the model number and serial number of t...

Page 361: ...l of archived data to this individual HFA II i you will need to repeat this retrieval process for each of the other HFA II i perimeters that you may have in your office network Hint If you wish to syn...

Page 362: ...If you select MONTHLY as the retrieval reminder frequency upon starting up the HFA II i you will be reminded to retrieve your data manually 30 days after your last retrieval and you will continue to...

Page 363: ...see Manually Creating a Patient Folder with the Patient Folder Button on page 14 26 Specify a Patient Folder from the File Functions menu see Manually Creating Patient Folders with the Specify Patien...

Page 364: ...NTER to complete your entry You will be returned to the Patient Data 1 screen Figure 14 28 Entering the Name of a Patient Folder Note Patient folders created from the Patient Data 1 screen override au...

Page 365: ...gure 14 30 FLOPPY or a USB storage device Figure 14 30 Specify Patient Folder Disk Options Screen 3 If you desire to limit the range of files select SET CURRENT RANGE Specify any limitations that you...

Page 366: ...from the list whom you wish to place in a patient folder Touching an entry on the Patient Selection screen selects it Touching an entry a second time de selects it During the selection process you ca...

Page 367: ...fied folder for the patient unless changed later via the Specify Patient Folders function or in the Patient Data 1 screen Furthermore if patient folders are created with the Specify Patient Folders fu...

Page 368: ...Date of Birth Patient ID and Issuer of ID exists when patients are copied transferred retrieved from an archive or restored from a backup There is no way to separate the combined records of erroneousl...

Page 369: ...Data Export screen all files will be placed into one common file folder If it was selected each file will be transferred into a specifically named file folder for each unique patient i e all files for...

Page 370: ...SET CURRENT RANGE If not press PROCEED and go to Step 9 7 The Transfer Tests Set Current Range window opens You can select a portion of all available tests by restricting the listing with a specified...

Page 371: ...Transfer Tests function again Note If your network server connection is lost or gives an error your exams will not be transferred to your network file server or EMR PMS DICOM system You can choose to...

Page 372: ...t not transferred to your network file server You can choose to defer the transfer and continue to take exams and when the network is back up use Transfer Deferred Tests to transfer them to your file...

Page 373: ...Tests button on the Save Transmit Option screen At instrument startup a message will be displayed if you have any deferred exams to be transferred Figure 14 39 Figure 14 39 Startup Deferred Exams Mes...

Page 374: ...verview multi test printout for example the GPA Single Field Analysis print style is only available if you have the GPA software licensed on your HFA II i Changing the Print To Files Options Use the f...

Page 375: ...Note The Data Export Host or EMR PMS Host options will only appear on the list if you have registered the HFA NET Pro software on your HFA II i The DICOM Archive option is only available if you have...

Page 376: ...ing Use it to select your printout destination Select PRINTER to generate a hard copy paper printout Select IMAGE FILE to save an image file to floppy disk or to export it via the network Select PRINT...

Page 377: ...ID The Issuer of ID may be automatically created on the HFA or EMR PMS DICOM system or specified manually in the HFA If specified manually the Issuer of ID should be a practice wide identifier which i...

Page 378: ...icensed HFA NET Pro and purchased and installed an EMR system or a PMS see Setting Up Exporting to Non DICOM EMR PMS Systems and DICOM Systems using DICOM Gateway 1 0 on page I 22 to set up the EMR PM...

Page 379: ...will be updated with information from the work list See Imported Patient Rules and Conflicts on page 14 59 Exporting to EMR PMS DICOM Systems To export exam data and reports to EMR PMS DICOM systems u...

Page 380: ...Transfer Destination drop down box is only available in the listing if you have licensed the DICOM Gateway 2 0 software on your HFA II i Otherwise these options will not appear in the Transfer Destin...

Page 381: ...ote The DATA EXPORT HOST or ERM PMS HOST options in the Destination drop down box are only available in the listing if you have licensed the HFA NET Pro networking software on your HFA II i The DICOM...

Page 382: ...DATA AND REPORT exam data will be transferred first followed by reports Note Exam data will not be exported to the DICOM Archive if you have already exported the same exam data it already exists on t...

Page 383: ...eway 1 0 work lists WORK LIST must be unchecked in the DICOM Gateway Services screen see Enable Disable DICOM Gateway Services on page H 4 To import patient data using a work list from your non DICOM...

Page 384: ...Specify any limitations that you wish to place on your search of all available patients from the Work List These limitations determine which patient s are selected Select the CLEAR QUERY button to cle...

Page 385: ...alphabetical order Figure 14 53 Work List Browser Screen 6 From the Work List browser select the patient you want Touching an entry on the Work List browser screen selects it Touching an entry a seco...

Page 386: ...ing Error Messages on page I 36 Note See Imported Patient Rules and Conflicts on page 14 59 for information on imported Patient ID and Issuer of ID rules and conflicts Importing Work Lists from DICOM...

Page 387: ...Empty Patient Data Screen 2 Press the RECALL PATIENT DATA button to bring up the Source Options screen 3 Touch the drop down arrow next to the Source drop down box Select your source of patient data...

Page 388: ...umentation for more information Note If your DICOM system supports the wild card character you can enter it to mean any characters in the Last Name and First Name fields For example entering j in the...

Page 389: ...urce Options screen Once set up and saved you only need to select the BROAD QUERY SETUP button again if you want to change the values on the Work List Broad Query Setup screen Figure 14 58 Work List B...

Page 390: ...gh your file listing more rapidly if your listing is two or more screens in length Figure 14 60 Work List Browser Screen Patient Selected 8 Press DETAIL to bring up a Details screen displaying patient...

Page 391: ...atient information and return to the Main Menu or to a selected test if you entered the Patient Data screen through a selected test Note If a problem occurs during this procedure refer to Table I 5 Wo...

Page 392: ...n a patient exists in the local database with the EXACT SAME Name Date of Birth Patient ID and Issuer of ID as a patient that is copied transferred retrieved from an archive or restored from a backup...

Page 393: ...Functions menu as shown in Figure 14 64 and press the VIEW TEST button Figure 14 64 File Functions Menu OR to print tests from a DICOM Archive 1 From the Main Menu press the PRINT icon to display the...

Page 394: ...COM Archive These limitations determine which patient s are selected Select the CLEAR QUERY button to clear all these query fields Note A patient cannot be selected if the patient has no exams When re...

Page 395: ...lphabetical order Figure 14 67 Patient List Browser Screen 5 From the Patient List browser select the patient you want Touching an entry on the Patient List browser screen selects it Figure 14 68 and...

Page 396: ...lects it During the selection process you can use the up down one line and up down one screen buttons to move through your file listing more rapidly if your listing is two or more screens in length Wh...

Page 397: ...occurs when a patient exists in the local database with the EXACT SAME Name Date of Birth Patient ID and Issuer of ID as a patient that is copied transferred retrieved from an archive or restored fro...

Page 398: ...coming patient information the imported patient s exams merges with the existing patient and the name and date of birth of the existing patient will be replaced by the name and date of birth of the im...

Page 399: ...ng Parts 15 4 Operating the Printrex Printer 15 9 Touch Screen Calibration 15 11 Using Removable USB Storage Devices and Floppy Disks 15 12 The HFA II i is designed to meet the demands of your busy sc...

Page 400: ...o ammonia Dampen a soft cloth with cleaner and gently wipe the surfaces Never spray the cleaner directly on the exterior surfaces Bowl Please review the two cautionary Notes that follow this table Dus...

Page 401: ...r cover underneath the overhang on the back of the instrument Press firmly with your finger or thumb on the middle of the top surface of the cover and push down and pull out to unlatch it Tilt the air...

Page 402: ...HFA II i and lower the table To remove the top access panel rotate it counterclockwise until you align the lamp symbol on the cover with the raised dot that is molded into the top of the case Standin...

Page 403: ...screw and replace connector cable 6To replace the top access panel insert the panel into the opening As you do so align the lamp image on the lid with the raised dot on the underlying case Rotate the...

Page 404: ...narrow bladed screwdriver gently pry open the cover to expose the fuse holders Information about the proper replacement fuses is found adjacent to the fuse holder 3Slide out each fuse holder marked w...

Page 405: ...the replacement fuses and proper ratings are posted next to the fuse location described below Power table fuses control the power to the table Underside of power supply Figure 15 2 HFA II i Power Tabl...

Page 406: ...at the base of the lifting column Move the table away from the wall to access the back of the table 2Use needle nose pliers or fingernails gently to slide the fuse drawer from its housing 3Remove def...

Page 407: ...ches at the lower corners of the door Pull up on the latches to open the door 2Remove the paper roll holder from the printer and remove the paper roll bar from the holder Slip the empty core off the b...

Page 408: ...icator flashes under certain conditions such as when the door is open or when there is no paper The printer is ready to print provided the Power indicator is lit and the Error indicator is not flashin...

Page 409: ...standard calibration method that follows below there are two additional ways to re calibrate the touch screen should you have difficulty getting to the TOUCH SCREEN CALIBRATION button on the Additiona...

Page 410: ...can continue the regular start up by cancelling out of the calibration mode This situation occasionally occurs when the patient response button is pressed down continuously because of the way it was...

Page 411: ...sk in the drive first take it out of its protective case Hold the disk so the arrow is aimed at the drive and insert it completely into the drive To remove a disk from a USB floppy disk drive press th...

Page 412: ...Care and Cleaning Humphrey Field Analyzer II i series User Manual 2660021145640 A 15 14...

Page 413: ...31 5 ASB Maximum Temporal Range 89 degrees Dynamic Range 50 dB Computer Operating System VxWorks 6 7 Intel Celeron Processor Internal storage 160 GB up to 10 million exams 5 USB ports Type A USB 2 0 s...

Page 414: ...ondensation Atmospheric Pressure 700 to 1060 hPa Max wet bulb 78 F 26 C Power Table Models HFA 120 and HFA 230 only Physical Table Top Dimensions 53 D x 88 W cm Table Min Max Height 63 Min 100 Max cm...

Page 415: ...ble mounted WARNING Do not reconfigure system components on the table nor add non system devices or components to the table nor replace original system components with substitutes not approved by Carl...

Page 416: ...Product Specifications Humphrey Field Analyzer II i series User Manual 2660021145640 A A 4...

Page 417: ...ripheral Field Test Patterns P 60 FF 81 FF 120 FF 135 FF 246 FF Armaly Nasal Step X X X X X X X X X X X X X X X X X Testing Strategies Modes Two Zone Three Zone Quantify Defects Age Level Referenced T...

Page 418: ...ze III Overview Size III Change Analysis Guided Progression Analysis GPA X X X X Xe X X X Xe X X X Xe STATPAC Formats Full Threshold FastPac Single Field Analysis Overview Change Analysis Glaucoma Cha...

Page 419: ...Touchscreen Keyboard with Glidepad Trackball Mouse External VGA Monitor X X Option Option Option X X Option Option Option X X Option Option Option X X X Option Option Patient Data Input Name Date of B...

Page 420: ...Product Features Humphrey Field Analyzer II i series User Manual 2660021145640 A B 4...

Page 421: ...items will be covered by their manufacturer s warranty and arrangement for service must be made through that manufacturer This Warranty will NOT apply if repair or parts replacement is required becau...

Page 422: ...T ALLOW THE EXCLUSION OR LIMITATION OF CONSEQUENTIAL OR INCIDENTAL DAMAGES SO THE ABOVE LIMITATIONS OR EXCLUSIONS MAY NOT APPLY TO YOU Service Contract A Warranty Extension Agreement Service Contract...

Page 423: ...ide on line or similar uses to third parties or e use the Software in any manner that infringes the intellectual property or other rights of another party You may be held legally responsible for any c...

Page 424: ...ght notice that is included in this appendix Derivative Works shall mean any work whether in Source or Object form that is based on or derived from the Work and for which the editorial revisions annot...

Page 425: ...contained within such NOTICE file excluding those notices that do not pertain to any part of the Derivative Works in at least one of the following places within a NOTICE text file distributed as part...

Page 426: ...demnity or other liability obligations and or rights consistent with this License However in accepting such obligations You may act only on Your own behalf and on Your sole responsibility not on behal...

Page 427: ...ey Field Analyzer II i series User Manual 2660021145640 A Icon Glossary D 1 D Icon Glossary Main Menu Help Patient Data File Functions Print Functions Undo Return to Previous Screen System Setup Infor...

Page 428: ...Icon Glossary Humphrey Field Analyzer II i series User Manual 2660021145640 A D 2...

Page 429: ...s equivalent to a Goldmann V 4e stimulus or 10 000 asb A simplified chart to convert from dB values to Goldmann units is available in Tables E 1 through E 6 To use the conversion tables first locate t...

Page 430: ...I 4e IV 4e V 4e 11 794 I 4d II 4d III 4d IV 4d V 4d 12 631 I 4c II 4c III 4c IV 4c V 4c 13 501 I 4b II 4b III 4b IV 4b V 4b 14 398 I 4a II 4a III 4a IV 4a V 4a 15 316 I 3e II 3e III 3e IV 3e V 3e 16 2...

Page 431: ...II 1c III 1c 38 1 6 I 3b I 4b I 1b II 1b III 1b 39 1 3 I 3a I 4a I 1a II 1a III 1a 40 1 0 I 2e I 3e I 4e I 1e II 1e 41 0 8 I 2d I 3d I 4d I 1d II 1d 42 0 6 I 2c I 3c II 4c I 1c II 1c 43 0 5 I 2b I 3b...

Page 432: ...34 II 10 11 12 13 14 15 16 17 18 19 20 21 22 23 24 25 26 27 28 29 III 5 6 7 8 9 10 11 12 13 14 15 16 17 18 19 20 21 22 23 24 IV 0 1 2 3 4 5 6 7 8 9 10 11 12 13 14 15 16 17 18 19 Table E 4 Using a Siz...

Page 433: ...a e d c b a e d c b a e d c b a 0 35 36 37 38 39 40 41 42 43 44 45 46 47 48 49 50 51 52 53 54 I 30 31 32 33 34 35 36 37 38 39 40 41 42 43 44 45 46 47 48 49 II 25 26 27 28 29 30 31 32 33 34 35 36 37 3...

Page 434: ...er II i series User Manual 2660021145640 A E 6 Blue Yellow Specifications Stimulus Color 440 nm Blue Background Illumination Color Shott OG 530 Filter Yellow Background Brightness Level 100 cd m2 Stim...

Page 435: ...est Patterns Figure F 1 Central 40 Point Screening Test Pattern Right Eye Figure F 2 Central 64 Point Screening Test Pattern Right Eye Figure F 3 Central 76 Point Screening Test Pattern Right Eye This...

Page 436: ...ual 2660021145640 A F 2 Figure F 5 Central Armaly Screening Test Pattern Right Eye Figure F 6 Full Field Armaly Screening Test Pattern Right Eye Figure F 7 Nasal Step Screening Test Pattern Right Eye...

Page 437: ...gure F 10 Full Field 120 Screening Test Pattern Right Eye Figure F 11 Full Field 135 Screening Test Pattern Right Eye Figure F 12 Full Field 246 Screening Test Pattern Right Eye Humphrey Field Analyze...

Page 438: ...anual 2660021145640 A F 4 Threshold Test Patterns Figure F 13 Central 30 2 Threshold Test Pattern Right Eye Figure F 14 Central 24 2 Threshold Test Pattern Right Eye Figure F 15 Central 10 2 Threshold...

Page 439: ...Humphrey Field Analyzer II i series User Manual 2660021145640 A Test Patterns F 5 Figure F 17 Nasal Step Threshold Test Pattern Right Eye Figure F 18 Peripheral 60 4 Threshold Test Pattern Right Eye...

Page 440: ...gure F 20 Superior 64 Screening Test Pattern Right Eye Figure F 21 Esterman Monocular Test Pattern Right Eye Figure F 22 Esterman Binocular Test Pattern Test Patterns Humphrey Field Analyzer II i seri...

Page 441: ...guration program that configures network settings for HFA NET Pro on Humphrey HFA II i instruments running system software version 4 2 or later The RCT uses a multi page wizard to guide the operator s...

Page 442: ...Yes to continue No further action on your part will be required If some or all of the ports are already opened the Open Ports button will keep them opened Other Firewall If you are using any other fi...

Page 443: ...lso allow you to know the location of the instrument To name your HFA II i instruments and allow them to be configured with the RCT follow the steps below 1 On the HFA II i instrument from the Main Me...

Page 444: ...2 with the English language and Easy mode selected by default The RCT provides five modes of operation Easy default mode Copy Custom Report and Test These modes are described in detail in the followi...

Page 445: ...ave Adobe Reader installed go to www adobe com to download and install the free Adobe Reader When the Next button is selected for the first time a LICENSE AGREEMENT window is opened Figure G 3 Read th...

Page 446: ...sy mode to configure your HFA if it is not already using networking features Note If you have a previously created User Account with the User Name Zeiss and a password different than the default RCT P...

Page 447: ...l your HFA instruments cannot respond fast enough you will receive a message such as No instruments are responding Please try again later or Could not retrieve instrument configuration data Please try...

Page 448: ...ieve and network backup Shared Printer configures the HFA to use a shared printer connected to the computer Figure G 6 Select Shared Folder 3 A list of all networked HFA II i instruments will be displ...

Page 449: ...essage Note You must select at least one instrument to continue Note The name of the HFA II i instrument can be created on the instrument in the HFA Network Setup Screen Creating a name for an instrum...

Page 450: ...ot currently exist you will be asked if you want to create it If you enter or select a folder that is not currently shared then the RCT will make it sharable Note The RCT only allows you to create a s...

Page 451: ...y Main Menu System Setup Printer Shared to select the shared printer You need to also select the correct printer type as PCL 5 LASERJET COMPATIBLE or PCL 3 DESKJET COMPATIBLE Main Menu System Setup Pr...

Page 452: ...uments Figure G 11 Commit Screen Select the PERFORM CONNECTION TESTS checkbox to perform a connection test for each config ured setup Results of these tests will be presented on the Completion screen...

Page 453: ...utton was not selected default then after selecting NEXT on the Commit screen a final Completion screen will be displayed Figure G 13 If you selected PERFORM CONNECTION TESTS then each selected instru...

Page 454: ...ments Copy mode behaves as if you had used Easy mode and manually entered the configuration of the source instrument rather than having the configuration automatically created The following steps desc...

Page 455: ...all your HFA instruments cannot respond fast enough you will receive a message such as No instruments are responding Please try again later or Could not retrieve instrument configuration data Please t...

Page 456: ...rom by clicking on it and then select NEXT to continue Figure G 16 Select the Source Networked HFA Instrument to Copy Note The name of the HFA II i instrument can be created on the instrument in the H...

Page 457: ...7 Please Wait Message 3 A list of all other non source networked HFA II i instruments will be displayed Figure G 18 All instruments are selected by default Select one or more destination instruments y...

Page 458: ...CANCEL will exit the RCT without configuring any of the selected instruments Figure G 19 Commit Screen Select the PERFORM CONNECTION TESTS checkbox to perform a connection test for each config ured se...

Page 459: ...ton was not selected default then after selecting NEXT on the Commit screen a final Completion screen will be displayed Figure G 21 If you selected PERFORM CONNECTION TESTS then each selected instrume...

Page 460: ...ected features of the selected instruments while in Easy mode the setup will be applied to all features of the selected instruments CAUTION If you use Custom mode and change the User Name and or passw...

Page 461: ...all your HFA instruments cannot respond fast enough you will receive a message such as No instruments are responding Please try again later or Could not retrieve instrument configuration data Please t...

Page 462: ...om configuration process Figure G 24 Enter November171846 for the password and then select NEXT to continue This login is included to provide a security barrier to the more advanced Custom configurati...

Page 463: ...NEXT to continue CTRL CLICK to select or deselect multiple instruments Figure G 26 Select Networked HFA Instruments to Configure Note The name of the HFA II i instrument can be created on the instrume...

Page 464: ...a file server Synchronizing data on two or more HFA II i instruments EMR PMS Export Setup export information to an Electronic Medical Records EMR system or Patient Management System PMS Data Export S...

Page 465: ...yConnect RCT 1 0 G 25 Figure G 28 List of Configurable Features Shared Folder Figure G 29 List of Configurable Features Shared Printer The File Server is the name of the computer Share is the path of...

Page 466: ...oes not currently exist you will be asked if you want to create it If you enter or select a folder that is not currently shared then the RCT will make it sharable Note The RCT only allows you to creat...

Page 467: ...y Main Menu System Setup Printer Shared to select the shared printer You need to also select the correct printer type as PCL 5 LASERJET COMPATIBLE or PCL 3 DESKJET COMPATIBLE Main Menu System Setup Pr...

Page 468: ...user name and password and then select NEXT to continue Note If you use a User Name in Custom mode from a previously created User Account and enter a password that is not the same as from the previous...

Page 469: ...nges Select BACK to go back to the previous screen s to make any corrections Selecting CANCEL will exit the RCT without configuring any of the selected instruments Figure G 33 Commit Screen Select the...

Page 470: ...ton was not selected default then after selecting NEXT on the Commit screen a final Completion screen will be displayed Figure G 35 If you selected PERFORM CONNECTION TESTS then each selected instrume...

Page 471: ...ny user can run Report mode the user does not need to be an Administrator The following steps describe how to use Report mode 1 Select REPORT from the SELECT A CONFIGURATION MODE radio buttons Figure...

Page 472: ...ome screen and then run the RCT again 2 A list of all networked HFA II i instruments will be displayed Figure G 38 All instruments are selected by default Select the instruments you want to display co...

Page 473: ...ait Message 3 The RCT will display the network settings for each selected instrument one instrument at a time Figure G 40 Select NEXT to continue to the next selected instrument Figure G 40 Network Se...

Page 474: ...onfiguration details for each selected instrument one instrument at a time Figure G 41 Select NEXT to continue to the next selected instrument Figure G 41 Feature Configuration Details for a Selected...

Page 475: ...the RCT will run successfully and configure the HFA but the connection test will still fail indicating that the HFA cannot currently export files to the shared folder If a connection test fails see T...

Page 476: ...all your HFA instruments cannot respond fast enough you will receive a message such as No instruments are responding Please try again later or Could not retrieve instrument configuration data Please t...

Page 477: ...continue CTRL CLICK to select or deselect multiple instruments Figure G 45 Select Networked HFA Instruments to Test Configurations Note The name of the HFA II i instrument can be created on the instru...

Page 478: ...en will be displayed Figure G 47 and Figure G 48 Select NEXT to begin testing your configured instruments one at a time Figure G 49 shows a connection test in progress for the first instrument configu...

Page 479: ...d Analyzer II i series User Manual 2660021145640 A EasyConnect RCT 1 0 G 39 Figure G 48 Configuration Complete in Easy Copy or Custom Mode Ready to Test Figure G 49 Connection Test in Progress for Fir...

Page 480: ...ests have been completed for all configured instruments select NEXT to continue to a final Completion screen where the results of all tests will be displayed Figure G 50 Figure G 51 and Figure G 52 Fi...

Page 481: ...52 Completion Screen Fail Note In some networks the RCT will run successfully and configure the HFA but the connection test will still fail indicating that the HFA cannot currently export files to th...

Page 482: ...invoked from its Network Diagnostics menu Clicking OK will display a test log for the next instrument that failed the connection tests if any A SAVE TEST RESULTS button will also be provided Clicking...

Page 483: ...etwork Once an HFA is visible in the RCT selection window it should be possible to configure it Check for loose network cable connections or other sources of network problems HFA has been transferring...

Page 484: ...tional information These exceptions are exposed via the File and Printer Sharing Service in the Windows XP Firewall dialog Exceptions Tab If your instrument and server are in different subnets example...

Page 485: ...If you have multiple HFAs the DICOM archive acts like a central database and provides a means of database backup Automatic or manual archiving and synchronization of patient records is not needed as t...

Page 486: ...following steps that you will need to perform 1 DICOM Server Setup Set up your DICOM storage server and modality worklist server to recognize the AE Titles of your HFAs that will be connecting throug...

Page 487: ...port a report at the end of an exam see Setting Up Save Transmit for EMR PMS DICOM Systems on page I 24 DICOM 2 0 Gateway Setup on HFA To set up DICOM Gateway 2 0 on the HFA II i 1 Select Main Menu Sy...

Page 488: ...tware using the pop up keypad Press ENTER Enable Disable DICOM Gateway Services 12Select SERVICES to display the DICOM Gateway Services screen Figure H 2 Figure H 2 DICOM Gateway Services Screen To en...

Page 489: ...FEP or DICOM Gateway 1 0 work list will be used see Importing Work Lists from Non DICOM EMR PMS Systems and DICOM Systems using DICOM Gateway 1 0 on page 14 45 Perform Test Connections 13Select TEST C...

Page 490: ...2 0 software QUERY PROVIDER Perform this connection test to the Query Provider server set in the DICOM Gateway 2 0 software RETRIEVE PROVIDER Perform this connection test to the Retrieve Provider serv...

Page 491: ...otocols Used by HFAs I 40 Note It is strongly recommended that you use the EasyConnect RCT in Easy Mode instead of manually configuring your network settings on your HFA II i instruments see EasyConne...

Page 492: ...see EasyConnect RCT 1 0 on page G 1 Please contact Carl Zeiss Meditec for minimum network requirements prior to having your software licensed for HFA NET Pro In order to be able to network your HFA I...

Page 493: ...onnector on the instrument panel is identified with an Ethernet symbol as shown on the left on the label that is attached to the adjoining panel Figure I 1 Location of the Network Connector Panel and...

Page 494: ...ring your network settings on your HFA II i instruments see EasyConnect RCT 1 0 on page G 1 You may set up your HFA network to work with Link Local DHCP or STATIC IP The following describes the proced...

Page 495: ...hing the local network Link Local does not require a DHCP server If you wish to use Link Local follow this procedure to set it up 1 From the HFA Network Setup screen select LINK LOCAL from the OBTAIN...

Page 496: ...o Network Troubleshooting Error Messages on page I 31 for assistance Note Any time you change any of the IP addresses on this screen it is necessary to power down the HFA II i and then restart HFA Net...

Page 497: ...me your HFA II i instrument for ease in identification when using the EasyConnect RCT Creating a name for an instrument can also allow you to know the location of the instrument 7 If an error message...

Page 498: ...as necessary Once they are all correct select SAVE Your setup entries will be saved and you will be returned to the Communications Setup screen Note Whenever you change the HFA Network Setup screen e...

Page 499: ...s setting up to export to FTP 1 Select MAIN MENU SYSTEM SETUP COMMUNICATIONS SETUP DATA EXPORT SETUP or ARCHIVE RETRIEVE SETUP etc to reach the screen that is shown in Figure I 8 2 In the File Server...

Page 500: ...or one that your Network Administrator has specifically created for your use Once the folder is designated its name and location will appear in the Folder box immediately below the FTP Folder button...

Page 501: ...e I 12 This section describes setting up to export a Shared Folder Note In order to use a Shared Folder you must have entered a Workgroup Name See Setting Up Your HFA Network on page I 4 Figure I 12 S...

Page 502: ...n the needed information and press ENTER 7 When you select the BROWSE FOR SHARED FOLDER button a Select Shared Folder screen will open listing Windows Workgroups Domains Select a Workgroup Domain such...

Page 503: ...n examination Note Patient Folders cannot be created on a DICOM Archive when using DICOM Gateway 2 0 Note Patient Folders are only available if you have licensed the HFA NET Pro networking software on...

Page 504: ...FTP or a Shared Folder You can archive data either manually or automatically The first archiving that you perform will archive the entire database on the HFA hard disk to the server Subsequent archivi...

Page 505: ...elect MANUAL ONLY as the archiving frequency 3 A Remind drop down box will appear below the Archive drop down box Either leave the drop down box setting at NONE or select WEEKLY as illustrated below o...

Page 506: ...he HFAs for retrieval without actually doing an archive first 6 Now that you have set up your archiving go on to either Setting Up Manual Archive Retrieval on page I 17 or Setting Up Automatic Archive...

Page 507: ...onthly Automatic Archiving 3 Go to Step 4 in Setting Up Manual Archiving to complete the archive setup Setting Up Manual Archive Retrieval Use the following steps to set up manual archive retrieval 1...

Page 508: ...u will continue to be reminded every day thereafter until you do a retrieval If you select MONTHLY as the retrieval reminder frequency upon starting up the HFA II i you will be reminded to retrieve yo...

Page 509: ...day the HFA II i will retrieve instrument data from the server automatically Data retrieval will occur at instrument startup Figure I 22 Selecting a Day of the Week for Automatic Archive Retrieval 4...

Page 510: ...ch they were saved e g 745i 654321 Either press the SELECT ALL button to choose all listed HFAs in one operation or select one or more HFA serial numbers from the list manually HFAs you select will ha...

Page 511: ...TION to display the screen that is shown in Figure I 25 2 Open the Transfer Destination drop down box and select Data Export HOST 3 Open the Data Format drop down box and select XML AND IMAGE FILES Fi...

Page 512: ...ec and to have an operational EMR PMS that is compatible with the HFA II i Once you have purchased and licensed the DICOM Gateway 1 0 and purchased and installed a DICOM system see the HFA II i DICOM...

Page 513: ...way 1 0 work lists WORK LIST must be unchecked in the DICOM Gateway Services screen see Enable Disable DICOM Gateway Services on page H 4 1 From the Main Menu select SYSTEM SETUP COMMUNICATIONS SETUP...

Page 514: ...Figure I 28 Setting Transfer Destination Drop Down Box to EMR PMS Host Figure I 29 Setting Transfer Destination Drop Down Box to DICOM Archive Note The ERM PMS Host option in the Transfer Destination...

Page 515: ...you to export patient and examination data as a computer file The text based data is exported as an XML Extensible Markup Language file to allow it to be readable across a broad range of different se...

Page 516: ...ton and select your desired destination as either DATA EXPORT HOST EMR PMS HOST DICOM ARCHIVE or FLOPPY DISK Note The Data Export Host or EMR PMS Host options will only appear on the list if you have...

Page 517: ...the Configuration Backup capability of your HFA II i you can back up those network settings to a USB storage device for safety in the event of hard disk problems You should use this Configuration Bac...

Page 518: ...nu Remote Host The Remote Host drop down box in the Network Diagnostics menu has the options shown in the table below Table I 1 Remote Host Drop down Box Entries Based on Software License Purchased So...

Page 519: ...Loop Back Test button performs an internal loop back test for the ethernet controller with either a Loop back Test Successful or Loop back Test Failed message being displayed Save Diagnostic Results...

Page 520: ...If you select YES a database retrieve from the file server will be performed Reset Archive The Reset Archive button displays the dialog box shown in Figure I 37 below Figure I 37 Reset Archive Dialog...

Page 521: ...from File Server failed Specific condition Table I 2 Specific Networking Error Messages Possible Specific Condition What to do Disk on server is full Free up disk space on server Cannot find server C...

Page 522: ...able is connected Ensure Archive root folder and instrument folder for other instruments are present on server Backup to File Server failed A network error has occurred Backing up patient database Ens...

Page 523: ...running Verify accuracy of the IP address for your server and re enter the address if necessary Cannot access the specified folder Check permissions and try again Verify that the user has access privi...

Page 524: ...ace to perform archive Make more space by deleting old exams Free up hard drive storage space on the HFA II i as necessary Not enough hard disk space to perform data retrieval Make more space by delet...

Page 525: ...attempts write down the details of your process and then contact Carl Zeiss Meditec Customer Service Unknown error occurred restore from file server not completed Repeat the process If it fails on se...

Page 526: ...on of the problem Error occurred while retrieving the work list No items in the work list Do you want to retry Retrieving the work list No patients were present in the work list that matched the query...

Page 527: ...the elements in the Referenced SOP Service Object Pair Instance Sequence was not available Retry 0213 Resource limitation The SCP Service Class Provider does not currently have enough resources to st...

Page 528: ...Common Internet File System A file sharing protocol used by Microsoft Windows Components Network elements such as HFA II i series instruments other networkable Carl Zeiss Meditec instruments computers...

Page 529: ...ctively restore only a portion of the backed up data Retrieve To return user selected archive data to the HFA II i Data is merged with existing HFA II i data Existing HFA II i data is not overwritten...

Page 530: ...lyb b Available only in limited circumstances Image Files Only XML and Image Files DICOM Gateway 2 0 Classic Seriala HFA 1 Seriala HFA 2 Serial DICOM Archive Report Exam Data Exam Data and Report Seri...

Page 531: ...pies of all your data backed up on either floppy disks USB storage devices or your network file server if you have licensed HFA NET Pro software on your HFA II i before beginning this procedure If nec...

Page 532: ...approximately 10 seconds to pass before moving on to Step 4 4 There is one more step to installing the software Turn on the power to the HFA II i The Install screen will be present Press the button la...

Page 533: ...Kinetic test feature Do not use this method for full system software upgrade installations 1 From the Main Menu select the SYSTEM SETUP icon On the System Setup menu select ADDITIONAL SETUP Next selec...

Page 534: ...age Device 5 To start the installation select the USB storage device that contains the optional software feature by pressing the button with its device name 6 You will see the screen that is shown in...

Page 535: ...step process A Obtain Node ID from the License Registration Screen on the HFA II i B Obtain License Key and Security Code from the Internet C Enter Licensing Information on the HFA II i Details for ea...

Page 536: ...ersupport meditec zeiss com Outside the United States please contact your local Carl Zeiss Meditec distributor 2 In the browser s address bar type in the following URL http www meditec zeiss com regis...

Page 537: ...tificate Serial Number including the alphabetic prefix and the intervening dash before the number and click the Submit button 7 Enter your Instrument Serial Number and click the Submit button Note Whe...

Page 538: ...ard for Certificate Serial Number 2 When you are returned to the License Registration screen select LICENSE KEY A pop up keypad will open as is shown in Figure J 10 Use it to enter your License Key th...

Page 539: ...MOVE button next to HFA NET XML Data Export is specialized software reserved for research purposes A License Registration screen Figure J 11 is displayed with the license information Select REMOVE if...

Page 540: ...Installing Licensing HFA II i Software Humphrey Field Analyzer II i series User Manual 2660021145640 A J 10...

Page 541: ...the stimulus while searching for the threshold B Make optimal use of the information contained in the patient s responses to those stimuli This is important both in terms of calculating the threshold...

Page 542: ...less time at locations where the answers are highly consistent When the information index reaches a predetermined value testing at that point is discontinued the point is then closed The information i...

Page 543: ...ponsibility for satisfying all local IRB or Ethics Committee requirements as well as for obtaining informed consent according to local requirements SITA and SITA SWAP Normative Databases Subjects that...

Page 544: ...ITA SWAP 18 years of age or older Able and willing to make the required study visits Able and willing to give consent and follow study instructions Exclusion Criteria History of amblyopia Pressure of...

Page 545: ...ished visual field loss Some eyes were allowed to be enrolled where earlier visual field tests had been normal or questionable but where optic nerve and other findings clearly indicated that the eye w...

Page 546: ...nimum rest period of five minutes between all tests The second visit was identical to the initial visit in order of testing and number of tests GPA Only one eye was tested Three visual field tests wer...

Page 547: ...eviation from normal The GPA database was used to generate significance levels for change that exceeds expected test retest variability Results in patients 80 years of age or older should be interpret...

Page 548: ...eir universities hospitals and clinics in the recruitment of subjects and in the collection of data None of these individuals however has endorsed or approved the final package We could not have devel...

Page 549: ...res of 20 or more and false positive or false negative errors of 33 or more were excluded as unreliable The significance limits thus derived were more restrictive than they would have been had unrelia...

Page 550: ...ere are some limitations For Central 10 2 test results STATPAC produces a Single Field Analysis or an Overview showing up to sixteen 16 tests results the Change Analysis and Glaucoma Change Probabilit...

Page 551: ...Printouts Displaying Mixed Test Strategies When SITA results are mixed with Full Threshold results FastPac results or both no SF or CPSD values will display for the SITA tests Note For the Change Anal...

Page 552: ...Plot Summary of Global Indices No p Values Reference to Older Test Strategies Humphrey Field Analyzer II i series User Manual 2660021145640 A L 4 Figure L 1 A Mixed Change Analysis Printout with Sita...

Page 553: ...ly due to normal variability The significance limits for this analysis were obtained by testing a large group of glaucoma patients four times in the course of a month Normal variability in these patie...

Page 554: ...Reference to Older Test Strategies Humphrey Field Analyzer II i series User Manual 2660021145640 A L 6 Figure L 2 The Glaucoma Change Probability Baseline...

Page 555: ...on other STATPAC printouts Two data presentations graytone and total deviation plot for the Baseline tests are printed on the upper left section of the printout A plot of the Mean Deviation MD for eac...

Page 556: ...nt amount are indicated by a single solid dot Note The open triangle also is used on the Guided Progression Analysis printouts where it indicates a deteriorating point Be careful not to confuse these...

Page 557: ...reased number of screening fields to appear abnormal We suggest that you use SWAP testing only with the threshold testing strategies and to use SITA SWAP instead of either Full Threshold or FastPac Ma...

Page 558: ...Reference to Older Test Strategies Humphrey Field Analyzer II i series User Manual 2660021145640 A L 10...

Page 559: ...nt software revision before calling Customer Service To find the Model and Serial Number Figure 1 5 The HFA II i Rear View on page 1 24 Look on the rear panel of the HFA II i to find the information T...

Page 560: ...oppy drive turn power on to HFA II i and follow directions Check brightness knob on right side of touch screen 1 23 Check to see if patient response button is being pressed down in holder Calibration...

Page 561: ...inter and turn back on No printout selected to print 7 16 Other printers Consult specific printer manual Improper printout Random characters or multiple pages printed Check that correct printer is sel...

Page 562: ...ss RE TRY TO FIND BLIND SPOT 5 12 Blind Spot alarm beep keeps sounding Same as Cannot find blind spot above Blind Spot may be turned off during test by pressing FIXATION 5 11 Gaze Tracking Gaze Tracki...

Page 563: ...1 26 2 6 try another keyboard Plugged in after HFA II i was powered on 1 31 plug into HFA II i before HFA II i powered on Not plugged in properly 1 28 1 29 Glidepad Trackball or Mouse Does not work M...

Page 564: ...tructions 11 10 Patient names exist in database without test data Test results not saved with patient information Use CLEANUP HARD DISK DATABASE feature to remove 11 23 USB Media Problems Message indi...

Page 565: ...Manual 2660021145640 A Troubleshooting M 7 Routine Cleaning Air Intake Filter Clean every 3 months or when dirty 15 3 Cleaning other components See Cleaning the HFA II i 15 2 Table M 1 Troubleshooting...

Page 566: ...60100029575 Patient Button 0000001212625 Keyboard Mini with Touch Pad 0000001193140 Printer Cable Parallel DB 25 to Centronics 48 0000001074100 Power Cable Instrument to Table 2660100022511 100V 120V...

Page 567: ...roubleshooting M 5 Automatic Export At End of Exam H 4 B Backing Up A Modified Main Menu 2 31 Automatic Backup to USB Storage Devices 2 20 Back Up Restore Button 10 3 Configuration Data 2 31 11 5 Data...

Page 568: ...ring Test Points 12 4 Field Size 12 5 Kinetic 13 48 Performing a Custom Test 12 16 Point Spacing 12 5 Printout Formats Screening 12 17 Printout Formats Threshold 12 18 Removing Test Points 12 11 Savin...

Page 569: ...tion 14 41 Save Transmit Option 14 41 Using 14 38 Enter Patient Data Patient Search Button 3 15 Environmental Conditions A 2 Error Messages I 31 DICOM Networking I 37 General Networking I 32 Specific...

Page 570: ...5 7 2 9 1 Glaucoma Change Probability GCP L 5 Glaucoma Hemifield Test GHT 1 21 7 5 M 3 Glidepad 1 4 1 20 1 28 2 7 13 2 13 10 13 35 M 5 Connecting 1 30 1 31 Global Indices 7 7 7 10 9 8 L 1 Glossary Ic...

Page 571: ...ults See STATPAC Analysis Intraocular Pressure IOP 3 18 IP Address defined I 38 Isopter defined 1 19 Issuer of ID 14 39 14 40 K Key Exam 8 20 8 29 8 30 Keyboard Using Wild Card Character 14 50 Keyboar...

Page 572: ...umination 15 5 Stimulus Projection Replacement of 15 4 LAN defined I 38 Language 2 3 2 10 2 14 Large Diamond See Fixation Target Lens See Trial Lens Licensing DICOM Gateway V2 0 14 3 J 5 GPA 8 35 J 5...

Page 573: ...9 9 M 4 P p Value See Probability Value Packbits 2 25 Parameters Change 4 2 5 2 Kinetic 13 5 Resetting to Standard 4 3 Screening 4 2 4 4 Setting 4 1 SITA SWAP 9 3 Threshold 4 7 Parts Replacement 15 4...

Page 574: ...lysis Printouts Change Analysis 7 10 L 3 Glaucoma Change Probability Analysis L 5 Guided Progression Analysis GPA 8 2 Overview 7 8 Screening Tests 7 17 SFA GPA 8 5 8 7 Single Field Analysis 7 4 SITA S...

Page 575: ...14 42 I 21 I 25 Setting 2 17 To DICOM Archive 14 41 Saving Data 5 15 7 2 13 18 13 37 Scotoma Absolute vs Relative 1 18 7 16 Defined 1 18 Mapping of 13 28 Screen Calibrating the Touch Screen 15 11 See...

Page 576: ...of Global Indices 7 12 Change Probability Map L 8 Current Threshold Test Printouts 7 16 Defined 7 2 Foveal Threshold 7 3 Glaucoma Change Probability L 5 Glaucoma Hemifield Test 7 5 Global Indices 7 7...

Page 577: ...ive Errors 6 4 Effects of Fixation Losses 6 4 Evaluating Reliability of Results 6 4 Importance of Patient Fixation 6 3 Instructions 3 24 Preparing the Patient 3 24 Reliability of 6 2 Tips for Good Pat...

Page 578: ...4 8 6 8 8 Defined 7 7 VFI Plot 8 4 8 11 8 13 8 15 8 17 8 19 8 20 8 26 VGA Monitor 1 28 1 30 Video Eye Monitor 1 21 2 3 3 25 4 5 4 8 5 3 5 8 5 12 6 3 13 10 M 3 View Test From DICOM Archive 14 55 View...

Page 579: ......

Page 580: ...info meditec zeiss com www meditec zeiss com Carl Zeiss Meditec AG Goeschwitzer Strasse 51 52 07745 Jena Germany Phone 49 36 41 22 03 33 Fax 49 36 41 22 01 12 info meditec zeiss com www meditec zeiss...

Reviews: