background image

Chapter 4  

Designer

DME Designer Owner’s Manual

288

Security Settings

Initial settings of user module security. 

[Enable Security]

Enables user module security. 
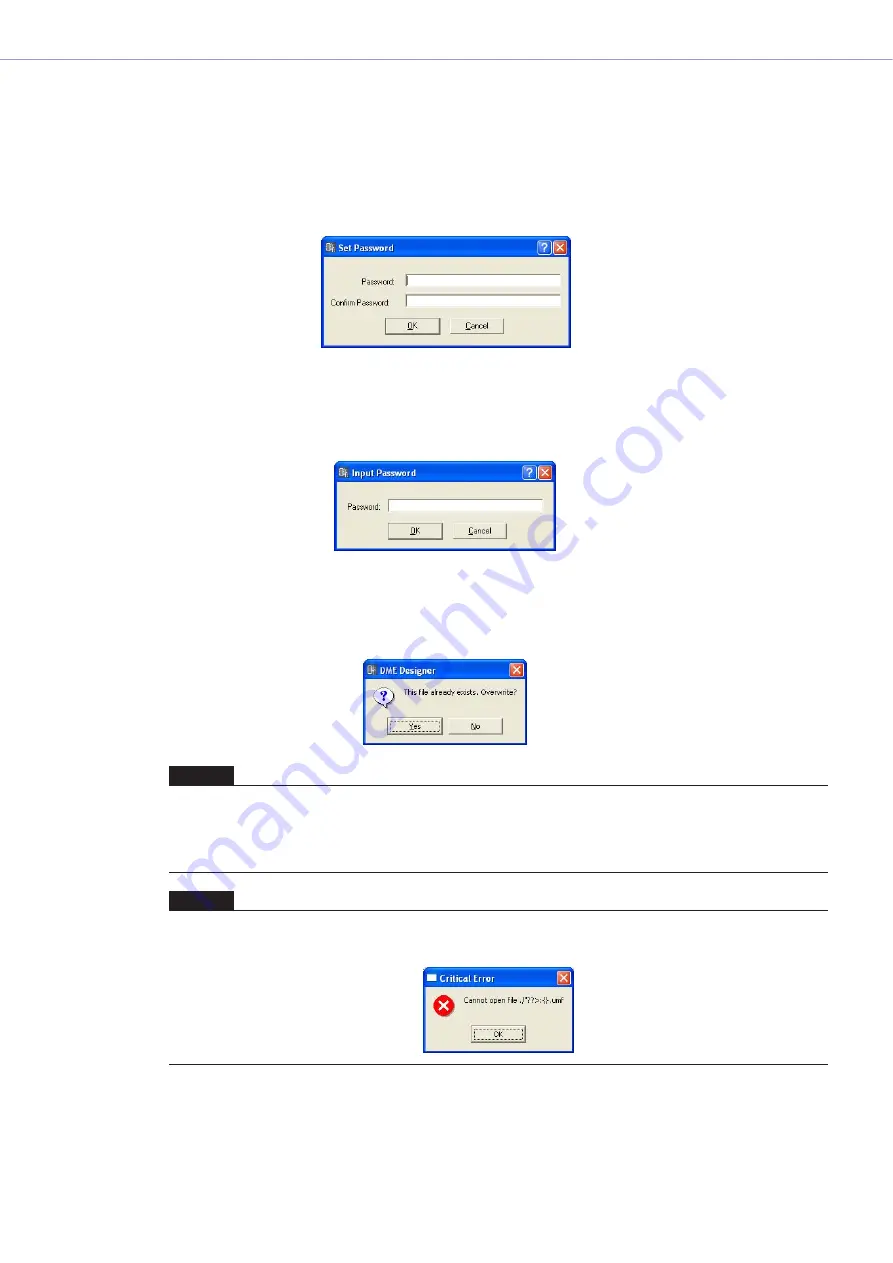
If you place a checkmark here, the “Set Password” dialog box appears. Enter the same password 
into the [Password] box and [Confirm Password] box, and click the [OK] button. 

[Set Password] Button

Changes the password. Clicking here displays the “Input Password” dialog box. Enter the current 
password and click the [OK] button. The “Set Password” dialog box will be displayed. Enter the 
same password into the [Password] box and [Confirm Password] box, and click the [OK] button. 

If you try to save a user module with the same name as an already saved user module, a message 
asking “This file already exists. Overwrite?” will be displayed. To overwrite, click the [Yes] button. To 
change the name, click the [No] button, and change the file name in the “Save User Module” 
dialog box. 

NOTE

When the “Save User Module” dialog box is displayed, the name set in the user module’s “User Module Properties” 
dialog box will be entered into the [File name] box. If you change the name of a user module and save it using the “Save 
User Module” dialog box, the filename in the user module and the user module name displayed in the Toolkit window will 
also change.
The [Label] box displayed in the “User Module Properties” dialog box will not change.

NOTE

If characters not usable in file names are used in the file name set in the “User Module Properties” dialog box, an error 
message will be displayed at the same time as the “Save User Module” dialog box. Delete the unusable characters 
before saving. 

Summary of Contents for DME24N

Page 1: ...EN OWNER S MANUAL OWNER S MANUAL Version 2 0 Version 2 0 ...

Page 2: ...allation Guide before installing the application Copying of the software or reproduction of this manual in whole or in part by any means is expressly forbidden without the written consent of the manufacturer Yamaha makes no representations or warranties with regard to the use of the software and documentation and cannot be held responsible for the results of the use of this manual and the software...

Page 3: ...rea is comprised of one or more Zones and each Zone can include up to 32 Device Groups A single Device Group can include as many as 16 devices Each Device Group has one Group Master NOTE Meter response may deteriorate as the number of meters displayed in a single device group in DME Designer increases In such cases meter response can be improved by dividing the device group See Changing Device Gro...

Page 4: ...rol multiple devices simultaneously With DME Designer DME audio systems can be designed and configured via a comprehensive block diagram interface on the computer screen The main concepts used in the creation of DME audio systems are Components Configurations Preset Parameters and Scenes Components Any independent signal processing block such as an equalizer compressor input output module or exter...

Page 5: ...that include multiple devices when the appropriate devices are connected Although it is possible to have multiple Zones in an Area multiple Device Groups in a Zone and multiple Scenes and Configurations in a Device Group only one Area Zone Device Group and Configuration can be active and editable via the DME Designer at any one time The active elements are known as the Current Zone Current Device ...

Page 6: ...ch Device Configurations A combination of the audio signal processing audio input output and external device control components and their interconnections created to create the desired audio system Local Parameter Link Settings Settings that allow linked operation between similar types of internal DME parameters Component Link Settings Settings that allow linked operation between similar types of ...

Page 7: ...d scenes are managed by their scene numbers Configurations A combination of the audio signal processing audio input output and external device control components and their interconnections created to create the desired audio system Local Parameter Link Settings Settings that allow linked operation between similar types of internal SP2060 parameters Preset Parameters The settings for the components...

Page 8: ...all Local parameter link settings External device settings All On BGM MC Band Device Group LCD Display Dome Low Dome Mid Dome Hi Hall Low Hall Mid Hall Hi Assigned Parameter 1 Crossover Output Low Level 1 Crossover Output Mid Level 1 Crossover Output Hight Level 2 Crossover Output Low Level 2 Crossover Output Mid Level 2 Crossover Output Hight Level No 001 002 003 004 005 006 Configuration Output ...

Page 9: ...linked scene operation See Scene Link Manager on page 130 Operating System Windows XP Professional XP Home Edition 2000 Professional CPU 1 GHz or better Intel Pentium Celeron family processor Memory At least 256 MB Hard Disk Capacity At least 300 MB Display 1 280 x 1 024 pixels or better High Color 16 bit or better Other Mouse CD ROM drive 100Base TX 10Base T Ethernet or USB connection environment...

Page 10: ...ority items can now be set when compiling configurations by using the Compile Priority function in the Preferences dialog box page 195 Delay time can now be displayed for each component by using the Show Signal Delay function page 281 Monitoring points can now be edited by using the Monitoring Point List dialog box page 282 The status of connections in a configuration can now be analyzed in advanc...

Page 11: ...ynchronization has been added page 43 A progress bar has been added to the Synchronization dialog page 42 A message appears to warn when synchronization will cause muting The following operations can be performed while on line Scene storage Scene name changes Fade ON OFF and Fade Mode changes Fade time changes Parameter link setting changes When a scene store is executed that scene becomes the cur...

Page 12: ...D824 AD8HR are turned on Execute a scene recall to send DME settings an external head amp This manual is now separate from the DME Designer installer and can not be accessed from the DME Designer menus Designer Window The following operations can be carried out via the shortcut keys Navigator Activate Navigator Activate Toolkit Activate Design Window Select Left Port and Start Wiring Select Right ...

Page 13: ...r Windows button has been added to the contextual menu Source Selector Speaker Processor Limiter Slot In Cascade In and Cascade Out components have been added The Delay algorithm has been revised page 368 LEVEL and MUTE are effective when Delay is Off for each channel The name of the overall Delay On parameter has been changed to All Bypass The bus send level range for Delay Matrix and Matrix Mixe...

Page 14: ...Window Firmware and component data can now be updated simultaneously page 160 A Recovery Update function that allows recovery from program corruption has been added page 162 A Component Link function that allows simultaneous linking of all component parameters has been added page 81 Scene Link function that allows simultaneous control of multiple devices in different device groups has been added p...

Page 15: ...es commands have been moved from the Print menu to the Tools menu Configuration has been changed to Configuration Manager in the Tools menu When Prohibit Diagonal Connections in the Tools menu is active it is possible to select 2 diagonal points and those points will automatically be connected by a combination of horizontal and vertical wires Component Editor Window A Level Meter Enable command th...

Page 16: ...Clock 157 Language Settings 158 Backup 159 DME Firmware Update 160 Chapter 4 Designer 163 Editing Configurations 163 Designer Window 164 Toolkit Window 170 Designer Window Menu 176 Objects 183 Design Window Shared Settings and Operations 241 Drawing and Editing Wires 253 Adding Deleting and Renaming a Zone 267 Changing Device Groups 268 Adding Deleting and Renaming a Configuration 270 Area Window ...

Page 17: ... software is started DME Designer Start Up and Logon When Auto Logon Is Not Set 1 Click Start All Programs YAMAHA OPT Tools DME Designer DME Designer The Log On dialog box will be displayed 2 Click the at the right of the User box and select the user If no user has been created only Administrator will appear in the list When starting DME Designer for the first time after installing select Administ...

Page 18: ...c logon has been set the Log On dialog box will not be displayed The user set for automatic logon will be logged on With automatic log on even if a password is set for a user it will not be requested during log on This is useful when logging on a specific user Starting by Opening a Project File DME Designer starts when a project file with a saved configuration is opened When the project file is op...

Page 19: ... button on the Main Panel window 1 Click Exit on the Main Panel window File menu When you try to close DME Designer Project File has been modified Save will be displayed in a dialog box 2 To save the file click Yes To close without saving click No If you click Yes the File Save dialog box will be displayed NOTE Sometimes the Project File has been modified Save dialog box will not be displayed ...

Page 20: ...indow Resource Meter window and others Main Panel Window Menus and buttons are available in the Main Panel window The current DME Designer environment including the active zone device group and scene the currently logged on user name and the connection status to the DME unit are displayed on the right side of the Main Panel window Main Panel Window Designer Window Component Editor Window Resource ...

Page 21: ...figuration of each DME or SP2060 unit Within the Configuration window are the User Module windows where you can assemble often used components into templates the Toolkit window which displays objects used in the other windows as the basic building blocks for sound designs and the Navigator window which lets you grasp the overall status of the system at a glance Area Window The Area window is used ...

Page 22: ...e complex processors or matrix mixers that determine the actual internal structure that operates each DME unit User Module Window The User Module window is used for designing user modules that can be arranged in the Configuration window You can create original modules by combining multiple examples of often used components When you save these modules as templates you can recall them easily wheneve...

Page 23: ...ote that the sampling frequency of the DME unit itself will also affect the usage percentage Objects and Components Object is the name for the parts that are arranged in the various design windows such as the Area Zone Configuration and User Module windows Objects are always laid out in the Toolkit window Only the appropriate objects for each window are displayed The blocks displayed at the higher...

Page 24: ...esigner you must logon when you start the software Except for the first time the software is started or when separate settings are made for the first time you can logon by specifying the name and password for a user that has been set as the administrator The administrator can build the system as a whole or apply function limitations that let other people edit Administrators or other people that ca...

Page 25: ...re is an Exit button This closes the application without logging on a user 5 Cancel Button When the Log On dialog box is displayed after a user is logged off there is a Cancel button instead of an Exit button This cancels the logoff The original user will continue to be logged on Logon Procedure 1 Click at the right of the User A drop down list of user names will be displayed 2 Click the user you ...

Page 26: ...u in the Main Panel window 1 Click the File menu Log Off command on the Main Panel window Log on the next user in the Log On dialog box Automatic Logging On With the auto logon function you can have a specified user automatically logged on when the application is started If you enable the auto logon feature the specified user will be logged on when the application is started without displaying the...

Page 27: ...ed using the File menu New command in the Main Panel window 1 Click File menu New in the Main Panel window Since the currently open project file must be closed before a new one can be created a Project file has been modified Save dialog box will be displayed 2 To save the file click Yes the File Save dialog box will be displayed If you click Yes the File Save dialog box will be displayed A new pro...

Page 28: ...layed in this box Click the on the right to move to another folder The large box below displays the contents of the folder in this box 2 Up One Level Button Moves to the folder one level higher in the hierarchy 3 Create New Folder Button Creates a new folder in the folder currently being displayed 4 Views Button Changes the way the folder content list is displayed If you click this button a menu a...

Page 29: ...e displayed as asterisks in the Password box Confirm Password Box Enter the password once again to confirm it Enter the same password as was entered into the Password box The characters you enter will be displayed as asterisks the same as in the Password box Save Button Saves the project file If the characters entered into the Password and Confirm Password boxes were not the same a Password is dif...

Page 30: ...e As command Enter a filename and specify the folder where the file will be saved Saving a File with a New Name With the File menu Save As command in the Main Panel window you can save the currently open file with a new filename When saving for the first time this creates a new file A file that has already been saved with a name will be saved as a separate file 1 Click File menu Save As in the Mai...

Page 31: ...red into the ID box To change it enter another ID into the box When using Save As to save a password protected file the dialog box will be displayed with the ID and password boxes automatically filled in with the ID and password that were assigned to the original file To change the ID and password enter new ones into the boxes 4 Enter the desired password into the Password box You can enter up to ...

Page 32: ...ore another one can be opened a Project file has been modified Save dialog box may be displayed Open Command Project files are opened using the File menu Open command in the Main Panel window 1 Click File menu Open in the Main Panel window A Project file has been modified Save dialog box may be displayed 2 Click the Yes or No button The Open dialog box will be displayed 3 Selects the file to be op...

Page 33: ...tton on the Enter ID Password dialog box the Wrong ID or password dialog box will be displayed Click the OK button and enter the correct ID and password the Enter ID Password dialog box Opening a Project File from the Recently Used Files List Recently used project files are displayed on the File menu in the Main Panel window If you click one of the filenames you can open that project file If secur...

Page 34: ...og box will be displayed Enter the ID and password to open the file Closing Project Files You cannot have multiple project files open simultaneously in DME Designer To close the currently open project file you can create a new project file or open another project file DME Data File You can import or export parameters for a DME or SP2060 that is arranged in a configuration file Parameters for a sin...

Page 35: ...he Main Panel window and move the mouse cursor over Import Device Configuration A submenu will be displayed The DME groups and SP groups included in the current configuration will be displayed on a submenu 3 Select the device group to which the DME or SP2060 is to be imported from the submenu DME and SP2060 units cannot be used assigned to the same device group 4 On the submenu click on the DME or...

Page 36: ... Import Device Configuration submenu Select Create New Group to create a new device group Create New DME creates a new DME and imports settings NOTE Only users for whom the Operation Security Edit checkbox in the Security dialog box has been checked can import DME data For information about user security levels see Scene Manager on page 70 NOTE If DME data file import was not possible a DME file i...

Page 37: ...in Panel window and move the mouse cursor over Export Device Configuration A submenu will be displayed The DME groups and SP groups included in the current configuration will be displayed on a submenu 3 On the submenu click on the DME or SP2060 from which you will export settings The Save As dialog box will be displayed 4 Enter the filename Determines whether a selected file type will be exported ...

Page 38: ...n will be displayed on the Export Device Configuration submenu Library Files Component Editor User Control Editor and User Module Editor parameters can be stored to and recalled from library files Refer to Library Files on page 301 The library data for a single SP2060 unit can be imported or exported as required Refer to SP2060 Library Manager on page 133 ...

Page 39: ...the properties See Device Group Selection on page 249 Designer Window on page 164 Objects on page 183 Design Window Shared Settings and Operations on page 241 4 Configuration Settings Zone names are set and zones are added and deleted using the Zone dialog box See Adding Deleting and Renaming a Configuration on page 270 5 Placing Components Place components and user modules in the Configuration wi...

Page 40: ...I port 1 DME Unit and Computer Connection Connect the DME unit and computer using a USB cable or an Ethernet cable See separate DME64N 24N Owner s Manual for details 2 MIDI Driver Installation Install the USB MIDI driver or DME N Network driver in the computer See separate DME Designer Installation Guide for details 3 MIDI Driver Setup Make the necessary settings for the MIDI driver installed in t...

Page 41: ...d Its scene number must be displayed in Scene Number and its scene name will be displayed in Scene Name If is displayed of Scene Name the scene will be recalled Main Panel Window Current Scene page 48 See Scene Manager on page 70 NOTE A maximum of 32 ports can be set NOTE Slave DME64N DME24N units connected via Ethernet and ICP1 units cannot be set NOTE Only USB 1 is available on DME8i C DME8o C D...

Page 42: ...Es and SP2060s included in the current device group are displayed in the Designer list in the Synchronization dialog box Click the IP Address box then select the DME or SP2060 unit IP address that matches the DME or SP2060 currently in the DME Designer NOTE When requesting the Synchronization dialog box a one time alert will be displayed if the MIDI Port settings have not been made After clicking ...

Page 43: ...signer will be synchronized with the unit If there are many zones this process may take time When going online is finished the Go On line button will be grayed out and the Main Panel window On Line button will light up The dialog box will close automatically if Close this window after synchronization is checked NOTE An alert will be displayed if no scene has been recalled NOTE It may not be possib...

Page 44: ...Chapter 2 DME Designer Overview DME Designer Owner s Manual 44 To go off line click either the ON Line button in the main panel window or the Go Off line button in the Synchronization dialog box ...

Page 45: ...displayed at the right When a new project file has been opened or has not yet been saved Untitled will be displayed for the file name Tool Buttons Small Frequently used commands are arranged here as buttons When a command cannot be used its button will be grayed out Current Scene Log On User Tool Buttons Large Tool Buttons Small Menu Bar Title Bar Mute Button Communication Status Current Device Gr...

Page 46: ...res operations undone with the Undo button back to their original condition Redo on the Edit menu page 53 User Defined Button Opens the User Defined Button dialog box See User Defined Button on page 57 Word Clock Button Opens the Word Clock dialog box See Word Clock on page 59 GPI Button Opens the GPI dialog box See GPI on page 56 MIDI Button Opens the MIDI dialog box See MIDI on page 57 Parameter...

Page 47: ...ays a menu User Control will be display there the user control window will be displayed If you click New User Control the New User Control dialog box opens Synchronization Button Opens the Synchronization dialog box See Synchronization Dialog Box on page 84 Event Logger Button Opens the Event Logger window See Event Logger Window on page 65 Event Scheduler Button Opens the Event Scheduler dialog b...

Page 48: ...mber and Scene Name Refer to Scene Manager on page 70 for information on scenes and Scene Link Manager on page 130 for information on scene linking Scene Number Displays the number of the current scene or scene link A list where you can select a scene or scene link is displayed when you press the The EDIT indicator will light when a parameter has been edited after recalling or storing a scene NOTE...

Page 49: ...splays the name of the currently active device group Click to display a list that allows selection of a different device group Mute Button Turns ON and OFF the DME mute button for the current device group To turn it ON press the Shift key while clicking If you click the button while it is OFF without pressing the Shift key the following message will be displayed Click the Mute Button with the Shif...

Page 50: ...onnected to a computer clicking this button alternately switches the unit s on line off line status The indicator will light when the DME unit is on line Message Transmit Receive Indicators Rx Lights when MIDI messages from the group master of the current device group are received by DME Designer Tx Lights when MIDI messages are transmitted from DME Designer to the group master of the current devi...

Page 51: ...iles that have not yet been saved In this dialog box you can name the file when you save it No Button Closes the project without saving it If the file has already been given a name and saved the most recently saved version will remain as is If the project has not been given a name and saved it will be lost Cancel Button Cancels creation of a new project Open Opens saved project files Because the c...

Page 52: ...s Saves the current project file as another file with a new name or in a new location When you select this command the Save as dialog box will be displayed See Project Files on page 27 Import Device Configuration Imports parameters for a device that is arranged in a configuration file See DME Data Import on page 35 Export Device Configuration Exports parameters of a device that is arranged in a co...

Page 53: ...g box asking Project file has been modified Save will be displayed To save click Yes To close without saving click No Edit Menu Undo Undoes a single operation The name of the operation that will be undone by Undo is displayed in the command name You can also select the commands that come after that When Undo is not possible the command will be grayed out Redo Returns to the status before the Undo ...

Page 54: ...oldest You can select an operation by clicking on it 2 OK Button Undoes all operations below the one selected on the list The operation selected on the list does not get undone 3 Close Button Closes the dialog box 4 Delete All Button Deletes the entire history of operations displayed on the list When an operation is deleted from the list it cannot be undone Operations undone from the Undo History ...

Page 55: ...y the currently logged on user are displayed on a submenu If you click New User Control on the submenu the New User Control dialog box opens See User Control User Module Editor on page 301 Navigator Displays or hides the Navigator window NOTE Controls that are not available to the currently logged on user are not shown in the menu NOTE The User Controls that are displayed when the DME Designer is ...

Page 56: ...age 78 page 301 Parameter Link Opens the Parameter Link window See Parameter Link on page 81 Synchronization Opens the Synchronization dialog box See Synchronization DME Designer and Unit Synchronization on page 83 Event Scheduler Opens the Event Scheduler dialog box See Event Scheduler on page 87 Wav File Manager Opens the Wav File Manager dialog box See Wav File Manager on page 94 GPI Opens the ...

Page 57: ...See DAW Control on page 122 Remote Control Setup List Opens the Remote Control Setup List Dialog box See Remote Control Setup List on page 125 Parameter List Opens the Parameter List dialog box See Parameter List on page 126 Component Lock Opens the Component Lock dialog box See Component Lock on page 129 Scene Link Manager Allows scene link setup See Scene Link Manager on page 130 SP2060 Library ...

Page 58: ...ortcut Keys Opens the Shortcut Keys dialog box See Shortcut Keys on page 136 Security Opens the Security dialog box See Security Creating Users and Making User Settings on page 137 Hardware Menu Network Setup Opens the Network Setup dialog box See IP Address Serup on page 145 Utility Opens the Utility dialog box See Utility on page 146 ...

Page 59: ...t Opens the Monitor Out dialog box See Monitor Out on page 156 Clock Opens the Clock dialog box See Clock on page 157 Language Opens the Language dialog box See Language Settings on page 158 Backup Opens the Backup dialog box See Backup on page 159 Firmware Update Updates the DME SP2060 or ICP1 firmware See DME Firmware Update on page 160 ...

Page 60: ...ows Click a window name to bring that window to the front Close All Editor Windows Closes all editor windows About Menu About DME Designer Displays information about this application NOTE Each design windows within the Designer window can be switched using the Window menu in the Designer window ...

Page 61: ...ommend that you save your project files to the DME unit for enhanced reliability Click DME File Storage in the File menu to display the DME File Storage dialog Names and Functions Zone List Select the desired zone and device group and DME from the list File List A list of the files stored on the selected DME Send Button Transfers selected files from the computer to the DME Receive Button Transfers...

Page 62: ... the last opened file If the file cannot be found because it was moved deleted or its name was changed a new project will be opened Create an empty file Opens a new project Load File Synchronization Opens the last opened file and synchronizes with the DME or SP2060 unit Contents Folder Specifies the folder where the images used by the Design windows and user controls are stored Click the Browse bu...

Page 63: ...rmation dialog box displayed when storing a scene Save after synchronization If a save is performed after the DME Designer is synchronized to the DME or SP2060 unit the next synchronization will be significantly faster because one the difference needs to be synchronized Check this checkbox to specify auto save after the DME Designer is synchronized to the DME or SP2060 unit Component Editor Tab Se...

Page 64: ...lick Edit Box Zoom When On the edit box will enlarge on mouse over Edit Box Font When On the edit box will enlarge on mouse over Common to All Tabs OK Button Applies any setting changes and closes the window Cancel Button Closes the window without changing any settings NOTE This is the font when the box is enlarged not the font that is used when the box is at it s smallest size The text may bleed ...

Page 65: ... window Events are displayed in realtime as long as the dialog box stays open while online The information is also simultaneously recorded in a file if the log function is enabled Names and Functions NOTE Does not apply to SP2060 units NOTE Only users for whom the View Log Window checkbox in the Security dialog box has been turned ON can display the Event Logger window The default setting for this...

Page 66: ... the DME from which the log will be taken During online status this button is grayed out and cannot be used Clicking here displays the Get Log dialog box Zone Selects the zone device group and device for which events will be displayed Only events from the selected device will be displayed in the window If All is selected events will be displayed for all Display button Information Warning Error Dis...

Page 67: ... counted are cleared when the Log Setup dialog box is closed by clicking the OK button or when the system goes online Automatically delete log files after __ days When a check is placed here log files exceeding the specified number of days are automatically deleted Specifies the number of days after which log files are automatically deleted Log file folder Specify the folder for saving log files C...

Page 68: ...dialog box Click the Get Log button in the Event Logger window to display the Get Log dialog box DME List Displays the IP addresses and types of DME units included in the device group Click the DME from which to obtain events by placing a check next to it Output File Name Sets the file name and save location for the log file Clicking the Browse button opens the file select dialog box where you can...

Page 69: ...es a zone DME If you click here a list will be displayed Specifies DMEs Event You can turn sending of logs for each event ON or OFF Type If you click here a list will be displayed Select type of event Information Warning and Error are displayed in a list GPI OUT Sends GPI output for each event OK Button Applies any setting changes and closes the window Cancel Button Closes the window without chang...

Page 70: ...n the Main Panel window or by using the Scene Manager dialog box Scene Manager Dialog Box Click either the Tools menu Scene Manager item or the Scene Link Manager window Scene Manager button to open the Scene Manager window that allows editing of scene data Scene names security levels and presets can be changed and copy pasted as required The DME scene memory is comprised of 999 user memories whil...

Page 71: ...played A name can be entered when a scene is stored The default names are Scene001 Scene002 etc The three digit number is the same as the scene number displayed in Scene Number for the stored scene NOTE The SP2060 display can only display up to 16 single byte characters Some characters that appear correctly on the DME Designer may change when displayed on the SP2060 display For example a backslash...

Page 72: ...e the same as the new user s security level but the scene recall setting can be set lower Fade It sets whether fade is applied ON or not OFF when a scene is recalled Fade Mode Sets the fade mode You can select All or Selected If you select All all channels using Fader components in their configuration will be affected Even when multiple components are used all channels are targeted If you select S...

Page 73: ...e Paste Button Pastes the contents of the cut or copied scene into the scene selected on the list Cuts the scene selected on the list The button will be grayed out and cannot be used when the unit is online or when an SP2060 preset is being used The selected scene will be overwritten Insert Button Inserts the contents of the cut or copied scene into the location of the scene selected on the list T...

Page 74: ... be displayed All components included in the scene will be displayed There is a checkbox to the left of each component Place a check next to the components you do not wish to have read by scene recall those you do not wish changed from their current status Press the Select All button to check all components or the Clear All button to clear the checks from all components Click the OK button The dia...

Page 75: ...eset parameters Preset parameters are created automatically Recall Button Recalls the scene selected in the list and makes it the current scene Scene Link Button Opens Scene Link Manager dialog box Refer to Scene Link Manager on page 130 NOTE The currently logged on user can store scenes at a security level equal to or lower than his or her own only NOTE When the computer and DME64N 24N unit are o...

Page 76: ...the preset parameters list while it is displayed the preset parameters list will be hidden When the dialog box is opened its status will be the same as the last time it was closed NOTE Not available for SP2060 groups Detail Button Del Button Store Button New Button Del Unused Button Preset parametersList DME preset parameters DME preset parameters ...

Page 77: ...med Preset001 Preset002 and so on preset parameters created with the New button are named New Preset You can select the preset parameters used in a scene by clicking the radio buttons to the left of the preset parameters names Del Button Deletes the preset parameters selected on the preset parameters list Store Button Stores the current parameter status in the preset parameters selected in the pre...

Page 78: ...trols included in the configuration of the current device group There they can be created or deleted You can also edit the name and security level of user controls here Names and Functions NOTE Security for the Logged On User The currently logged on user can create and edit the user controls of all users at lower security levels as well as the controls specified for that user Available user contro...

Page 79: ...ou to change it Security Level Displays the security level set for each user control Clicking here will display a list where you can change the security level User Displays the name of the user specified in User Control Clicking here will display a list of the available users NOTE Levels at or below the security level of the currently logged on user are displayed in the list ...

Page 80: ...e Use the radio buttons to the left to select security level or user dependent control User Level Select a security level from the drop down list User Name Check a checkbox Click OK to create the specified User Control setup Delete Button Deletes the user control selected on the list OK Button Accepts the changed settings and closes the dialog box Cancel Button Closes the dialog box without changi...

Page 81: ... Creating Parameter Links on page 341 You can check the status of parameter links and edit them in the Parameter Link window Parameter Link Window When you click Parameter Link in the Tools menu the Parameter Link window is displayed You can also display the window by selecting Open Parameter Link from the context menu displayed in the user control user module editor and component editor Names and...

Page 82: ... for the DME icon The parameters Min and Max can be displayed or hidden by clicking the plus or minus signs for the component Link Click to turn ON or OFF Turn OFF to disable parameter linking Component linking for multiple parameters can be turned ON or OFF via the contextual menu that appears when the group name is right clicked Keep Offset Click to urn ON or OFF When ON the parameter offset is ...

Page 83: ...tion You can also control the DME or SP2060 in real time from DME Designer Operations performed in the DME Designer control editor are reflected in the DME or SP2060 unit and operations on the DME or SP2060 side are reflected in DME Designer You can not perform configuration editing using the Designer while online Offline The communication status becomes offline when editing configurations Switchi...

Page 84: ...isplayed The data from the current device group in the Designer is synchronized with the DME or SP2060 unit Here you can make settings for synchronizing the unit in DME Designer one on one with the DME or SP2060 that actually exists on the network Names and Functions Go On line Button Go Off line Button Designer Message Area Close this window after synchronization checkbox Network ...

Page 85: ...signer DME button Data from the DME or SP2060 unit is read into DME Designer Current data stored in the DME or SP2060 unit such as scenes are read into DME Designer The configurations in the DME unit and DME Manager must identical to allow synchronization Even if the basic configurations are the same if one has been edited or changed in any way synchronization will not be possible SP2060 configura...

Page 86: ...ame type in the area If the unit is a DME24N IP addresses for all DME24N devices in the area will be displayed on the list If you click the title bar with IP Address written on it pale mark appears you can line them up vertically Network The devices currently connected to the network are displayed in the Network list To keep consistency with the Designer list on the left side the status of DMEs on...

Page 87: ... the DME unit during online status Scene changes parameter changes GPI output and WAV file playback can all be scheduled Names and Functions Event View Displays registered scheduling events When periodic events cyclical events are first displayed together they are displayed in order of date The order of same time events can be changed by dragging and dropping Click to select an event No Displays t...

Page 88: ... day Time Displays the time for starting the event Group List selects the device group for which events are to be specified displayed Only events for the selected device group will appear in the window Enable Event Scheduler Enables the scheduled events Add Button Adds an event Clicking here displays the Add Event dialog box If the maximum of 50 events has already been registered this button is gr...

Page 89: ...ent setting changes OK Button Applies any setting changes and closes the window Cancel Button Closes the window without changing any settings Add Event Edit Event Dialog Box The dialog box is displayed when you click on the Add or Edit button in the Event Scheduler dialog box Here you can add or edit a scheduling event Event Name Box Enter the event name There is no limit to the number of characte...

Page 90: ...on When Scene Change is selected Select the scene to be recalled from the Scene list Stored scenes are displayed in the list When Parameter Value Edit is selected Scene Select a scene from the list If the DME unit s current scene differs from the scene specified in event scheduling the scheduled scene will be recalled If the DME unit s current scene is the same as the scene specified in event sche...

Page 91: ...e for the parameter Change the parameter using the spin buttons or the slider on the right When GPI Out is selected DME From the list select the DME where you will be making settings Port1 Port2 Port3 Set ON OFF or for each port If it is set to OFF the LOW HIGH port outputs HIGH LOW signal the HIGH LOW port outputs LOW HIGH signal When Play Wav File is selected Scene Select a scene from the list W...

Page 92: ...ored Year Month Week Day Hour Set the period for the event using the radio buttons to the left Day Day of the week Set the conditions on the right side Select Day Day of the week and set the date and other information The items that can be set vary according to the selected period When the event period is Year All settings can be made When the event period is Month If Day is selected only the date...

Page 93: ...ngs will depend on the event cycle When the event cycle is Year Only the Year setting is available When the event cycle is Month Only the Month and Week setting is available When the event cycle is Week Only the Month Week and Day settings are available When the event cycle is Day Only the Month Week Day and Day of the week settings are available When the event cycle is Hour Only the Month Week Da...

Page 94: ...making settings Wave File Displays the Wave file information Settings can be made here as well No The Wave file number is displayed in the leftmost column Numbers are added from the top in order List Name You can set up to 27 characters as a label separate from the Wave file name The Wave file name is displayed here by default NOTE Does not apply to SP2060 units NOTE These settings can be edited o...

Page 95: ... ON is set playback happens automatically when the file is selected If you click here a list will be displayed Select ON or OFF Next No Specifies the number for the Wave file to be played next If you click here a list will be displayed Select the number for the Wave file to be played next Stop This stops playback after this Wave file is finished playing without specifying the next wave file Since ...

Page 96: ...d with a format different than these a message is displayed that says the file cannot be used There is an upper limit to size beyond which a file cannot be used This limit varies according to the format If the size of the selected file is beyond the limit a message is displayed that says the file cannot be used Remove Button Deletes settings from the selected line This button is grayed out when no...

Page 97: ...bout GPI GPI is an abbreviation for General Purpose Interface Using GPI input and output DMEs can be remotely controlled from custom made controllers or external equipment The number of GPI ports depends on the type of device Sets GPI input output for each DME Using GPI input data you can switch DME scenes and change component change component parameters Refer to the DME owner s manual for informa...

Page 98: ...ports These settings determine which DME parameters will be controlled by input received at each individual GPI IN port The port numbers are shown in the leftmost column Function Specifies the function to be controlled by GPI input Click to see a list from which you can choose the function to be assigned to the corresponding GPI IN port The nine available functions are No Assign Parameter Value Ed...

Page 99: ...ain Panel Window DME Designer Owner s Manual 99 No Assign No function assigned This is the default setting Select No Assign to clear an assigned function The Parameter Min Max and Terminal items are not available ...

Page 100: ...eter value and the maximum voltage applied to GPI IN will produce the specified Min parameter value with intermediate voltages produced the corresponding intermediate parameter values The specified Min and Max parameter values are alternately selected each time the voltage applied to GPI IN rises from below to above the median voltage NOTE Components for user modules are also listed in a hierarcha...

Page 101: ...r will be recalled each time the voltage applied to GPI IN rises from below to above the median voltage The scene specified by Parameter will be recalled each time the voltage applied to GPI IN drops from above to below the median voltage Same as Same as Max voltage applied to GPI IN Min voltage applied to GPI IN Min parameter value Min parameter value Max parameter value Median voltage Example Re...

Page 102: ...ed parameter The scene number will be incremented each time the voltage applied to GPI IN rises from below to above the median voltage The scene number will be incremented each time the voltage applied to GPI IN drops from above to below the median voltage Same as Same as Max voltage applied to GPI IN Min voltage applied to GPI IN Median voltage Trigger Max voltage applied to GPI IN Min voltage ap...

Page 103: ...ed parameter The scene number will be decremented each time the voltage applied to GPI IN rises from below to above the median voltage The scene number will be decremented each time the voltage applied to GPI IN drops from above to below the median voltage Same as Same as Max voltage applied to GPI IN Min voltage applied to GPI IN Median voltage Trigger Max voltage applied to GPI IN Min voltage ap...

Page 104: ...N when the voltage is below the median Mute will be alternately turned ON and OFF each time the voltage applied to GPI IN drops from below to above the median voltage Mute will be alternately turned ON and OFF each time the voltage applied to GPI IN rises from above to below the median voltage Max voltage applied to GPI IN Min voltage applied to GPI IN Median voltage Mute ON Mute OFF Mute OFF Max ...

Page 105: ...I IN is above the median voltage and ON when the voltage is below the median GPI Lock will be alternately turned ON and OFF each time the voltage applied to GPI IN drops from below to above the median voltage GPI Lock will be alternately turned ON and OFF each time the voltage applied to GPI IN rises from above to below the median voltage Max voltage applied to GPI IN Min voltage applied to GPI IN...

Page 106: ...al switching device The internal clock time will be adjusted each time the voltage applied to GPI IN rises from below to above the median voltage The internal clock time will be adjusted each time the voltage applied to GPI IN drops from above to below the median voltage Same as Same as Internal clock time Time after adjustment 0 14 seconds Returned to 0 seconds 15 29 seconds Advanced to 30 second...

Page 107: ...al fader knob or similar device and specify on off control of 2 state parameters via an external switching device The specified Wave file will be played each time the voltage applied to GPI IN rises from below to above the median voltage The specified Wave file will be played each time the voltage applied to GPI IN drops from above to below the median voltage Same as Same as Median voltage refers ...

Page 108: ...ws component parameter values to be output via GPI In this case Parameter is used to select the parameter to be output Threshold specifies the parameter threshold value Terminal and Polarity determine how the GPI voltage will be output in response to parameter changes Terminal Polarity GPI Output Ignored When value of the specified parameter is above the threshold level the output will be high and...

Page 109: ... Event Logger Event Log is shown when GPI OUT is set in Event Logger See Word Clock on page 154 Apply Button Applies any current setting changes OK Button Applies any setting changes and closes the window Cancel Button Closes the window without changing any settings Terminal GPI Output When the current scene is the same as the scene specified by Parameter the output will be high and when different...

Page 110: ...nges and closes the window Cancel Button Closes the window without changing any settings Control Change Tab Assigns components to control change for each DME You can change DME parameters by sending control change messages from external equipment You can assign to control change numbers 1 31 33 95 and 102 119 NOTE Does not apply to SP2060 units NOTE Because control change numbers 0 and 32 are used...

Page 111: ...rol change numbers Component Displays the assigned components Control changes that have no component assigned to them are blank If you click here a list will be displayed Usable components are on the list Click the component name to select it NOTE If user module security is enabled the components are not displayed However parameters displayed in the user module editor are displayed here ...

Page 112: ...ange and parameter units that can be set will vary depending on the parameter selected in the Parameter box You can change the parameter by dragging the slider To make a finer setting press the Shift key while dragging the slider The value for the parameter will be shown while you are dragging the slider When you finish dragging and release the mouse button the slider will disappear The same slide...

Page 113: ...Chapter 3 Main Panel Window DME Designer Owner s Manual 113 Clear Button Clears assignments for the selected control change numbers All Clear Button Clears assignments for all control change numbers ...

Page 114: ...g banks Program Change Event Program numbers and the scenes assigned to them are displayed in a list No This displays program numbers from 1 to 128 Scene Displays the scene number and name of the assigned scene Program changes that have no scene assigned to them are blank When you click here a list of scenes is displayed Select the scene you want to assign All Clear Button Clears all scene assignm...

Page 115: ...number 1 Bank Select LSB The bank is changed when assigning scenes numbered 129 and higher Eight banks can be used numbered from zero to seven Click the and select the bank where you will make settings Parameter Change Tab Specifies the parameter to be controlled by parameter change commands for each address Up to 128 can be set ...

Page 116: ...meter change numbers Component Assigns components If you click here a list will be displayed Assignable components are on the list Click the component name to select it Parameter Set the assigned component link parameter When you click here a list is displayed of parameters included in the component selected in the Component box Select the parameter you want to assign ...

Page 117: ...t key while dragging the slider The value for the parameter will be shown while you are dragging the slider When you finish dragging and release the mouse button the slider will disappear The same slider is displayed whether you click the Min box or the Max box The black part is the parameter range If you drag the left edge of the black part the Min value will change If you drag the right edge the...

Page 118: ... the User Defined Button dialog box The user defined parameter settings are shared between device group configurations User Defined Button Dialog Box When you click User Defined Button in the Tools menu the User Defined Button dialog box is displayed Names and Functions Group Select the device group to be set up from the list 1 2 3 4 Tabs Switches the set to which settings will apply You can set u...

Page 119: ...eld GPI OUT Allows GPI output The GPI setting is made in the Parameter field Play Wav File Allows initiation of Wave file playback The Wave file setting is made in the Parameter field Wave files set by the Wav File manager can be specified Files can not be selected unless a Wav Player is included in the DME64N 24N configuration NOTE Components for user modules are also listed in a hierarchal displ...

Page 120: ...lay box After you confirm the name by pressing the Enter key a short name will be created and displayed in the function key area as follows F1 shortnam The short name will also be displayed in the DME unit or ICP1 main display A short name is automatically created with up to eight characters for display as the user defined parameter name on the DME unit or ICP1 main screen Min Max Sets the lower a...

Page 121: ...ncluded in the current configuration will be displayed 5 Select the parameter to assign to the function key 6 Click the LCD Display box and enter text for the user defined parameter name The LCD Display box can accept up to 23 characters but only eight characters can be displayed in the DME unit or ICP1 main screen When making a user defined parameter name the first eight characters should be unde...

Page 122: ...ng can be made only when in offline status Names and Functions DME From the list select the DME64N 24N where you will be making settings DAW Type Select the DAW type The following choices are in the list Off Type1 and Type2 DAW Control Table The following can be set for each channel from 1 to 64 Function Controller Label Parameter NOTE DAW Control can be set on DME64N 24N units only NOTE DAW contr...

Page 123: ...before the current scene When a selection has been made SDEC is displayed in the Label field Mute Sets all mute Mute is set ON and OFF by the DAW controller When a selection has been made MUTE is displayed in the Label field Component Changes the component parameters Selectable component names that are arranged in the configuration are displayed in a list When selected the first parameter included...

Page 124: ...r Value Edit or Play Wav File is set in Function set the parameters If you click here a list will be displayed When Scene Change is set in Function Displays scenes that can be selected When Parameter Value Edit is set in Function Selectable parameters are displayed When Play Wav File is set in Function Selectable Wave files are displayed OK Button Applies any setting changes and closes the window ...

Page 125: ...tions DME From the list select the DME where you will be making settings Function Select No Assign Parameter Value Edit or Level Meter Parameter Specifies the parameter to be controlled A list of parameters will be displayed according to the selection of Function Min Max Displays the minimum and maximum values for the parameter Type Selects a fader curve when level etc is select for Parameter Sele...

Page 126: ...rent zone are displayed Here you can check things like the parameter IDs You can also print the list of parameters When the dialog box is opened or when a DME is selected from the DME list the parameter values are displayed Names and Functions DME From the list select the DME where you will be making settings Components in the selected DME are displayed in the component list Component List The com...

Page 127: ...component selected in the list all parameters for the selected DME or all parameters for all DMEs When you click the Preview button the dialog box display will change and the print preview will be displayed in the center Buttons will be added to the upper part of the dialog box NOTE Components for user modules are also listed in a hierarchal display but if user module security is enabled the compo...

Page 128: ...Portrait Prints on the paper with it oriented vertically Landscape Prints on the paper with it orientated horizontally Font Displays the set font Clicking the Font button displays the Font dialog box where you can change the font Target Set the parameters to be printed by clicking one of the radio buttons Selected Component Prints all parameters for the component selected in the list Selected DME ...

Page 129: ...t will also be displayed When the checkbox to the left of the component name is checked the component is locked so that it is not possible to change parameters from a PM5D or other external device controlling the DME unit via the RS 422 interface The lock settings will be transferred to the DME when the unit is placed on line The settings can only be changed while off line NOTE Does not apply to S...

Page 130: ... Link button the Scene Manager window to open the Scene Link Manager window Scene Link Manager Window This window allows setup and recall of scene linking between DME groups and SP2060 units Scene linking makes it possible to simultaneously recall scenes on multiple DME groups and or SP2060 units Up to 999 scene link setups can be specified NOTE Only users with security status in which Edit is che...

Page 131: ... selected in the scene link tree view When clicked an Are you sure dialog will appear Click the Yes button to delete the selected scene link setup Click the No button to abort the scene link delete operation The No button will be grayed out and inoperable if a scene link setup is not selected Copy Button Copies the selected scene link setup The Copy button will be grayed out and inoperable if a sc...

Page 132: ...link setup up one position in the scene link view The Move UP button will be grayed out and inoperable if a scene link setup is not selected Move Down Button Moves the currently selected scene link setup down one position in the scene link view The Move Down button will be grayed out and inoperable if a scene link setup is not selected Recall Button Recalls the scene number specified for the curre...

Page 133: ...unctions SP2060 List Displays a list of the SP2060 units connected to the specified port Library List Library titles and library file names are displayed in this list The default titles are the file names minus the file extension Click a title to edit it Titles can be up to 23 characters in length but the SP2060 display will only show 16 characters 2 byte characters can also be used but they will ...

Page 134: ...2060 and click the OK button to copy the library Multiple destination SP2060 units can be selected Click the Cancel button to abort the library copy operation The Copy button will be grayed out and inoperable if no SP2060 is selected Import List Button Imports a library file llf extension to the SP2060 selected in the SP2060 list When the Import List button is clicked the Open window will appear S...

Page 135: ...urrent device to be used by the DME Designer Port Dialog Box Selects the MIDI driver used for transmitting and receiving MIDI messages Tx Selects from a list the MIDI driver used for transmitting MIDI messages Rx Selects from a list the MIDI driver used for receiving MIDI messages Group Select the device group to be set up from the list NOTE Only USB 1 is available on DME8i C DME8o C DME4io C ...

Page 136: ...ortcut Keys dialog Names and Functions Click to select the desired shortcut item Enter New Key If assigned the current shortcut will be displayed A shortcut entered via the computer keyboard will be displayed OK Button Enters the settings and closes the dialog box Cancel Button Closes the dialog box without entering the settings ...

Page 137: ...ctions Various restrictions apply depending on the security level of the user that is currently logged on The currently logged on user can edit only users at a security level lower than his or her own The currently logged on user cannot raise his or her own security level Administrator User The Administrator user is registered by default and can use all functions Immediately after DME Designer is ...

Page 138: ...w the user that created them Scene sets the level for storing and recalling scenes The logged on user can store or recall scenes at levels equal to or lower than his or her own level For example a user at level 3 can recall scenes set for scene recall at levels 3 through 10 Levels are also set for user control The logged on user can display or edit user controls at levels equal to or lower than hi...

Page 139: ... entered in order to log on If auto logon is changed from ON to OFF Confirmation of Current User dialog box will be displayed Enter the user s password into the Password box and click the OK button If you click the Cancel button auto logon will remain ON Auto Logon User Selects the user for auto logon when Enable Auto Log On is checked The currently logged on user can set this command for users at...

Page 140: ... a or button will be displayed to the left of higher level user s name on the list Clicking the or buttons displays or hides the users subordinate to that higher user The currently logged on user can create multiple users at lower levels 1 Name Displays the user names The currently logged on user is displayed in bold text 2 Startup User Control Displays ON to automatically open the user control an...

Page 141: ...n Allows switching between configurations Synchronization Allows synchronizing with the DME or SP2060 unit View Log Window Displays the Event Logger window Scene Store Recall Level Sets the level at which scenes can be stored and recalled Click the and buttons or enter a number into the box to set the level While levels 1 through 10 are available the range of levels that can be actually set varies...

Page 142: ...assword the user leave the box blank Confirm Password Box Enter the password once again to confirm it When you type in the password box asterisks will be displayed instead of the characters you enter If you do not want to set a password the user leave the box blank Startup User Control When a user logs on the user controls of all users in the current device group with a lower security level as wel...

Page 143: ...or can be selected only if the logged on user is the Administrator If there are multiple users select the user that will be above the new user Multiple users can be created subordinate to a single user 3 Click the Add User button The Add User dialog box will be displayed 4 Enter the user name into the Name box 5 Enter the password into the Password box You can also create users with no password If...

Page 144: ...er to use Scene Store Recall Level and User Control Level will be set to one level lower than the user above the newly created user The initially set level will automatically be the highest level that can be set for that user To lower the level enter a larger number in the box Click the OK button and the dialog will close You can continue creating new users without closing the dialog box NOTE If t...

Page 145: ...e device group master or slave IP Address Displays and sets the IP address of the DME or SP2060 unit connected to the port specified by Port Select NOTE These settings can be edited regardless of the current settings of the DME and SP2060 units The DME Utility screen Lock page and SP2060 Utility screen User Lock settings only apply to the device panels NOTE DME64N 24N slave devices will not be dis...

Page 146: ...rt Select MAC Address Displays the MAC address of the DME or SP2060 unit connected to the port specified by Port Select Utility Click the Utility item of the Hardware menu to open the Utility window Utility Window This window provides a variety of utility settings for DME and SP2060 units These settings can only be made when the target unit is online A password will be required to open this window...

Page 147: ... names given to the DME and SP2060 units Version Display the firmware version numbers of DME and SP2060 units that are online Battery Displays the battery status of DME and SP2060 units that are online Date Displays the date and time of the internal clocks of DME and SP2060 units that are online Network Tab Displays DME and SP2060 network information ...

Page 148: ... allows editing of the DME64N 24N panel display LCD Contrast Displays and sets the display contrast The parameter range is 0 100 LCD Backlight Displays and sets the display backlight status The settings are ON or OFF ON The display backlight is continuously on OFF The display will light when a panel control is operated but will go out 10 seconds after panel operation stops Meter Fall Time Displays...

Page 149: ...ill be automatically engaged when the unit is turned on The settings are Unlock and Lock Unlock The panel will not be locked when power to the unit is turned on Lock The panel will be locked when power to the unit is turned on Panel Lock Target Displays and sets the panel lock target The settings are Key Only and Key GPI Key Only Only input via the panel controls will be locked Key GPI Input via t...

Page 150: ...possible Last Mem Resume Determines whether the scene number that was selected when the power was last turned off will be recalled when the power is turned on or whether the overall status of the unit when the power was last turned off will be recalled when the power is turned on The settings are ON and OFF ON The status of the unit when the power was last turned off will be recalled OFF The scene...

Page 151: ...ntrol using DME Communication Protocol via RS 422 MIDI 232C Control using MIDI commands via RS 232C MIDI 422 Control using MIDI commands via RS 422 Remote Ctrl 232C Remote control using DME Communication Protocol via RS 232C Remote Ctrl 422 Remote control using DME Communication Protocol via RS 422 MIDI Tab Port Selects the MIDI port to be set up DAW Type Selects the DAW type when a DAW controller...

Page 152: ...m change control change and parameter change details can be set up via the MIDI window Program Change Control Change and Parameter Change tabs respectively Program Change Control Change Parameter Change Sets transmit Tx receive Rx OMNI and Echo for program change control change parameter change When ON clicking turns this OFF When OFF clicking turns this ON When OMNI is ON channel messages are rec...

Page 153: ... current input voltage as the maximum input voltage for checked channels The specified maximum voltage is indicated by a red bar Min Button Sets the current input voltage as the minimum input voltage for checked channels The specified minimum voltage is indicated by a blue bar Common to All Tabs Apply Button Applies any current setting changes OK Button Applies any setting changes and closes the w...

Page 154: ...or each DME or SP2060 in the Word Clock dialog box When you click Word Clock on the Hardware menu the Work Clock dialog box is displayed Names and Functions DME From the list select the DME or SP2060 where you will be making settings Clock Information Displays the word clock frequency for the DME or SP2060 selected in DME The number of channels varies according to the card inserted into the slot C...

Page 155: ...ses the dialog box Status Meaning Indicates that there is no input signal Indicates there is an input signal and sync is possible with the current word clock Indicates there is an input signal but cannot sync with word clock clocks are different Indicates that there is no DME or SP2060 unit information Device Name Slot Internal Word Clock Cascade Digital DME64N 1 4 44 1kHz 48kHz 88 2kHz 96kHz WC I...

Page 156: ...itor output destination DME From the list select the DME64N 24N where you will be making settings Drop down list From the list select the card that will be the destination for the monitor output OK Button Accepts the changed settings and closes the dialog box Cancel Button Closes the dialog box without changing the settings NOTE Monitor Out can be set on DME64N 24N units only ...

Page 157: ...n online The default is the computer date and time Set the date in the left box and the time in the right box You can change the numbers using the and at the right of the boxes OK Button Applies any setting changes and closes the window Cancel Button Closes the window without changing any settings NOTE Does not apply to SP2060 units NOTE You can close the dialog box using the Close button or by pr...

Page 158: ... unit language Names and Functions Language Select the language English German French Spanish and Japanese are in the list OK Button Accepts the changed settings and closes the dialog box Cancel Button Closes the dialog box without changing the settings NOTE Language Settings can be set on DME64N 24N units only NOTE You can close the dialog box using the Close button or by pressing Esc or Alt F4 ...

Page 159: ...ata You can place checks next to multiple DMEs and SP2060s Folder Box Specifies the folder that will be the destination for saving and reading operations Clicking the Browse button opens the folder select dialog box where you can specify a folder The backup file name will be the DME s IP address If the folder is specified when sending DME data the file sent to the DME will be the file in the folde...

Page 160: ... performing the DME or SP2060 unit firmware update connect the DME or SP2060 unit and the computer by USB or Ethernet The USB MIDI or DME N Network Driver must be installed in the computer NOTE To perform the ICP1 firmware update the ICP1 and the device group master DME unit must be connected by Ethernet In addition the device group master DME unit must be connected to the computer as described ab...

Page 161: ...60 or ICP1 unit you wish to update Clicking the checkboxes alternately turns the check mark on and off The Select All button can be used to check all DME SP2060 and ICP1 units The Clear All button removes the check marks from all DME SP2060 and ICP1 units 4 When the DME SP2060 and ICP1 units to be restored have been checked click the Update button The firmware update will begin When the restore up...

Page 162: ...ICP1 units The Clear All button removes the check marks from all DME SP2060 and ICP1 units 4 When the DME SP2060 and ICP1 units to be restored have been checked click the Update button The firmware restore process will begin When the restore update is complete the DME SP2060 and ICP1 units will restart automatically It is also necessary to restart the DME designer NOTE When performing a firmware r...

Page 163: ...ations can be added via the Configuration manager window Information about the Zone Manager window can be found in the Adding Deleting and Renaming a Zone section on page 267 information on the Device Group and Sampling Frequency Settings window can be found in the Device Group Selection section on page 249 and information on the Configuration Manager window can be found in the Adding Deleting and...

Page 164: ...ing tasks such as arranging objects making connections and changing properties Edit Mode OFF When Edit Mode is OFF you cannot arrange objects make selections or display Properties dialog boxes for objects You can display the component editor Designer Window You can display or hide the Designer window using the Designer command on the View menu in the Main Panel window Title Bar Designer is display...

Page 165: ... the clipboard Paste Button page 177 Pastes data from the clipboard Navigator Button page 168 Displays or hides the Navigator window Resource Meter Button page 167 Displays or hides the Resource Meter window Analyze Button page 181 Displays the Analyze dialog box and analyzes the configuration Show Signal Delay Button The digital signal delay value is displayed in the Configuration window Show Sig...

Page 166: ...Mode page 166 in the Configuration Editing section Status Bar DME ID Component ID When the mouse pointer is moved over a DME device in the Zone window the ID for that DME device is displayed When the mouse pointer is moved over a component in the Configuration window the ID for the component is displayed Sampling Frequency Displays the sampling frequency in the configuration window Sheet size Disp...

Page 167: ...calculated after this compiling operation The usage percentage will vary according to the number of connections and components The Resource Meter window gives you a precompile guideline for use while designing your configuration An error may occur even when the meter shows less than 100 percent based on conditions such as the number of connections and type and number of components used SPX Resourc...

Page 168: ...dule or component to make each design window active The subordinate items are displayed or hidden using the buttons to the left of the area zones configurations user modules or DME devices When the subordinate items are displayed the button changes to If you click this button the subordinate items will be hidden When the subordinate items are hidden the button changes to If you click this button t...

Page 169: ...ation If a configuration is clicked during offline editing the clicked configuration will be selected Device If you click a device a Configuration window will be opened for that unit If that window is already open it will be displayed on top of any other windows Component Click a component and the component editor will open User Module The window specified by User Module Properties Double Click Ac...

Page 170: ...r s Manual 170 Toolkit Window The Toolkit displays objects that can be arranged in each design window The displayed contents vary according to which window is active See Objects on page 183 Displayed in the designer window Floating style ...

Page 171: ...oolkit window The objects are categorized by type and displayed here in a hierarchy You can use the buttons to display or hide items below a particular level in the window Click the button to display the items on the next level down and the button to hide them Moving the Toolkit Window You can move the Toolkit window by dragging it If you drag the window to right or left side it will remain fixed ...

Page 172: ...submenu on the Tools menu or on the context menu that appears when you right click on the sheet Active Design Window Toolkit Window Area Window Area Parts List Zone Window Device List Configuration Window Component List User Module Window Component List Area Parts List Device List Component List Configuration Window Component List User Module Window DME ICP SP2060 External Device Component SPX Com...

Page 173: ...ponent List Configuration Window The Component List displays objects that can be arranged in Configuration windows The same objects are displayed in the Component List submenu on the Tools menu or on the context menu that appears when you right click on the sheet NOTE Configurations are added using the menu bar Tool menu Configuration Manager dialog box Toolkit window Device List submenu on the To...

Page 174: ...t displays objects that can be arranged in the User Module window The same objects are displayed in the Component List submenu on the Tools menu or on the context menu that appears when you right click on the sheet Toolkit window Tools menu Component List submenu on the Tools menu or on the context menu ...

Page 175: ...areas See Area Window on page 272 Zone Window Used to design zone configurations See Zone Window on page 274 Configuration Window Used to design configurations for DME units arranged in a zone See Configuration Window on page 277 User Module Window Used to design user modules configurations A module that combines a number of other components yet is treated as a single component is called a user mo...

Page 176: ...ndow in Design Window Shared Settings and Operations page 247 Print Preview Displays a print preview of the active design window Printing Each Design Window in Design Window Shared Settings and Operations page 247 Print Prints the active window When you select this command the Print dialog box will be displayed Printing Each Design Window in Design Window Shared Settings and Operations page 247 Pr...

Page 177: ...ected object Moves the selected object to the clipboard Copy Copies the selected object to the clipboard The selected object remains as is Paste This command pastes the object on the clipboard into the active window If there is no data on the clipboard or if the object on the clipboard is not a type that can be pasted into the active window this command cannot be used Delete Deletes the selected o...

Page 178: ...d Legend Descriptive Fields in Objects page 232 Properties Opens the Properties dialog box for the selected objects See Object Types on page 183 View Menu Displays or hides the windows Toolbar Displays or hides the toolbar A checkmark appears beside this menu item when the toolbar is displayed Status Bar Displays or hides the status bar A checkmark appears beside this menu item when the status bar...

Page 179: ...itches the port name display of the slot components When you select this command a checkmark appears next to it and long names are displayed If you select this command when a checkmark is next to it the checkmark disappears and short names are displayed Zoom In Gives a closer view of an area displayed on the screen Zoom Out Widens the area displayed on the screen Zoom To Selects the display magnif...

Page 180: ...173 Component List This command can be used only when a Configuration window or User Module window is active A submenu here displays the same objects as the Toolkit window Clicking an object on the submenu then clicking the Configuration User Module window places the object in that window Component List Configuration Window in Toolkit Window page 173 Component List User Module Window in Toolkit Wi...

Page 181: ... be selected only when a Configuration window or User Module window is active while in online status Probe Monitor in Configuration Window page 279 Monitoring Point List Opens the Monitoring Point List dialog box Registers points for monitoring with headphones Monitoring Point List in Configuration Window page 282 Edit Mode Turns the edit mode ON or OFF Edit Mode in Editing Configurations page 163...

Page 182: ...indow Shared Settings and Operations page 244 Preferences Displays the Preferences dialog box Sets the line thickness and the design window edit operations Preferences in Design Window Shared Settings and Operations page 241 Window Menu Arranges multiple windows The lower part of the menu displays the names of currently open windows A checkmark appears next to the active window When you click the ...

Page 183: ... Where It can be Placed Displayed Explanation Zone Area Zones DME Zones DME and any cards inserted into its slots ICP Zones User defined parameter control SP2060 Zones Speaker Processor External Device Area Zones External Device Component Configuration User Module User Module Audio processor Control parts SPX Component Configuration User Module SPX components User Module Configuration Combination ...

Page 184: ...nu If you right click on the name of a zone object located in the Area window a context menu will be displayed Zone Context Menu Cut Cuts the selected object and places it on the clipboard Copy Copies the selected object to the clipboard Paste Pastes the object currently on the clipboard Delete Deletes an object Display Order Changes the display order of the objects according to a command in the s...

Page 185: ...not be displayed Font Button Clicking here displays the Select Font dialog box This sets the font used to display the object name For information about the Select Font dialog box see page 236 Color Button Clicking here displays the Select Color dialog box This sets the color of the object name text For information about the Select Color dialog box see page 237 Text Position Sets the location of th...

Page 186: ...ut the Select Color dialog box see page 237 Image Button Displays an image inside the object You can use image files in the following formats BMP bmp PNG png XPM xpm and JPEG jpg Clicking here displays the Select Image dialog box Specify an image file and set its display method For information about the Select Image dialog box see page 239 OK Button Accepts the changed settings and closes the dial...

Page 187: ... have been made for an expansion card installed in one of the DME slots the card will be displayed automatically DME24N DME64N DME24N with no I O card installed DME24N with an I O card installed in its expansion slot DME64N with no I O cards connected in slots DME64N with I O cards installed in expansion slots 1 and 4 ...

Page 188: ...Chapter 4 Designer DME Designer Owner s Manual 188 DME8i C DME8o C DME4io C ...

Page 189: ...matically from the Configuration window Even if the I O components are deleted the wiring will remain When the DME64N Cascade Setting is Turned ON When Show Cascade Port is checked in the DME64N DME Device Properties dialog box the cascade I O components will be displayed in the Configuration window If Show Cascade Port is turned OFF in the DME64N DME Device Properties dialog box cascade I O compo...

Page 190: ...ouble click on it If you right click on the object a context menu will be displayed Scene Info and On line Button DME objects include an object that provides scene info and an On line button The scene info area displays the current scene number and name Click the scene info area to open the Scene Manager window The On Line button has the same function as the On Line button in the main panel window...

Page 191: ...zation window See Synchronization DME Designer and Unit Synchronization on page 83 Cut Cuts the selected object and moves it to the clipboard Copy Copies the selected object to the clipboard Paste Pastes the DME object that is on the clipboard Delete Deletes the object you clicked on Duplicate Duplicates the object you clicked on Display Order Changes the display order of the objects according to ...

Page 192: ...el dialog box will be displayed This sets the DME master volume Properties Displays the DME Device Properties dialog box DME Properties To display the DME Device Properties dialog box select a DME object then click the Properties command on the Edit menu Here you can set DME properties DME24N DME64N DME8i C ...

Page 193: ...r the label Clicking here displays the Select Font dialog box For information about the Select Font dialog box see page 236 Show Scene Display and On line Indicator When checked the current scene number and name and on line indicator are displayed in the zone window NOTE The name set in the Label box will be displayed on the list in the Toolkit window Import Export menu commands and on the list in...

Page 194: ...d setup is provided for the DME8i C DME8o C DME4io C Select I O Card Specifies the type of I O card Card Label I O card names having up to 100 characters can be entered here Port Style On Zone Window Specifies how the DME ports appear in the zone window Custom Port Style Customizes the port display Left Sets the number of ports to be displayed on the left Right Sets the number of ports to be displ...

Page 195: ... Fixed Delay is selected Cascade Turns the DME 64N cascade ON or OFF Show Cascade Port on Configuration Window Checking this enables cascade Cascade Setting Here you can make settings that apply when cascade is enabled Clicking here displays the Cascade Setting dialog box See Cascade Setting dialog box on page 196 OK Button Accepts the changed settings and closes the dialog box Cancel Button Close...

Page 196: ...margin for the Cascade connection audio signal Select 0 dB or 18 dB All DME Unit No settings for DME units other than the first unit will be automatically set to the same value as the first unit when connected These settings are grayed out after connection indicating that they cannot be changed Mixer I O Channel Here you can display and set the channel used for audio input output to a mixer If the...

Page 197: ...l appear when the Edit Port Label and Type button is clicked Specifies the port labels and types to be displayed to the left and right of DME and SP2060 objects To set labels enter the Port Name for Left and Right Each name can be up to 100 characters in length To set the port type use Port Type to select the Left and Right types ...

Page 198: ...u will be displayed ICP Object Context Menu Cut Cuts the selected object and moves it to the clipboard Copy Copies the selected object to the clipboard Paste Pastes the control panel object that is on the clipboard If the same control panel object exists on the sheet where you are pasting a new ICP object will be created Delete Deletes the object you clicked on Duplicate Duplicates the object you ...

Page 199: ...utton Sets the font for the label Clicking here displays the Select Font dialog box For information about the Select Font dialog box see page 236 Label Color Button This sets the color of the label text Clicking here displays the Select Color dialog box For information about the Select Color dialog box see page 237 Back Color Button Sets the object color Click to display the Select Color dialog bo...

Page 200: ...tton The scene info area displays the current scene number and name Click the scene info area to open the Scene Manager window The On Line button has the same function as the On Line button in the main panel window On Line Button page 50 The SP2060 Object Context Menu Open Configuration Window Opens the Configuration window Configuration Window page 277 Configuration Manager Not available for SP20...

Page 201: ...Creates a duplicate of an object Display Order Changes the display order according to the selected submenu command Recall Scene Selects and recalls a scene from the submenu Flash Unit LEDs Select to flash all indicators on the SP2060 panel Flashing will continue until this command is de selected Output Level Not available for SP2060 objects Properties Opens the SP2060 Device Properties window ...

Page 202: ...s the object style select Plain Raised or Sunken from the list Show Scene Display and On line Indicator When checked the current scene number and name and on line indicator are displayed in the zone window Label Font Button Specifies the label font The Select Font window will appear when this button is clicked See The Select Font Window on page 236 for details on using the Select Font window Label...

Page 203: ...splays all audio ports This command grayed out and cannot be selected for SP2060 objects Custom Port Style Customizes the port display This setting is always used for SP2060 objects Left Specifies the number of ports to be displayed on the left side of the object Right Specifies the number of ports to be displayed on the right side of the object Edit Port Label and Type Edits the label and type fo...

Page 204: ...channel analog to digital converter The AD8HR is an eight channel analog to digital converter that features a head amp with high quality sound You can connect Yamaha AD824 and AD8HR A D converters to a DME unit and control them remotely from DME Designer DME Designer has a component editor for controlling AD824 and AD8HR units If you arrange an AD824 or AD8HR from External Device in the Zone windo...

Page 205: ... display order of the objects according to a command in the submenu Properties Displays the External Device Properties dialog box At the lowest position below External Device AD824 and AD8HR display the Serial Controlled Device Properties dialog box The other objects display the External Device Properties dialog box External Device Properties To display the External Device Properties dialog box se...

Page 206: ...plication Box The linked application will be displayed Click the Browse button to locate and select an application Specifies the path to an application to be launched when an External Device object is double clicked File Box The linked file will be displayed Click the Browse button to locate and select a file Specifies the path to a file to be launched when an External Device object is double clic...

Page 207: ...ox select AD824 or AD8HR then click the Properties command on the Edit menu This dialog box is the same as the External Device Properties dialog box except for Remote Remote Select the DME you will control remotely from AD824 and AD8HR DME Unit The DMEs in the current configuration will be displayed in a list Select the DME you will control remotely ID Selects an ID from 1 to 8 The default is 1 ...

Page 208: ...opies the selected object to the clipboard Paste Pastes the object that is on the clipboard Delete Deletes the object you clicked on Duplicate Duplicates the object you clicked on Display Order Changes the display order of the objects according to a command in the submenu Recall Component Library Recalls libraries with component parameters saved in them Clicking here displays the submenu When a li...

Page 209: ...h component If multiple examples of the same component type are arranged on a single sheet changing the properties of a single component does not change the others To display the Component Properties dialog box select a component object then click the Properties command on the Edit menu Label Box You can enter up to 100 English characters to display over the object Width Box Specifies the width of...

Page 210: ...window Component objects arranged in a configuration are displayed in block form Clicking on a positioned SPX component will select it and right clicking will display a contextual menu Unlike normal components SPX components use SPX specific resources and therefore the usage percentage display that appears to the lower right of normal components will not appear Check the SPX resource usage percent...

Page 211: ...reates component link Refer to Creating Component Links on page 342 for more iformation Properties Displays the SPX Component Properties dialog box SPX Component Properties SPX component properties are set for each component If multiple examples of the same component type are arranged on a single sheet changing the properties of a single component does not change the others To display the SPX Comp...

Page 212: ...Font dialog box For information about the Select Font dialog box see Select Font dialog box page 236 Label Color Button Sets the color for the label text Clicking here displays the Select Color dialog box Inputs Outputs Label Color Button Sets the color for the I O port label text Clicking here displays the Select Color dialog box ...

Page 213: ...ent by clicking on it then double click it the component editor opens If you right click on the object a context menu will be displayed Slot Component Object Context Menu Open MY Card Editor Open HA Editor Open CobraNet Editor Opens the editor for Slot components Open Slot In Component Editor Open Slot Out Component Editor Open Input Component Editor Open Output Component Editor Opens the componen...

Page 214: ... dialog box For information about the Select Font dialog box see Select Font Dialog Box page 236 Label Color Button This sets the color of the label text Clicking here displays the Select Color dialog box Inputs Outputs Label Color Button Sets the color for the I O port label text Clicking here displays the Select Color dialog box Color Button Sets the color of the object Clicking here displays th...

Page 215: ... Outputs You can enter up to 100 English characters for each name You can switch between long and short port names displayed in the configuration window with the Port Long Name command in the View menu When you select this command a checkmark appears next to it and long names are displayed If you select this command while a checkmark is next to it the checkmark disappears and short names are displ...

Page 216: ...d User Module Object Context Menu Open User Module Design Window Opens the User Module Design Window Open User Module Editor Opens the User Module Editor Cut Cuts the selected object and moves it to the clipboard Copy Copies the selected object to the clipboard Paste Pastes the object that is on the clipboard Delete Deletes the object you clicked on Duplicate Duplicates the object you clicked on D...

Page 217: ...ation Save User Module Saves the selected user module See Saving User Modules on page 287 Properties Displays the User Module Properties dialog box User Module Properties To display the User Module Properties dialog box select a user module object then click the Properties command on the Edit menu NOTE Libraries can be recalled only by users for whom Control Component Editor in security is turned ...

Page 218: ...displays the Select Color dialog box Inputs Outputs Labels Color Button Sets the color for the I O port label text Clicking here displays the Select Color dialog box Color Button Sets the color of the object Clicking here displays the Select Color dialog box Inputs Outputs Sets Sets the number of input output ports Enter a number into the Inputs box and Outputs box or set a value using the and but...

Page 219: ...ssword Button Changes the password for user modules Clicking this button displays the Input Password dialog box Enter the current password and click the OK button The Set Password dialog box will be displayed and you can set a new password This button will be grayed out when Enable Security is turned OFF OK Button Accepts the changed settings and closes the dialog box Cancel Button Closes the dial...

Page 220: ... displayed Placing Pictures There are three picture placement methods You can drop the Picture item from the Toolkit window into each design window You can double click Picture on the Toolkit window You can click Picture in the Area Parts Device List Component List on the Tools menu then click each design window When you place a picture object the Open dialog box is displayed Select the image file...

Page 221: ...e you can change the image file If you right click on a picture object a context menu will be displayed Picture Module Object Context Menu Cut Cuts the selected object and moves it to the clipboard Copy Copies the selected object to the clipboard Paste Pastes the object that is on the clipboard Delete Deletes the object you clicked on Duplicate Duplicates the object you clicked on Display Order Ch...

Page 222: ...out the Select Font dialog box see page 236 Label Color Button This sets the color of the label text Clicking here displays the Select Color dialog box For information about the Select Color dialog box see page 237 Port Label Color Button Sets the color of the I O port label Click to display the Select Color dialog box File Name Box Displays the path to the graphic file Browse Button Selects a gra...

Page 223: ...alog box When first placed in the design window the word Text is entered into the box If you click the text object handles small squares appear at the corners and sides of the object You can adjust the size by dragging the handles You can open the Text Properties dialog box by double clicking the box If you right click on the object a context menu will be displayed Text Object Context Menu Cut Cut...

Page 224: ... color of the background Clicking here displays the Select Color dialog box Draw Text Border Displays a frame around the text object If this is not checked only the text will be displayed on the sheet Text Border Style Box Sets the style of the object From the list select Plain Raised or Sunken Link Component Editor When On a Text object can be double clicked to open the component editor specified...

Page 225: ... clicking the box If you right click on the object a context menu will be displayed Box Object Context Menu Cut Cuts the selected object and moves it to the clipboard Copy Copies the selected object to the clipboard Paste Pastes the object that is on the clipboard Delete Deletes the object you clicked on Duplicate Duplicates the object you clicked on Display Order Changes the display order of the ...

Page 226: ...Sets the color of the box Clicking here displays the Select Color dialog box For information about the Select Color dialog box see page 237 Line Sets the line that frames the box Type Displays a list where you can select the type of line to frame the box The following types are available Solid Dash Dot DashDot and DashDotDot Size Box Sets the width of the line that frames the box This setting can ...

Page 227: ...perties dialog box by double clicking the ellipse If you right click on the object a context menu will be displayed Ellipse Object Context Menu Cut Cuts the selected object and moves it to the clipboard Copy Copies the selected object to the clipboard Paste Pastes the object that is on the clipboard Delete Deletes the object you clicked on Duplicate Duplicates the object you clicked on Display Ord...

Page 228: ...ialog box For information about the Select Color dialog box see page 237 Line Sets the line that frames the ellipse Type Displays a list where you can select the type of line to frame the ellipse The following types are available Solid Dash Dot DashDot and DashDotDot Size Box Sets the width of the line that frames the ellipse This setting can range from 1 to 100 pixels Color Button Sets the color ...

Page 229: ... wire object one of three types of context menus will be displayed depending where you clicked Wire Object Context Menu Line Segment Start Wire Begins drawing a line segment from the location where you clicked Delete Wire Deletes the entire wire Cut Cuts the selected object and moves it to the clipboard Copy Copies the selected object to the clipboard Paste Pastes the object that is on the clipboa...

Page 230: ...ire Deletes the entire wire Delete Deletes the node The nodes before and after will become directly connected Properties Displays the Wire Properties dialog box Wire Object Context Menu Termination Continue Wire Begins drawing wire from a termination node Start Wire Begins drawing a wire from the location where you right clicked Delete Wire Deletes the entire wire Properties Displays the Wire Prop...

Page 231: ...ays a list where you can select the type of line The following types are available Solid Dash Dot DashDot and DashDotDot Line Color Button Sets the color of the line Clicking here displays the Select Color dialog box Selected Color Button Sets the color of the selected line Clicking here displays the Select Color dialog box OK Button Accepts the changed settings and closes the dialog box Cancel Bu...

Page 232: ... one of the Legend fields displayed on the sheet the Edit Legend dialog box is displayed If you right click on the Legend the displayed context menu will have the Edit Legend command only If you click there it will display the Edit Legend dialog box The Edit Legend dialog box is used to enable disable Legend display and to set the contents displayed there You can display the Edit Legend command fr...

Page 233: ...each field Legend Base Font Style Displays a list where you can select the font Show Legend Place a checkmark here to display the legend on the sheet Save as Default Legend Saves this legend as the default legend used when a new sheet is created When a new configuration is created it will have a legend with the same contents as this one Change for All Legends In Area Place a checkmark here to have...

Page 234: ... the sheet Fixed Aspect Ratio When this is checked the relationship between horizontal and vertical is fixed When the value for Horizontal or Vertical changed the size of the other direction changes so that the proportions of the paper remain the same Save As Default Sheet Size When turned ON the current values will become the default for creating sheets New sheets will be created at the same size...

Page 235: ...e 237 Image Button Displays an image as the sheet background You can use image files in the following formats BMP bmp PNG png XPM xpm and JPEG jpg Clicking here displays the Select Image dialog box For information about the Select Image dialog box see page 239 Change for All Sheets Changes all sheets so that they are the same OK Button Accepts the changed settings and closes the dialog box Cancel ...

Page 236: ...tyle by clicking its name on the list below Normal Standard style Italic Italic or slanted text Bold Bold text Bold Italic Bold italic text Size Sets the text size The currently selected size is displayed in the box Select a size by clicking it in the list below Effects Sets effects for the text Check the effects you wish to set Strikeout Adds a strikeout line through the center of the text Underl...

Page 237: ...ayed at the upper right of the dialog box by clicking on it in the palette Color information is displayed below the color palette If you like the color you selected click the OK button If you don t like the color you can select a new color by clicking in another location in the color palette or by dragging the cross symbol to another location there Grey colors can be selected on the tall thin char...

Page 238: ...cted and a frame will appear around it 2 Set the color on the color palette 3 Click the Add to Custom Colors button The selected color will be added to Custom colors NOTE You can save another color in a box that already has an original color saved in it Just click on the box to select it The new color will overwrite the previous color which will be lost ...

Page 239: ...he manner in which the image file will be displayed Center Centers the image in the object or sheet Tile Displays multiple copies of the image side by side until the available space is filled If the image file is smaller than the sheet it will be displayed repeatedly like tiles on a wall Fit Expands or reduces the size of the image to match the size of the sheet where it will be displayed File Box...

Page 240: ... the image file Clicking here displays the Open dialog box Select a file with one of the following extensions bmp png xpm or jpg then click the Open button OK Button Accepts the changed settings and closes the dialog box Cancel Button Closes the dialog box without changing the settings ...

Page 241: ...s command in the Designer window Tools menu Graphics Ports Wires Specifies wire color thickness and type for each port type Color Sets the default color for the port and wire Width Sets the default wire width from a range of 1 to 5 Type Sets the port type NOTE The initial color and thickness of the wires produced when drawing connections are specified here The color and thickness of drawn wires ca...

Page 242: ...plicate position will be automatically adjusted so that the object does not overlap the original object Horizontal Pixels Box Sets the horizontal distance Vertical Pixels Box Sets the vertical distance Auto Suffix Number Turns automatic appending of sequentially numbered suffixes to the names of placed objects on or off DME Speaker Processor When ON numbered suffixes will automatically be appended...

Page 243: ...dragging them Spacing This sets the spacing of the grid This setting can range from 2 to 99 pixels X Box This sets the spacing of the grid in the horizontal direction Y Box This sets the spacing of the grid in the vertical direction Show Grid Displays the grid Place a checkmark here to enable display and select the type of grid Line Displays the grid using lines Dot Displays the grid using dots Sa...

Page 244: ...re that support vector graphics such as Adobe Illustrator Symbols are substituted for external devices in the following three types of folders Microphone mike symbol Power Amp amp symbol Speaker speaker symbol Text decoration except for size will be eliminated Picture objects and background images for the sheet or objects will all be eliminated Style attributes for boxes will be eliminated When yo...

Page 245: ...specify the folder where the file will be saved then click the Save button When you return to the Export DXF dialog box the specified filename will be displayed in the DXF File Name box Scale Sets the reduction ratio When the size of the sheet is large you can reduce it before exporting it Text Style Specifies the text font for output in DXF format The default is the TXT drawing font used in CAD N...

Page 246: ... Sets the size of the paper Preset Size Displays a list where you can select preset paper sizes When you select a paper size numerical values are set for Horizontal and Vertical Custom Sizes Set a custom size by specifying the vertical and horizontal sizes of the sheet Horizontal Box Sets the horizontal width of the sheet Vertical Box Sets the vertical height of the sheet Unit Selects the unit use...

Page 247: ...ated to printing are found on the Designer Window Print menu Print Setup When you select this command the Print Setup dialog box will be displayed Sets the paper size and orientation Paper Size Displays a list where you can select the paper size Orientation Sets the orientation of the paper Portrait Prints on the paper with its long sides vertical Landscape Prints on the paper with its long sides ...

Page 248: ...kit Window You can double click an object in the Toolkit window to place it in each design window Selecting from the Tools Menu Available objects are displayed on the Area Parts List Device List Component List submenus which are accessed from the Tools menu When you click an object name the mouse pointer changes shape Click the location on the sheet where you want to place the object Selecting fro...

Page 249: ...p to be selected from a list If a group does not exist it will be grayed out in the list and cannot be selected New Group Creates a new group The initial color of the new group s name and added devices can be edited as required Select Sampling Frequency Specifies the sampling frequency NOTE The sampling frequency can be changed from that specified in the Word Clock window Refer to Word Clock on pa...

Page 250: ... If you hold down the Ctrl key and click again on one of the objects that is part of the multiple selection it will cancel selection of that single object Selecting by Dragging If you position the mouse in an empty location on the sheet and start dragging from there a frame will be displayed as the pointer moves Any objects within this frame will be selected Changing the Selected Object Using the ...

Page 251: ... Redo command to redo operations that have been undone Deleting Objects Objects can be deleted by selecting them and pressing the Delete key Moving Objects You can move objects by dragging them with the mouse If Snap to Grid is ON in the Grid dialog box the dragged objects will automatically align with the grid You can also move a selected object using the arrow keys If Snap to Grid is ON in the G...

Page 252: ...and on the Edit menu Select the object for which you want to change the display order then select the appropriate command from the Display Order submenu on the Edit menu Top Moves the selected object to the top of the stack Bottom Moves the selected object to the bottom of the stack Front Moves the selected object up one level in the stack Back Moves the selected object down one level in the stack...

Page 253: ...and destinations input side it also lets you draw connections and independent lines on the display Each wire has at least two wire nodes Between the nodes are line segments Selecting Wires and Canceling Selection You can select a line segment by clicking on it If you hold down the Alt key while clicking you will select the entire wire NOTE The color used when a wire object is selected can be set w...

Page 254: ... only that line segment is selected If you hold down the Ctrl key while clicking you can select multiple line segments Furthermore if you drag the mouse from an empty location on the sheet so that nodes are enclosed by a box line segments between those nodes will be selected Canceling Line Segment Selection If you select another object or an empty location on the sheet it will cancel selection of ...

Page 255: ...ultiple nodes by holding down the Ctrl key while clicking Furthermore if you drag the mouse from an empty location on the sheet so that nodes are enclosed by a box the enclosed nodes will be selected Canceling Node Selection If you select another object or an empty location on the sheet it will cancel selection of the object you previously clicked You can also cancel node selections by holding the...

Page 256: ... to a logical signal within the hardware Component and user module hotspots normally include logical connections External device hotspots do not include logical connections Selecting Hotspots If you click a hotspot drawing will start To select press Shift click You can select multiple hotspots as follows Select a hotspot with Shift click then select additional hotspots using Ctrl Shift click Hotsp...

Page 257: ...annot be drawn To activate this function select it from the menu so that a checkmark appears next to the command name in the menu Selected the command again to remove the checkmark and deactivate the function You can also limit wire drawing to horizontal and vertical lines by holding the Shift key while drawing the wires NOTE You can change the positions of existing components or nodes while conve...

Page 258: ...nu Node Right click click Start Wire on the menu Line Segment Right click click Start Wire on the menu Anywhere on the Sheet Right click click Start Wire on the menu NOTE When creating diagrams the keyboard cursor keys can be used to move the mouse cursor and the Enter Key can be used to create nodes NOTE A termination cannot be connected to a terminal that will be shorted Multiple connections can...

Page 259: ...hotspot to complete the connection Method 2 From Hotspot to Node or Line Segment Click the hotspot where the connection originates to begin drawing then click the location node where you want the line to bend Click an already drawn wire node or line segment to complete the connection If you connect to a line segment a node will be created there NOTE A termination cannot be connected to a terminal ...

Page 260: ...ill connect too A wire will be displayed below the destination hotspot Finish dragging while holding the Ctrl key down Method 2 Connect Multiple Selected Hotspots Select multiple hotspots using Shift Ctrl click or Shift drag then drag from one of the selected hotspots to the destination hotspot The selected multiple origin hotspots will all be connected Method 3 Using Shortcuts Press the F2 key to...

Page 261: ... open hot spot to the left of the selected object and the uppermost open hot spot to the right of the object on the left Press the F5 key to connect the uppermost open hot spot to the right of the selected object and the uppermost open hot spot to the left of the object on the right and continue automatically making sequential connections until no more open ports are available on either object Aut...

Page 262: ... automatically making sequential connections until no more open ports are available on either object Automatic connections will not be made over other objects Press the F8 key to clear all wires connected to the selected object NOTE When multiple objects are selected these operations apply to the first object selected NOTE These shortcuts can be changed as required See Chapter 3 Main Panel Window ...

Page 263: ...nu Method 2 Start Drawing from a Node Right click on a wire node then click Start Wire on the displayed menu You can start a branch wire from the node you clicked on Method 3 Start Drawing from a Line Segment Right click on a wire line segment then click Start Wire on the displayed menu A node will be created at the point you right clicked and you can start a branch wire from that node Drawing fro...

Page 264: ...click Press the Esc key Drawing also finishes if another window is made active Wire Editing You can delete wires change node positions connect to other wires and perform other wire edit operations Delete Deleting an Entire Wire Right click the wire then click Delete Wire in the context menu Deleting Nodes Nodes can be deleted by selecting them and pressing the Delete key Nodes on both sides of the...

Page 265: ... dragged with the mouse you can move all selected nodes simultaneously Moving Line Segments To move a line segment select the nodes on both sides of the segment and drag one of the nodes Connecting to Other Wires If you drag a node and lay it over another wire the two will be connected at that position If you drag it to a line segment a node will be created Created Node ...

Page 266: ...indow can be drawn for display only Even in the Configuration window and User Module window you can also draw wires for display only Situations Where No Logical Connection Is Created Both sides are source output side signals Both sides are destination input side signals Two source output side signals are connected to a destination There are two destination input side signals and the wire is not co...

Page 267: ...one Manager dialog box Zone List Lists the zones included in the project To change settings for a zone select it by clicking it in the list Add Button Adds a zone Clicking here displays the Please enter new name dialog box Enter a new name then click OK A zone will be added Delete Button Deletes the zone selected on the list Clicking here displays the Are you sure dialog box Click the OK button an...

Page 268: ...e groups Click Device Group Manager in the Tools menu to open the Device Group Manager window via which device groups can be changed as required Device Group Manager Window Device Group All device groups in the zone being edited appear in the list Click the Slick a device group to select it for editing Name The name of the device group Attribute The type of device group Default Color The default c...

Page 269: ... the OK button Color Button Species the default color for new devices added to the currently selected device group The Select Color window will appear when this button is clicked Refer to The Select Color Window on page 237 for information on the Select Color window Apply Default Color to All Existing Devices When checked the color of all existing devices will change accordingly when the initial d...

Page 270: ...nfigurations Lists the configurations included in the device group being edited To change settings for a configuration select it by clicking it in the list Add Button Adds a configuration Clicking here displays the Please enter new name dialog box Enter a configuration name then click OK A configuration will be added Delete Button Deletes the configuration selected on the list Clicking here displa...

Page 271: ...s the Enter new name for the current configuration dialog box Enter a configuration name then click the OK button Close Button Closes the Configuration Manager dialog box NOTE The current name of the configuration you will be renaming is displayed in the Current Configuration Name box of the Enter new name for current configuration name message ...

Page 272: ...icture Text Box Ellipse Wire Legend Title Bar You can move windows by dragging the title bar Zone Zones are added and deleted using the Zone dialog box You cannot perform operations such as deletion cut or copy You can change the position and design of zone objects in the Area window Double click to open a Zone window Objects You can perform edit operations such as arrange cut copy paste delete an...

Page 273: ...than zones can be placed in the window by dragging them from the Toolkit window You can also place objects by double clicking them in the Toolkit window You can also display the Area Parts List from the Tools menu or from the context menu that appears when you right click on the sheet ...

Page 274: ...vice Picture Text Box Ellipse Circle Legend Title Bar Displays the zone name you have in the Zone dialog box There is always one zone named Zone 1 in a newly created project Configuration You can create multiple configurations within a zone but they cannot be arranged within the Zone window There is a Zone window for each configuration where devices can be arranged To switch configurations click t...

Page 275: ...ing them from the Toolkit window You can also place objects by double clicking them in the Toolkit window The same objects are displayed in the Device List submenu on the context menu that appears when you right click the Tools menu or on the sheet For information about the Device List see page 173 Device Action When Double Clicked DME SP2060 Displays Configuration Window ICP Displays Control Pane...

Page 276: ... located in the Speaker Processor folder These icons can be dragged to the zone window ICP Placement Just like for a DME or SP2060 placing an ICP is to drag the icon from the Toolkit window If there are multiple ICPs in a hardware configuration create an equivalent number of ICP objects In the Toolkit window ICP1 icons are located in the ICP1 folder This icons can be dragged to the zone window ...

Page 277: ...t placed in the window the editor set in Double Click Action in User Module Properties will open I O Component Depending on the settings for the DME placed in the Zone window I O components will be automatically placed or added I O components can be arranged in the DME24N DME8i C DME8o C DME4io C and SP2060 configuration window When Show Cascade Port is ON in the DME64N DME Device Properties dialo...

Page 278: ... of the Same Type You can arrange a number of components of the same type If there are two or more of the same component numbers will be attached to their names as follows Compressor 2 Compressor 3 and so on Multiple components placed in the configuration are independent and you can set different parameters for each of them NOTE If the Matrix Mixer 64 input 64 output or the Matrix Mixer 64 input 3...

Page 279: ... it ON or OFF using Probe Monitor in the Tools menu or the Probe Monitor button on the toolbar The probe monitor can be set to ON or OFF for each DME64N 24N The probe monitor can be used only when online with the DME64N 24N and Configuration window or user module active When the probe monitor is ON no editing is possible except in the Component Editor Probe Monitor Procedure 1 Turn the probe monit...

Page 280: ... Tools menu or the Probe Monitor button on the toolbar to turn OFF the probe monitor When probe monitor is turned off the mouse pointer returns to its normal shape Monitoring the Second or Later Time The software remembers the location being monitored even when probe monitoring is turned OFF The next time probe monitoring is turned ON the location that was being monitored previously will be select...

Page 281: ...olbar ON and OFF settings for Show Signal Display are saved for each configuration window Switching the setting between ON and OFF in another configuration window has no effect on the current window You can edit the configuration while Show Signal Delay is turned ON Delay values for components and I O components are displayed at the lower center of the object Delay values for wires are displayed b...

Page 282: ...t information When monitoring point information is cut information below that point moves up Copy Button Copies the selected monitoring point information Paste Button Pastes the copied monitoring point information at the selected line Insert Button The copied monitoring point information is inserted at the selected point Clear Button Deletes the selected monitoring point information NOTE Monitorin...

Page 283: ...ou can then select components for monitoring Port R Sets the monitoring point R channel port Clicking here displays a list of ports for the component selected in the Component R field Click the port you want to monitor OK Button Updates the settings and closes the dialog box Cancel Button Closes the dialog box without changing the settings NOTE Components arranged in user modules are also displaye...

Page 284: ...ox Because this function allows you to make sure there are no problems with component arrangement and wires without connecting to the DME unit it is useful for eliminating complier errors before executing Synchronization Message Box Displays the progress of the analysis operation When the analysis finishes the results are displayed If errors are detected during analysis they will display as shown ...

Page 285: ...indow and can be used as templates User modules are saved in project files but user module templates can also be exported as files and used in other projects A User Modules folder will be created in the folder specified in Contents Folder in the Preferences dialog box in the Main Panel window User modules will be saved there If you do not change the setting in the Preferences dialog box the locati...

Page 286: ...rag the Blank User Module to the Configuration window When you release the mouse button at the location where you will place the user module the User Module Properties dialog box is displayed 4 Here you can set object properties Inputs Outputs Sets is set to 1 Set the required number of ports 5 Click the OK button A user module will be created and placed in the Configuration Design window The user...

Page 287: ...d Security Settings at the lower part of the Save User Module dialog box They correspond to the same items in the User Module Manager dialog box When saved with different settings than the User Module Manager dialog box the saved settings are immediately applied Double Click Action Initial setting of the window that opens when you double click on a user module placed in the component editor Open U...

Page 288: ...a message asking This file already exists Overwrite will be displayed To overwrite click the Yes button To change the name click the No button and change the file name in the Save User Module dialog box NOTE When the Save User Module dialog box is displayed the name set in the user module s User Module Properties dialog box will be entered into the File name box If you change the name of a user mo...

Page 289: ... module names are displayed on the title bar User module names are set in the User Module Properties dialog box Objects You can place cut copy paste delete and move component and shape objects When you double click an object placed in the window the component editor will open Placing Components Components are placed the same as in the Configuration window You can place objects by dragging them fro...

Page 290: ...set different parameters for each of them User Module Manager When you click User Module Manager on the Tools menu the User Module Manager dialog box is displayed Edits renames and deletes user module templates User Modules User modes saved as templates are displayed in the list Select the target user module by clicking on it NOTE Only user modules saved can be displayed User modules placed in the...

Page 291: ...correct password is not entered the window will stay closed When you place a checkmark here the Set Password dialog box appears Enter the same password into the Password box and Confirm Password box and click the OK button To disable user module security turn OFF the checkbox If you click the checkbox when it already has a checkmark the Input Password dialog box appears Enter the password set for ...

Page 292: ...rary from the user module export file Export Button Saves the user module settings and library to the user module export file Click to display the Export dialog All features of this dialog window are the same as the standard Windows file save dialog except for the Export Library option Export Library can be sued to select the library to be saved Import Library Button Loads a file from the specifie...

Page 293: ...hout changing the settings NOTE Settings in the User Module Manager dialog box are changed when you click the OK button If you mistakenly set security change the password or delete a user module you can click the Cancel button to close the dialog box and return to the original unchanged settings Please note that Import Export Import Library and Export Library will be applied even if the Cancel but...

Page 294: ...w the Component Editor window will open There is not just one window that is called the component editor The contents of the editor and the name on the title bar will differ according to type of component for which the window was opened Names and Functions The contents of the Component Editor window vary according to the component Title Bar Displays the label Label settings are made in the Compone...

Page 295: ... page 335 Library Saves and recalls component editor parameter sets as files See Library on page 337 The operation of component editor knobs and sliders etc can be specified the Component Editor tab of the Preferences window in the main panel window Refer to Preferences on page 62 NOTE When controlling the DME64N 24N by connecting an RS 232C compatible controller to the REMOTE terminal a component...

Page 296: ...t results from using the mouse on the scale area with Component Editor tab Slider Mode in the Preferences dialog box Preferences dialog box Component Editor tab page 63 NOTE To make a finer setting press the Shift key while dragging the knob when Knob Mode is Linear If you click a knob while pressing the Ctrl key the setting will return to its default value NOTE To make a finer setting press the S...

Page 297: ...n turned on the button lights up The color depends on the button s function In button sets of this type you can select one of several buttons When you do all other buttons in the set turn off Click here to execute a command Displays a menu When turned ON When turned OFF Click this button to switch all channels in the block ...

Page 298: ...x is checked the edit box will zoom when the mouse is positioned over it mouse over Preferences dialog box Component Editor tab page 63 Click Text in the selected edit box will turn red Values can be entered and edited via the keyboard It is not necessary to enter the unit Press the ENTER key to confirm the entry and display the unit Changing Values Using Spin Boxes When the mouse pointer is place...

Page 299: ...on keys or the mouse wheel Up and Down Arrow Keys Increases or decreases number settings PageUp Key PageDown Key Increases or decreases number settings in large increments The PageUp key increases and the PageDown key decreases the setting Enter Key When you press the Enter key the numbers you entered will be confirmed Ctrl Key Enter Key When you press the Ctrl Enter key the setting will return to...

Page 300: ...meter by dragging in the directions of the arrow Control points that can be dragged in any direction usually have their position determined by multiple parameters in the component editor These multiple parameters can be adjusted by dragging the point When there are multiple control points in the graph they are identified by their colors A bar with the same color as each control point can be found ...

Page 301: ...ou can create a compact control window by only including controls for parameters that are used frequently You can also lay out controls for multiple components so that you can adjust parameters for them from a single window There is also a Library button in the user control editor which you can use to save parameters to the library User controls are created by selecting View menu User Control New ...

Page 302: ...ubmenu User Control Name Displays a menu of user controls included in the current configuration of the current zone Clicking one of the user controls opens the user control editor A checkmark appears next to already open windows New User Control When you select the New User Control command the User Control Manager dialog box will be displayed Here you can create delete rename and otherwise manage ...

Page 303: ...ck the New button The New User Control dialog box will be displayed 3 Enter the name for the new user control into the Name box 4 Sets security for User Control Different settings are provided for individual security levels and users Security cannot be set higher than the user security level Click the User Level button to select a security level NOTE You can also display the User Control Manager d...

Page 304: ...he list in the User Control Manager dialog box 6 Click the OK button in the User Control Manager dialog box When a new user control is created it will be displayed in the View menu User Control submenu in the Main Panel window If you click the control it will be displayed in a user control editor window Snap and Library appear appears in a new user control ...

Page 305: ...ntrol is set to 2 only users at level 1 or level 2 can display or edit it Security levels for user controls can be changed in the User Control Manager dialog box by a user who has logged on at a security level equal to or higher than the user control 1 Click User Control Manager on the Main Panel window Tools menu The User Control Manager dialog box will be displayed 2 Changing User Control Securi...

Page 306: ...r can edit user controls if a check has been placed for that user in the Operation Security Edit checkbox User controls at a level equal to or lower than the level set in Operation Security User Control Level will be displayed in the menu Using user security you can set whether user controls will open at logon or when a file is opened If Startup User Control is turned ON the user control editor wi...

Page 307: ...User Modules on page 285 for more information about user modules Opening a User Module Editor Window In the designer window the user module editor can be opened by selecting Open User Module Editor from a user module contextual menu User modules for which Open User Module Editor is selected as the Double Click Action in the User Module Properties window can be opened by double clicking For informa...

Page 308: ...Module properties page 216 User Module page 285 The lock icon will appear locked when the password has not been entered and layouts edited in the Design Mode cannot be saved When the password is entered it becomes temporarily possible to save the layout The lock icon will not appear if the Enable Security checkbox in the Properties dialog box is not checked ...

Page 309: ...he palette disappears Commands for editing in the user control editor user module editor are provided on the edit palette Design Mode Off Button Turns OFF the design mode Undo Button Redo Button Used to undo redo operations Cut Button Copy Button Cuts or copies the selected controls See Cut Copy Paste Controls on page 321 Paste Button Pastes cut or copied controls See Cut Copy Paste Controls on pa...

Page 310: ...ol this button arranges the controls between them at uniform intervals It puts the same amount of space between each control and its neighbor Align Vertically Button This button can be used only when three or more controls are selected It arranges the controls in a uniform vertical line Without changing the position of the uppermost and lowermost control this button arranges the controls between t...

Page 311: ... any control that is not aligned with the grid position will cause it to align with the nearest grid Please note that after copying multiple controls in one operation from the component editor and adjusting their positions manually their positions could become disarranged when you select them by clicking on them if they do not already align with the grid interval Furthermore if you change the grid...

Page 312: ...e user control editor If you align the mouse pointer with a side or corner of the window its shape will change into a double headed arrow When the arrow is shaped like this dragging it will change the size of the window Even if you change the width of the window the library button will remain where it is in the upper right corner ...

Page 313: ...ol editor window while in design mode then click Set Background Image on the displayed context menu Default Sets the background color to black the same as the component editor Select this if you have set the background with Color or Image and you want to return to the original background Color Sets the color of the background Use the Select Color button to select a color Select Color Button Clicki...

Page 314: ...kground Layout Box This box displays a list where you can select how the image file will be displayed Center Centers the image in the window Tile Displays multiple copies of the image side by side until the available space is filled If the image file is smaller than the window it will be displayed repeatedly like tiles on a wall Fit Expands or reduces the size of the image to match the size of the...

Page 315: ...rol in the component editor while in design mode the control will be selected and a red frame will be displayed around it Controls like knobs sliders edit boxes and labels are all separate objects Only the item clicked will be selected If you hold down the Ctrl key while clicking you can select multiple controls and labels If you use Ctrl click on a selected control it will cancel that control s s...

Page 316: ...ol editor The context menu will be displayed 4 Click Design Mode on the menu Design mode will be turned ON 5 Drag the controls from the component editor to the user control editor NOTE If you drag controls like knobs and sliders edit boxes and labels that show parameter types and place them one by one in the user control editor they must be arranged in the user control editor If you select multipl...

Page 317: ...ecking Double Click Action Open User Module Editor in the Store dialog box see Saving User Modules on page 285 for details about storing user modules 3 Double click a user module in the Configuration window The user module editor and edit windows for the components arranged in the user module will be displayed 4 Right click in the component editor or user module editor then click the Design Mode c...

Page 318: ...ule editor press the Paste command shortcut key Ctrl V or the Paste button on the edit palette 1 Click on the source component editor window to make it active then select the control or controls you want to copy 2 Press the C key while holding down the Ctrl key The selected controls will be copied to the clipboard 3 With the target user control editor or user module editor active press the V key w...

Page 319: ...as long as they come from different components located in the configuration or user module Controls for components arranged in the configuration can be copied only to the user control editor Controls for components arranged in a user module can be copied to both the user control editor and the user module Order of Controls Controls newly pasted in the user control editor will be displayed above an...

Page 320: ...hen you select multiple controls using Shift click you can move all of them at the same time Dragging When grid is ON the upper left of the dragged controls will automatically align with the grid When dragging the coordinates displayed here refer to the upper left corner of the object being dragged The Distance to Right and Distance to Bottom are displayed in pixel units using the upper left of th...

Page 321: ...Delete key Undo and Redo Commands During Editing The Undo and Redo commands in the main panel window Edit menu and the Undo and Redo commands in the editing palette can be used to undo or redo controller move size change or delete operations Control Properties A properties dialog box will open when you either double click a controller in the User Control Editor or User Module Editor or right click...

Page 322: ...es Dialog Box The Toggle Button Properties dialog box will appear when you either double click the ON OFF button or right click it and select Properties from the contextual menu This sets the text displayed by the button along with the color of the button Text box Enter the text to be displayed by the button You can set different text for when the button is ON and for when it is OFF Size Select a ...

Page 323: ...utton Properties dialog box will appear when you either double click a radio button or right click it and select Properties from the contextual menu You can set the button s color size and font Color Select a color from the list White Red Yellow Green Blue or Violet Size Select a button size from the list Small 37x11 Small 44x11 Medium 75x11 Medium 74x22 or Large 111x33 Text Box Enter the text to ...

Page 324: ...er segments and scale Segment Select a number of meter segments from the list 2 6 or 60 Scale Select the type of scale to be displayed beside the meter from the list This option is only available when Segment is set to 60 Solid Frame Properties Dialog Box The Solid Frame Properties dialog box will appear when you right click a solid frame and select Properties from the contextual menu Here you can...

Page 325: ...utton If you set the position of the partition line in the box on the right and click the Add button the partition line will be added and displayed in the Position list Delete Button Deletes the partition line selected in the Position list Color Frame Properties Dialog Box The Color Frame Properties dialog box will appear when you right click a solid frame and select Properties from the contextual...

Page 326: ...n on this dialog box Arrows Specifies the shape of line endpoints terminals The Left and Right endpoints of Top Line and Bottom Line lines and the Top and Bottom endpoints of Left Line and Right Line lines can be set independently None No endpoint shape Arrow Arrow shaped endpoint Circle Circle shaped endpoint User Picture Properties Dialog Box Right click the image and select Properties from the ...

Page 327: ...e Text Properties dialog box Text Box Displays and edits the text to be displayed Text Font Selects the font Click to display the Select Font dialog box Refer to Select Font Dialog Box on page 236 for more information on the Select Font dialog box Text Color Button Sets the text color Click to display the Select Color dialog box For information about the Select color dialog box see page 237 Alignm...

Page 328: ...ox Use Curve to select the degree of roundness Line Type Select a type of frame line from the list Solid Dash Dot Dash Dot Or Dash Dot Dot Size Sets the thickness of the frame line in pixels The range is from 1 to 100 Select Color Button Sets the color of the frame line Click to display the Select color dialog box Refer to Select Color Dialog Box on page 237 for more information on the Select Colo...

Page 329: ... Dash Dot Dash Dot Or Dash Dot Dot Size Sets the thickness of the frame line in pixels The range is from 1 to 100 Select Color Button Sets the color of the frame line Click to display the Select color dialog box Refer to Select Color Dialog Box on page 237 for more information on the Select color dialog box Fill Color Sets the ellipse fill color when ON Select Color Button Sets the ellipse fill co...

Page 330: ...n the user control editor or user module editor The context menu will be displayed 2 Click Tab Order in the context menu Numbers for the current tab order are displayed to the upper left of each edit box 3 Click the tab order numbers in the order in which you want to set the tab order Even if you do not want to change tab order number 1 click all the numbers in the order you desire starting from n...

Page 331: ...Design Mode command switches the design mode between ON and OFF A checkmark appears when the design mode is turned ON If you click in the context menu when the checkmark is present design mode will turn OFF and the edit window will return to operation mode NOTE Only users for whom the Operation Security Edit checkbox in the Security dialog box has been checked can turn the design mode ON NOTE You ...

Page 332: ...n Mode Switches between design mode and operation mode When you are in design mode a checkmark will appear to the left of the command name Peak Hold Turns the peak hold meter ON or OFF and performs a reset The ON or OFF setting for peak hold applies to the whole zone On When you select this peak hold is turned ON and a checkmark appears next to it If you select this item while it is checked peak h...

Page 333: ...by pressing the Tab key When you select this command numbers are displayed next to the edit boxes A checkmark appears next to Tab Order in the context menu To exit tab order settings click Tab Order the context menu or click anywhere besides a tab order number in the user control editor Clicking the displayed numbers changes the order The numbers are changed in the order that they are clicked To e...

Page 334: ...ical display order of the controllers It opens the component editor for the control you clicked Properties Opens the properties dialog box for the control See Control Properties on page 321 The contextual menu that appears in when a controller is right clicked in the design mode Properties User Control Editor User Module Editor only Opens the controller properties window Refer to Control Propertie...

Page 335: ...For more information about libraries see Library page 337 Snap Buttons A through D The Snap buttons allow you to switch between parameter sets The buttons change in appearance according to their ON OFF status and to whether or not there were changes to the parameter set from when the editor was started When there has been no change to the parameter set since the editor was started When a button is...

Page 336: ...rs in the editor to the settings you want to record 3 Click another snap button Recalling a Library 1 Click the snap button that has recorded the parameter set This turns it ON 2 The library is recalled Switching Parameter Set If you click a snap button that has a parameter set recorded the system switches to the parameter set recorded there Copying Parameter Sets Parameter sets can be copied betw...

Page 337: ...uml for user module editors If you store library files in folders that conform to the following path they will be automatically displayed in the component editor Recall Library menu C Program Files YAMAHA OPT Tools DME Designer Editor Library Component Group Name Component Name The dialog box used for storing items in the library opens with the library folder displayed If you save like this withou...

Page 338: ... Set the parameters to be stored in the library 2 Click the Store Library button in the component editor The Save Library File dialog box will be displayed 3 Enter the filename Select a filename that makes it easy to understand the contents of the parameter set 4 Specify the folder for saving the file If you want the saved file displayed on the Recall Library menu do not change the folder for savi...

Page 339: ...mponent editor The Recall Library menu will be displayed 3 Click the library name filename in the Recall Library menu The parameters in the library will be recalled Designer Window If you right click on a component or user module in the design window a context menu will be displayed You can recall a library using the Recall Component Library command If you click Recall Component Library in the con...

Page 340: ... not appear on the Recall Library menu You must specify the file you want in order to recall it 1 Click the Recall Library button in the component editor The Recall Library menu will be displayed 2 Click the Recall Library menu Open File Dialog The Open dialog box will be displayed 3 Move to the correct folder and select a library file 4 Click the Open button ...

Page 341: ...ter to Parameter Link Global Link Local Link Add Group commands create new groups Controls can be added by right clicking Adding Controls to a Group If you right click a control in the component editor a context menu will be displayed You can create groups or add controls using commands in the Add Parameter to Parameter Link submenu Groups that do not have the same type of parameters will be graye...

Page 342: ... The same types of parameters can be linked between the same types of component included in a group Component groups can be created using the component editor and components can be added to the group as required Parameter linking is set up via the Parameter Link window Refer to Parameter Link on page 81 for information on the Component Link Parameter Link window Creating a New Group Right click a ...

Page 343: ... Add Components to a Group Right click a component in the component editor to display the contextual menu Add Component to Component Link group name adds to an existing group Groups that are not of the same type will be grayed out and cannot be selected ...

Page 344: ... and you can use the Component List on the Tools menu Components can be separated into groups based on types In the Toolkit window component groups are displayed as folders Some of the groups in the Toolkit window are further divided into subgroups Click the buttons to the left of the folders to display the components NOTE When the User Module window is active User Module is not present on the men...

Page 345: ...ups Those without triangles are components Component List NOTE When the User Module window is active User Module is not present in the menu Group Component Variations DME64N DME24N DME8i C DME8o C DEM4io SP2060 Crossover 2 Way 3 Way 4 Way 5 Way 6 Way Crossover Processor 2 Way 3 Way 4 Way 5 Way 6 Way Crossover Processor II 2 Way 3 Way 4 Way 5 Way 6 Way Delay Long 1 Output 2 Output 3 Output 4 Output...

Page 346: ...ynamics Compander CompanderH Mono Stereo CompanderS Mono Stereo Compressor Mono Stereo De Esser Mono Stereo Ducking Mono Stereo Expander Mono Stereo Gate Mono Stereo Limiter Mono Stereo EQ GEQ Mono 7 Band 15 Band 31 Band Stereo 7 Band 15 Band 31 Band PEQ Mono 2 Band 3 Band 4 Band 6 Band 8 Band Stereo 2 Band 3 Band Group Component Variations DME64N DME24N DME8i C DME8o C DEM4io SP2060 ...

Page 347: ...ono Stereo Notch Mono Stereo Programmable BPF Mono Stereo Programmable HPF Mono Stereo Programmable LPF Mono Stereo Meter 1 Channel 2 Channel 4 Channel 8 Channel 12 Channel 16 Channel Miscellaneous Oscillator Mono Wav File Player Mixer Auto Mixer 2 Channel 4 Channel 8 Channel 12 Channel 16 Channel Delay Matrix 2 Input 2 Output 4 Output 8 Output 12 Output Group Component Variations DME64N DME24N DM...

Page 348: ...Input 1 Output 2 Output 4 Input 1 Output 2 Output 4 Output 8 Input 1 Output 2 Output 4 Output 8 Output 12 Input 1 Output 2 Output 4 Output 8 Output 12 Output 16 Input 1 Output 2 Output 4 Output 8 Output 12 Output 16 Output 32 Input 16 Output 32 Output 64 Input 32 Output 64 Output Pan LCR 1 Channel 2 Channel 4 Channel 8 Channel 12 Channel 16 Channel Group Component Variations DME64N DME24N DME8i C ...

Page 349: ...ut 2 Input 2 Output 4 Output 8 Output 12 Output 16 Output 4 Input 2 Output 4 Output 8 Output 12 Output 16 Output 8 Input 2 Output 4 Output 8 Output 12 Output 16 Output 12 Input 2 Output 4 Output 8 Output 12 Output 16 Output 16 Input 2 Output 4 Output 8 Output 12 Output 16 Output Source Selector 3 Position 1 Channel 4 Position 1 Channel Group Component Variations DME64N DME24N DME8i C DME8o C DEM4i...

Page 350: ...ent Editor Cascade Cascade In Component Editor Cascade Out Component Editor Analog Input Output Analog Input Component Editor Analog Output Component Editor SP2060 Input Output SP2060 Input Component Editor SP2060 Output Component Editor CobraNet Input Output CobraNet Input Component Editor CobraNet Output Component Editor MY Card Component Editor of each card Remote Controlled Head Amp Component ...

Page 351: ...requency channels and outputs them The following five types of components are available in the Crossover group 2 Way 3 Way 4 Way 5 Way and 6 Way Crossover components have a single input and multiple outputs Double click a component to display the component editor for it 1 2 3 6 4 7 5 8 9 Crossover component ...

Page 352: ...6 dB Oct AdjustGc 36 dB Oct Butrwrth 36 dB Oct Bessel 48 dB Oct AdjustGc 48 dB Oct Butrwrth 48 dB Oct Bessel 48 dB Oct Linkwitz Sets the attenuation for each octave and the filter type THRU turns off the filter 8 Frequency 20 Hz to 20 kHz Sets the LPF cutoff frequency 9 Gc 6 dB to 6 dB When AdjustGc Adjustable Gc is selected for Type this sets the gain for the cutoff frequency HPF Type Thru 6 dB O...

Page 353: ...rol points show Output Level and Frequency As you modify the parameters using the knobs and edit boxes the control points move Also as you drag the points the Output Level and Frequency parameters reflect the changes you make You can adjust the Output Level parameter by vertically dragging the control point in the center of each curve You can adjust the Frequency parameter by horizontally dragging...

Page 354: ...ces gentle attenuation A large value produces sudden attenuation THRU No filter is applied There is no attenuation which produces a level line at all frequencies AdjustGc Adjustable Gc With this setting you can adjust Gc gain on the cutoff frequency between 6 dB and 6 dB If you set 3 dB it becomes a Butterworth filter If you set 6 dB it becomes Linkwitz Riley filter When you select Adjustable Gc t...

Page 355: ...enuation than Butterworth and there is little distortion of the waveform when square waves are passed through Linkwitz Linkwitz Riley As second order filters the sum of the output voltages for LPF and HPF have a gain of 0 dB across the entire band The pass band is flat but the cutoff frequency gain is 6 dB Linkwitz Riley Butterworth Bessel ...

Page 356: ...e a common configuration in the component editor If you click the Crossover Compressor PEQ or Delay button in the Navigator section an editor for the crossover compressor parametric equalizer or delay will be displayed in a separate window A separate component editor will open for each output channel such as Low or Mid when you click on the compressor parametric equalizer or delay Section Paramete...

Page 357: ...h HPF Each frequency band has its own color with Low being red Mid being green and so on These correspond to the colors of the lines on the graph Crossover When you click the Crossover button for the crossover processor it opens the crossover editor window 2 Way Low High 3 Way Low Mid High 4 Way Low Low Mid High Mid High 5 Way Sub Low Low Low Mid High Mid High 6 Way Sub Low Low Low Mid Mid High Mi...

Page 358: ...tenuation for each octave and the filter type THRU turns off the filter 4 Frequency 20 Hz to 20 kHz Sets the LPF cutoff frequency 5 Gc 6 dB to 6 dB When AdjustGc Adjustable Gc is selected for Type this sets the gain for the cutoff frequency 6 HPF Type Thru 6 dB Oct 12 dB Oct AdjustGc 12 dB Oct Butrwrth 12 dB Oct Bessel 12 dB Oct Linkwitz 18 dB Oct AdjustGc 18 dB Oct Butrwrth 18 dB Oct Bessel 24 dB...

Page 359: ...s on the Beat value Sets the delay time 2 Level to 0 dB Sets the output signal level for each channel 3 On ON OFF Turns delay ON 4 Mute ON OFF Mutes the signal for each frequency band 5 Delay Scale ms Sample Meter Feet Frame Beat Selects the units for setting the delay time The selected button will light up and the units in the Delay edit box will change If Beat is selected use the knob to set the...

Page 360: ...Displays the PEQ curve Parameter Setting Range Function 2 Type PEQ L SHELF 6 dB Oct L SHELF 12 dB Oct H SHELF 6 dB Oct H SHELF 12 dB Oct HPF LPF Select the filter type from a menu 3 Q 0 1 to 16 0 Sets the frequency band width for each band 4 Frequency 20 Hz to 20 kHz Sets the frequency for each band 5 Gain 18 dB to 18 dB Sets the gain for each band 6 Bypass ON OFF Turns ON bypass for each band 7 P...

Page 361: ...utput Meter Displays the output signal level Parameter Setting Range Function 4 Threshold 54 dB to 0 dB Sets the threshold value 5 Ratio 1 1 to 1 Sets the compression ratio 6 Knee HARD 1 2 3 4 5 Sets the way compression is applied 7 Attack 0 to 120 ms Sets the attack time 8 Release 44 1 kHz 6 ms to 46 s 48 kHz 5 ms to 42 3 s 88 2 kHz 3 ms to 23 s 96 kHz 3 ms to 21 1 s Sets the release time The set...

Page 362: ...of bands may vary depending on the component but they share a common configuration in the component editor There are input and output level meters in the upper part of the window If you click the Crossover Delay PEQ or Compressor button in the Navigator section an editor for the crossover delay parametric equalizer or compressor will be displayed in a separate window A separate component editor wi...

Page 363: ...nge Function 3 Input Gain to 10 dB Sets the input signal level 4 Mute ON OFF Mutes the input signal 5 Output Gain to 10 dB Sets the output signal level for each frequency band 6 Mute ON OFF Mutes the output signal for each frequency band 7 Navigator Crossover This opens the crossover editor window 8 Delay This opens the delay editor window 9 PEQ This opens the parametric equalizer editor window Co...

Page 364: ... AdjustGc 36 dB Oct Butrwrth 36 dB Oct Bessel 48 dB Oct AdjustGc 48 dB Oct Butrwrth 48 dB Oct Bessel 48 dB Oct Linkwitz Sets the attenuation for each octave and the filter type THRU turns off the filter 6 Frequency 20 Hz to 20 kHz Sets the LPF cutoff frequency 7 Gc 6 dB to 6 dB When Adjustable Gc is selected for Type this sets the gain for the cutoff frequency 8 HPF Type Thru 6 dB Oct 12 dB Oct Ad...

Page 365: ... depends on the Frame value Beat the range depends on the Beat value Sets the delay time 2 Level to 0 dB Sets the output signal level for each channel 3 On ON OFF Turns delay ON 4 Delay Scale ms Sample Meter Feet Frame Beat Selects the units for setting the delay time The selected button will light up and the units in the Delay edit box will change If Beat is selected use the knob to set the BPM b...

Page 366: ...Function 1 PEQ Curve Displays the PEQ curve Parameter Setting Range Function 2 Type PEQ L SHELF 6 dB Oct L SHELF 12 dB Oct H SHELF 6 dB Oct H SHELF 12 dB Oct HPF LPF Select the filter type from the menu 3 Q 0 1 to 16 0 Sets the band width of each band 4 Frequency 20 Hz to 20 kHz Sets the frequency of each band 5 Gain 18 dB to 18 dB Sets the frequency gain for each band 6 Bypass ON OFF Turns ON byp...

Page 367: ...uction attenuation 3 Output Meter Displays the output signal level Parameter Setting Range Function 4 Threshold 54 dB to 0 dB Sets the threshold value 5 Ratio 1 1 to 1 Sets the compression ratio 6 Knee HARD 1 2 3 4 5 Sets the way compression is applied 7 Attack 0 to 120 ms Sets the attack time 8 Release 44 1 kHz 6 ms to 46 s 48 kHz 5 ms to 42 3 s 88 2 kHz 3 ms to 23 s 96 kHz 3 ms to 21 1 s Sets th...

Page 368: ...nge Function 1 Delay All Bypass ON OFF Bypasses from input to output 2 Input Level to 0 dB Sets the input signal level 3 Mute ON OFF Mute the input signal 4 Delay Tap Delay ms 0 to 1300 Sample the range depends on the Fs value Meter 0 to 446 7 Feet 0 to 1465 4 Frame the range depends on the Frame value Beat the range depends on the Beat value Sets the delay time There are two edit boxes displaying...

Page 369: ...Sets the input signal level 3 Mute ON OFF Mute the input signal 4 Delay Tap Delay ms 0 to 130 Sample the range depends on the Fs value Meter 0 to 44 7 Feet 0 to 146 5 Frame the range depends on the Frame value Beat the range depends on the Beat value Sets the delay time There are two edit boxes displaying milliseconds and the units selected for Delay Scale 5 Level to 0 dB Sets the output signal le...

Page 370: ...ection of the component editor The currently selected trigger source is displayed on the button Click the button and select the trigger source from the menu SELF Sets the input signal as the trigger source for mono channel components L R Sets the left or right input signal as the trigger source for stereo channel components LR BOTH Sets both the left and right input signals as the trigger source f...

Page 371: ...one KeyIn input Double click a component to display the component editor for it The parameters are the same for mono channel and stereo channel components The compander hard and compander soft differ in the compression ratio of their fixed expander The expander compression is expressed by the straight portion of the lower left part of the compander curve The compression ratio of the compander hard...

Page 372: ...ion ratio 6 Width 1 dB to 90 dB Sets the width of the expander 7 Attack 0 to 120 ms Sets the attack time 8 Release 44 1 kHz 6 ms to 46 s 48 kHz 5 ms to 42 3 s 88 2 kHz 3 ms to 23 s 96 kHz 3 ms to 21 1 s Sets the release time The setting range may very depending on the operating frequency 9 Gain 18 dB to 0 dB Sets the output gain KeyIn Mono SELF KEYIN Selects the trigger source from a menu The curr...

Page 373: ... such as vocals or piano music Both mono channel and stereo channel compressors are provided Mono channel compressors have one input one output and one KeyIn input Stereo channel compressors have two inputs two outputs and one KeyIn input Double click a component to open the component editor for it The parameters are the same for mono channel and stereo channel components 1 2 3 4 5 6 7 8 9 Compres...

Page 374: ...n ratio 6 Knee HARD 1 2 3 4 5 Sets the way compression is applied 7 Attack 0 to 120 ms Sets the attack time 8 Release 44 1 kHz 6 ms to 46 s 48 kHz 5ms to 42 3 s 88 2 kHz 3 ms to 23 s 96 kHz 3 ms to 21 1 s Sets the release time The setting range may very depending on the operating frequency 9 Gain 0 dB to 18 dB Sets the output gain KeyIn Mono SELF KEYIN Selects the trigger source from a menu The cu...

Page 375: ...ntal axis is the input signal level and the vertical axis is the output level 2 Gain Reduction Meter Displays the gain reduction attenuation 3 Output Meter Displays the output signal level Parameter Setting Range Function 4 Threshold 54 dB to 0 dB Sets the threshold value 5 Ratio 1 1 to 1 Sets the compression ratio 6 Knee HARD 1 2 3 4 5 Sets the way the de esser effect is applied 7 Attack 0 to 120...

Page 376: ...ckers have one input one output and one KeyIn input Stereo channel duckers have two inputs two outputs and one KeyIn input Double click a component to open the component editor for it The parameters are the same for mono channel and stereo channel components 70 60 50 40 30 20 10 0 10 20 70 60 50 40 30 20 10 0 10 20 Input Level dB Output Level dB Ratio 2 1 Knee Hard Threshold 20dB 1 2 9 3 4 5 6 7 8...

Page 377: ...ets the attack time 7 Hold 44 1 kHz 0 02 ms to 2 13 s 48 kHz 0 02 ms to 1 96 s 88 2 kHz 0 01 ms to 1 06 s 96 kHz 0 01 ms to 981 ms Sets the hold time The setting range may very depending on the operating frequency 8 Decay 44 1 kHz 6 ms to 46 s 48 kHz 5 ms to 42 3 s 88 2 kHz 3 ms to 23 s 96 kHz 3 ms to 21 1 s Sets the decay time The setting range may very depending on the operating frequency 9 KeyI...

Page 378: ...xis is the output level 2 Gain Reduction Meter Displays the gain reduction attenuation 3 Output Meter Displays the output signal level Parameter Setting Range Function 4 Threshold 54 dB to 0 dB Sets the threshold value 5 Ratio 1 1 to 1 Sets the compression ratio 6 Knee HARD 1 2 3 4 5 Sets the way the expander is applied 8 Attack 0 to 120 ms Sets the attack time 8 Release 44 1 kHz 6 ms to 46 s 48 k...

Page 379: ... input one output and one KeyIn input Stereo channel gates have two inputs two outputs and one KeyIn input Double click a component to open the component editor for it The parameters are the same for mono channel and stereo channel components 70 60 50 40 30 20 10 0 10 20 70 60 50 40 30 20 10 0 10 20 Input Level dB Output Level dB Ratio 2 1 Threshold 10dB Knee Hard 1 2 9 3 4 5 6 7 8 Gate component ...

Page 380: ...s reduced 6 Attack 0 to 120 ms Sets the attack time 7 Hold 44 1 kHz 0 02 ms to 2 13 s 48 kHz 0 02 ms to 1 96 s 88 2 kHz 0 01 ms to 1 06 s 96 kHz 0 01 ms to 981 ms Sets the hold time 8 Decay 44 1 kHz 6 ms to 46 s 48 kHz 5 ms to 42 3 s 88 2 kHz 3 ms to 23 s 96 kHz 3 ms to 21 1 s Sets the decay time The setting range may very depending on the operating frequency 9 KeyIn Mono SELF KEYIN Selects the tr...

Page 381: ...iter response in graph form The horizontal axis represents input signal level and the vertical axis represents output level 2 Gain Reduction Meter Displays the amount of gain reduction 3 Output Meter Displays the output signal level Parameter Setting Range Function 4 Threshold 54 dB to 0 dB Sets the threshold value 5 Attack 0 to 120 ms Sets the attack time 6 Release 44 1 kHz 6 ms to 46 s 48 kHz 5 ...

Page 382: ... different types of parametric equalizers each with a different number of frequency bands Mono channel and stereo channel equalizers are available for each type Graphic Equalizer GEQ Boosts or cuts signals within the specified frequencies The mono group contains 7 band 15 band and 31 band mono channel components The stereo group contains 7 band 15 band and 31 band stereo channel components Mono ch...

Page 383: ... gain adjust width 8 EQ Flat Returns the faders of all bands to 0dB 9 Input Level to 10 dB Sets the input signal level Phase ON OFF Reverses the phase of the input signal HPF Frequency 20 Hz to 20 kHz Sets the HPF cutoff frequency Bypass ON OFF Turns bypass ON LPF Frequency 20 Hz to 20 kHz Sets the LPF cutoff frequency Bypass ON OFF Turns bypass ON Notch Frequency 20 Hz to 20 kHz Sets the notch fi...

Page 384: ...ecified frequencies In both the Mono group and Stereo group there are 2 band 3 band 4 band 6 band and 8 band components available Mono channel PEQs have one input and one output each Stereo channel PEQs have two inputs and two outputs each The number of bands varies depending on the component but all share a common configuration in the component editor Double click a component to display the compo...

Page 385: ...r Q 0 7 Attenuates the low frequencies with a gentle curve 12 dB Oct LPF This is a low pass filter Q 0 7 Attenuates the high frequencies with a gentle curve 12 dB Oct Name Function 1 EQ Curve Displays the equalizer effect You can change the parameter by dragging the control point with the mouse Section Parameter Setting Range Function 2 Input Level to 10 dB Sets the input signal level 3 Phase ON O...

Page 386: ...ing scene recall When you turn this ON the fader moves gradually to the position after the jump If you turn this OFF it immediately jumps to the parameters saved in the recalled scene See The Scene Manager Dialog Box page 70 for details about settings for the components to be faded and the time period when the Fade is On Parameter Setting Range Function 1 Phase ON OFF Reverses the phase of the out...

Page 387: ...his mode when the input source is speech Music Select this mode when the input source is music Selects the type of input signal to be processed 2 Suppression Lebel 0 9 Specifies the amount of feedback reduction Higher values produce greater feedback reduction Further the amount of pitch changed produced by the effect is displayed in cents 3 Bypass ON OFF Turns bypass on 1 2 3 ...

Page 388: ...There are two types of BPF components mono channel and stereo channel Mono channel BPFs have one input and one output Stereo channel BPFs have two of each Double click a component to display the component editor for it The parameters are the same for mono channel and stereo channel components Section Parameter Setting Range Function 1 Input Level to 10 dB Sets the input signal level 2 Phase ON OFF...

Page 389: ...channel HPFs have two of each Double click a component to display the component editor for it The parameters are the same for mono channel and stereo channel components Section Parameter Setting Range Function 1 Input Level to 10 dB Sets the input signal level 2 Phase ON OFF Reverses the phase of the input signal 3 HPF Frequency 20 Hz to 20 kHz Sets the cutoff frequency 4 Slope 6 dB Oct 12 dB Oct ...

Page 390: ...hannel LPFs have two of each Double click a component to display the component editor for it The parameters are the same for mono channel and stereo channel components Section Parameter Setting Range Function 1 Input Level to 10 dB Sets the input signal level 2 Phase ON OFF Reverses the phase of the input signal 3 LPF Frequency 20 Hz to 20 kHz Sets the cutoff frequency 4 Slope 6 dB Oct 12 dB Oct S...

Page 391: ... have two of each Double click a component to display the component editor for it The parameters are the same for mono channel and stereo channel components Section Parameter Setting Range Function 1 Input Level to 10 dB Sets the input signal level 2 Phase ON OFF Reverses the phase of the input signal 3 Notch Frequency 20 Hz to 20 kHz Sets the center frequency 4 Q 0 1 to 63 0 Sets the band width o...

Page 392: ...o channel components Section Parameter Setting Range Function 1 Input Level to 10 dB Sets the input signal level 2 Phase ON OFF Reverses the phase of the input signal 3 HPF Frequency 20 Hz to 20 kHz Sets the HPF cutoff frequency 4 Type Thru 6 dB Oct 12 dB Oct AdjustGc 12 dB Oct Butrwrth 12 dB Oct Bessel 12 dB Oct Linkwitz 18 dB Oct AdjustGc 18 dB Oct Butrwrth 18 dB Oct Bessel 24 dB Oct AdjustGc 24...

Page 393: ...B Oct Butrwrth 24 dB Oct Bessel 24 dB Oct Linkwitz 36 dB Oct AdjustGc 36 dB Oct Butrwrth 36 dB Oct Bessel 48 dB Oct AdjustGc 48 dB Oct Butrwrth 48 dB Oct Bessel 48 dB Oct Linkwitz Sets the attenuation for each octave and the filter type THRU turns off the filter 9 Gc 6 dB to 6 dB When AdjustGc Adjustable Gc is selected for Type this sets the gain for the cutoff frequency Bypass ON OFF Turns bypass...

Page 394: ...mponents Section Parameter Setting Range Function 1 Input Level to 10 dB Sets the input signal level 2 Phase ON OFF Reverses the phase of the input signal 3 HPF Frequency 20 Hz to 20 kHz Sets the HPF cutoff frequency 5 Type Thru 6 dB Oct 12 dB Oct AdjustGc 12 dB Oct Butrwrth 12 dB Oct Bessel 12 dB Oct Linkwitz 18 dB Oct AdjustGc 18 dB Oct Butrwrth 18 dB Oct Bessel 24 dB Oct AdjustGc 24 dB Oct Butr...

Page 395: ...components Section Parameter Setting Range Function 1 Input Level to 10 dB Sets the input signal level 2 Phase ON OFF Reverses the phase of the input signal 3 LPF Frequency 20 Hz to 20 kHz Sets the LPF cutoff frequency 5 Type Thru 6 dB Oct 12 dB Oct AdjustGc 12 dB Oct Butrwrth 12 dB Oct Bessel 12 dB Oct Linkwitz 18 dB Oct AdjustGc 18 dB Oct Butrwrth 18 dB Oct Bessel 24 dB Oct AdjustGc 24 dB Oct Bu...

Page 396: ...available with 1 2 4 8 12 and 16 channels Double click a component to display the component editor for it The number of channels varies depending on the component but all share a common configuration in the component editor Name Function 1 Meter Displays signal levels for each channel 1 Meter component editor ...

Page 397: ...t This sound covers a frequency range of 20 Hz to 20 kHz As the frequency doubles the energy of the sound is cut in half The sound level is equal at all frequencies Burst Outputs pink noise continuously Section Parameter Setting Range Function 1 Wave Form Sine 100 Hz 1 kHz 10 kHz Vari Selects the frequency and waveform that will be generated Only one of the six Sine and Noise buttons can be select...

Page 398: ... Setting Range Function 1 Ex Input Level to 0 dB Sets the input level from an input port Only effective when External Input is selected as the playback file 2 Wav File Player Play 001 to 100 Selects and displays the playback file Only files set in the DME unit in which this component is placed by the Wav File Manager can be selected 3 List Open the Wav File Manager to display a list of files set i...

Page 399: ...that exceed a specified threshold There are five mixer types each with a different number of inputs Double click a component to display the component editor for it The number of channels varies depending on the component but all share a common configuration in the component editor The auto mixer component editor consists of two sections input channels and master output 1 3 8 4 5 2 6 7 9 Auto Mixer...

Page 400: ...ime The setting range may vary depending on the operating frequency 5 Decay 44 1 kHz 110 m to 46 s 48 kHz 101 m to 42 3 s 88 2 kHz 55 m to 23 s 96 kHz 51 m to 21 1 s Sets the speed for closing the gate The setting range may vary depending on the operating frequency 6 Solo ON OFF Turns solo ON If Solo is engaged for even one channel all non Solo channels will be muted 7 On ON OFF Turns ON each chan...

Page 401: ...5 components Double click a component to display the component editor for it The number of input and output channels varies depending on the component but all share a common configuration in the component editor The delay matrix component editor consists of four sections input output matrix and block The Master buttons in the Input and Output sections display windows where you can make master inpu...

Page 402: ...oup its channel numbers are highlighted Click to open the Delay Matrix Crosspoint editor window Section Name Function 1 Input Master Opens the Input Master window 2 Output Master Opens the Output Master window 3 Matrix Delay meters Output level meters Displays output level and delay time for each output channel Clicking here displays the Crosspoint window 4 Block On Turns ON output for all channel...

Page 403: ...annel If Solo is engaged for even one channel all non Solo channels will be muted 4 On ON OFF Turns ON each channel s input 5 Block On Turns ON input for all channels in the Input Master window When turned ON the On button lights up 6 Off Turns OFF input for all channels in the Input Master window 7 Nominal Resets all input signal levels in the Input Master window making them 0 dB 8 Minimum Resets...

Page 404: ... the output signal level for each channel 2 Level to 10 dB Sets the output signal level for each channel 3 On ON OFF Turns ON each channel s output 4 Block On Turns ON output for all channels in the Output Master window When turned ON the On button lights up 5 Off Turns OFF output for all channels in the Output Master window 6 Nominal Resets all output signal levels in the Output Master window mak...

Page 405: ...played and then click another output channel that channel group will be displayed in the Delay Matrix All Inputs to One Output editor window One Delay Matrix All Inputs to One Output editor window is displayed for each delay matrix component editor Section Parameter Setting Range Function 1 Bus Send Level Delay 0 to 500ms Sets the delay time for each input channel 2 Level to 10 dB Sets the output ...

Page 406: ...channel group that is displayed in the window Section Parameter Setting Range Function 1 Input Channel Displays the selected input channel Select another channel from a menu 2 Phase ON OFF Reverses the phase of the input signal 3 Level to 10 dB Sets the input signal level 4 Solo ON OFF Turns solo ON If Solo is engaged for even one channel all non Solo channels will be muted 5 On ON OFF Turns input...

Page 407: ...e delay matrix component editor the input channels are arranged vertically while the output channels are arranged horizontally Section Parameter Setting Range Function 1 Input Channel Switches to another channel group 2 Output Channel Switches to another channel group 3 Bus Send Level Delay 0 to 500 ms Sets the delay time for each crosspoint 4 Level to 10 dB Sets the output signal level for each c...

Page 408: ...Crosspoint editor window Only one Delay Matrix Crosspoint matrix window is displayed for each delay matrix component editor Matrix Mixer In the matrix mixer the input channels and output buses are arranged in a checkerboard configuration You can adjust the group balance for each output bus There are 24 components in the in the Matrix Mixer group each with different numbers of input and output chan...

Page 409: ...s that display four channels each Section Name Function 1 Input Master Opens the Input Master window 2 Output Master Opens the Output Master window 3 Matrix Output level These meters display the output level for each channel Clicking here displays the Crosspoint window 4 Block On Turns ON output for all channels in the Crosspoint window Lights the ON button does not change the matrix mixer compone...

Page 410: ...channel number on the left side of the matrix the Matrix Mixer One Input to All Outputs editor window opens The matrix is divided into groups each with four input channels and four output channels When you place the mouse pointer over a group its channel numbers are highlighted Click to open the Matrix Mixer Crosspoint editor window Output level Click to open the Matrix Mixer All Inputs to One Out...

Page 411: ...ignal level from each channel input to the output bus 3 Solo ON OFF Turns ON solo for each channel If Solo is engaged for even one channel all non Solo channels will be muted 4 On ON OFF Turns ON each channel s input 5 Block On Turns ON input for all channels in the Input Master window When turned ON the On button lights up 6 Off Turns OFF input for all channels in the Input Master window 7 Nomina...

Page 412: ...tput signal level for each channel 2 Level to 10 dB Sets the output signal level for each channel 3 On ON OFF Turns ON each channel s output 4 Block On Turns ON output for all channels in the Output Master window When turned ON the On button lights up 5 Off Turns OFF output for all channels in the Output Master window 6 Nominal Resets all output signal levels in the Output Master window making the...

Page 413: ...ne Output editor window is displayed and then click another output channel that channel group will be displayed in the Matrix Mixer All Inputs to One Output editor window One Matrix Mixer All Inputs to One Output editor window is displayed for each matrix mixer component editor Section Parameter Setting Range Function 1 Bus Send Level Level to 10 dB Sets the output signal level for each input chan...

Page 414: ...itor window is displayed and then click another input channel that channel will be displayed in the Matrix Mixer One Input to All Outputs editor window One Matrix Mixer One Input to All Outputs editor window is displayed for each matrix mixer component editor Section Parameter Setting Range Function 1 Input Channel Displays the selected input channel Select another channel from a menu 2 Phase ON O...

Page 415: ...nction 1 Input Channel Switches to another channel group 2 Output Channel Switches to another channel group 3 Bus Send Level Level to 10 dB Sets the output signal level for each crosspoint 4 On ON OFF Turns ON output for each crosspoint 5 Block On Turns ON output for all channels in the Crosspoint window When turned ON the On button lights up 6 Off Turns OFF output for all channels in the Crosspoi...

Page 416: ...t and Output sections of the Matrix Mixer Crosspoint editor window switch the channel group that is displayed If you click another channel group when the matrix mixer component editor is active and an Matrix Mixer Crosspoint editor window is displayed that channel group will be displayed in the open Matrix Mixer Crosspoint editor window Only one Matrix Mixer Crosspoint matrix window is displayed f...

Page 417: ... Center Center Nominal Uses the center volume as a reference setting it as 0 dB The LR speakers are 3 dB LR LR Nominal Uses the LR speaker volumes as a reference setting them as 0 dB The center volume is 3 dB LCR In the LCR component one input is divided into left center and right outputs The number of outputs is triple the inputs Components are available with 1 2 4 8 12 and 16 channels Double cli...

Page 418: ... component but all share a common configuration in the component editor Parameter Setting Range Function 1 CSR 0 to 100 Sets the ratio for sending the center signal to LR 2 Pan L63 Center R63 Sets LR orientation 3 Pan Nominal Position Center LR Selects the nominal position from a menu Parameter Setting Range Function 1 Pan L63 R63 Sets the LR orientation 2 Pan Nominal Position Center LR Selects th...

Page 419: ...tered there Name Location Setting Range Function 1 2D Surround Pan Graph Sets the sound image orientation You can move the sound image by clicking and dragging 2 Speaker Button L Left L63 F63 Clicking here moves the sound image to the button location 3 C Center C F63 4 R Right R63 F63 5 Ls Left Surround L63 R63 6 Bs Back Surround C R63 7 Rs Right Surround R63 R63 8 LFE Low Frequency Effect Sub Woo...

Page 420: ...u can move the control by dragging it with the mouse Click If you click within the graph the control point will move to that position Speaker Button If you click any speaker button besides the LFE button the control point will jump to that speaker s position Click Click ...

Page 421: ...nd Pan Graph Sets the sound image orientation You can move the sound image by clicking and dragging 2 Speaker Button Clicking here moves the sound image to the button location 3 Position Left Right Position L63 C R63 Displays the LR surround location 4 Front Back Position F63 C R63 Displays the front back surround location 5 Divergence Front 0 to 100 Sets the ratio for sending the front center sig...

Page 422: ...nd image orientation You can move the sound image by clicking and dragging 2 Speaker Button Clicking here moves the sound image to the button location 3 Position Left Right Position L63 C R63 Displays the LR surround location 4 Front Back Position F63 C R63 Displays the front back surround location 5 Divergence Front 0 to 100 Sets the ratio for sending the front center signal to front L and front ...

Page 423: ... image by clicking and dragging 2 Speaker Button Clicking here moves the sound image to the button location 3 Position Left Right Position L63 C R63 Displays the LR surround location 4 Front Back Position F63 C R63 Displays the front back surround location 5 Divergence Front 0 to 100 Sets the ratio for sending the front center signal to front L and front R 6 Rear 0 to 100 Sets the ratio for sendin...

Page 424: ...ber of channels varies depending on the component but all share a common configuration in the component editor Routers let you route signals from various Input locations by connecting them to various Output locations One output can be connected to one input only A single input can be output to multiple channels but multiple inputs cannot be output over a single channel In other words you can distr...

Page 425: ...ne is displayed connecting them Click to set routing for that position If another output channel has been assigned to the clicked input channel the original assignment will not be cleared If another input channel has been assigned to the clicked output channel the original assignment will be cleared Clearing Routing Settings If you click the dot that indicates routing the routing indicated by that...

Page 426: ... 16 Position components are all 1 Channel types while 1 2 and 6 Channel versions of 4 Position and 8 Position components are provided Double click a component to open the component editor The component editor is the same for all types the only difference being the number of sources The Source Selector connects the selected input to the output For example if you select 1 for a 4 Position 2 Channel ...

Page 427: ...cessor that includes APF All Pass Filter horn EQ and limiter functions Six component types are available 1 Way 2 Way 3 Way 4 Way 5 Way and 6 Way Speaker Processor components have one input and one or multiple outputs Double click a component to open the component editor 2 4 1 5 3 Speaker processor Component 9 7 5 6 8 ...

Page 428: ...Curve Display Button Turns crossover curve display for each output channel on or off Section Parameter Range Function 7 Delay Delay ON OFF Applies delay to the crossover response 8 PEQ PEQ ON OFF Applies PEQ to the crossover response 9 Navigator Input Level to 10 dB Specifies the input signal level Crossover Opens the crossover editor window Delay Opens the delay editor window PEQ Opens the parame...

Page 429: ...and Frequency parameters can also be changed by directly dragging the control points Changes to the Frequency parameter are shown on the crossover phase response graph The control point in the center of the graph can be dragged vertically to change the Output Level parameter Control points at the intersections between the frequency bands can be dragged horizontally to change the Frequency The Outp...

Page 430: ... a dotted line when muted 4 LPF Type Thru 6dB Oct 12dB Oct AdjustGc 12dB Oct Butrwrth 12dB Oct Bessel 12dB Oct Linkwitz 18dB Oct AdjustGc 18dB Oct Butrwrth 18dB Oct Bessel 24dB Oct AdjustGc 24dB Oct Butrwrth 24dB Oct Bessel 24dB Oct Linkwitz 36dB Oct AdjustGc 36dB Oct Butrwrth 36dB Oct Bessel 48dB Oct AdjustGc 48dB Oct Butrwrth 48dB Oct Bessel 48dB Oct Linkwitz Sets the roll off slope and filter t...

Page 431: ...ted 8 Frequency 20 Hz to 20 kHz Sets the HPF cutoff frequency 9 Gc 6 dB to 6 dB Sets the cutoff frequency gain when the Type setting is AdjustGc Adjustable Gc Parameter Range Function 1 Delay ms 0 to 500 Sample the range depends on the Fs value Meter 0 to 171 8 Feet 0 to 563 6 Frame the range depends on the Frame value Beat the range depends on the Beat value Sets the delay time Two edit boxes sho...

Page 432: ...ossover Processor PEQ button to open the window Parametric equalization is provided for each crossover band NOTE Delay Scale does not support the parameter link feature Refer to Parameter Link on page 81 for information on parameter linking Speaker Processor PEQ edit window 9 3 5 4 6 1 2 7 8 ...

Page 433: ...is reason the gain can only be set to higher than 0dB and the frequency higher than 500Hz Name Function 1 Crossover response phase Shows crossover phase response 2 Crossover response level Shows crossover level response Parameter Range Function 3 Type PEQ L SHELF 6dB Oct L SHELF 12dB Oct H SHELF 6dB Oct H SHELF 12dB Oct HPF LPF APF 1 1st APF 1 2nd Horn EQ 2 Select a filter type from the menu 4 B W...

Page 434: ...reduction 3 Output Meter Displays the output level Parameter Range Function 4 Threshold 54 dB to 0 dB Sets the threshold level 5 Attack Fast Mid Slow Manual 0 to 120ms Sets the attack time 6 Release Fast Mid Slow Manual 44 1kHz 6ms to46s 48kHz 5ms to 42 3s 88 2kHz 3ms to 23s 96kHz 3ms to 21 1s Sets the release time With the Fast Mid or Slow settings the optimum value is automatically set based on ...

Page 435: ...onent to display the context menu click Recall Component Library then select the effect type from the Effect Type submenu Double click this component to display the component editor for it Name Parameter Function 1 Input Meter Displays the input signal level 2 Mix Balance Control Adjusts the balance between the fundamental tone and the effect tone 3 Bypass button When turned ON the input signal is...

Page 436: ... Reflection spacing Liveness 0 to 10 Early reflections decay characteristics 0 dead 10 live Ini Dly 0 0 to 500 0 ms Initial delay before reverb begins Diff 0 to 10 Reflection diffusion left right reflection spread Density 0 to 100 Reflection density ER Num 1 to 19 Number of early reflections FB Gain 99 to 99 Feedback gain Hi Ratio 0 1 to 1 0 High frequency feedback ratio HPF THRU 21 2 Hz to 8 00 k...

Page 437: ... reverse phase feedback Hi Ratio 0 1 to 1 0 High frequency feedback ratio HPF THRU 21 2 Hz to 8 00 kHz High pass filter cutoff frequency LPF 50 0 Hz to 16 0 kHz THRU Low pass filter cutoff frequency Echo Two input two output stereo delay with crossed feedback loop Delay L 0 0 to 1350 0 ms Left channel delay time Delay R 0 0 to 1350 0 ms Right channel delay time FB Dly L 0 0 to 1350 0 ms Left chann...

Page 438: ...9 to 99 Feedback gain plus values for normal phase feedback minus values for reverse phase feedback Offset 0 to 100 Lowest phase shifted frequency offset PHASE 0 00 to 354 38 degrees Left and right modulation phase balance Stage 2 4 6 8 10 12 14 16 Number of phase shift stages LSH F 21 2 Hz to 8 00 kHz Low shelving filter frequency LSH G 12 to 12 dB Low shelving filter gain HSH F 50 0 Hz to 16 0 k...

Page 439: ...reverse phase feedback Mode 1 to 10 Pitch shift precision Rotary One input two output rotary speaker simulator Rotate STOP START Rotation stop start Speed SLOW FAST Rotation speed see SLOW and FAST parameters Slow 0 05 to 10 00 Hz SLOW rotation speed Fast 0 05 to 10 00 Hz FAST rotation speed Drive 0 to 100 Overdrive level Accel 0 to 10 Acceleration at speed changes Low 0 to 100 Low frequency filte...

Page 440: ...nsitivity Direction UP DOWN Upward or downward frequency change Decay 44 1kHz 6 0ms to 46 0s 48kHz 5 0ms to 42 3s 88 2kHz 3ms to 23 0s 96kHz 3ms to 21 1s Decay speed Offset 0 to 100 Delay time offset FB Gain 99 to 99 Feedback gain plus values for normal phase feedback minus values for reverse phase feedback LSH F 21 2 Hz to 8 00 kHz Low shelving filter frequency LSH G 12 to 12 dB Low shelving filt...

Page 441: ...ulation delay time Wave Sine Tri Modulation waveform Rev Flange One input two output reverb and flanger effects in parallel Rev Time 0 3 to 99 0 s Reverb time Ini Dly 0 0 to 500 0 ms Initial delay before reverb begins Hi Ratio 0 1 to 1 0 High frequency reverb time ratio Diff 0 to 10 Spread Density 0 to 100 Reverb density HPF THRU 21 2 Hz to 8 00 kHz High pass filter cutoff frequency LPF 50 0 Hz to...

Page 442: ...s in parallel Rev Time 0 3 to 99 0 s Reverb time Ini Dly 0 0 to 500 0 ms Initial delay before reverb begins Hi Ratio 0 1 to 1 0 High frequency reverb time ratio Diff 0 to 10 Spread Density 0 to 100 Reverb density HPF THRU 21 2 Hz to 8 00 kHz High pass filter cutoff frequency LPF 50 0 Hz to 16 0 kHz THRU Low pass filter cutoff frequency Rev Bal 0 to 100 Reverb and panned reverb balance 0 all panned...

Page 443: ...Feedback delay time FB Gain 99 to 99 Feedback gain plus values for normal phase feedback minus values for reverse phase feedback Delay Hi 0 1 to 1 0 Delay high frequency feedback ratio HPF THRU 21 2 Hz to 8 00 kHz High pass filter cutoff frequency LPF 50 0 Hz to 16 0 kHz THRU Low pass filter cutoff frequency Dly Rev 0 to 100 Delay and reverb balance 0 all delay 100 all reverb Rev Time 0 3 to 99 0 ...

Page 444: ...ow pass band pass Type 3 HPF LPF BPF Filter 3 type high pass low pass band pass Freq 1 28 0 Hz to 16 0 kHz Filter 1 frequency Freq 2 28 0 Hz to 16 0 kHz Filter 2 frequency Freq 3 28 0 Hz to 16 0 kHz Filter 3 frequency Level 1 0 to 100 Filter 1 level Level 2 0 to 100 Filter 2 level Level 3 0 to 100 Filter 3 level Reso 1 0 to 20 Filter 1 resonance Reso 2 0 to 20 Filter 2 resonance Reso 3 0 to 20 Fil...

Page 445: ...1s Compressor release time Cmp Knee 0 to 5 Compressor knee Lookup 0 0 to 100 0 ms Lookup delay Cmp Byp ON OFF Compressor bypass L M XOver 21 2 Hz to 8 00 kHz Low mid crossover frequency M H XOver 21 2 Hz to 8 00 kHz Mid high crossover frequency Slope 6 dB 12 dB Filter slope Ceiling 6 0 dB to 0 0 dB OFF Specifies the maximum output level Exp Thre 54 0 dB to 24 0 dB Expander threshold Exp Rat 1 1 to...

Page 446: ...omponent only has outputs 4 8 and 16 channel types are provided Right click the component and select Open Slot In Component from the contextual menu to open the component editor The component editor is the same for all types Name Function 1 Meter Shows the signal level for each channel ...

Page 447: ...by right clicking the component then clicking Open Slot Out Component Editor on the displayed context menu Parameter Setting Range Function 1 Phase ON OFF Reverses the phase of the output signal for each channel 2 On ON OFF Turns ON each channel s output 3 Delay 0 to 24 Samples Sets the delay time 4 Level to 0 dB Sets the output level 5 Dither Off 16 20 24 Sets the quantization bit rate for conver...

Page 448: ...s a Cascade In component which can be displayed by checking Show Cascade Port in the DME Device Properties dialog box Right click the component and select Open Component Editor from the contextual menu to open the component editor The component editor is the same for all types Name Function 1 Meter Shows the signal level for each channel ...

Page 449: ...Out The Cascade Out Component only has inputs Right click the component and select Open Component Editor from the contextual menu to open the component editor The component editor is the same for all types Name Function 1 Meter Shows the signal level for each channel ...

Page 450: ...Input Component Editor from the contextual menu to open the component editor Analog Output Double click Analog Output to display the component editor for it The displayed parameters are the same as for Slot Out component editor NOTE The DME24N DME8i C and DME4io C have analog inputs The DME24N and DME8i C have eight analog inputs while the DME4io C has four Parameter Setting Range Function 1 48 ON...

Page 451: ...or Name Parameter Range Function 1 Input Select Analog IN A B Selects analog input channels A and B as the input signal sources Analog IN A A Selects analog input channel A as the source for both input signals Digital IN L R Selects digital input channels L and R as the input signal sources Digital IN L L Selects the digital L input channel as the source for both signals Selects the input signal s...

Page 452: ...ble When Disable is selected settings made via the CobraNet network take priority When Enable is selected settings made from the DME Designer take priority 2 High Sampling Mode Input Format Double Channel Single Selects the format for 88 2 96 kHz sampling rates Linked to Output Format Output Format Double Channel Single Selects the format for 88 2 96 kHz sampling rates Linked to Input Format 3 Bun...

Page 453: ... DME8i C DME8o C DME4io C Owner s Manual for mote information on CobraNet Section Name Parameter Range Function 1 Channel per Bundle Input 1 2 4 8 Specifies the number of channels per input bundle 1 Output 1 2 4 8 Specifies the number of channels per output bundle 1 2 Conductor Priority Auto 0 255 Sets the conductor priority 255 is the highest priority Auto means 32 on DME8i C DME8o C DME4io C 3 I...

Page 454: ...s halved and even numbered channels are unavailable In the Double Speed Mode digital audio data is transmitted and received at the current high sampling rate 88 2 96 kHz In the Single Mode digital audio data is transmitted and received at half the current high sampling rate 88 2 96 kHz Setting Examples When the MY card word clock is used as the master word clock Double FS determines whether the sp...

Page 455: ...When ON the speed of the word clock from the MY Card is doubled Only displayed when this card is functioning as the word clock master 3 Output Format Double Channel Double Speed Single Selects the format for 88 2 96 kHz Parameter Setting Range Function 1 Input Format Double Channel Double Speed Selects the format for 88 2 96 kHz 2 Double Fs ON OFF When ON the speed of the word clock from the MY Ca...

Page 456: ...ards it is Double Channel Single 2 Double Fs ON OFF When ON the speed of the word clock from the MY Card is doubled Only for MY16 AE MY8 AE96 MY16 TD When On is set for the MY8 AE96 the Input Format is Double Channel When Off is set the input format is Double Speed Only displayed when this card is functioning as the word clock master 3 Output Format Double Speed Double Channel Single Selects the f...

Page 457: ... is doubled Only available when the card is set as the word clock master Output Format Double Channel Single Selects the format for 88 2 96 kHz sampling rates Linked to Input Format 3 Bundle Number Input 0 to 65279 Sets the input bundle number Output 0 to 65279 Sets the output bundle number 4 Serial Channel Rx OFF 1 16 Sets the serial channel for the receive side Tx OFF 1 16 Sets the serial channe...

Page 458: ...d ON the speed of the MY card word clock output is doubled Only available when the card is set as the word clock master Output Format Double Channel Single Selects the format for 88 2 96 kHz sampling rates Linked to Input Format 3 Bundle Number Input 0 65279 Specifies the input bundle number Output 0 65279 Specifies the output bundle number 4 Serial Channel Rx OFF 1 15 Specifies the serial receive...

Page 459: ...erter Double click the component to display the component editor for it NOTE If a DME is not selected in the properties dialog box the component editor will not be displayed even if you double click page 204 Section Parameter Setting Range Function 1 Gain 48 ON OFF Turns ON phantom power 48V 2 Gain 10 to 62 dBu Sets the head amp gain 3 Word Clock 48 kHz 44 1 kHz BNC Slot Sets the operating frequen...

Page 460: ...ponent editor will not be displayed even if you double click page 204 Section Parameter Setting Range Function 1 Gain 48 ON OFF Turns ON phantom power 48V 2 HPF ON OFF Turns output ON 3 Frequency 20 to 600Hz Sets the cutoff frequency 4 Gain 10 to 62 dBu Sets the head amp gain 5 Word Clock 96 kHz 88 2 kHz 48 kHz 44 1 kHz Word Clock In Digital Out A Sets the operating frequency for the Word Clock Do...

Page 461: ...then Butterworth and there is little distortion of the waveform when square waves are passed through Components Crossover Crossover Processor Crossover Processor II Programmable BPF Programmable HPF Programmable LPF Speaker Processor Butterworth Butrwrth One type of filter characteristics This filter has the most general characteristics The pass band is flat and the gain for the cutoff frequency i...

Page 462: ... is also used as the frequency band button Components Crossover Crossover Processor Crossover Processor II De Esser GEQ PEQ BPF HPF LPF Notch Programmable BPF Programmable HPF Programmable LPF Oscillator Speaker Processor SPX Remote HA Gain Sets the amplification factor for the entire signal level Components Crossover Processor Crossover Processor II Compander Compressor De Esser Expander GEQ PEQ ...

Page 463: ...nput signal between right and left Components LCR LR SPX Pan Nominal Position Sets the 0 dB reference for pan There are two selections available Center and LR LR Nominal Center nominal uses the center volume as a reference The means the center volume is 0 dB and the LR speakers are 3 dB LR nominal uses the LR speaker volume as the reference The means the LR speaker volume is 0 dB and the center is...

Page 464: ... from the previous high It s a good ideal to try an initial release time setting in the range of 0 11 to 0 5 milliseconds Components Crossover Processor Crossover Processor II Compander Compressor De Esser Expander Limiter Speaker Processor SPX Slope In a high pass filter HPF or low pass filter LPF this sets the attenuation amount for each octave A large value results in rapid attenuation Clicking...

Page 465: ... has the same function as the Left button 2 F2 Key When the Main display is showing this button calls the Parameter Edit display for the middle User Defined Button in the upper part of the display When the Utility display is showing it has the same function as the Up button 3 F3 Key When the Main display is showing this button calls the Parameter Edit display for the User Defined Button in the upp...

Page 466: ...t 2 seconds the Mute display will appear 7 HOME Key Directly recalls the home main display If pressed while the main display is showing the HOME button steps through the User Defined Button display pages page 470 8 SCENE Key Calls the scene recall display page 471 Calls the scene store confirmation display if pressed and held from longer than 2 seconds page 471 The indicator will light green while...

Page 467: ...TER 3 Page Scroll Bar The scroll bar provides an indication of which parameter page is currently being displayed 4 pages are available and the scroll bar moves one position to the right each time the HOME key is pressed and a new page of parameters is selected and then back to the leftmost position after the rightmost position has been reached 4 Edit Indicator If a parameter is changed after recal...

Page 468: ...arameters Numeric parameters can be edited in a number of ways and depending on the parameter a fader knob or minimum and maximum values may appear to the left of the numeric value A Numeric Value with a fader A Numeric Value with a Knob 1 Name of parameter selected for editing 2 Fader 3 Knob 4 Minimum and maximum values 5 Current value Some Parameter Edit displays have just one numeric parameter ...

Page 469: ...ost item on the display will be always highlighted as the list is scrolled and in others the same item will remain highlight as the list is scrolled up or down 1 Use the dial to scroll up or down the list As you scroll the highlighted selection will remain highlighted and will scroll up or down with the list 2 Press the ENTER key to highlight the centermost item on the display 3 Press the ENTER ke...

Page 470: ...he parameter to be edited appears 3 Use the F1 F2 F3 F5 keys select the parameter to be edited The Parameter Edit display for the selected User Defined Button will appear 4 User Defined Button as required Refer to Parameter Edit Displays on page 468 for editing procedures Mute Switching Turns the DME series output mute function ON or OFF 1 Press the F6 MUTE key for longer than 2 seconds The Mute P...

Page 471: ...on window will appear 4 Press the ENTER button again The new scene will be selected Scene Store Stores the current scene data for later recall 1 Press the SCENE button for longer than 2 seconds A confirmation window will appear on the display 2 Press the ENTER key This stores the scene data in the current scene memory NOTE If head amplifier parameters are included in the recalled scene data the he...

Page 472: ... Disp Current status and setup for the display mode etc page 474 LCD Contrast Current status and setup for display panel contrast LCD Backlight Current status and setup for the display panel backlight Lock Current status and setup for panel lock and related functions page 474 Utility Current status and setup for the Utility display settings Panel Lock Boot Current status and setup for the ICP1 s p...

Page 473: ...ers 1 Device Group Indicates whether or not the device is functioning as the device group master Device Group status of ICP1 is fix to Slave 2 IP Adr This is the device s IP address Edit using the Numeric Parameters editing procedure described on page 468 3 Master ID Displays and sets the device group master host address 4 Link Mode Shows the status of the NETWORK connector The NETWORK connector c...

Page 474: ...ccessed without a password Lock A password must be entered to access the Utility display When Lock is selected a password entry window will appear when the F4 UTILITY key is pressed to access the utility pages Use the F1 and F3 buttons to position the cursor and the dial to enter the desired character at the cursor location When all of the password s characters have been entered as required press ...

Page 475: ...e Scene store operations are allowed Disable Scene store operations are prohibited Edit using the List Parameters editing procedure described on page 469 2 Last Mem Resume This parameter displays whether the ICP1 will recall the current scene when started up or whether the memory contents at the time the unit was turned off will be recalled ON The memory contents at the time the unit was turned of...

Page 476: ...isplay appears 3 Press the F2 F5 keys to select a type of initialization Initialize DME Deletes all user settings except component data The Utility settings will be set to default values Delete All Data Component data will be deleted The Utility settings will be set to default After initialization transfer necessary components from DME Designer Exit Diag Mode Leaves this screen and restarts 4 Pres...

Page 477: ...le files umf in the ContentsFolder and User Module folders Cannot switch configurations in the Navigator Window While online you cannot not switch to a configuration different from the current scene If you can switch between scenes you will be able to switch configurations The user module window does not open even when a user module is double clicked This is a user module saved by selecting Open U...

Page 478: ...ing 270 editing 163 renaming 270 Configuration window 22 277 Component List 173 Control aligning 320 copy 321 cut 321 moving 320 paste 321 placing 315 properties 321 Control Change tab 110 Crossover 351 Crossover Processor 356 Crossover Processor II 362 Current Scene 48 Current Zone 48 D DAW Control 137 Decay Decay Time 461 De Esser 375 Delay 368 461 delay long 368 delay short 369 Delay Matrix 401...

Page 479: ... 25 Log Setup dialog box 67 Logical connection 266 situations where no logical connection is created 266 Low Pass Filter LPF 390 LR 418 M MAC Adr 473 Main display 467 Main Panel window 20 45 Matrix Mixer 408 Menu bar 45 165 Meter 396 MIDI 110 Control Change tab 110 Parameter Change tab 115 Program Change tab 114 MIDI dialog box 110 Misc Page 475 Miscellaneous 397 Miscellaneous Setup Misc Page 475 ...

Page 480: ...how Signal Delay 281 Slope 464 Slot Component 213 446 Snap 335 SP2060 Input 451 SP2060 Output 451 Speaker Processor component 427 SPX Component 210 435 Status bar 166 Surround 3 1 421 Surround 5 1 422 Surround 6 1 423 Synchronization DME Designer and DME unit synchronization 83 Synchronization dialog box 84 T Tab Order changing 330 Text box 223 Threshold 464 Title bar 45 164 Tool button large 47 s...

Page 481: ...Index DME Designer Owner s Manual 481 nodes 255 Word Clock 154 Z Zone 184 adding 267 current 48 deleting 267 renaming 267 Zone Net Page 473 Zone window 22 274 ...

Page 482: ...U R G Pro Audio Digital Musical Instrument Division Yamaha Corporation 2004 Yamaha Corporation MW D0 ...

Reviews: