Doc. P/N:
WSP-009-005
Version: V1.5
Issue Date:
October 2013
www.wassp.com
Page 14 of 73
Installation Manual
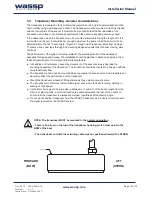
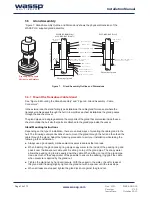
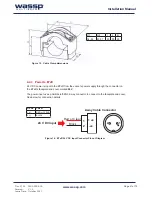
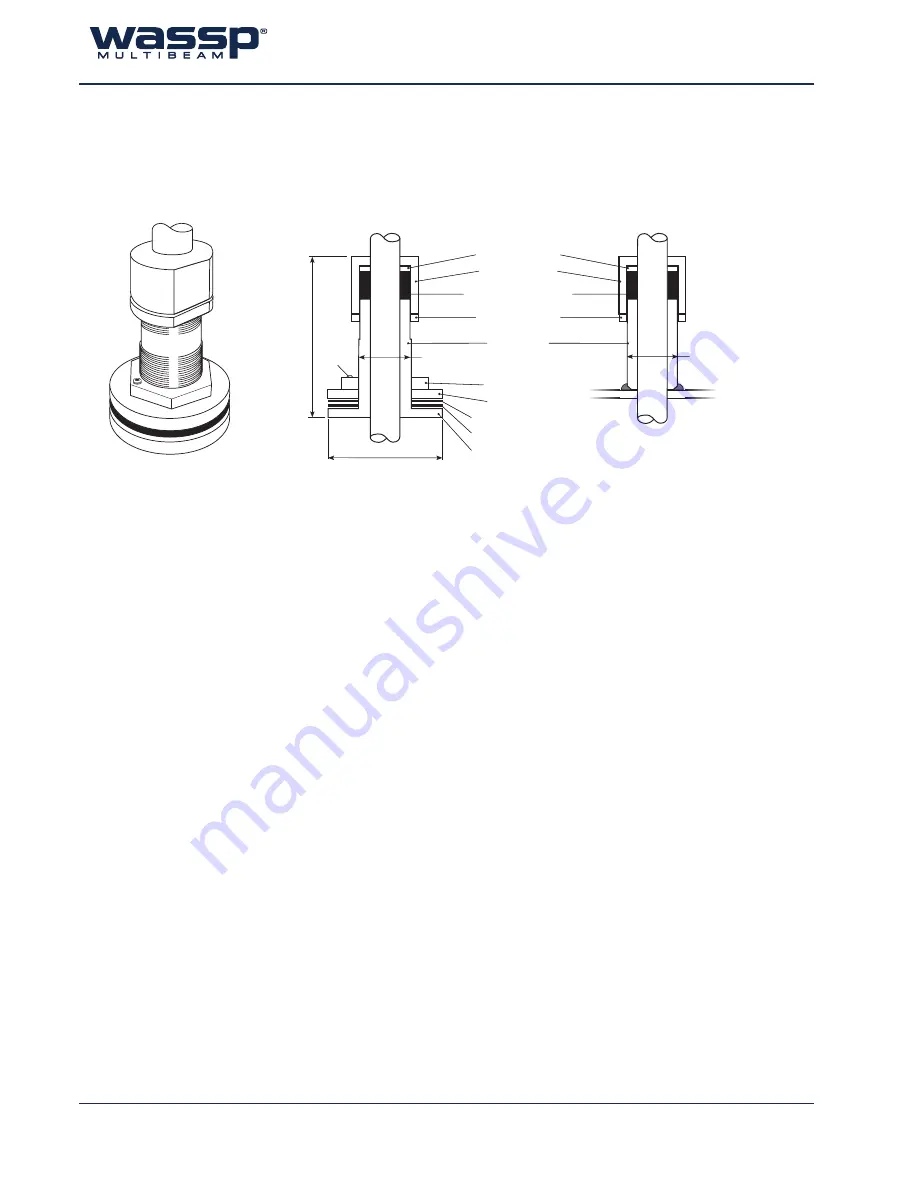
Figure 7. Gland Assembly Outline and Dimensions
80
WSP-002-080 (Alloy)
WSP-002-081 (Plastic)
Cut away of gland
TRANSDUCER
CABLE
GLAND NUT
GLAND PACKING RING
GLAND PIPE
HULL PLATE
GLAND PIPE FLANGE
LOCK
SCREW
GLAND LOCK NUT
LOCK PLATE
GASKET ABOVE HULL
GASKET BELOW HULL
50 mm Outside diameter of
GLAND PIPE FLANGE
Drawing not to scale
All sizes in millimeters
STEEL WASHER
Cut away of gland
TRANSDUCER
CABLE
WSP-002-082 (Steel)
63.5 mm Outside diameter of
GLAND PIPE FLANGE
Appr
ox. 1
40 mm
HULL
HULL
5.5 Gland Assembly
“Figure 7. Gland Assembly Outline and Dimensions”shows the physical dimensions of the
WASSP Ltd. supplied gland assembly.
5.5.1 Mount the Transducer Cable Gland
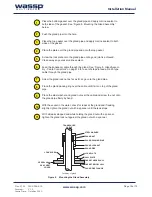
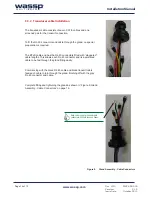
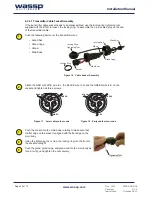
See “Figure 8. Mounting the Gland Assembly” and “Figure 9. Gland Assembly - Cable
Connectors”.
In the external sea chest and fairing type installations, the cable gland forms a seal where the
transducer cable passes through the hull. In low profile sea chest installations, the gland passes
through the sea chest cover.
The gland pipe and a single gasket are the only parts of the gland that are located inside the sea
chest or outside the hull, all other parts are attached to the gland pipe inside the vessel.
Gland Mounting Instructions
Depending on the type of installation, there are various ways of mounting the cable gland to the
hull. The following example describes how to mount the gland through the hull and then feed the
cable through the gland. Adapt the following procedure to suit your installation while taking the
following into consideration:
►
Always use a good quality marine sealant to seal across areas that can leak.
►
When installing the gland packing ring, apply soapy water to the inside of the packing ring and
pass it over the transducer cable until it is sitting on top of the gland pipe. The soapy water
allows the packing ring to slide easily down the cable. When sitting on top of the gland pipe,
clean as much of the soapy water off as possible to ensure the packing ring grips the cable
when pressure is applied by the gland nut.
►
Tighten the gland nut by hand until secure. With the vessel in the water, check for leaks at
the gland and if leaking slightly, tighten the gland nut with a spanner until the leak stops.
►
When all leaks are stopped, tighten the gland lock nut against the gland nut.


