background image

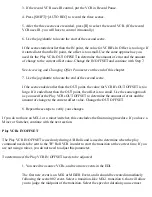
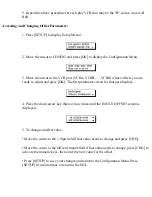
move the cursor to the choice you want, then press [OK]. 

Setup Functions 

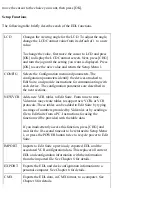
The following table briefly describes each of the EDL functions. 

LCD 

Changes the viewing angle for the LCD. To adjust the angle, 
change the LCD Contrast value from its default of 1 to a new 
value. 

To change the value, first move the cursor to LCD and press 
[OK] to display the LCD Contrast screen. Next, press [CHG] 
and turn the jog until the setting you want is displayed. Press 
[OK] to save the new value and return the Setup Menu 1. 

CONFIG 

Selects the Configuration menu and parameters. The 
configuration parameters identify the devices attached to 
Edit Suite, and provide instructions for communicating with 
each device. The configuration parameters are described in 
the next sections. 

NEWVCR  Adds new VCR tables to Edit Suite. From time to time, 

Videonics may create tables to support new VCRs or VCR 
protocols. These tables can be added to Edit Suite by typing 
in strings of numbers provided by Videonics or by sending a 
file to Edit Suite from a PC. Instructions for using the 
function will be provided with the table data. 

If you inadvertently access this function, press [CHG] and 
wait for the 10-second timeout to be returned to Setup Menu 
1, or press the POWER button twice to recycle power to Edit 
Suite. 

IMPORT 

Imports to Edit Suite a previously exported EDL and the 
associated VCR configuration data. This replaces all current 
EDL and configuration information with the information 
from the imported file. See Chapter 8 for details. 

EXPORT 

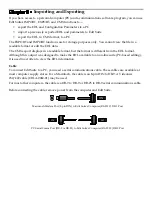
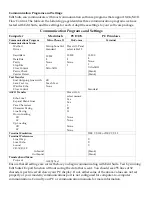
Exports the EDL and deck configuration information to a 
personal computer. See Chapter 8 for details. 

CMX 

Exports the EDL data, in CMX format, to a computer. See 
Chapter 8 for details. 

Summary of Contents for AB-1 Edit Suite

Page 1: ...hapter 3 Getting Started Chapter 4 Making a Production Assemble Editing Auto Assemble Editing Chapter 5 The NEW Menu and Edit Suite Events New Menu Scene A B C D Events Source SRC Events MX1 Events Mi...

Page 2: ...A VCR Tables PANA Panasonic Control M Protocol LANC Control L Protocol RS 422 Protocol RS 232 Protocol VCR Infrared Code List Appendix B Cables and Cable Pinouts Appendix C Equipment Hookup Appendix...

Page 3: ......

Page 4: ...ting with how Edit Suite fits in with the rest of your equipment and ending with an introduction to the Edit Decision List Chapter 2 introduces the Edit Suite keyboard Skim through Chapter 2 spending...

Page 5: ...s video processors and audio mixers This figure shows a fairly typical configuration for Edit Suite It includes two play sources Deck A and Deck B a recorder a Videonics MX 1 Mixer left a Videonics Ti...

Page 6: ...t devices except the MX 1 Edit Suite sends a GPI trigger down the cable which causes a titler to play a screen of titles or a mixer switcher to cut or transition from one VCR to another With a Videoni...

Page 7: ...rd major time code VITC vertical interval time code is written in the video signal a little bit above the video that normally displays on your monitor As with LTC if VITC is played on a VCR that uses...

Page 8: ...ew or record the events It will march down the Edit Decision List finding each of your scenes controlling your recorder and play VCRs and creating your production Now leaf through Chapter 2 and follow...

Page 9: ...n in the display changes when function keys are pressed scenes are created or VCRs are controlled For example the display above shows a Scene Event Scene Events specify which VCR or camcorder contains...

Page 10: ...and right between fields and screens of information The change key CHG key temporarily switches the keypad to numeric entry mode the OK key confirms entries and clears messages and the SETUP key acce...

Page 11: ...turned There are four states for the LEDs 1 If only one LED is lit that VCR will be controlled 2 If two LEDs are lit one steady and one blinking slowly the VCR with the steady LED is the current VCR...

Page 12: ...ntly selected VCR except Record VCRs using Infrared control Jog Shuttle The jog shuttle is used to locate and mark the scenes you want to record It can control all of your VCRs except record VCRs usin...

Page 13: ...econdary function of the jog shuttle is to trim numeric values As a general rule anywhere you can make a numeric entry in Edit Suite you can use the jog shuttle to change that entry The Shuttle Ring A...

Page 14: ...elector Production and Transport keys to access many of Edit Suite s functions In all cases where two or three keys are required to access a function the first one or two keys will be modifier keys Wh...

Page 15: ...les and one IR infrared wand If you need different or additional cables follow the instructions on the Cable Exchange Card or contact the distributor in your conutry For customers with RS 232 or RS 42...

Page 16: ...e sure both the monitor and the VCR are set to receive audio and video inputs Verify that your sources display play and record as expected If you have any problems refer to Appendix C Equipment Hookup...

Page 17: ...uration parameters Start by displaying the Configuration Menu A Press to display Setup Menu 1 LCD CONFIG NEWVCR IMPORT EXPORT CMX VCRA VCRB VCRC VCRD VCRR GPI M GPI T Setup Menu 1 Configuration Menu B...

Page 18: ...d VCR If you are not using a mixer switcher configure VCRR for your record VCR and any of the other ports for your source VCR s To configure the ports A Press and to move the cursor to the VCR port yo...

Page 19: ...ared is used record VCR only VCRR LANC Sony LANC Control L protocol is used PANA Panasonic 5 pin Control M protocol is used 232 RS 232 protocol is used 422 RS 422 protocol is used To select a protocol...

Page 20: ...ep 6 To enter a VCR table number use the left right arrow keys to move to the VCR field then press CHG once The cursor will change to a blinking block and the numeric keys on the keypad are activated...

Page 21: ...perating Manual should indicate if your VCR has these capabilities Advanced Parameters C Verify that the advanced parameters for the port you are defining are set to the values below If not change the...

Page 22: ...redisplay the advanced parameters D Press SETUP twice Edit Suite will configure the VCR port you just defined and return you to the Configuration Menu While the port is being configured a wait indica...

Page 23: ...ove the deck from Record Pause to Record B Press SETUP to save your choice and return to the Configuration Menu C Unplug the power supply from Edit Suite D Plug the IR wand into the IR jack on the bac...

Page 24: ...Step M Move to the CMD field and press CHG enough times to display the command used to put your VCR into Record from Record Pause This is the command you determined in Step F L Make sure the recorder...

Page 25: ...ER and GPI choices have an associated offset value Leave the offset value set to 0000 for now C Press SETUP twice to exit the Setup menus and return to the NEW Menu No changes to the GPI T port config...

Page 26: ...code If your VCRs have a Master Slave switch or menu setting select Slave If your VCRs have a Local Remote switch select Remote B Test For each VCR port you defined and connected except for a record V...

Page 27: ...attached to the correct port and VCR that power is applied to the VCR and that there is a tape with video in the VCR Next verify that the PROTO VCR TCSRC and TC fields are set correctly If not correc...

Page 28: ...o this the Scene Event is replaced by the Live VCR display The Live Display shows the current source and the current time code If you want to see the Scene Event again press OK VCR PANA A 00 05 24 00...

Page 29: ...controlled put the VCR in Record Pause Press GO TO up arrow to return to the first event then press SHIFT AUTO REC to start recording Again the POWER LED will blink and the other LEDs will be turned...

Page 30: ...s GPI M underneath the OUT key Depending on how you configured the GPI M port in Step 7 either an MX1 or a MIXER Event will be created between the last two scene events Your EDL should look similar to...

Page 31: ...viewed scene 002 the transition and scene 003 To preview the entire EDL move to the top of the EDL before selecting PREVIEW G RECORD THE A B ROLL Display the scene event from which you want to start t...

Page 32: ...video on a prerecorded tape This chapter describes the steps to do assemble and auto assemble editing It also provides instructions for reviewing the last recorded scenes and provides hints to help im...

Page 33: ...ord VCR into Record It will also create a Scene Event and fill in the IN time with the time code that was current on the play VCR when REC was pressed 7 At the end of the scene press OUT Edit Suite wi...

Page 34: ...re described in Chapter 5 5 If you have a titler or other GPI device and want titles to play during some of your scenes add GPI T Events at the locations you want the titles GPI Events are described i...

Page 35: ...if there is no usable footage around it 4 If you have access to time code use it This will greatly improve the accuracy of your productions 5 If you have time code it must be continuous or errors may...

Page 36: ...ith the Videonics MX 1 to fade up from black MX1 Events Used with the Videonics MX 1 to create A B Rolls between any of the VCRs camcorders or other sources attached to the MX 1 or to create A B Rolls...

Page 37: ...added immediately before event 002 as shown below 001 IN 00 05 22 04 A OUT 00 05 35 20 002 IN 00 07 05 12 A OUT 00 07 17 00 003 IN A OUT 001 IN 00 05 22 04 A OUT 00 05 35 20 002 IN 00 07 05 12 A OUT...

Page 38: ...ollowing sections for a more detailed description of each type of event To exit the NEW Menu without creating an event Press NEW again The event that was being displayed when the NEW Menu was selected...

Page 39: ...ecorded If you have a Videonics MX 1 mixer you can create Scene Events from two three or even four different sources Edit Suite will switch control from one VCR to the next when the video source chang...

Page 40: ...ne Events are created either the IN time the OUT time or both times are empty To fill in the IN OUT times either Use the transport keys and the jog shuttle to move the tape to the desired IN OUT time...

Page 41: ...acy and quality is to shoot all of your footage and record all of your productions using the SP tape speed setting on your camcorder or VCR If you have time code VITC LTC or RCTC as long as the time c...

Page 42: ...er for a Scene Event use the arrow keys to move the cursor to the Event Number field press CHG to activate the numeric keys then type in the desired number or use the jog shuttle and press OK The numb...

Page 43: ...e for the specified duration Fade Up From Black If you use a Videonics MX 1 you can access the MX 1 background colors via a Source Event You specify the color you want to use and the duration of the s...

Page 44: ...he first few seconds of video from the Source Event will not be recorded The amount of error varies from VCR to VCR but is never more than about two or three seconds The problem does not occur with So...

Page 45: ...If COL MX 1 Color to use If COL is selected you are also given a choice of which color to use To change the choice for color move the cursor to the color value field 0 above press CHG and type the va...

Page 46: ...is from VCR A and scene 003 is from VCR B The arrows on events 002 and 003 indicate that the events are part of a logical group In this case the group is the scene from event 002 the MX 1 transition...

Page 47: ...the video for events 001 and 002 by prepositioning the video for event 002 to its preroll position This way Edit Suite knows when to begin rolling the B source so that it will be playing the correct...

Page 48: ...Simultaneous Rolling of Two VCRs You can roll two VCRs simultaneously by placing an MX1 or MIXER Event between two Scene Events leaving the OUT time for the second Scene Event blank and pressing PREV...

Page 49: ...An MX1 Event will be created using the field values that were selected on the MX 1 at the time the GPI M button was pressed 002 003 FX 187 DI MX1 SP 4 BG 6 BC 4 If the event is placed between existin...

Page 50: ...SP speed field To change the value press CHG to activate the numeric keys then use the numeric keys or the jog shuttle to change the value If you use the jog shuttle complete your entry by pressing O...

Page 51: ...e arrows on events 002 and 003 indicate that the events are part of a logical group In this case the group is the scene from event 002 the MIXER Event and the scene from event 003 In the MIXER Event a...

Page 52: ...on command to the Mixer If the cuts and transitions are always a little late make the offset value larger If they are always a little early make the offset value smaller The offset is in 1 8 frame inc...

Page 53: ...be the source for the new event To set a next source press GO TO A B C or D Changing the MIXER Transition Duration To change the MIXER Transition Duration 002 003 TRANS DUR MIXER 00 00 00 00 Press CHG...

Page 54: ...w on the Scene Event and the up arrow on the GPI Event The arrows are called grouping arrows and indicate that there are events in this case the GPI Event related to the Scene Event Events that are gr...

Page 55: ...vents are usually used to send a trigger command to a titler or character generator Typically the titles can be timed to remain on the screen for just a few moments or for several seconds If the title...

Page 56: ...If this scene is displayed in the LCD when you press GPI T and VCR A is the current VCR the GPI Event is the only event created 001 IN 00 05 20 00 A OUT 00 05 35 00 001 FIXED GPI T 00 05 25 00 If how...

Page 57: ...d Scene or Source Event NOTE If you selected RELATIVE IN or RELATIVE OUT a sign field precedes the offset In most cases you will use a for a Relative In in all cases you should use a for a Relative Ou...

Page 58: ...re not already loaded load the previously recorded tape in the record VCR and the tape with the new audio into the play VCR Press SHIFT AUTO REC Edit Suite will send commands to the record VCR to posi...

Page 59: ...uration of the INS event is used If the Scene Event has a shorter duration the OUT time for the Scene Event will be ignored and the source VCR will continue to play until the insert is complete Setup...

Page 60: ...IN default value of 0000 and leave the preroll value for the source VCR set to five seconds Ways to Create an Insert Event There are three ways to create an Insert Event 1 The NEW Menu Display the NEW...

Page 61: ...CHG repeatedly to cycle between the three choices AV for both audio and video A for audio only V for video only Use the IN OUT keys as described above to update the IN and OUT times or move to the fie...

Page 62: ...l not be processed by Edit Suite unless it immediately follows an Insert Event If a Split Insert is to be done the INS type must be AV Before you can do a Split Insert you must set both the INS and th...

Page 63: ...event displayed in the LCD is an Insert Event a SPLT Event is created If the active event is not an Insert Event Edit Suite will beep twice and ignore the command Changing the SPLT Field Values To cha...

Page 64: ...next STOP Event or the last event in your list One common use of STOP Events is to separate entire productions Edit Suite can hold 250 events which for many users is enough for several small producti...

Page 65: ...ow then practice each procedure as you read through the chapter This will make it easier for you to recall the procedures and key sequences when you need to use them for your own productions Moving Up...

Page 66: ...f the EDL before doing a preview or auto record so that all the events in the EDL are previewed recorded You often move to the bottom of the EDL before adding new scenes This way the new scenes are ad...

Page 67: ...more Stop Events between the current event and the top bottom of the EDL the top bottom event displays If you use Stop Events to separate your productions the above key sequence provides an easy metho...

Page 68: ...d it necessary to move some events from one location to another This section describes procedures for moving an individual event or a group of events To Move an Event From one Location to Another 1 Di...

Page 69: ...the order of the events in the third column Event 003 retained its old event number instead of causing the entire list to be renumbered This way you can keep track of events by their original event n...

Page 70: ...you wanted to move will be deleted Notice the order of the events in the third column Event 002 retained its old event number instead of causing the entire list to be renumbered This way you can keep...

Page 71: ...e active event instead of pressing PASTE press SHIFT PASTE After PASTE or SHIFT PASTE is pressed Step 3 the paste buffer is empty To make another copy of the event repeat the procedure To Make a Copy...

Page 72: ...e event instead of pressing PASTE press SHIFT PASTE After PASTE or SHIFT PASTE is pressed Step 3 the paste buffer is empty To make another copy of the group repeat the procedure Deleting Events and Ev...

Page 73: ...a copy of the event in the paste buffer Pressing CUT deletes the event but puts a copy in the paste buffer so the event can be pasted to a new location See Moving Events earlier in this chapter Note I...

Page 74: ...lete all GPI T or GPI M Events in a Group of Events 1 Display any event in the group 2 Press DELETE GPI T or DELETE GPI M To Delete all GPI T or GPI M Events in the EDL 1 Display any event in the grou...

Page 75: ...the EDL Renumbering all Events in the EDL After deleting moving and copying events the event numbers in the EDL will probably be out of a numerical sequence Although this poses no problem for Edit Sui...

Page 76: ...ed and the tens and units digits are reset to 01 For example the first Scene or Source Event after the first STOP Event will be event 101 as shown in Step 2 above the first event after the second STOP...

Page 77: ...ount of slippage that occurs over time in the VCR s transport Use Edit Suite s GO TO Zero function select the VCR then press GO TO 0 to rewind the tapes For VCRs with PANA and LANC protocols this func...

Page 78: ...s not used These VCRs control their own searches To determine if the Out Offset needs to be adjusted 1 Use the up down arrow keys to display the second EDL event 2 Press GO TO IN to have Edit Suite se...

Page 79: ...T OFFSET parameter 7 Add or subtract the value in Step 6 to the current OUT OFFSET value then repeat this procedure to verify your changes If you find that sometimes you are a frame or two early and s...

Page 80: ...If it ended later than the OUT point the offset is too small Use the same approach as you used for the Play VCRs OUT OFFSET to determine the amount of error and the amount of change to the current of...

Page 81: ...ss R to select the record VCR If the Record VCR uses IR you will have to control that VCR manually 6 Check the resulting video on the Record VCR for the midpoint of the transition from A to B If the B...

Page 82: ...nd press OK The first parameter screen for that port displays 4 Press the down arrow key three or four times until the IN OUT OFFSET screen is displayed 5 To change an offset value Move the cursor to...

Page 83: ...om the EDL format Although this output was designed to make the EDL available to an on line suite PC based editing it is used most often to view the EDL information Cable To connect Edit Suite to a PC...

Page 84: ...utgoing Lines with Save Text As Wait for Echo Flow Control CR Teach Text None Standard ASCII Transfer Echo Local Expand Blank Lines Pace Characters Character Pacing Line Pacing Down Loading CR LF Up L...

Page 85: ...age Down to display the Download Protocol menu Select Protocol 7 ASCII Assign a file name and press return Select Receive Text File in the Transfers Menu Select a directory and file name Click OK 3 At...

Page 86: ...end and set the Protocol to ASCII Text Locate and select the file to be sent but do not click SEND Press Page Up to display the Upload Protocol menu Select Protocol 7 ASCII Type the filename to be sen...

Page 87: ...minal 1 At the PC start the communications program 2 Do this step if you want to save the CMX data to a file If you just want to view the CMX listing omit this step Select Open New Capture File in the...

Page 88: ...Wnnn Wipe Wipe Transition Duration Frames Max 255 GPI always Relative In CMX Notes 1 The CMX event numbers are sequential beginning with 001 regardless of the EDL event numbers 2 Sources are shown as...

Page 89: ...00 B OUT 00 03 25 00 004 IN 00 05 00 00 A OUT 00 05 15 00 004 005 FX 025 DI MX1 SP 3 BG 0 BC 5 005 IN 00 03 10 00 B OUT 00 03 25 00 006 IN 00 05 00 00 A OUT 00 05 15 00 007 IN 00 06 00 00 A OUT 00 06...

Page 90: ...GPI ports so they can be used with your VCRs camcorders mixer and titler To display Setup Menu 1 press SETUP Setup Menu 1 Setup Menu 2 To move between Setup Menu 1 and 2 press the up down arrow keys...

Page 91: ...ions NEWVCR Adds new VCR tables to Edit Suite From time to time Videonics may create tables to support new VCRs or VCR protocols These tables can be added to Edit Suite by typing in strings of numbers...

Page 92: ...o each of your VCRs and camcorders To display the Configuration Menu from Setup Menu 1 move the cursor to CONFIG and press OK To return to Setup Menu 1 from the Configuration Menu press SETUP Setup Me...

Page 93: ...Definition VCR Tuning and VCR Search There are a few more parameters for the record VCR than for the Play VCRs VCR Definition Parameters Play VCRs Camcorders Record VCR VCR Tuning Parameters Play VCR...

Page 94: ...VCR uses IR protocol a choice list for the command used to change from Record Pause to Record displays To change any other parameter value move the cursor to the field press CHG to activate the numeri...

Page 95: ...need to be increased to 12 for play VCRs camcorders if insert editing is used and a VCR with PANA protocol is the Record VCR For Record VCRs only VCRs that require a preroll are prerolled For the most...

Page 96: ...arameters The Tuning Parameters are used to improve the accuracy of your edits They adjust the timing Edit Suite uses when it sends play pause record and record pause commands to the VCRs during norma...

Page 97: ...own searches so these parameters are ignored unless RS 232 table 006 021 or 024 is used or RS 422 table 021 is used These tables are used if external LTC or VITC is used with an RS 232 or RS 422 VCR...

Page 98: ...Suite determines which way it needs to move the VCR transport It does this by comparing the current time with the search point For a GO TO the search point is the IN or OUT point of the current event...

Page 99: ...IR Name None PROTO LANC PANA 232 422 protocol VCR VCR table 001 VCRs 001 001 Sony 001 number 002 003 Panasonic Camcorders 004 JVC 007 CCD V5000 012 Canon PREROLL 05 05 05 05 TCSRC Time Code INT for re...

Page 100: ...VPARAMS Press OK to access the remaining parameters Press SETUP to return to the ADVPARAMS tile PLY play 00 15 00 15 00 15 00 15 REW rewind 00 30 00 30 00 30 00 30 FFD fast forward 02 00 02 00 02 00 0...

Page 101: ...guration Menu is used to specify the type of GPI general purpose interface device that will be attached to Edit Suite s GPI M port a Videonics MX 1 a third party mixer or switcher or another type of G...

Page 102: ...in the Configuration Menu and press OK GPI M Choices GPI T The GPI M Choices above show each of the choices for the GPI M port To cycle between the choices with the cursor in the GPI M field press CHG...

Page 103: ...and press OK See MIXER Events or GPI Events in Chapter 5 to determine the amount of offset To return to the Configuration Menu from either GPI parameter screen press SETUP...

Page 104: ...ounter and provides the actions to take to isolate prevent or work around the cause of the problem Error Messages If Edit Suite detects an error or advisory condition it displays an error message simi...

Page 105: ...f the VCR uses RS 232 or RS 422 protocol press SHIFT STOP to reinitialize communication with the VCR 06 Split delay out of range The amount of delay in a SPLT event is greater than or equal to the len...

Page 106: ...corrupt or there is a problem with the LCD Unplug then reconnect power to Edit Suite to reset its memory If the error persists retype the VCR number for each VCR If this does not fix the problem selec...

Page 107: ...memory left in Edit Suite to add the table Any single table you have been provided is small enough to fit in memory however if you have added other tables via the NEWVCR function the combination may e...

Page 108: ...tion If you have a monitor with a vertical hold you can adjust the hold to see the VITC a series of short vertical lines at the top of the video If the TCSRC parameter is set to EXT check the STABLE A...

Page 109: ...record either an event referenced a VCR port that has a PROTO set to NONE or VCRR s PROTO is set to NONE In the SETUP CONFIG menu check the PROTO setting for each VCR attached to Edit Suite If the se...

Page 110: ...cannot do inserts delete the INS Events from the EDL 24 Split not available A SPLT split insert event is specified but the VCRR configuration indicates that the record VCR cannot do split inserts If t...

Page 111: ...ouble conditions you may encounter and the action to take to prevent or work around these conditions Troubleshooting Table Trouble Action Asterisks display in the time code field instead of time code...

Page 112: ...This is probably due to a Match Frame Edit If you have back to back transitions in the EDL Edit Suite needs to pause in the middle of some scenes so that it can correctly preposition the video for th...

Page 113: ...current source Turn the shuttle past the Pause position and then back to Pause If this does not work try pressing the PLAY transport key If the jog worked previously remove and then reattach Edit Sui...

Page 114: ...r one minute from the start of the tape should not be used If an A B Roll is specified the A or B scene may be shorter than the duration of the transition Either lengthen the scene or increase the spe...

Page 115: ...ter 7 Fine Tuning SRC event is short If a Source SRC Event is the first event in an auto record the Record VCR must be put in Record Pause manually before the auto record is started Otherwise the SRC...

Page 116: ...rs or goes blank Edit Suite will not receive the time code value If RCTC is used with LANC protocol select VCR table 121 126 see Appendix A If time code is being used the time code may not be continuo...

Page 117: ...If VITC or LTC is striped on the tapes the time code must be delivered to Edit Suite via an audio LTC or video VITC cable attached to Edit Suite s Time Code IN port In this case select TCSRC EXT and T...

Page 118: ...121 126 Many VCRs with RCTC do not update the time code when the VCR is in Rewind and or Fast Forward mode Since Edit Suite needs this information during searches and auto records the rewind and fast...

Page 119: ...ept there is only one shuttle speed between pause and play 006 Minimum feature set For use with VCRs and camcorders that support stop pause play cue review fast forward and rewind only 007 This table...

Page 120: ...nge TC to VITC or LTC 001 Works with most VCRs using RS 422 protocol and includes shuttle speed down to 1 30 x Play Turning the jog slowly advances rewinds the video approximately 3 frames per revolut...

Page 121: ...r revolution Increasing the rate causes the VCR to increase its jog speed up to a maximum of Play speed Do not use this table if TCSRC EXT Use table 021 instead 005 Sony UVW 1400 The 1400 requires sli...

Page 122: ...aster jog 033 Panasonic Same as 003 except each slow turn of the jog advances the video approximately 7 1 2 frames 004 JVC This is the primary table for JVC VCRs using RS 232 protocol Turning the jog...

Page 123: ...100 Magnin 025 Marantz 124 059 Matsui 082 Memorex 010 MGA 034 Minolta 105 003 Mitsubishi 009 018 031 034 054 Montgom Ward 010 027 MultiTech 043 NEC 111 124 006 019 059 Nordmende 071 072 084 086 093 09...

Page 124: ...for the Videonics RS 232 RS 422 cable and the cable required for Sanyo GVR S955 VCRs Sony LANC Control L Submini Videonics Part No CBLA 0020 01 8 pin DIN Sony LANC Control L 3 conductor sub mini Sony...

Page 125: ...ers A standard RS 232 serial communication cable is used to connect a PC to Edit Suite The computer end of the cable may be a DB 9 or a DB 25 These are available at most computer parts stores RS 232C...

Page 126: ...ini 3 conductor mini TIME CODE IN Videonics Part No CBLA 0001 02 These are standard audio video cables with RCA jacks RCA style RCA style Cable Pinout Charts The following are the cable pinouts used t...

Page 127: ...ensing communication package used with the GVR S955 RS 232 422 Cable RS 232 422 Cable Pinout Chart CBLA 0042 01 VCR CONTROL DB 9 PIN 1 PIN 2 PIN 3 PIN 4 PIN 5 PIN 6 PIN 7 PIN 8 HOUSING PIN 7 PIN 8 PIN...

Page 128: ......

Page 129: ...r GPI compatible titler GPI compatible mixer or titler may be may be substituted substituted Edit Suite can control up to five VCRs camcorders four play and one record This appendix describes how to c...

Page 130: ...available for those Record VCRs without wired control capability Cables You will need one edit control cable for each VCR with an edit control jack one IR wand if your record VCR uses IR control one...

Page 131: ...CONTROL REC port on Edit Suite If IR control is used attach the IR wand to the IR jack 5 and position the wand as shown in Chapter 3 Getting Started Next connect a video monitor 1 to the Record VCR a...

Page 132: ...apes contain prerecorded VITC or LTC and your Play VCRs accommodate it take advantage of this capability You will need to determine whether your VCR feeds time code over the edit control cable or exte...

Page 133: ...Press A then either press a transport control key or rotate the jog shuttle wheel VCR A should begin to move and the time code display at Edit Suite should begin to update Repeat this step for each VC...

Page 134: ...Appendix D Edit Control Chart...

Page 135: ...ble Edit OUT time Source Event ABCD SHIFT A B C D for any source whose PROTO NONE Source Event MX 1 Color SHIFT COLOR GPI T Event Fixed with Time Code GPI T If the current source steady LED is differe...

Page 136: ...guration Information With an EDL event displayed Reset CONFIG to factory settings SHIFT DELETE SETUP DELETE Everything Unplug Edit Suite then press SHIFT ALLSTOP Reset entire unit to factory settings...

Page 137: ...R Toggle MX1 Preview Display between SHIFT CHANGE next current and preview Freeze Mixer Output cannot be saved SHIFT GPI M in EDL Rearrange Renumber EDL Events To Press Move an Event CUT display new l...

Page 138: ...ed EDL event 1 PREVIEW starts a preview of the EDL commencing from the currently displayed EDL event 2 SHIFT REVIEW PREVIEW displays the last edit recorded on your Record VCR Cannot be used if the rec...

Page 139: ...1 NEW displays the NEW Menu 2 SHIFT NEW inserts the next event created with the New menu before the current EDL event 3 DELETE NEW clears all field values of the current EDL event 1 CUT temporary buff...

Page 140: ...0 Setup rewinds VCRs and camcorders whose PROTO is LANC or PANA and resets their counters to 0000 1 CHG cycles through choices in a choice list or activates the numeric keys when in a numeric field 2...

Page 141: ...e VCR into pause mode 2 Used in the Configuration Menu to test the record VCR for IR control 1 Play places the VCR into Play mode 2 Play causes Edit Suite to update the time code display in a live VCR...

Page 142: ...he off line logsheet will help you when transferring projects from one editing system to another or when keeping a written record of your edits A full scale printed version can be found in the literat...

Page 143: ......

Page 144: ...available 103 Creating Updating Events 127 InsIN OUT Offset 57 Cut From Scene to Scene 36 48 Invalid ED Number 103 Definition Parameters 90 Invalid primary tile 102 Deleting Events 70 128 Jog Failure...

Page 145: ...23 Search Parameters 92 Setup and Configuration Menus 87 Setup Menu 14 Simultaneous Rolling of Two VCRs 45 Slow Response 105 Source SRC Events 40 Split delay out of range 100 Split Insert SPLT Events...

Page 146: ...e NEW tile changed to MX 3 MX tile Effect FX Number FX 000 706 was FX 000 239 Tile Type label shows as MX1 or MXP depending on GPI M choice Speed SP _ same as previous Edit Suite versions Background C...

Page 147: ...multiple times to cycle through the three choices MXPRO default MX 1 and MIXER Select MXPRO if you will be using a Videonics MXPro mixer select MX 1 for the Videonics MX 1 or select MIXER for a third...

Page 148: ...changed to 239 If GPI M is set to MX1 and an effect number greater than 239 is specified effect number 001 dissolve is sent to the MX1 during an edit operation About Style Numbers The Style field is...

Page 149: ...ion 2 01 and may provide slightly better results when the above VCRs are used as source VCRs rather than as recorders The only difference between table 046 and 047 is the amount of time Edit Suite wai...

Page 150: ...ptoms similar to those described for table Lanc_101 try using this table to fix the problem 4 RS232_111 113 114 115 These tables are for RS 232 VCRs when used as source rather than record VCRs they sh...

Page 151: ...118 016 109 041 119 017 107 046 120 019 111 047 121 021 103 050 122 022 112 056 123 024 113 058 127 026 101 059 124 029 102 060 125 035 114 061 126 064 128 C Change to GPI Trigger Signal To add suppo...

Reviews: